Elemental Shaman Raid Guide
Welcome to the Elemental Shaman Raid guide for the World of Warcraft patch 11.1.7! This guide covers everything you need to know to understand your character! Are you starting out and leveling up from 70? Check out the leveling guide!
Overview
Hero Talents
- Call of the Ancestors
- This is the whole mechanic for this Hero Tree. Whenever you summon an Ancestor you reduce the cooldown of your Fire Elemental or Storm Elemental by 5 seconds thanks to Offering from Beyond.
- These Ancestors cast spells depending on what you cast.
- If you cast any ST spell the Ancestor casts a Lava Burst on your target.
- If you cast any AoE spell the Ancestor casts a Chain Lightning on your target.
- Ancestors spawn when you cast Primordial Wave and Ancestral Swiftness, which is the capstone talent in the Hero Tree. Make sure you have Nature's Swiftness specced if you play this tree.
- Latent Wisdom or Ancient Fellowship
- Latent Wisdom
- Your Ancestor's spells are 25% more powerful.
- Ancient Fellowship
- Ancestors have a 20% chance to call another Ancestor for 6 sec when they despawn.
- Latent Wisdom
- Heed My Call or Routine Communication
- Heed My Call
- Ancestors last an additional 4 sec.
- Routine Communication
- Lightning Bolt, Lava Burst, Chain Lightning, Icefury, and Frost Shock casts have a 8% chance to call an Ancestor to your side for 6 sec.
- Heed My Call
- When an Ancestor despawns they cast an Elemental Blast on a nearby target thanks to Final Calling. This Elemental Blast does give you the Critical strike, Haste or Mastery as well.
- The rest of this tree are passives that don't affect your gameplay much.
- Primordial Capacity
- Increases your maximum Maelstrom by 25.
- Maelstrom Supremacy
- Increases the damage of your spenders by 15%.
- Elemental Reverb
- Lava Burst gains 1 additional charge and deals 5% increased damage.
- Primordial Capacity
- Tempest
- Your Lightning Bolt turns into Tempest after either
- You spend 300 Maelstrom.
- You get 3 stacks of Awakening Storms.
- The main idea of this Hero Tree is to cycle through as much Maelstrom as possible and cast as many Tempest as possible.
- Your Lightning Bolt turns into Tempest after either
- Arc Discharge
- Tempest causes your 2 next Lightning Bolt or Chain Lightning to be instant cast and deal 40% increased damage.
- Storm Swell or Supercharge
- Storm Swell
- Tempest grants you 9% Mastery for 6 sec.
- Supercharge
- Lightning Bolt, Tempest, and Chain Lightning have a 50% chance to cause an additional Overload
- Storm Swell
- Rolling Thunder
- Grants you 1 charge of Stormkeeper every 50 sec.
- Conductive Energy
- Casting Tempest applies Lightning Rod to your target.
- The rest of this tree are passives that wont effect your gameplay much.
- Unlimited Power
- Spending Maelstrom grants you Haste.
- Voltaic Surge
- Increases the damage of your Earthquake and Chain Lightning by 5%.
- Stormcaller
- Increases the critical strike chance and damage of your nature spells by 5%.
- Unlimited Power
Talents
Gameplay Altering Talents
Discover all talents that significantly alter your gameplay within the Spec and Class Talent trees. This section gives a concise overview of these talents and their applications but for a more detailed look check out the Rotation and Deep Dive sections below.
Spec Tree
- Storm Elemental
- Gives you Wind Gust stacks, which increases your Haste by 4%, stacking up to 4 times.
- Stormkeeper
- Empowers your next 2 Lightning Bolt or Chain Lightning.
- Primordial Wave
- Together with Splintered Elements increases your Haste by up to 30%.
- Ascendance
- 3 min cooldown. Increases your Mastery: Elemental Overload damage by 150% and your spells proc 1 additional Mastery: Elemental Overload.
Class Tree
- Spiritwalker's Grace
- Allows you to cast while moving for 15 sec, which can save you a lot of DPS you might lose otherwise in certain scenarios.
- Nature's Swiftness
- Makes your next nature cast instant. When playing Farseer, it becomes Ancestral Swiftness and summons Ancestor as well.
Hero Talents
- Call of the Ancestors
- Ancestors spawn when you cast Primordial Wave and Ancestral Swiftness.
- Final Calling
- When an Ancestor despawns, it will cast an Elemental Blast, which gives you the Critical strike, Haste, or Mastery as well.
Rotation
Tier Set
- 2-Set: Your spells and abilities have a chance to hit a Jackpot! that summons a Storm Elemental for 8.0 sec. Ascendance always hits a Jackpot!
- 4-Set: When you summon or extend your Storm Elemental, your Lightning Bolt, Chain Lightning, Tempest and Lava Burst deal 20% increased damage for 8 sec.
Single-Target
Opener
- If you get an Icefury at some point, you cast it instantly to trigger Fusion of Elements.
- With the new reworked Ascendance, you don't have infinite Lava Burst anymore, so you spread out your Lava Burst casts.
Priority List
This is a general priority you aim to maintain throughout the fight.
- Cast Storm Elemental on cooldown.
- Cast Stormkeeper on cooldown.
- Cast Ascendance on cooldown.
- Cast Primordial Wave on cooldown.
- Cast Ancestral Swiftness on cooldown.
- Cast Earth Shock with Master of the Elements.
- Cast Icefury if you don't already have Fusion of Elements active.
- Cast Lava Burst.
- Cast Frost Shock only while moving.
- Cast Lightning Bolt.
Multi-Target
Opener
- In the opener you are trying to cast as many Earthquake and Chain Lightning as possible, during Ascendance.
- With the new reworked Ascendance, you don't have infinite Lava Burst anymore, so you spread out your Lava Burst casts.
- If you are fighting 4+ Targets, skip casting Lava Burst.
- If you are fighting 2 Targets, spend Stormkeeper on Lightning Bolt.
Multi-Target Priority List
- Cast Storm Elemental on cooldown.
- Cast Stormkeeper on cooldown.
- Cast Ascendance on cooldown.
- Cast Primordial Wave on cooldown. Apply Flame Shock if needed first.
- Cast Ancestral Swiftness on cooldown.
- Cast Earthquake.
- Cast Icefury if you don't already have Fusion of Elements active.
- Cast Chain Lightning.
- Cast Lava Burst.
- Cast Frost Shock only while moving.
Deep Dive
Lightning Rod
Elemental Blast, Earth Shock, Earthquake, and Tempest applies Lightning Rod which duplicates a lot of you Chain Lightning, Lightning Bolt, and Tempest damage on to the targets affected by Lightning Rod.
Elemental Blast and Earth Shock will always apply Lightning Rod to your target.
Earthquake prioritizes your target, but if your target already has Lightning Rod, it will apply it to a nearby enemy instead.
Most of the time you don't have to care about Lightning Rod as on Single-Target it will just get applied to your target, while on AoE your Earthquake will automatically apply to other targets, however, on AoE you need to think about how you use Tempest. Whenever you cast it you want to try to cast in a target that doesn't have Lightning Rod or is about to fall off. If there's a priority target without Lightning Rod you can also try to apply it to that target.
Understanding Maelstrom
Maelstrom is an essential resource to play around. Due to our mastery, Mastery: Elemental Overload you will generate Maelstrom randomly and you have to be ready so that you don't overcap. This is why it's important to spend as soon as you can.
In some AoE scenarios, you will be playing Swelling Maelstrom which reduces the chance of overcapping.
When you are playing, try to think how much your spells will generate ahead of time and learn to understand how much you will have in one or two globals from now, so you can plan your rotation ahead of time.
Understanding Mechanics
Rotational min-maxing is just one aspect of mastering a specialization, but there are numerous other key mechanics that influence your performance. Use the following guides to improve them.
Liberation of Undermine
← Scroll for more Bosses →
Offensive Cooldown Usage
- Tune-Up could be slightly delayed as it is based on when your raid breaks all Protective Plating.
- You want to use Storm Elemental as soon as it comes ready to get extra uses in. If you have good RNG it can come ready around 4:00 and if it's close you hold Ascendance a bit to line them up at around 4:00-4:15
Boss Tips
- Rotate Astral Shift and Stone Bulwark Totem when you are targetted by Incendiary Fire.
- In P2 you want to interrupt and disrupt the Pit Mechanics Repair cast as it shortens the duration of P2.
Offensive Cooldown Usage
Boss Tips
- Earth Elemental is great to use when you are on Flarendo, as there will be multiple Scrapbombs you have to soak.
Offensive Cooldown Usage
Boss Tips
- Wind Rush Totem is great to use during P2 to help your group run between the Amplifiers.
- You can hold Stormkeeper for the upcoming Pyrotechnics.
Offensive Cooldown Usage
- This fight is random as you can get Rolling Rubbish at different times each pull. You want to use CDs whenever there are adds so always hold for the next add wave.
Boss Tips
- You want to rotate Astral Shift and Stone Bulwark Totem on Incinerator.
Offensive Cooldown Usage
Boss Tips
- Your defensives should be used when you are about to get hit by stuff, as there is a lot of things to dodge. Blazing Beam, Rocket Barrage and Mega Magnetize are all scary you have to be ready with defensives.
Offensive Cooldown Usage
- The opener is awkward as you want to hold CDs for roughly 20 seconds. This way you have CDs lined up for each Spin To Win!.
- Try to use Ancestral Swiftness and Primordial Wave on cooldown the whole time so that it lines up with Spin To Win!.
Stat Priority
Understand your secondary stat priority and the tertiary stats needed for optimal performance during Raid boss fights as an Elemental Shaman. For more detailed information, visit the Stats and Attributes guide.
Higher Item level items are better in most scenarios. For an accurate representation of what item to equip you should use Simcraft! A static "Stat Priority" is just a starting point and can easily shift depending on your individual gear.
- All secondary stats are affected by diminishing returns. Click here to learn more!
Tertiary
- Avoidance - Great stat to reduce the damage intake of "Area of Effect" abilities.
- Leech - Provides additional healing through damage dealing.
- Speed - Niche tertiary that can be very useful and has been proven useful in the past. Makes playing certain mechanics a lot easier.
Gear
| Slot | Item | Location |
|---|---|---|
| Head | Gale Sovereign's Charged Hood | Tier / Catalyst |
| Neck | Strapped Rescue-Keg | Cinderbrew Meadery |
| Shoulder | Gale Sovereign's Zephyrs | Tier / Catalyst |
| Cloak | Consecrated Cloak | Crafting |
| Chest | Gale Sovereign's Clouded Hauberk | Tier / Catalyst |
| Wrist | Glyph-Etched Vambraces | Crafting |
| Gloves | Gravi-Gunk Handlers | Sprocketmonger |
| Belt | Durable Information Securing Container | Overcharged Delves |
| Legs | Gale Sovereign's Pantaloons | Tier / Catalyst |
| Boots | Treads of the Galvanic Skysoarer | Rookery |
| Ring 1 | Footbomb Championship Ring | THE MOTHERLODE!!! |
| Ring 2 | The Jastor Diamond | Gallywix |
| Trinket 1 | House of Cards | One-Armed Bandit |
| Trinket 2 | Eye of Kezan | Gallywix |
| Weapon | Best-in-Slots | One-Armed Bandit |
Below you are presented with a good list of farmable alternatives that are obtainable outside of WoW’s weekly lockout system. While replaced in time as you progress, these offer immediate character power.
| Slot | Item | Location |
|---|---|---|
| Head | Amphitheater Stalker's Hood | Theater of Pain |
| Neck | Strapped Rescue-Keg | Cinderbrew Meadery |
| Shoulder | Skystreak's Hidden Missiles | Operation: Floodgate |
| Cloak | Cloak of Questionable Intent | The Motherlode |
| Chest | Bront's Singed Blastcoat | Operation: Floodgate |
| Wrist | Consecrated Baron's Bindings | Priory of the Sacred Flame |
| Gloves | Swift Pneumatic Grips | Operation: Mechagon |
| Belt | Maniacal Monarch's Girdle | Operation: Mechagon |
| Legs | Chemical Blaster's Legguards | The Motherlode |
| Boots | Treads of the Galvanic Skysoarer | The Rookery |
| Ring 1 | Footbomb Championship Ring | The Motherlode |
| Ring 2 | Fleshfused Circle | Theater of Pain |
| Trinket 1 | Carved Blazikon Wax | Darkflame Cleft |
| Trinket 2 | Signet of the Priory | Priory of the Sacred Flame |
| Main-Hand | Dark Zone Headtaker | Darkflame Cleft |
| Off-Hand | Barricade of the Endless Empire | Theater of Pain |
Trinkets
Below you can find active and passive alternatives to our recommended trinkets. Do note that some trinkets are better than others depending on the raid boss.
Active Trinket alternatives
- Signet of the Priory
- Good on-use option, but since it is a 2 min CD it doesn't line up great.
Passive Trinket alternatives
- Mug's Moxie Jug
- If you cannot maintain Eye of Kezan stacks throughout a dungeon, Mug's Moxie Jug is better.
- Reverb Radio
- Great passive option, especially if you are low on Haste.
- Candle Confidant
- Good passive option.
Embellishments
- Darkmoon Sigil: Ascension
- Writhing Armor Banding
- If you don't have access to Best-in-Slots, these will be your best embellishments.
- Darkmoon Sigil: Ascension has to go on your weapon.
- Writhing Armor Banding is best to put on your Cloak or Wrists.
- If you don't have access to Best-in-Slots, these will be your best embellishments.
or
- Dawnthread Lining
- If you do have Best-in-Slots, then you should use any of these 2. Sim whichever is better with your current gear.
- The optimal slots to craft on are Cloak, Belt, Boots or Wrists depending on your available gear.
Remaining Sparks
- Crafted items are 681 item level and regular items are 684 on max item level, therefore, it's not beneficial to equip crafted items outside of your 2x embellishments unless you don't have access to other high item level gear on that slot.
Simcraft
To find the best combination of gear available to you or identify the best possible upgrades, visit our Simcraft guide to learn how to utilize Simcraft easily and effectively.
Consumables
- Phials
- Fleeting Flask of Alchemical Chaos
- Food
- Feast of the Divine Day
- Combat Potion
- Tempered Potion
- Health Potion
- Algari Healing Potion -- a big burst of healing
- Weapon Oil
- Algari Mana Oil -- default
- Flametongue Weapon if you are specced into Improved Flametongue Weapon.
- Augment Rune
- Crystallized Augment Rune
- Sockets
- Quick Onyx
- Culminating Blasphemite -- Unique, use one of each gem color to enhance your Culminating Blasphemite.
- Masterful Emerald
- Masterful Ruby
- Masterful Sapphire
Enchantments
| Head | Greater Rune of the Void Ritual S.A.D. |
| Neck | Magnificent Jeweler's Setting 2x |
| Cloak | Enchant Cloak - Chant of Leeching Fangs |
| Chest | Enchant Chest - Crystalline Radiance |
| Wrist | Enchant Bracer - Chant of Armored Leech S.A.D. |
| Waist | S.A.D. |
| Legs | Sunset Spellthread |
| Boots | Enchant Boots - Scout's March |
| Ring 1 | Enchant Ring - Radiant Mastery Magnificent Jeweler's Setting 2x |
| Ring 2 | Enchant Ring - Radiant Mastery Magnificent Jeweler's Setting 2x |
| Weapon | Enchant Weapon - Authority of the Depths |
You buy S.A.D. from the Great Vault Vendor to add sockets to your Helm, Wrists & Waist.
Races
For min-maxing an Elemental Shaman in raiding, different racial traits can provide a tremendous benefit to your character. If this is not your top goal, picking a race that fits your style works just as well.
- Stoneform -- Dwarf
- Dispels Magic and Bleed debuffs. Has been useful in the past on some bosses with Bleeds.
- Rocket Jump -- Goblin
- Do a small jump in the direction your character is facing.
- While you're in the Rocket Jump animation you are placed on a global cooldown until your character lands.
- Berserking -- Troll
- Strong DPS racial on-use, lines up nicely with Ascendance.
- Reduce the duration of movement-impairing effects by 20%. This was only useful once in the recent history of progression raiding but is still worth noting.
- Blood Fury -- Orc
- Strong DPS Racial on-use.
- 20% reduced stun duration on you which can be useful in some situations.
Recommendation
In general, it's safe to say that if you care about min-maxing your DPS, you should go with the highest DPS racial. That being said, the story is a bit different if it's about progression raiding. Some help out massively to speed up the progression on certain bosses. Notably, Dwarf with their Stoneform helped out on Tindral Sageswift and Fyrakk the Blazing in the past by having easy access to dispelling yourself at crucial points of the fights mentioned.
Macros
Discover recommended macros for Elemental Shamans during Raid encounters and watch a quick video guide on creating simple macros for your character.
Earthquake -- Casts Earthquake on your cursor without confirmation.
#showtooltip
/cast [@cursor] Earthquake
Liquid Magma Totem - Uses Liquid Magma Totem on your cursor without confirmation.
#showtooltip
/cast [@cursor] Liquid Magma Totem
Wind Rush Totem -- Casts Wind Rush Totem on your cursor without confirmation.
#showtooltip
/cast [@cursor] Wind Rush Totem
Totemic Projection -- Casts Totemic Projection on your cursor without confirmation.
#showtooltip
/cast [@cursor] Totemic ProjectionPrimordial Wave -- Casts Primordial Wave on your mouseover or target.
#showtooltip Primordial Wave
/cast [@mouseover, exists] Primordial Wave; Primordial Wave
Flame Shock -- Casts Flame Shock on your mouseover target.
#showtooltip Flame Shock
/cast [@mouseover, exists] Flame Shock; Flame Shock
Focus Mouseover -- Puts whatever you mouseover on focus
/focus mouseoverHex -- Casts Hex on your mouseover or target.
#showtooltip Hex
/cast [@mouseover, exists] Hex; Hex
Healing Surge -- Casts Healing Surge quickly on an ally by mouseovering or targeting.
#showtooltip Healing surge
/cast [@mouseover, exists] Healing surge; Healing surge
Addons
Below, you see a screenshot of the author's User Interface for their Elemental Shaman, outlining which addons are used and how they are utilized in Raids to make your life easier.
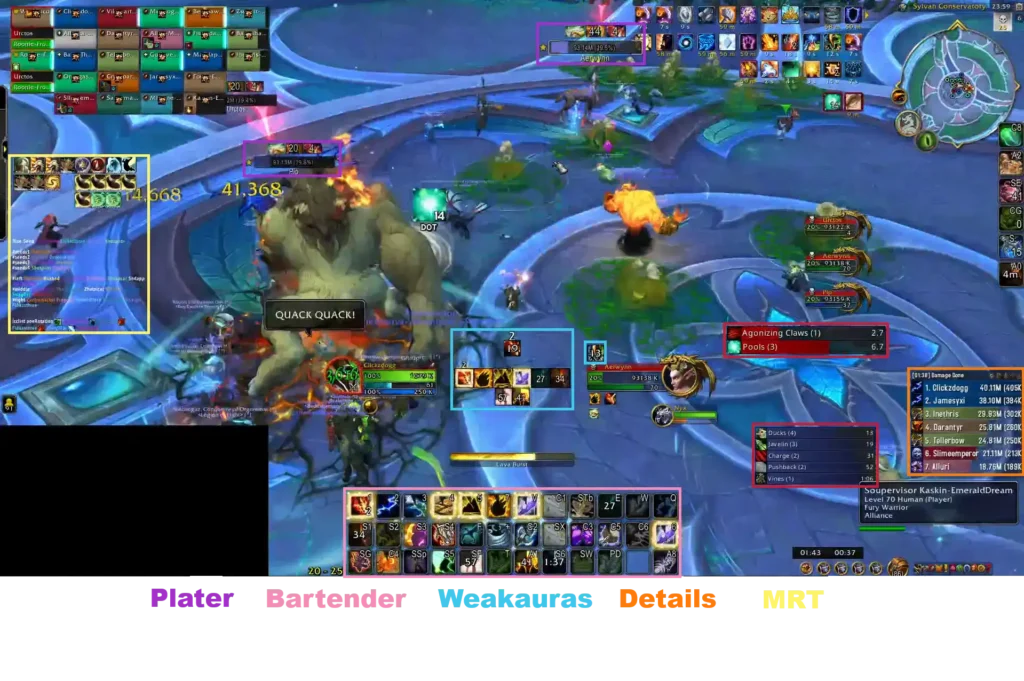
- MRT -- Notes, Raid cooldowns, and more
- Helpful addon for Raiders, especially for Raid leaders and officers.
- BigWigs -- Generic Boss Mod
- BigWigs is a boss encounter add-on. It consists of many individual encounter scripts, or boss modules; mini add-ons that are designed to trigger alert messages, timer bars, sounds, and so forth, for one specific Raid encounter.
- WeakAuras -- Jack of all trades
- WeakAuras is a powerful and flexible framework that allows the display of highly customizable graphics on World of Warcraft's user interface to indicate buffs, debuffs, and other relevant information. This addon was created to be a lightweight replacement for Power Auras but has since introduced more functionalities while remaining efficient and easy to use.
- Plater -- Advanced Nameplates
- Plater is a nameplate addon with an extraordinary amount of settings, out of the box debuff tracking, threat coloring, and support for scripting similar to WeakAuras and wago.io + the WeakAuras-Companion for Mod/Script/Profile updates.
- Details -- In-depth Damage Meter
- Most powerful, reliable, handsome, damage meter.
- Bartender4 -- Action bar addon
- Bartender4 gives you more customizable action bars.
Maelstrom Bar
Shows your Maelstrom, and predicts what have after your cast.

Changes this Patch
- The initial shield from Stone Bulwark Totem is no longer dispellable. The repeating shields will continue to be dispellable.
- Ghost Wolf visuals have been updated to scale with player model and have been made more transparent to reduce visual clutter.
- Lightning Bolt has a new spell visual.
- Ancestral Guidance has been removed.
Elemental
- Deeply Rooted Elements is now a small percent chance per Maelstrom spent rather than being a flat chance per Maelstrom Spender.
- Developers' notes: This change should make it equally valuable to cast a Maelstrom spender while talented into Deeply Rooted Elements, so abilities such as Elemental Blast no longer generate less Ascendance activations over time.
- Primordial Wave has been redesigned – Now deals a high amount of damage to all targets affected by your Flame Shock.
- Developers' notes: Primordial Wave is a complicated spell to manage and get optimal use out of. We're adjusting it to be more of a big damage impact upon activating the ability rather than priming your next Lava Burst to hit many targets.
- Healing Stream Totem healing increased by 80%.
- Ascendance now requires a target to cast. Flame Shock and Lava Burst from casting it will always hit your primary target.
- Lightning Rod's visual has been updated.
- Chain Lightning overload is no longer displayed to allies in raids and dungeons.
- Chain Lightning now displays a more subtle visual when viewed by allies in raids and dungeons.
- Earthquake Overload is no longer displayed to allies in raids and dungeons.
- Farseer
- Maelstrom Supremacy now increases the healing of Healing Surge and Chain Heal by 15% (was 8%).
- Stormbringer
- Arc Discharge can now accumulate up to 2 charges.
FAQ
A: In general the one you position with your mouse is better as you can drop it ahead of mobs if they are being moved, while the one that drops on your target may be nicer to play.
Credits
Written By: Clickz
Reviewed By: Xerwo