Discipline Priest Mythic+ Guide
Welcome to the Discipline Priest Mythic+ guide for the World of Warcraft patch 11.1.7! This guide covers everything you need to know to understand your character! Are you starting out and leveling up from 70? Check out the leveling guide!
Overview
Hero Talents
- Voidweaver focuses primarily on your own benefits, as it increases your damage every mini ramp, while Oracle focuses on enhancing your big healing cooldowns and providing utility to the team.
- Every Mind Blast opens a Entropic Rift that does a lot of damage and gives you the following buffs and benefits:
- Smite is transformed into Void Blast and its Atonement healing is increased by an additional 100%.
- Voidheart
- Increases your Atonement healing massively.
- Dark Energy
- Increased Movement Speed.
- When Entropic Rift ends it collapses and does a lot of damage via Collapsing Void.
- Oracle grants you a new Ability that cycles through 4 different versions:
- Premonition of Insight
- Decreases the cooldown of the next 3 spells you cast by 7 seconds.
- Premonition of Piety
- Increases your healing done by a large amount and causes 70% of your overhealing to be redistributed.
- Premonition of Solace
- Your next Flash Heal or Renew apply a massive absorb and a 15% dr to your target.
- Premonition of Clairvoyance
- Gain the effects of all the other Premonitions.
- Premonition of Insight
Talents
When to use this Spec
This is your default loadout going into any dungeon as it specializes in survivability. You have to adjust the class talent tree based on the utility needed for the affix and dungeon combo. To make your life easier, Dungeon specific talent loadouts are available in the Dungeons section.
Gameplay Altering Talents
Discover all talents that significantly alter your gameplay within the Spec and Class Talent trees. This section gives a concise overview of these talents and their applications but for a more detailed look check out the Rotation and Deep Dive sections below.
Spec Tree
- Shadow Covenant
- The most powerful buff for a Priest as it activates synergies between talents by transforming Penance into shadow spell.
- Inescapable Torment
- This talent greatly increases your damage while your pet is active and extends its duration, strengthening your Atonement windows.
- Weal and Woe
- Allows you to cast a very powerful Power Word: Shield after each Penance.
- Schism
- Mind Blast increases your target's damage taken from your spells by 10%, so always cast it first when starting your damage rotation.
- Harsh Discipline
- Provides a new burst tool, as it transforms each Power Word: Radiance into an output cooldown.
- Protector of the Frail
- This talent grants an extra charge of Pain Suppression and reduces its cooldown with each cast of Power Word: Shield. This allows more frequent use of Pain Suppression, greatly easing difficult encounters.
Class Tree
- Phantom Reach
- Increases the range of your spells to 46 yards, giving you a significant advantage. This allows you to outrange certain Mythic+ mechanics or continue healing your teammates even if the party spreads out.
- Surge of Light
- The best recovery tool for Discipline Priests, because Flash Heal is your strongest direct heal outside of a friendly Penance. This talent helps significantly with mana management and mobility.
- Twins of the Sun Priestess
- You also gain the effects of Power Infusion when you cast it on an ally.
- Protective Light
- In combination with Binding Heal and Surge of Light, this talent provides you with an easily accessible 10% damage reduction.
- Translucent Image
- Adds a new but weak defensive ability to the Priest class toolkit. Together with Protective Light, it builds a reliable life insurance for yourself!
Rotation
Tier Set
- 2-Set: Your healing spells have a chance to apply Insurance! to their targets that heals them for (1023.68% of Spell power) over 15 sec. Insurance! is consumed if an ally drops below 40% health to heal them for (614.25% of Spell power).
- 4-Set: When your Power Word: Shield is completely absorbed on an ally, they are granted Insurance! at 40% effectiveness. Allies with your Insurance! or absorption effects receive 15% increased healing from you.
Priority List
For Healing
- Maintain Atonement on your Group via Power Word: Radiance if your entire Group is taking damage.
- Apply Atonement via Power Word: Shield to targets who require healing.
- Cast Penance on Cooldown.
- Cast Mind Blast on Cooldown.
- Keep Purge the Wicked on your target.
- Cast Smite.
- Cast Flash Heal if there is no enemy to hit.
For Damage
- Keep Purge the Wicked on your target.
- Cast Mind Blast on Cooldown.
- Cast Penance on Cooldown.
- Cast Shadow Word: Death on Cooldown.
- Cast Smite.
Cooldowns
Shadowfiend
- Shadowfiend is the spell you need to pay the most attention to in dungeons, as it significantly increases your power because you enter Shadow Covenant upon summoning it.
Power Word: Barrier
- Power Word: Barrier is a very powerful defensive spell with a significant downside in Mythic+ dungeons, as your group needs to be inside it when the damage occurs. This is often not possible, so it is frequently used as an external cooldown to benefit only one person.
Deep Dive
Min maxing Power Infusion
- While Power Infusion is your spell, the optimal usage is to disregard yourself and instead fully focus on your teammates. To achieve that you need to see your party members' offensive cooldown uptime. It is recommended that you use either addons or WeakAuras like those discussed in the Addon section to do this, or simply communicate with them and ask for them to request at the exact time they want it!
Understanding Mechanics
Rotational min-maxing is just one aspect of mastering a specialization, but there are numerous other key mechanics that influence your performance. Use the following guides to improve them.
Dungeons
← Scroll for more Dungeons →
Boss Tips
Brewmaster Aldyr
- General Tips
- Use Leap of Faith in the intermission to complete it faster!
- Personal/External
- Always have a defensive active when targeted with Throw Cinderbrew.
I'pa
- General Tips
- Always dispel Burning Fermentation from players who do not have a defensive ability active first.
- Personal/External
- Always have a defensive active when targeted with Burning Fermentation.
Benk Buzzbee
- General Tips
- Focus on playing the Bee-Haw! mechanic first, if played well there is no group damage.
- Personal/External
- Always have a defensive active when Fluttering Wing happens.
Goldie Baronbottom
- General Tips
- Use Ultimate Penitence to make dodging waves easier for yourself and the rest of your party!
- Personal/External
- Ensure you have a defensive active when Let It Hail! happens.
Trash Tips
- Important abilities to interrupt in this dungeon are:
- Boiling Flames from Venture Co. Pyromaniac.
- Free Samples? from Taste Tester.
- Rejuvenating Honey from Flavor Scientist.
- Bee-stial Wrath from Bee Wrangler.
- Honey Volley from Royal Jelly Purveyor.
- Pay extra attention to these casts:
- Throw Chair from Hired Muscle.
- Reckless Delivery from Careless Hopgoblin
- Failed Batch from Flavor Scientist.
- Swarming Surprise from Venture Co. Honey Harvester.
Boss Tips
Ol' Waxbeard
- General Tips
- Position yourself close to a pillar to hide behind when the boss targets you with Reckless Charge.
- Personal/External
- Always use a defensive cooldown when targeted with Luring Candleflame.
Blazikon
- General Tips
- Make sure that you hit a candle with Wicklighter Barrage.
- Personal/External
- Always have a defensive active when Dousing Breath breath happens.
The Candle King
- General Tips
- This boss does a lot of damage, make sure your group is stacked!
- Always hit a Wax Statue with Darkflame Pickaxe, otherwise you will be overwhelmed by raw damage.
- Always instantly dispel Paranoid Mind!
- Personal/External
- Ensure to have a personal defensive active when targeted with Throw Darkflame.
The Darkness
- General Tips
- Since this boss doesn’t deal constant damage, use your mobility spells like casting Penance on yourself to collect candles.
- Stay stacked with your group, do not bait Shifting Anomalies ahead.
- Personal/External
- Always have a defensive active when targeted with Shadowblast.
Trash Tips
- Important abilities to interrupt in this dungeon are:
- Blazing Fiends - Explosive Flame
- Shuffling Horror - Drain Light
- Royal Wicklighter - Flashpoint
- Sootsnout - Flaming Tether
Boss Tips
Captain Dailcry
- General Tips
- Depending on your route the either Elaena Emberlanz, Sergeant Shaynemail or Taener Duelmal is up
- Interrupt Repentance from Elaena Emberlanz.
- Sergeant Shaynemail puts a strong bleed Lunging Strike.
- Taener Duelmal casts Cinderblast.
- Depending on your route the either Elaena Emberlanz, Sergeant Shaynemail or Taener Duelmal is up
- Personal/External
- Ensure you have a defensive active when targeted with Savage Mauling.
Baron Braunpyke
- General Tips
- The boss casts empowered versions of his spell when empowered by Vindictive Wrath.
- Personal/External
- Use your personal defensives when soaking Sacrificial Pyre.
Prioress Murrpray
- General Tips
- Turn around at the end of Blinding Light.
- Keep the Arathi Neophytes away from your range players with Ursol's Vortex.
- Personal/External
- Use a defensive when Blinding Light happens.
Trash Tips
- Important abilities to interrupt in this dungeon are:
- Devout Priest - Inner Fire
- Devout Priest - Greater Heal
- Pay extra attention to these casts:
- Ardent Paladin - Sacred Toll
- Arathi Footman - Defend
Boss Tips
Kyrioss
- General Tips
- Dispel Lightning Torrent as fast as possible, if people get hit.
- Personal/External
- Rotate through your defensives while Lightning Torrent is happening.
Stormguard Gorren
- Personal/External
- Rotate your personals to mitigate damage from Chaotic Corruption.
Voidstone Monstrosity
- General Tips
- Take a central position so you can heal your entire party!
- Dispel Unleash Corruption as fast as possible.
- Personal/External
- Ensure you have a defensive active when Null Upheaval happens.
Trash Tips
- Important abilities to interrupt in this dungeon are:
- Cursed Thunderer - Lightning Bolt
- Unruly Stormrook - Energized Barrage
- Cursed Rooktender - Lightning Surge
- Void Ascendant - Feasting Void
Boss Tips
Big M.O.M.M.A.
- General Tips
- Disengage from the boss after being targeted by Sonic Boom to avoid getting hit by it.
- During the first phase always hit the Darkfuse Mechadrones as it triggers the second phase after all of them are dead.
- If you take too long to kill the Darkfuse Mechadrones Big M.O.M.M.A casts Kill-o-Block Barrier.
- Phase 2 is a burn phase, hold your cooldowns for Jumpstart it is a 200% damage increase.
Demolition Duo
- General Tips
- Kill both bosses in a similar time to avoid Divided Duo.
- Diffuse Big Bada BOOM! with Barreling Charge and Kinetic Explosive Gel.
- Personal/External
- Ensure to always have a defensive active when affected by Kinetic Explosive Gel.
Swampface
- General Tips
- Make sure there is a rule in place that determines the direction in which you and your party should always move!
- Personal/External
- Always have a defensive active when Awaken the Swamp happens.
Geezle Gigazap
- General Tips
- Preposition well to avoid kiting Leaping Sparks for a long time.
- Output Cds
- Save your healing cds for Turbo Charge as this is the time your party takes heavy damage.
- Personal/External
- Ensure to always have a defensive active when targeted with Gigazap.
Trash Tips
- Important abilities to interrupt in this dungeon are:
- Mechadrone Sniper - Trickshot
- Venture Co. Diver - Harpoon
- Disturbed Kelp - Restorative Algae
- Darkfuse Bloodwarper - Blood Blast
- Pay extra attention to these casts:
- Shreddinator 3000 - Shreddation
- Move towards the end of the cast to avoid any damage.
- Disturbed Kelp - Jettison Kelp
- Coordinate AoE stops to prevent this from happening.
- Shreddinator 3000 - Shreddation
Boss Tips
An Affront of Challengers
- General Tips
- At 100 Energy Sathel the Accursed casts Searing Death, be spread before it to avoid cleaving each other.
- Output Cds
- Use everything to maximize damage as there is low AoE damage on this boss.
- Personal/External
- Ensure to have a defensive cooldown active whenever Mighty Smash happens.
Gorechop
- Output Cds
- Use everything to maximize damage as there is low AoE damage on this boss.
- Personal/External
- The Oozing Leftovers cleave with Leaping Thrash, prioritize not stacking with other people.
Xav the Unfallen
- Personal/External
- Ensure to have a defensive active whenever Might of Maldraxxus happens.
Kul'tharok
- General Tips
- Spread around the boss to avoid cleaving each other with Well of Darkness.
- Use Ursol's Vortex to keep the Lost Souls away from Kul'Tharok.
- Personal/External
- Rotate through your defensive arsenal whenever targeted with Well of Darkness.
Mordretha, the Endless Empress
- General Tips
- Dark Devastation targets a random player and it can overlap with Ghostly Charge, bait it towards a good direction so you can easily dodge both mechanics.
- Personal/External
- Rotate through your defensive arsenal whenever targeted with Manifest Death.
Trash Tips
- Important abilities to interrupt in this dungeon are:
- Necrotic Bolt from Battlefield Ritualist.
- Unholy Fervor from Battlefield Ritualist.
- Necrotic Bolt from Maniacal Soulbinder.
- Necrotic Bolt Volley from Maniacal Soulbinder.
- Bone Spear from Bone Magus.
- Sear Mind from Twilight Beguiler.
- Withering Discharge from Blighted Sludge-Spewer.
- Pay extra attention to these casts:
- Heavin the Breaker - Interrupting Roar
- You can LoS this cast.
- Harugia the Bloodthirsty - Bloodthirsty Charge
- You can LoS this cast.
- Portal Guardian - Soulstorm
- Make sure to dispel Shadow Vulnerability.
- Raging Bloodhorn - Raging Tantrum
- You can remove Raging Tantrum with Soothe.
- Heavin the Breaker - Interrupting Roar
Boss Tips
Tussle Tonks
- General Tips
- Kill the Platinum Pummeler and Gnomercy 4.U. at the same time to avoid Electrical Storm.
- Personal/External
- Use defensives during Ground Pound.
K.U.-J.O.
- Output Cds
- During Explosive Leap avoid hitting the Junk Bomb.
- Personal/External
- Rotate Defensives on Explosive Leap.
Machinist's Garden
- General Tips
- Fully focus on dodging Self-Trimming Hedge.
- Use Stampeding Roar during "Hidden" Flame Cannon.
- Personal/External
- Rotate through your defensive arsenal whenever targeted with Blossom Blast.
King Mechagon
- General Tips
- Throughout the fight the Plasma Orb adjust their positioning around different players on Recalibrate. Watch the arrows closely to avoid getting clipped by it.
- Personal/External
- Ensure to have a defensive active when targeted with Mega-Zap.
Trash Tips
- Important abilities to interrupt in this dungeon are:
- Bomb Tonk - Detonate
- Mechagon Tinkerer - Giga-Wallop
- Mechagon Mechanic - Tune Up
Boss Tips
Coin-Operated Crowd Pummeler
- General Tips
- Spread before Footbomb Launcher to help your team kick the Footbombs.
- Instantly dispel yourself if a Timed Detonation happens.
- Personal/External
- Always have a defensive active when the Boss casts Static Pulse.
Azerokk
- Personal/External
- Rotate through your defensive arsenal whenever the boss uses Resonant Quake.
Rixxa Fluxflame
- Personal/External
- Ensure to have a defensive active when targeted with Propellant Blast.
Morgul Razdunk
- General Tips
- Preposition in melee whenever Gatling Gun happens.
- Personal/External
- Use a defensive whenever targeted with Homing Missile.
Trash Tips
- Important abilities to interrupt in this dungeon are:
- Refreshment Vendor - Iced Spritzer
- Hired Assassin - Toxic Blades
- Venture Co. Earthshaper - Rock Lance
- Stonefury - Furious Quake
- Venture Co. Alchemist -� Transmute: Enemy to Goo
- Pay extra attention to these casts:
- Hired Assassin - Fan of Knives
- Use AoE stops to prevent this.
- Mechanized Peacekeeper - Charged Shield
- Venture Co. War Machine - Charged Shot
- Hired Assassin - Fan of Knives
Affixes
The Affix system got revamped going into The War Within Season 1 retiring most Affixes as well as introducing new kiss-curse ones while also changing on which key level these appear.
- +2 Affixes -- Rotates on a weekly basis
- Xal'atath's Bargain: Ascendant
- Xal'atath's Bargain: Voidbound
- Xal'atath's Bargain: Oblivion
- Xal'atath's Bargain: Devour
- +4 Affixes -- Alternates between each other on a weekly basis
- Tyrannical
- Fortified
- +7 Affix
- Challenger's Peril
- +10 Affixes -- Alternates between each other on a weekly basis, is always the opposite of the +4 Affix
- Tyrannical
- Fortified
- +12 Affix
- Xal'atath's Guile -- Replaces the +2 Affix
Following you get some useful tips for handling different Mythic+ Affixes as a Discipline Priest.
- Xal'atath's Bargain: Ascendant
- Use Psychic Scream to interrupt as many orbs as possible.
- Xal'atath's Bargain: Voidbound
- There is nothing special you can do to help with this affix.
- Xal'atath's Bargain: Oblivion
- Keep an eye behind you and collect any orbs that fly into melee range. Make sure to intercept them before they hit any enemies.
- Xal'atath's Bargain: Devour
- You can remove all debuffs at once with Mass Dispel. If Mass Dispel is on cooldown make sure to instantly single dispel one healing absorb debuff!
Stat Priority
Understand your secondary stat priority and the tertiary stats needed for optimal performance during Mythic+ dungeons as a Discipline Priest. For more detailed information, visit the Stats and Attributes guide.
The conclusion here is that you want to equip the highest item level generally.
All secondary stats are affected by diminishing returns. Click here to learn more!
Tertiary
- Avoidance - Reduces damage taken from AoE effects.
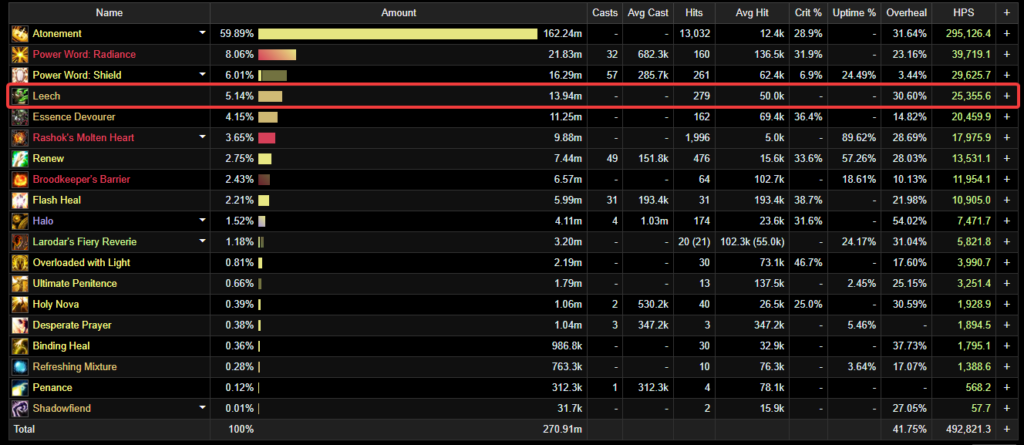
- Leech - Returns a portion of your damage and healing done as healing to you. (Excludes self healing)
- Speed - increases movement speed. (Does stack with other movement speed abilities)
The only time you should think about picking a lower item level is if it has Leech or Avoidance. Speed is nice to have, but you should generally ignore that stat.
Here is a showcase of how powerful Leech is for a Healer:
Gear
Due to the way stat weights work for Discipline Priests, there isn't a strict best-in-slot list. Although it is theoretically possible to obtain items with all the correct Tertiaries, doing so requires extraordinary luck or several human lifespans because of the weekly reset system in World of Warcraft.
| Slot | Item | Location |
|---|---|---|
| Head | Cleanup Crew's Wastemask | Stix |
| Neck | Semi-Charmed Amulet | Rik |
| Shoulder | Confessor's Unshakable Radiance | Tier/Catalyst |
| Cloak | Test Pilot's Go-Pack | Sproketmonger |
| Chest | Confessor's Unshakable Vestment | Tier/Catalyst |
| Wrist | Consecrated Cuffs | Crafting |
| Gloves | Confessor's Unshakable Mitts | Crafting |
| Belt | Durable Information Securing Container | Delves |
| Legs | Confessor's Unshakable Leggings | Tier/Catalyst |
| Boots | Cloudstrider Soles | Rookery |
| Ring 1 | The Jastor Diamond | Gallywix |
| Ring 2 | Faded Championship Ring | Cauldron |
| Trinket 1 | Eye of Kezan | Gallywix |
| Trinket 2 | Mug's Moxie Jug | Mug'Zee |
| Weapon | Big Earner's Bludgeon | Mug'Zee |
| Off-Hand | Vagabond's Torch | Crafting |
Authors Note:
This list shows the best items for healing in Raids from all sources. Keep in mind that getting different tier pieces with Leech / Avoidance changes which off-piece is best for you. Likewise, any other non-trinket item with Leech / Avoidance replaces the one suggested here.
Below you are presented with a good list of farmable alternatives that are obtainable outside of WoW’s weekly lockout system. While replaced in time as you progress, these offer immediate character power.
| Slot | Item | Location |
|---|---|---|
| Head | Inventor's Ingenious Trifocals | Mechagon |
| Neck | Strapped Rescue-Keg | Cinderbrew Meadery |
| Shoulder | Shoulderguards of Fraying Sanity | Mechagon |
| Cloak | Electrician's Siphoning Filter | Floodgate |
| Chest | Saboteur's Rubber Jacket | Floodgate |
| Wrist | Rixxa's Sweat-Wicking Cuffs | Motherlode |
| Gloves | Punctured Apiary Gloves | Cinderbrew Meadery |
| Belt | Ringmaster's Cummerbund | Mechagon |
| Legs | Ancient Hardened Legwraps | Rookery |
| Boots | Deranged Alchemist's Slippers | Motherlode |
| Ring 1 | Footbomb Championship Ring | Motherlode |
| Ring 2 | Bloodoath Signet | Theater of Pain |
| Trinket 1 | Signet of the Priory | Priory of the Sacred Flame |
| Trinket 2 | Carved Blazikon Wax | Darkflame Cleft |
| Two-Hand Weapon | Neural Synapse Enhancer | Mechagon |
| One-Hand Weapon | Electrifying Cognitive Amplifier | Mechagon |
| Off-Hand | Deathwalker's Promise | Theater of Pain |
Trinkets
Below you can find active and passive alternatives to our recommended trinkets. Do note that some trinkets are better than others depending on the dungeon.
Passive Trinket alternatives
- Mister Pick-Me-Up
- A very good passive healing trinket.
Embellishments
- Darkmoon Sigil: Ascension
- Very strong stat stick that gives you a high amount of a random secondary stat that changes every 8 seconds.
- Writhing Armor Banding
- Doubles the effect of your Darkmoon Sigil: Ascension.
Remaining Sparks
- Crafted items are 681 item level and regular items are 684 on max item level, therefore, it's not beneficial to equip crafted items outside of your 2x embellishments unless you don't have access to other high item level gear on that slot.
Consumables
- Phials
- Flask of Tempered Swiftness
- Food
- Feast of the Divine Day
- Combat Potion
- Algari Mana Potion -- Recommended
- Potion Bomb of Power -- Best for Time
- Health Potion
- Algari Healing Potion
- Weapon Oil
- Algari Mana Oil
- Augment Rune
- Crystallized Augment Rune
- Sockets
- Deadly Emerald
- Culminating Blasphemite -- Unique, use one of each gem colour to enhance your Blasphemite.
- Quick Ruby
- Quick Onyx
- Quick Sapphire
Enchantments
| Helm | Nerubian Gemweaver - Greater Rune of the Void Ritual |
| Neck | Magnificent Jeweler's Setting 2x |
| Cloak | Enchant Cloak - Chant of Leeching Fangs |
| Chest | Enchant Chest - Crystalline Radiance |
| Wrist | Enchant Bracer - Whisper of Armored Leech S.A.D. |
| Belt | S.A.D. |
| Legs | Daybreak Spellthread |
| Boots | Enchant Boots - Scout's March |
| Ring 1 | Enchant Ring - Radiant Critical Strike Magnificent Jeweler's Setting 2x |
| Ring 2 | Enchant Ring - Radiant Critical Strike Magnificent Jeweler's Setting 2x |
| Weapon | Enchant Weapon - Stormrider's Fury |
You buy S.A.D. from the Great Vault Vendor to add sockets to your Helm, Wrists and Belt.
Races
For min-maxing a Discipline Priest in Mythic+ Dungeons, different racial traits can provide a tremendous benefit to your characters. If this is not your top goal, picking a race that fits your style works just as well.
- Stoneform -- Dwarf
- Removes all magic, bleed, poison, and disease effects and reduces physical damage taken.
- Shadowmeld -- Night Elf
- Turns you invisible, any action, taking damage, or moving breaks this effect.
- Use-cases:
- Run past basically any mob and then cast Shadowmeld to make them reset. Even works on mobs that have stealth detection if you get enough distance before you Shadowmeld.
Recommendation:
It is highly recommended to play a Dwarf this season! The higher the keys you run, the more essential Stoneform becomes in certain dungeons, such as Siege of Boralus and others.
Macros
Discover recommended macros for Discipline Priest during Mythic+ dungeons and watch a quick video guide on creating simple macros for your character.
All spells in this Discipline Priest Raid Guide are available as mouseover macros for your convenience!
Penance
/cast [@mouseover, help] Penance; PenancePower Word: Shield
/cast [@mouseover, help] Power Word: Shield; Power Word: ShieldPower Word: Radiance
/cast [@mouseover, help] Power Word: Radiance; Power Word: RadianceRenew
/cast [@mouseover, help] Renew; RenewFlash Heal
/cast [@mouseover, help] Flash Heal; Flash HealPower Infusion
/cast [@mouseover,exists] Power Infusion; Power InfusionLeap of Faith
/cast [@mouseover, help] Leap of Faith; Leap of FaithPain Suppression
/cast [@mouseover, help] Pain Suppression; Pain SuppressionIf you press shift while using this macro you get the Angelic Feather automatically placed under you, skipping the control click.
/cast [mod:shift, @player] Angelic Feather; Angelic FeatherReplace your Purify macro if you wish. This macro makes it so that if you target an enemy you purge and if you target an ally you dispel, saving you a keybind.
#showtooltip Purify
/use [@mouseover, help] Purify; [harm] Dispel Magic; [noharm] Purify
Your Mass Dispel instantly goes off when you press the button without having to confirm click, use with caution.
#showtooltip
/cast [@cursor] Mass Dispel
A nice little Priest only macro, if you know you know.
/cast [nomod] Levitate
/cancelaura [mod:shift] Levitate
Addons
Below, you see a screenshot of the author's User Interface for their Discipline Priest, outlining which addons are used and how they are utilized in Mythic+ Dungeons to make your life easier.
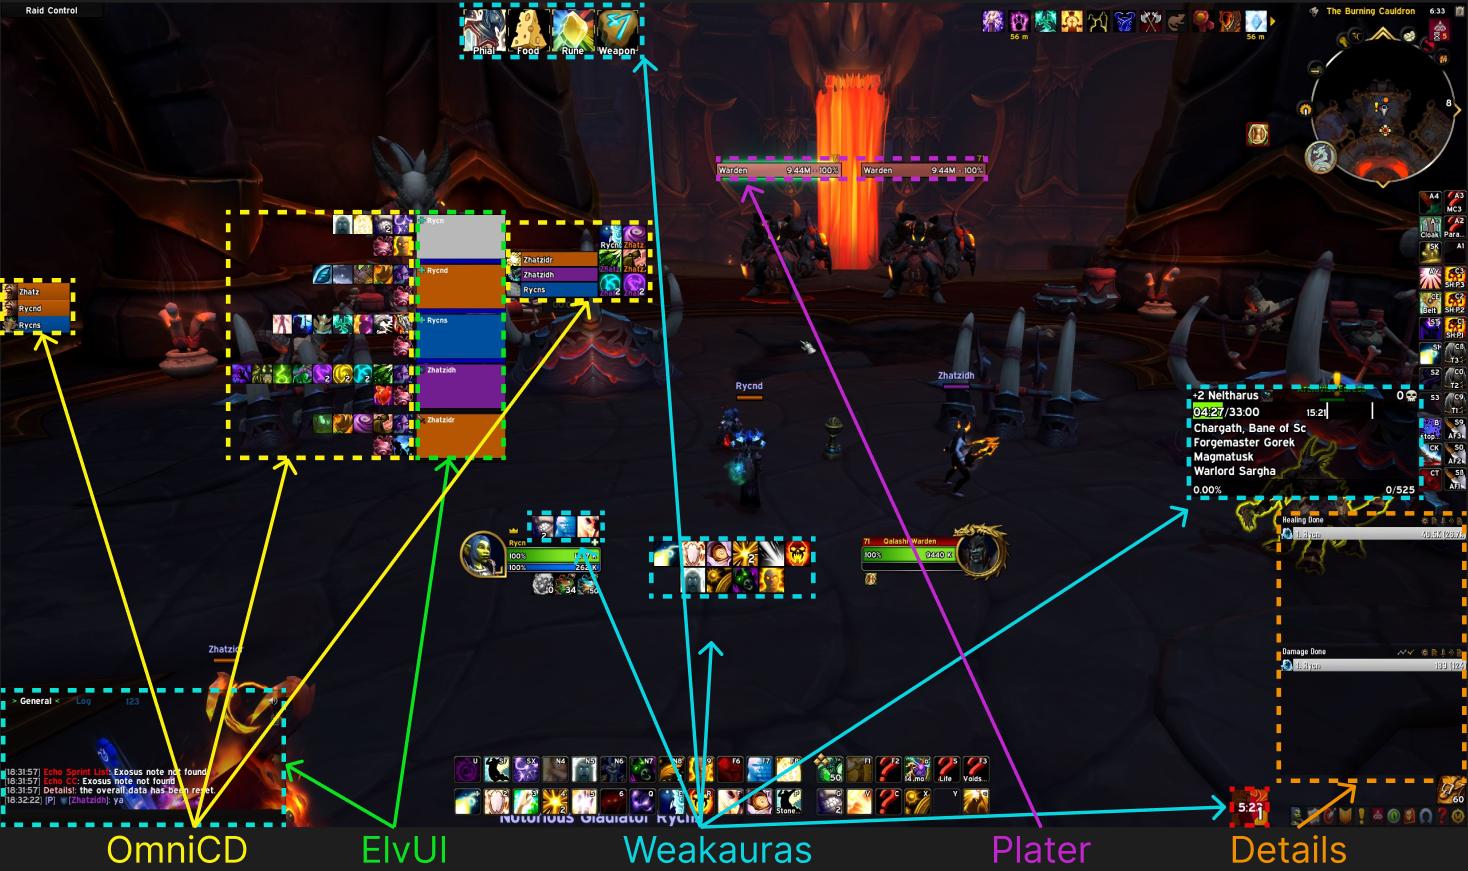
- OmniCD -- Party CD Tracker
- Addon to track your party members' Cooldowns, mandatory for M+
- ElvUI / BetterBlizzFrames -- Party/Raidframe Addon
- WeakAuras -- Jack of all trades
- WeakAura allows players to create and customize graphical displays of game information. These displays, known as "auras" can show various aspects such as buffs, debuffs, cooldowns, health, and other important events.
- Plater -- Nameplate Addon
- Plater is a nameplate addon with an extraordinary amount of settings, out of the box debuff tracking, threat coloring, and support for scripting similar to WeakAuras + the WeakAuras-Companion for Mod/Script/Profile updates.
- BigWigs -- BossMods Addon
- BigWigs is a boss encounter add-on. It consists of many individual encounter scripts, or boss modules; mini add-ons that are designed to trigger alert messages, timer bars, sounds, and so forth, for one specific raid encounter.
- Details -- Damage Meter
- Shows you Damage/Healing throughout the dungeon
These WeakAuras are recommended for optimal performance in raids as a Discipline Priest.
Power Word: Life Glow
Glows your frame when Power Word: Life is useable

Stamina Tracker
Shows an icon when you need to buff stamina

Power Infusion Handler
Notifies you when someone requests PI of you

Atonement Tracker
Shows your active amount of Atonements
Changes this Patch
PRIEST
- Hero Talents
- Voidweaver
- Developers’ notes: We are cleaning up some interactions between Mindbender and Voidwraith to reduce its effectiveness for Discipline. In addition, we're compensating Shadow to tune Voidweaver up in comparison to Archon and to make up for the reductions to Voidwraith.
- Voidwraith's damage is now reduced by 25% when talented into Mindbender.
- Voidwraith's cooldown has been increased to 3 minutes (was 2 minutes), now matching Shadowfiend's cooldown.
- Voidweaver
- Discipline
- Developers' notes: The goal of these changes is to reduce the number of cooldowns Discipline has access to and bake some of that power into other abilities. In addition, we're resolving some pain points in the talent tree and making it easier to quickly get Atonements on allies by moving Overloaded with Light into a more central location. Finally, we're re-theming Purge the Wicked into a Shadow spell so that Twilight Equilibrium can be more consistently activated.
- New Talent: Divine Procession – Smite extends the duration of an active Atonement by 3 seconds.
- New Talent: Inner Focus – Flash Heal, Power Word: Shield, Penance, Power Word: Radiance, and Power Word: Life have a 20% increased chance to critically heal.
- Purge the Wicked renamed to Encroaching Shadows and has been updated – Now causes Shadow Word: Pain to spread instead of overriding Shadow Word: Pain with a new spell.
- Aegis of Wrath has been renamed to Eternal Barrier and has been updated – No longer decays over time and instead increases the duration of Power Word: Shield by 5 seconds and its absorption by 20% (was 30%).
- Void Summoner has been updated – Now reduces the cooldown of Shadowfiend, Mindbender, or Voidwraith by 50%.
- Void Summoner now only triggers from Mind Blast and Penance casts. Void Summoner reduces the cooldown of Shadowfiend by 8 seconds or Mindbender by 4 seconds (was 4 seconds and 2 seconds).
- Evangelism healing increased by 40%.
- Evangelism now heals all targets affected by Atonement for 4200% spell power, split amongst targets healed. Evangelism continues to extend Atonement by 6 seconds and its visual has been updated.
- Contrition has been made baseline and now logs as Penance healing.
- Penance damage and healing increased by 50%.
- The cooldown of Penance is now reduced by Haste.
- Developers' notes: Penance has many stacking modifiers that affect its power, which has made it feel weak when the player doesn’t have all these modifiers active. We would like Penance to still feel good on its own, so we’re reducing the effectiveness of Power of the Dark Side and Harsh Discipline while also increasing the base damage and healing of Penance.
- Penance healing now triggers Divine Aegis.
- Harsh Discipline now only increases the number of Penance bolts by 1 per talent point invested (was up to 2). The buff will continue to stack up to 2 times but will now represent charges instead of increasing the number of bolts per stack.
- Power of the Dark Side increases the damage and healing of Penance by 30% (was 50%).
- Power Word: Shield absorption increased by 15%.
- Power Word: Radiance healing radius increased to 40 yards (was 30 yards).
- Luminous Barrier healing increased by 20%.
- Smite damage increased by 25%.
- Shadow Word: Pain damage increased by 44%.
- Developers' notes: Shadow Word: Pain should be an important part of Discipline’s healing on Atonement targets to provide a steady stream of healing over time. Its damage has been weaker than we would like, especially compared to other spells in the kit like Entropic Rift, so we’re bringing it up and reducing Entropic Rift’s damage. This has a side effect of boosting Oracle’s damage comparatively to Voidweaver.
- Expiation no longer increases the damage of Shadow Word: Death and Mind Blast. Instead, it now deals damage equal to 200% of the duration consumed from Shadow Word: Pain.
- Indemnity increases the duration of Atonement applied by Power Word: Shield by 4 seconds (was 3 seconds).
- Ultimate Penitence now shields the Priest for 100% of their health (was 50%).
- Priests may now slowly move during Ultimate Penitence and can control their landing upon finishing the channel.
- Pain and Suffering increases the damage of Shadow Word: Pain by 15/30% (was 7/15%).
- Pain and Suffering now increases the duration of Shadow Word: Pain by 2 seconds per talent point invested.
- Divine Aegis no longer triggers from periodic healing or Atonement or causes Power Word: Shield critical heals to be stronger. Absorption increased to 30% (was 5%).
- Divine Aegis now displays on raid frames.
- Atonement’s heal impact visual is now hidden for allies in raids and dungeons.
- Several talents have changed positions in the talent tree.
- The following talents have been removed:
- Heaven's Wrath
- Rapture
- Train of Thought
- Oracle
- New Talent: Twinsight – 3 additional Penance bolts are fired at an enemy within 40 yards when healing an ally with Penance or fired at an ally within 40 yards when damaging an enemy with Penance.
- Premonition now has 2 charges baseline.
- Divine Providence has been removed.
- Voidweaver
- Entropic Rift damage reduced by 20%.
- Voidwraith grants the reduced effectiveness version of Shadow Covenant while talented into Mindbender.
- Voidwraith now returns 0.2% mana when talented into Mindbender (was 0.5%).
FAQ
A: Start using Pain Suppression as your own defensive cooldown.
A: You are missing to many global cooldowns, and don't have enough Shadow Covenant uptime.
Credits
Written By: Rycn
Reviewed By: Velo