Destruction Warlock Raid Guide
Welcome to the Destruction Warlock Raid guide for the World of Warcraft patch 11.1.5! This guide covers everything you need to know to understand your character! Are you starting out and leveling up from 70? Check out the leveling guide!
Overview
Hero Talents
- Hellcaller and Diabolist perform similary in pure single-target, with Diabolist being slightly ahead. Hellcaller excells in spread out cleave through Wither while Diabolist has a lot of passive AoE due to Diabolic Rituals.
- Spending a Soul Shard starts a cycle of one of 3 different Diabolic Rituals.
- Diabolic Ritual: Overlord
- Diabolic Ritual: Mother of Chaos
- Diabolic Ritual: Pit Lord
- Starts on 1. again.
- The duration of an active Diabolic Ritual is reduced by 1 second per Chaos Bolt, Rain of Fire or Shadowburn cast baseline. Your Diabolic Ritual is reduced by 1 additional second when you cast Chaos Bolt because of Touch of Rancora as well as another second if you're talented into Infernal Machine and your Summon Infernal is active.
- Only 1 Diabolic Ritual can be up at a time and each turns into their respective Demonic Art after it expires which is triggered after you cast your next Chaos Bolt, Rain of Fire or Shadowburn:
- Demonic Art: Overlord
- A Fel Lord jumps at your target and applies Cloven Soul for 15 seconds.
- Demonic Art:Mother of Chaos
- Deals damage to your target and turns your next Incinerate into Infernal Bolt which generates 2 Soul Shards.
- Demonic Art: Pit Lord
- Summons a Pit Lord that attacks your target with Felseeker and turns your next Chaos Bolt into Ruination which deals a large amount of AoE damage.
- Demonic Art: Overlord
- Additionally, whenever a Demonic Art is active, your next Chaos Bolt, Rain of Fire or Shadowburn benefits from Touch of Rancora.
- Your Summon Infernal is further empowered through Abyssal Dominion.
- Your Immolate is turned into Wither.
- Wither has no cast time or FACING requirement.
- You have access to a 1 minute cooldown called Malevolence.
- Wither can stack up and has multiple neat interactions with different talents which can increase its stack count or have other benefits.
- Spending Soul Shards on damaging spells increases the stacks of Wither by 1 and has a chance to gain an additional stack due to Blackened Soul and Bleakheart Tactics.
- Casting Malevolence increases all active Wither stacks by 3 while each Chaos Bolt adds 1 additional stack during its duration.
- Mark of Peroth'arn gives Wither the chance to add a stack whenever it crits.
- Whenever Blackened Soul deals damage you have a chance to gain Flashpoint stacks through Seeds of Their Demise even if you are not currently talented into Flashpoint.
- Wither has a built-in mechanic which consumes its' accumulated stacks one after another for more damage. This mechanic is called Corrupted.
- The Corrupted state of Wither is triggered by the following:
- Chance whenever Wither gains a stack.
- If Wither reaches 8 stacks.
- If the target Wither is on reaches 20% or is below 20% already.
- When Malevolence is up.
- The Corrupted state of Wither is triggered by the following:
Talents
When to use this Spec
Use this spec if you want to do primarily Single-Target damage. You can use the same spec-specific talents with Hellcaller as well apart from Crashing Chaos which you switch to Rain of Chaos instead and Shadowburn instead of Channel Demonfire.
Gameplay Altering Talents
Discover all talents that significantly alter your gameplay within the Spec and Class Talent trees. This section gives a concise overview of these talents and their applications but for a more detailed look check out the Rotation and Deep Dive sections below.
Spec Tree
- Channel Demonfire
- Deals damage to targets afflicted by Immolate
- Further enhanced by Raging Demonfire and Demonfire Mastery.
- Deals damage to targets afflicted by Immolate
- Roaring Blaze
- It is crucial to keep this buff active as much as possible through proper Conflagrate usage.
- Cataclysm
- Another way of dealing upfront damage and refreshing Immolate at the same time.
- Soul Fire
- A hard hitting spell which is amplified by Roaring Blaze, it is also further enhanced by Decimation.
- Ritual of Ruin
- Passively nets you free Chaos Bolt casts and also spawns an Overfiend that generates more Soul Shards.
- Summon Infernal
- Your main cooldown for burst windows, this is enhanced by Rain of Chaos.
Class Tree
- Soulburn
- Enhances multiple utility spells, mainly used together with Demonic Circle: Teleport, Healthstone, Demonic Gateway and Drain Life.
- Sweet Souls
- Only works if other people use the Healthstones that you created.
- Soul Conduit
- Sometimes alters your cast sequence by refunding Soul Shards.
- Pact of Gluttony
- Massive for survivability since it alters your Demonic Healthstone to be useable multiple times per combat.
- Combo this together with Lifeblood for extra leech upon use.
Hero Talents
- Soul-Etched Circles
- Your default pick since you rarely use Howl of Terror.
- Infernal Machine
- Outperforms Cruelty of Kerxan.
- Infernal Vitality
- Decent health recovery during Unending Resolve.
- Good to pair with Dark Accord and Resolute Barrier for more frequent uses.
When to use this Spec
Use this spec in most, if not all, of the fights inside Liberation of Undermine. Learn more in the designated Liberation of Undermine section!
Talent Adjustments
Listing all the changes within the Class and Spec tree compared to the default build.
Spec Tree
- Added
- Shadowburn, Blistering Atrophy and Fiendish Cruelty.
- Very strong 1 Soul Shard cost spender, especially if your target is below 30% health.
- Further enhanced by Blistering Atrophy and Fiendish Cruelty.
- Shadowburn, Blistering Atrophy and Fiendish Cruelty.
- Removed
- Channel Demonfire
- Raging Demonfire
Demonfire Mastery
Hero Talents
Changed Diabolist to Hellcaller for more info visit the Hero Talent section above.
- Curse of the Satyr
- Combines your Curse of Weakness and Curse of Tongues.
- Bleakheart Tactics
- Outperforms Hatefury Rituals.
- Zevrim's Resilience
- Small recovery help while Dark Pact is up.
When to use this Spec
Use this spec if you're fighting 2-3 enemies for an extended period of the fight.
Talent Adjustments
Listing all the changes within the Class and Spec tree compared to the default build.
Spec Tree
- Added
- Havoc
- This serves as one of your strongest tools to damage two targets at once or generate additional Soul Shards in AoE situations.
- Shadowburn, Blistering Atrophy & Fiendish Cruelty
- Havoc
- Removed
- Burn to Ashes
- Channel Demonfire
- Raging Demonfire
- Demonfire Mastery
Hero Talents
Changed Diabolist to Hellcaller for more info visit the Hero Talent section above.
- Curse of the Satyr
- Combines your Curse of Weakness and Curse of Tongues.
- Bleakheart Tactics
- Outperforms Hatefury Rituals.
- Zevrim's Resilience
- Small recovery help while Dark Pact is up.
Rotation
Tier Set
- 2-Set: Your damaging spells have a chance to hit a Jackpot! that fires a flurry of 6 Demonfire bolts at 200% effectiveness. Casting Summon Infernal always hits a Jackpot!.
- 4-Set: Hitting a Jackpot! increases your Mastery by 2% and your spells gain maximum benefit from Mastery: Chaotic Energies for 10 seconds.
Single-Target
Opener
- Your goal is to spend as many Soul Shards as possible without wasting resources while also keeping relevant abilities on cooldown.
- Always cast Immolate unless it was already applied by either Soul Fire or Cataclysm.
- Use your active trinkets, Tempered Potion and racials like Blood Fury or Berserking after using Summon Infernal.
Priority List
This is a general priority you aim to maintain throughout the fight.
- Keep up Immolate on your target.
- Cast Ruination if Ruination is up.
- Cast Chaos Bolt if Demonic Art: Overlord, Demonic Art: Mother of Chaos or Demonic Art: Pit Lord is up.
- Cast Shadowburn if you are capping on Soul Shards or if you have 2 stacks.
- Cast Chaos Bolt if you are capping on Soul Shards.
- Cast Infernal Bolt if you are below 3 Soul Shards and Infernal Bolt is up.
- Cast Conflagrate to keep up Roaring Blaze, or if you have 2 stacks.
- Cast Soul Fire with Decimation up.
- Cast Shadowburn to keep up Eradication.
- Cast Chaos Bolt to keep up Eradication.
- CastSoul Fire if you're not overcapping on Soul Shards and have Backdraft up.
- Cast Conflagrate to generate Soul Shards.
- Cast Incinerate to generate Soul Shards.
Opener
- Your goal is to spend as many Soul Shards as possible without wasting resources while also keeping relevant abilities on cooldown.
- Always cast Wither unless it was already applied by either Soul Fire or Cataclysm.
- Use your active trinkets, Tempered Potion and racials like Blood Fury or Berserking after using Summon Infernal.
Priority List
This is a general priority you aim to maintain throughout the fight.
- Keep up Wither on your target.
- Cast Shadowburn if you are capping on Soul Shards or if you have 2 stacks.
- Cast Chaos Bolt if you are capping on Soul Shards.
- Cast Conflagrate to keep up Roaring Blaze, or if you have 2 stacks.
- Cast Soul Fire with Decimation up.
- Cast Shadowburn to keep up Eradication.
- Cast Chaos Bolt to keep up Eradication.
- CastSoul Fire if you're not overcapping on Soul Shards and have Backdraft up.
- Cast Conflagrate to generate Soul Shards.
- Cast Incinerate to generate Soul Shards
Multi-Target
Opener
- Below, you see an example of how your opener looks like using the recommended Multi-Target talent spec and depending on the number of Soul Conduit procs, among other factors.
- Always cast Immolate, unless it was already applied by Soul Fire or Cataclysm.
- Use your active trinkets, Tempered Potion, and racials like Blood Fury or Berserking after using Summon Infernal.
2+ Target Priority List
- Keep up Immolate on both targets.
- Cast Ruination if Ruination is up.
- Cast Havoc on a secondary target.
- Cast Chaos Bolt if Demonic Art: Overlord, Demonic Art: Mother of Chaos or Demonic Art: Pit Lord is up.
- Cast Shadowburn if you are capping on Soul Shards or if you have 2 stacks.
- Cast Chaos Bolt if you are capping on Soul Shards.
- Cast Infernal Bolt if you are below 3 Soul Shards and Infernal Bolt is up.
- Cast Conflagrate to keep up Roaring Blaze, or if you have 2 stacks.
- Cast Soul Fire with Decimation up.
- Cast Shadowburn to keep up Eradication.
- Cast Chaos Bolt to keep up Eradication.
- CastSoul Fire if you're not overcapping on Soul Shards and have Backdraft up.
- Cast Conflagrate to generate Soul Shards.
- Cast Incinerate to generate Soul Shards.
Opener
- Below, you see an example of how your opener looks like using the recommended Multi-Target talent spec and depending on the number of Soul Conduit procs, among other factors.
- Always cast Wither unless it was already applied by either Soul Fire or Cataclysm.
- Use your active trinkets, Tempered Potion and racials like Blood Fury or Berserking after using Summon Infernal.
2+ Target Priority List
This is a general priority you aim to maintain throughout the fight.
- Keep up Wither on both targets.
- Cast Havoc on a secondary target.
- Cast Shadowburn if you are capping on Soul Shards or if you have 2 stacks.
- Cast Chaos Bolt if you are capping on Soul Shards.
- Cast Conflagrate to keep up Roaring Blaze, or if you have 2 stacks.
- Cast Soul Fire with Decimation up.
- Cast Shadowburn to keep up Eradication.
- Cast Chaos Bolt to keep up Eradication.
- CastSoul Fire if you're not overcapping on Soul Shards and have Backdraft up.
- Cast Conflagrate to generate Soul Shards.
- Cast Incinerate to generate Soul Shards
AoE
Opener
- This opener can vary by a lot depending on your Soul Shards generation. Below you see one variation of an opener on 4 targets.
- Always cast Immolate unless it was already applied by either Soul Fire or Cataclysm.
- Use your active trinkets, Tempered Potion, and racials like Blood Fury or Berserking after using Summon Infernal.
Priority List
- Keep up Immolate on targets that last over 9 seconds.
- Cast Havoc on a secondary target.
- Cast Chaos Bolt or Rain of Fire if you are about to cap on Soul Shards.
- Cast Cataclysm on cooldown if talented.
- Cast Conflagrate to keep up Roaring Blaze or if you have 2 stacks.
- Cast Soul Fire on cooldown especially with a Decimation proc.
- Cast Chaos Bolt to keep up Eradication or Rain of Fire.
- Cast Shadowburn if something is about to die within 5 seconds.
- Cast Conflagrate to generate Soul Shards.
- Cast Incinerate to generate Soul Shards
Opener
- This opener can vary by a lot depending on your Soul Shards generation. Below you see one variation of an opener on 4 targets.
- Always cast Wither unless it was already applied by either Soul Fire or Cataclysm.
- Use your active trinkets, Tempered Potion and racials like Blood Fury or Berserking after using Summon Infernal.
Priority List
- Keep up Wither on targets that last over 9 seconds.
- Cast Havoc on a secondary target.
- Cast Chaos Bolt or Rain of Fire if you are about to cap on Soul Shards.
- Cast Cataclysm on cooldown if talented.
- Cast Conflagrate to keep up Roaring Blaze or if you have 2 stacks.
- Cast Soul Fire on cooldown especially with a Decimation proc.
- Cast Chaos Bolt to keep up Eradication or Rain of Fire.
- Cast Shadowburn if something is about to die within 5 seconds.
- Cast Conflagrate to generate Soul Shards.
- Cast Incinerate to generate Soul Shards
Deep Dive
Conflagrate, Backdraft and Roaring Blaze
- Make sure to space out your Conflagrates to ensure a high uptime on Roaring Blaze.
- Use your Backdraft charges on Soul Fire then Chaos Bolt and otherwise on Incinerate.
- Don't cast Soul Fire or Channel Demonfire without Roaring Blaze present on your target.
Min-maxing Eradication
- Your casted spell still gets the benefit from Eradication if it finishes before the previous Eradication fades from the target.
- You aim to have a consistent uptime of Eradication to maximize your damage output.
Below, you find an example of how to correctly manage the Eradication timing assuming it takes the Chaos Bolt 2 seconds to reach its target.
- Shadowburn also applies Eradication but doesn't have the added benefit of "travel time" since it's an instant cast spell.
Maximizing your Havoc
To maximize your damage while Havoc is active you need to spend as many casts on Chaos Bolt or Rain of Fire as possible. For this to happen you should enter the Havoc window with as many of the following conditions as possible:
- A high amount of Soul Shards or Soul Shard income.
- Conflagrate should be close to 2 stacks.
- Refresh Immolates so they won't drop off during your Havoc window.
- Pre-build Ritual of Ruin stacks.
Below is an example of what happens when you correctly manage your Havoc window.
- This is not a fixed rotation; This is just one example of how to play during your Havoc window. Soul Conduit procs, critical hits and Soul Fire resets can increase your Soul Shard generation, allowing you to spend more Soul Shards on Chaos Bolt or Rain of Fire.
Using Rain of Fire vs. Chaos Bolt / Shadowburn
The way you spend Soul Shards varies based on the number of targets you're fighting, whether Havoc is active or not and some additional conditions. The table below should help you reach a decision quickly.
| Condition | Is Havoc active? | Which spell do you use? |
|---|---|---|
| Fighting 1-2 enemies | No | Chaos Bolt / Shadowburn |
| Fighting 2-4 enemies | Yes | Chaos Bolt / Shadowburn |
| Fighting >=3 enemies | No | Rain of Fire |
| Fighting >=5 enemies | Irrelevant | Rain of Fire |
| Targets are moving | Irrelevant | Chaos Bolt / Shadowburn |
| Deal priority damage? | Irrelevant | Chaos Bolt / Shadowburn |
| While moving/disrupted and/or you are about to overcap on Soul Shards. | Irrelevant | Shadowburn / Rain of Fire |
| Targets are dying? | Irrelevant | Shadowburn |
| Condition | Is Havoc active? | Which spell do you use? |
|---|---|---|
| Fighting 1-2 enemies | No | Chaos Bolt / Shadowburn |
| Fighting 2-3 enemies | Yes | Chaos Bolt / Shadowburn |
| Fighting >2 enemies | No | Rain of Fire |
| Fighting >3 enemies | Irrelevant | Rain of Fire |
| Targets are moving | Irrelevant | Chaos Bolt / Shadowburn |
| Deal priority damage? | Irrelevant | Chaos Bolt / Shadowburn |
| While moving/disrupted and/or you are about to overcap on Soul Shards. | Irrelevant | Shadowburn / Rain of Fire |
| Targets are dying? | Irrelevant | Shadowburn |
Understanding Mechanics
Rotational min-maxing is just one aspect of mastering a specialization, but there are numerous other key mechanics that influence your performance. Use the following guides to improve them.
Liberation of Undermine
�← Scroll for more Bosses →
Offensive Cooldown Usage
Boss Tips
- It is possible to delay the Tune-Up phase until around 2 minutes into the fight which means you can use your Summon Infernal on pull and have it on time for the Tune-Up damage amplification.
- Place a Demonic Gateway to help your raid get away with Spew Oil quickly.
- Use your defensives whenever you're affected by Incendiary Fire.
Offensive Cooldown Usage
Defensive Cooldown Usage
- Use Dark Pact and Unending Resolve alternating each Scrapbomb soak. You get 3 Scrapbombs per phase meaning you can cover all of them this way.
Boss Tips
- Place your Demonic Circle in the middle of the room to be able to cross it later when you need to swap sides quickly.
- Set up a Demonic Gateway the same way to help out your fellow raiders.
- Start the fight on the opposite side of your assignment to apply Havoc on pull and use your Demonic Gateway towards the correct side right after to gain an edge on your opener.
- You can also play the whole fight in the middle of the room applying Havoc on cooldown which increases your DPS significantly.
Offensive Cooldown Usage
Boss Tips
- Use your defensives on Sound Cannon or when you're about to get hit by Resonant Echoes.
- If you can't make it to an Amplifier before Blaring Drop hits you during the intermission utilize your Demonic Circle: Teleport to skip a wave and catch up with your raid!
Offensive Cooldown Usage
Boss Tips
- Use Summon Felhunter on this boss to be able to interrupt Scrap Rockets as often as possible with Spell Lock.
- Use your defensives whenever you're afflicted by Incinerator.
Offensive Cooldown Usage
Defensive Cooldown Usage
- Use your defensives on overlaps of Sonic Ba-Boom and Foot-Blasters explosions.
Boss Tips
- Use Demonic Circle: Teleport right after Beta Launch goes off to quickly reposition yourself.
- Additionally, place a Demonic Gateway for your raid to make it easier to get in position in the intermission.
Offensive Cooldown Usage
Boss Tips
- Use defensives whenever the Reel Assistants cast Withering Flames on you. This together with Pay-Line explosions is dangerous.
- Interrupt Overload! as late as possible to avoid potential Withering Flames casts.
- Talent Amplify Curse to use an improved version of Curse of the Satyr to slow down the casts of the Reel Assistants.
- The point in Flashpoint is pretty valuable due to the amount of time you can apply Wither to enemies which stay above 80% for an extended period.
Stat Priority
Understand your stat priority and the tertiary stats needed for optimal performance during Raid boss fights as a Destruction Warlock. For more detailed information, visit the Stats and Attributes guide.
For an accurate representation of what item to equip you should use Simcraft!
A static "Stat Priority" is just a starting point and can easily shift depending on your current gear.
- All secondary stats are affected by diminishing returns. Click here to learn more!
Tertiary
- Avoidance - Great stat to reduce the damage intake of "Area of Effect" abilities.
- Leech - Provides additional healing through damage dealing. The damage of your pets does not heal you thus Leech is a great tertiary for you since most of your damage is coming from your own spells.
- Speed - Niche tertiary that can be very useful and has been proven useful in the past. Makes playing certain mechanics a lot easier.
Gear
| Slot | Item | Location |
|---|---|---|
| Head | Spliced Fiendtrader's Transcendence | Tier / Catalyst |
| Neck | Semi-Charmed Amulet | Rik Reverb |
| Shoulder | Spliced Fiendtrader's Loyal Servants | Tier / Catalyst |
| Cloak | Chef Chewie's Towel | Cinderbrew Meadery |
| Chest | Spliced Fiendtrader's Surgical Gown | Tier / Catalyst |
| Wrist | Consecrated Cuffs | Crafting |
| Gloves | King's Malicious Clutches | Darkflame Cleft |
| Belt | Honorbound Retainer's Sash | Priory of the Sacred Flame |
| Legs | Spliced Fiendtrader's Skin Tights | Tier / Catalyst |
| Boots | Cloudstrider Soles | The Rookery |
| Ring 1 | Faded Championship Ring | Cauldron of Carnage |
| Ring 2 | The Jastor Diamond | Chrome King Gallywix |
| Trinket 1 | Eye of Kezan | Chrome King Gallywix |
| Trinket 2 | Mug's Moxie Jug | Mug'Zee |
| Weapon | Scalding Queenmaker's Shiv | Cinderbrew Meadery |
| Offhand | Vagabond's Torch | Crafting |
Below you are presented with a good list of farmable alternatives that are obtainable outside of WoW’s weekly lockout system. While replaced in time as you progress, these offer immediate character power.
| WSlot | Item | Location |
|---|---|---|
| Head | Inventor's Ingenious Trifocals | Operation: Mechagon |
| Neck | Strapped Rescue-Keg | Cinderbrew Meadery |
| Shoulder | Exquisitely Aerodynamic Shoulderpads | The MOTHERLODE!! |
| Cloak | Cloak of Questionable Intent | The MOTHERLODE!! |
| Chest | Soulsewn Vestments | Theater of Pain |
| Wrist | Gleamwax Shackles | Darkflame Cleft |
| Gloves | King's Malicious Clutches | Darkflame Cleft |
| Belt | Honorbound Retainer's Sash | Priory of the Sacred Flame |
| Legs | Rowdy Reveler's Legwraps | The MOTHERLODE!! |
| Boots | Cloudstrider Soles | The Rookery |
| Ring 1 | Footbomb Championship Ring | The MOTHERLODE!! |
| Ring 2 | Bloodoath Signet | Theater of Pain |
| Trinket 1 | Signet of the Priory | Priory of the Sacred Flame |
| Trinket 2 | Synergistic Brewterializer | Cinderbrew Meadery |
| Weapon | Neural Synapse Enhancer | Operation: Mechagon |
| Weapon | Scalding Queenmaker's Shiv | Cinderbrew Meadery |
| Offhand | Deathwalker's Promise | Theater of Pain |
Trinkets
Below you can find active and passive alternatives to our recommended trinkets. Do note that some trinkets are better than others depending on the boss fight.
Active Trinket alternatives
- House of Cards
- Our best raid on use this season.
- Signet of the Priory
- Decent dungeon on use while also providing benefits to your group.
- Soulletting Ruby
- "Okay" on use but hard to farm due to the amount of items that are lootable in Theater of Pain.
- Funhouse Lens
- This is a decent on use trinket, but very hard to get because you can only loot it from delves.
Passive Trinket alternatives
- Entropic Skardyn Core
- This trinket got recently buffed which made it quite good.
Embellishments
- 1x Darkmoon Sigil: Ascension
- Only crafted on your main hand or off-hand weapon. Craft it on your main hand for more power early on or on your off-hand for long-term BiS.
- 1x Writhing Armor Banding
- The optimal slots to craft on are Wrists, Boots or Waist depending on your available gear.
or
- 1-2x Elemental Focusing Lens
- Deals a decent amount of damage in Single-Target.
- The optimal slots to craft on are Wrists, Boots or Waist depending on your available gear.
or
- 1-2x Dawnthread Lining
- The optimal slots to craft on are Wrists, Boots or Waist depending on your available gear.
Remaining Sparks
- Crafted items are 681 item level and regular items are 684 on max item level, therefore, it's not beneficial to equip crafted items outside of your 2x embellishments unless you don't have access to other high item level gear on that slot.
Simcraft
To find the best combination of gear available to you or identify the best possible upgrades, visit our Simcraft guide to learn how to utilize Simcraft easily and effectively.
Consumables
- Phials
- Flask of Alchemical Chaos -- maximum DPS.
- Flask of Tempered Versatility -- less DPS but more survivability.
- Food
- Feast of the Divine Day
- Combat Potion
- Tempered Potion
- Health Potion
- Algari Healing Potion -- a big burst of healing
- Weapon Oil
- Algari Mana Oil -- default
- Oil of Deep Toxins
- Augment Rune
- Crystallized Augment Rune
- Sockets
- Elusive Blasphemite -- Unique, recommended over Culminating Blasphemite
- Deadly Sapphire
- Deadly Emerald
- Masterful Ruby
- Deadly Onyx
- Elusive Blasphemite -- Unique, recommended over Culminating Blasphemite
Enchantments
| Head | S.A.D. Greater Rune of the Void Ritual |
| Neck | Magnificent Jeweler's Setting 2x |
| Cloak | Enchant Cloak - Chant of Winged Grace |
| Chest | Enchant Chest - Crystalline Radiance |
| Wrist | Enchant Bracer - Chant of Armored Avoidance S.A.D. |
| Waist | S.A.D. |
| Legs | Sunset Spellthread |
| Boots | Enchant Boots - Scout's March |
| Ring 1 | Enchant Ring - Radiant Haste Magnificent Jeweler's Setting 2x |
| Ring 2 | Enchant Ring - Radiant Haste Magnificent Jeweler's Setting 2x |
| Weapon | Enchant Weapon - Authority of the Depths |
You buy S.A.D. from the Great Vault Vendor to add sockets to your Helm, Wrists & Waist.
Races
For min-maxing a Destruction Warlock in raiding, different racial traits can provide a tremendous benefit to your character. If this is not your top goal, picking a race that fits your style works just as well.
- Stoneform -- Dwarf
- Dispels Magic and Bleed debuffs. Has been useful in the past on some bosses with Bleeds.
- Rocket Jump -- Goblin
- Do a small jump in the direction your character is facing.
- While you're in the Rocket Jump animation you are placed on a global cooldown until your character lands.
- Berserking -- Troll
- Strong DPS racial but lines up poorly with Summon Infernal.
- Reduce the duration of movement-impairing effects by 20%. This was only useful once in the recent history of progression raiding but is still worth noting.
- Blood Fury -- Orc
- Strong racial for damage because of both Command and Blood Fury which lines up with Summon Infernal.
- 20% reduced stun duration on you which can be useful in some situations.
- Spatial Rift -- Void Elf
- Spawn a shadow traveling into your facing direction, and activate it again to teleport to it.
- Maximum range of 100 yards.
Recommendation
In general, it's safe to say that if you care about min-maxing your DPS, you should go with the highest DPS racial. That being said, the story is a bit different if it's about progression raiding. Some help out massively to speed up the progression on certain bosses. Notably, Dwarf with their Stoneform helped out on Tindral Sageswift and Fyrakk the Blazing in the latest Race to World First by having easy access to dispelling yourself at crucial points of the fights mentioned.
Macros
Discover recommended macros for Destruction Warlocks during Raid encounters and watch a quick video guide on creating simple macros for your character.
Cataclysm -- Casts Cataclysm on your cursor without confirmation.
#showtooltip
/cast [@cursor] Cataclysm
Summon Infernal - Uses Summon Infernal on your cursor position without reticle. Can't be used while Channel Demonfire is being cast.
#showtooltip
/cast [@cursor, nochanneling: Channel Demonfire] Summon Infernal
Rain of Fire -- Casts Rain of Fire without confirmation click which can save you valuable time and increases your Rain of Fire casts per second.
#showtooltip
/cast [@cursor] Rain of Fire
Shadowfury -- Casts Shadowfury on your cursor without confirmation.
#showtooltip
/cast [@cursor] ShadowfuryImmolate -- Casts Immolate on your mouseover or target.
#showtooltip Immolate
/cast [@mouseover,exists] Immolate;Immolate
Havoc -- Casts Havoc on your mouseover target if it exists, isn't dead and is hostile, else Havoc is cast on your target.
#showtooltip
/cast [@mouseover,exists,nodead,harm] Havoc;Havoc
Curse of Weakness -- Amplify Curse before applying Curse of Weakness to your mouseover target or target.
#showtooltip Curse of Weakness
/cast [known:328774] Amplify Curse
/cast [@mouseover, exists, harm, nodead] Curse of Weakness; Curse of Weakness
Curse of Tongues -- Uses Amplify Curse before applying Curse of Tongues to your mouseover target or target..
#showtooltip Curse of Tongues
/cast [known:328774] Amplify Curse
/cast [@mouseover, exists, harm, nodead] Curse of Tongues; Curse of Tongues
Curse of Exhaustion -- Uses Amplify Curse before applying Curse of Exhaustion to your mouseover target or target.
#showtooltip Curse of Exhaustion
/cast [known:328774] Amplify Curse
/cast [@mouseover, exists, harm, nodead] Curse of Exhaustion;[@target] Curse of Exhaustion
Drain Life -- Uses Drain Life on your mouseover target or target.
#showtooltip
/cast [@mouseover,exists] Drain Life;Drain Life
Banish -- Casts Banish on your mouseover target if it exists.
#showtooltip
/cast [@mouseover,harm,nodead,exists] Banish; [harm,nodead] BanishWe're mainly using custom macros for Pets because the normal functionality of Command Demon proved unreliable in the past.
Pet Ability 1 Macro -- Casts your main pet abilities for each pet on your mouseover target.
/cast [@mouseover]Singe Magic
/cast [@mouseover,exists]Spell Lock;Spell Lock
/cast [@mouseover]Suffering
/cast [@mouseover,exists]Seduce;Seduce
/cast [@mouseover,exists]Axe Toss;Axe Toss
/cast [nopet,@mouseover,exists]Command Demon;[nopet]Command Demon
Focus Pet Ability 1 Macro -- Casts your main pet abilities for each pet on your focus target.
/cast [@focus] Singe Magic
/cast [@focus] Spell Lock
/cast [@focus] Suffering
/cast [@focus] Seduce
/cast [@focus] Axe Toss
/cast [nopet,@focus] Command Demon
Pet Ability 2 Macro -- Casts your second relevant pet ability on your mouseover target if needed.
/cast [@mouseover] Singe Magic
/cast [@mouseover,exists] Devour Magic;Devour Magic
/cast Shadow Bulwark
/cast Felstorm
/cast [nopet,@mouseover] Command Demon
Focus Pet Ability 2 Macro -- Casts the second relevant Pet ability on your focus target, and also sends your pet to attack your focus.
/cast [@focus]Singe Magic;
/cast [@focus] Devour Magic;
/cast [@focus] Lesser Invisibility;
/cast Shadow Bulwark;
/cast [nopet,@focus] Command Demon
/petattack [@focus]
Grimoire of Sacrifice & dismiss pet -- Casts Grimoire of Sacrifice if you specced into it. If you don't have Grimoire of Sacrifice talented it dismisses your pet instead.
showtooltip
/run if not IsSpellKnown(108503) then PetDismiss(); end
/cast Grimoire of SacrificeSoulstone Mouseover -- Casts Soulstone on your mouseover, conventional [@mouseover,exists] macros got broken a while ago, this is a workaround for it.
#showtooltip Soulstone
/target [@mouseover,help]
/cast Soulstone
/targetlasttarget
Unending Breath Selftcast -- Casts Unending Breath on yourself without targeting anything. Useful for situations where you're not able to DPS anything to still fish for trinket procs / stacks.
#showtooltip
/cast [@player] Unending Breath
Mortal Coil / Howl of Terror choice -- Swaps between Mortal Coil and Howl of Terror depending on which talent got picked. Useful to add your own macro conditions like @focus or @mouseover etc.
/cast [known:Mortal Coil] Mortal Coil
/cast [known:Howl of Terror] Howl of Terror
Addons
Below, you see a screenshot of the author's User Interface for their Destruction Warlock, outlining which addons are used and how they are utilized in Raids to make your life easier.
- MRT -- Notes, Raid cooldowns, and more
- Helpful addon for Raiders, especially for Raid leaders and officers.
- ElvUI -- Full User Interface replacement
- A user interface designed around user-friendliness with extra features that are not included in the standard UI.
- Alternatively, you can also use Shadowed Unit Frames (SUF) and an action bar addon of your choice or of course the stock UI.
- BigWigs -- Generic Boss Mod
- BigWigs is a boss encounter add-on. It consists of many individual encounter scripts, or boss modules; mini add-ons that are designed to trigger alert messages, timer bars, sounds, and so forth, for one specific Raid encounter.
- WeakAuras -- Jack of all trades
- WeakAuras is a powerful and flexible framework that allows the display of highly customizable graphics on World of Warcraft's user interface to indicate buffs, debuffs, and other relevant information. This addon was created to be a lightweight replacement for Power Auras but has since introduced more functionalities while remaining efficient and easy to use.
- Plater -- Advanced Nameplates
- Plater is a nameplate addon with an extraordinary amount of settings, out of the box debuff tracking, threat coloring, and support for scripting similar to WeakAuras and wago.io + the WeakAuras-Companion for Mod/Script/Profile updates.
- Details -- In-depth Damage Meter
- Most powerful, reliable, handsome, damage meter.
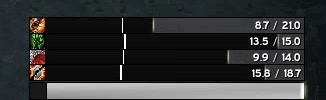
Soulshard Bar
Shows your current shards.

Dot timers
Shows your dots and pandemic window of them.
Changes this Patch
- Warlock
- Drain Life damage increased by 300%.
- Destruction
- Developers' notes: War Within introduced a lot of new spells to Destruction’s kit, increasing its complexity considerably compared to prior versions of the specialization. In Undermine(d), we are adding passive versions of Dimensional Rift and Channel Demonfire as well as adding the ability to change Rain of Fire's targeting to an enemy target rather than a reticle. These changes are aimed at providing more options for players to customize their gameplay to fit their preferred level of complexity when it comes to playing Destruction.
- New Talent: Demonfire Infusion – Periodic damage from Immolate / Wither has a 4% chance to fire a Demonfire bolt at 100% increased effectiveness. Incinerate has a 25% chance to fire a Demonfire bolt at 100% increased effectiveness.
- Dimension Ripper has been redesigned – Periodic damage dealt by Immolate / Wither has a 5% chance to tear open a Dimensional Rift.
- Havoc duration is now 15 seconds (was 12 seconds).
- Mayhem now has a 35% chance to activate (was 25%).
- Decimation will now highlight Soul Fire while active.
- Diabolic Embers has been moved to row 10.
- Rain of Fire is now a choice node that can be used to change the targeting from reticle to your current target.
- Warlock
- Diabolist
- The cycle of Diabolic Ritual is now reset when entering an arena, entering a battleground, starting a raid encounter, or starting a Mythic+ dungeon.
- Overlord will now use an alternative attack if there are no available paths for charging. There should be no difference in throughput between the alternative attack and his current attack.
- Destruction
- Diabolist
- Diabolic Ritual has been updated – Chaos Bolt, Rain of Fire, and Shadowburn grant Diabolic Ritual for 20 seconds. If Diabolic Ritual is already active, its duration is reduced by 1 second instead. When Diabolic Ritual expires you gain Demonic Art: Overlord,Demonic Art: Mother of Chaos or Demonic Art: Pit Lord, causing your next Chaos Bolt, Rain of Fire, or Shadowburn to summon an Overlord, Mother of Chaos, or Pit Lord that unleashes a devastating attack against your enemies.
- Touch of Rancora has been updated – Demonic Art: Overlord,Demonic Art: Mother of Chaos or Demonic Art: Pit Lord increases the damage of your next Chaos Bolt, Rain of Fire, or Shadowburn by 100% and reduces its cast time by 50%. Chaos Bolt reduces the duration of Diabolic Ritual by 1 additional second.
- Developer's note: We’re adjusting Diabolic Ritual to avoid a situation where constantly casting Rain of Fire, due to its instant cast time, provides the best output for Diabolist. To avoid adding to Diabolic Ritual's already lengthy tooltip, we’re adding functionality to Touch of Rancora to add further value to casting Chaos Bolt so that its cast time doesn’t hinder its usefulness to ain of Fire[/wow-spell], due to its instant cast time, provides the best output for Diabolist warlocks.
- Diabolist
- Diabolist
- Warlock
- Demon Skin now creates an absorb for 0.12/0.24% maximum health (was 0.2/0.4%) and may stack up to 5/10% of your maximum health (was 8/15%).
- Fixed an issue where Lifeblood was giving Leech higher than the intended amount.
- Destruction
- Chaos Bolt damage increased by 40%.
- Shadowburn damage increased by 125%.
- Conflagrate damage increased by 25%.
- Incinerate damage decreased by 10%.
- Soul Fire damage increased by 5%.
- Channel Demonfire damage increased by 10%.
- Channel Demonfire damage dealt to nearby enemies increased by 25%.
- Summon Infernal damage increased by 10%.
- Rain of Fire damage increased by 35%.
- Pyrogenics now increases damage taken from your Fire spells by 3% (was 5%).
- Ritual of Ruin now activates after spending 20 Soul Shards (was 15).
- Avatar of Destruction now generates 1 Soul Shard Fragment every 1 second (was 0.5 seconds).
- Summon Infernal now generates 1 Soul Shard Fragment every 1 second (was 0.5 seconds).
- Fixed an issue where Power Overwhelming incorrectly gave 1% Mastery instead of 0.5% Mastery per stack.
- Fixed an issue where 3 stacks of Power Overwhelming were granted when using Rain of Fire while talented into Inferno.
- Fixed an issue where Rain of Fire could damage enemies through walls.
- Destruction
- Warlock
- All talent trees have had many talents move locations or have had their pathing updated.
- New Talent: Pact of Gluttony – Healthstones you conjure for yourself are now Demonic Healthstone and can be used multiple times in combat. Demonic Healthstone cannot be traded.
- New Talent: Swift Artifice – Reduces the cast time of Soulstone and Create Healthstone by 50%.
- New Talent: Demonic Tactics – Increases melee and spell critical strike chance for you and your summoned demon by 2%.
- Fel Pact has been redesigned – Fel Domination cooldown is reduced by 60 seconds and is now a 1-point talent (was 2).
- Fiendish Stride has been redesigned – Reduces the damage dealt by Burning Rush by 10%. Burning Rush increases your movement speed by an additional 20%. Now a 1-point talent (was 2).
- Soul Leech is now a talent (was learned at level 10).
- Mortal Coil has a new visual effect.
- Soul Conduit now a 1-point talent.
- The following talents have been removed:
- Grimoire of Synergy
- Inquisitor's Gaze
- Summon Soulkeeper
- Profane Bargain
- Destruction
- New Talent: Devastation – Increases the Critical Strike chance of your Destruction spells by 5%.
- New Talent: Emberstorm – Increases the damage done by your Fire spells by 2/4% and reduces the cast time of your Incinerate spell by 10/20%.
- New Talent: Decimating Bolt – Hurl bolts of decimating magic at your target, dealing Shadow damage and increase the damage of your next 3 Incinerates by 40%. Decimating Bolt’s damage, and the bonus to Incinerate both increase as your target’s health decreases.
- New Talent: Summoner's Embrace – Increases the damage dealt by your spells and your demon by 3%.
- New Talent: Indiscriminate Flames – Backdraft increases the damage of your next Chaos Bolt by 5% or increases the critical strike chance of your next Incinerate or Soul Fire by 35%.
- New Talent: Blistering Atrophy – Increases the damage of Shadowburn by 20%. Shadowburn always critically strikes a target that is at or below 30% health.
- New Talent: Fiendish Cruelty – When Shadowburn fails to kill a target that is at or below 30% health, its cooldown is reduced by 5 seconds.
- New Talent: Demonfire Mastery – Increases the damage of Channel Demonfire by 30% and it deals damage 35% faster.
- New Talent: Improved Chaos Bolt – Increases the damage of Chaos Bolt by 10% and reduces its cast time by 0.5 seconds.
- New Talent: Avatar of Destruction – Consuming Ritual of Ruin summons an Overfiend for 8 seconds. Overfiend generates 1 Soul Shard Fragment every 0.5 seconds and casts Chaos Bolt at its summoner’s target, dealing Chaos damage.
- New Talent: Dimension Ripper – Incinerate has a chance to tear open a Dimensional Rift or recharge Dimensional Rift if learned.
- New Talent: Flame Rift – Dimensional Rift can now summon a powerful Flame Rift.
- New Talent: Lessons of Space-Time – While you have a Dimensional Rift open, all of your damage is increased by 5%.
- New Talent: Unstable Rifts – Bolts from Dimensional Rift deal 25% of damage dealt to nearby enemies as Fire damage.
- Ruin has been redesigned – Increases the Critical Strike damage of your Destruction spells by 5/10%.
- Inferno has been redesigned – Rain of Fire damage is increased by 20% and its Soul Shard cost is reduced by 1.
- Decimation has been redesigned – Your critical strikes have a chance to reset the cooldown of Soul Fire and reduce the cast time of your next Soul Fire by 80%.
- Chaos Incarnate has been redesigned – Chaos Bolt, Rain of Fire, and Shadowburn always gain at least 70% of the maximum benefit from your Mastery: Chaotic Energies.
- Scalding Flames has been redesigned – Increases the damage of Immolate by 25% and its duration by 3 seconds.
- Chaos Bolt is now learned at level 10 (was a talent).
- The cooldown of Summon Infernal is now 2 minutes (was 3 minutes).
- Raging Demonfire now extends Immolate by 0.5 seconds (was 0.2 seconds).
- Chaos Bolts cast by Overfiend no longer gains modifiers active on its summoner.
- The tooltip of Summon Overfiend has been updated – Generates 1 Soul Shard Fragment every 0.5 seconds and casts Chaos Bolt at 80% effectiveness at its summoner’s target.
- The visual for casting Dimensional Rift has been updated.
- The following talents are now 1 point:
- Burn to Ashes
- Master Ritualist
- Power Overwhelming
- Infernal Brand
- Crashing Chaos
- Ashen Remains
- Eradication
- Conflagration of Chaos
- Ruin
- Scalding Flames
- Fire and Brimstone
- Rolling Havoc
- Raging Demonfire
- Flashpoint
- Emberstorm
- The following talents have been removed:
- Avatar of Destruction
- Chaosbringer
- Pandemonium
- Cry Havoc
- Improved Immolate
- Decimating Bolt
- Grand Warlock's Design
- Flame Rift
- Lessons of Space-Time
- Unstable Rifts
- Infernal Brand
FAQ
A: You aren't spacing your Chaos Bolts out correctly. Try to cast something in between each Chaos Bolt to maximze Eradication uptime.
Credits
Written By: Xerwo
Reviewed By: Shodam