Brewmaster Monk Raid Guide
Welcome to the Brewmaster Monk raid guide for the World of Warcraft patch 11.1.7! This guide covers everything you need to know to understand your character! Are you starting out and leveling up from 70? Check out the leveling guide!
Overview
Hero Talents
- Master of Harmony and Shado-Pan are both very competitive with each other when it comes to damage output.
- Master of Harmony influences your gameplay with Endless Draught and Mantra of Purity, while Shado-Pan is almost fully passive.
- We recommend you to play Shado-Pan as it does slightly more Single Target damage than Master of Harmony and it is fully passive too which makes it easier to play.
- Flurry Strikes
- After 240 Energy spent you unleash all Flurry Strikes.
- Efficient Training
- paired with Chi Surge provides a really good cooldown reduction for Weapons of Order.
- Does nothing for Press the Advantage.
- Wisdom of the Wall
- Wording can be deceiving you need to trigger 10x Flurry Strikes by spending 240 energy to obtain any of the Wisdom of the Wall buffs.
- You can have multiple Wisdom of the Wall buffs at the same time.
- Shado-Pan choice node picks are:
- Pride of Pandaria
- Protect and Serve
- Very good with Vivacious Vivification.
- Predictive Training
- This passive does not have a cooldown and can proc at any time.
- Aspect of Harmony
- Damage and effective healing are stored as Vitality.
- During Aspect of Harmony you don't generate any Vitality.
- Important: Overhealing does not count as effective healing.
- Purified Spirit
- Important node to never waste any Vitality.
- Endless Draught
- Having 2 charges of Celestial Brew makes it easy to hold/delay the use to optimize for damage and survivability.
- Mantra of Purity
- The extra shield and Stagger reduction are strong defensively.
- Clarity of Purpose
- Enables Purifying Brew to also store Vitality.
- Coalescence
- Increases the damage enemies take by 10% while you are under the effect of Aspect of Harmony.
Talents
When to use this spec
This is the default loadout going into any boss unless specified otherwise. You have to adjust the class talent tree based on the utility needed for the encounter. To make your life easier, boss-specific talent loadouts are available in the Raids section.
Gameplay Altering Talents
Discover all talents that significantly alter your gameplay within the Spec and Class Talent trees. This section gives a concise overview of these talents and their applications but for a more detailed look check out the Rotation and Deep Dive sections below.
Spec Tree
- Shuffle
- Shuffle doubles the effectiveness of Stagger.
- Gift of the Ox
- This spawns Healing Spheres when you take damage.
- August Blessing
- This talent is what makes Crit so valuable, converting overhealing into a heal over time.
- Scalding Brew
- Make sure to keep Breath of Fire on cooldown to gain the 20% damage increase on your Keg Smash.
- Stormstout's Last Keg
- Keg Smash now has 2 charges.
- Training of Niuzao
- This provides you with Mastery based on your stagger, one of the reasons why Mastery is not that highly ranked in stat priority.
- Shadowboxing Treads
- Makes Blackout Kick cleave and increases its value by a lot.
- Face Palm
- Tiger Palm becomes way stronger and generates extra brew cooldown reduction.
- Charred Passions
- While Charred Passions is active, make sure to always use Blackout Kick on cooldown.
- Ox Stance
- A buff that is generated while using your brews and consumed automatically by big hits.
Class Tree
- Hasty Provocation
- Provoke now increases the targets movementspeed by 50%.
- Lighter Than Air
- Now after rolling you can press double jump and do a small dash forward.
Hero Talents
- Flurry Strikes
- Unleashs a huge amount of burst damage upon your target after spending 240 energy.
- Wisdom of the Wall
- Provides a nice passive bonus effect after every 10th Flurry Strike.
- Protect and Serve
- Increases healing of your instant Vivifies gained from Vivacious Vivification.
- Efficient Training
- Gives you approximately 30 seconds of cooldown reduction to your Weapons of Order.
When to use this spec
This talent loadout is more for advanced Brewmaster Monks that know how to juggle well with their resources. This build is more focused on damage but can also easily survive anything if played well.
Talent Adjustments
Listing all the changes within Class and Spec tree compared to the default build.
Spec Tree
- Added
- Chi Surge
- Weapons of Order does extra damage and receives cooldown reduction based on targets hit.
- Invoke Niuzao, the Black Ox
- Can be used as defensive but it's value is very weak and only does some passive damage.
- Chi Surge
- Removed
- 1 Point in High Tolerance
- One With the Wind
Rotation
Tier Set
- 2-Set: Each time you take damage you have a chance to activiate Luck of the Draw! causing you to cast Fortifying Brew for 6.0 sec. Your damage done is increased by 15% for 8 sec after Luck of the Draw! activates.
- 4-Set: When you gain Luck of the Draw!, your next 2 casts of Blackout Kick deal 150% increased damage and incur a 2.0 sec reduced cooldown.
Opener
- We want to gain a good amount of Shuffle through Keg Smash and Blackout Kick while also getting our debuffs rolling. This results in a long opener weaving in a lot of different spells.
Priority List
Make sure to keep this list in mind, unless some bosses or scenarios require you to hold some abilities listed here
- Cast Blackout Kick on cooldown.
- If talented into Blackout Combo consume it with Tiger Palm directly after.
- Cast Keg Smash on cooldown especially if Flow of Battle (4-Set) is active.
- Cast Breath of Fire on cooldown.
- Cast Weapons of Order on cooldown.
- Cast Rising Sun Kick on cooldown.
- Cast Exploding Keg.
- Cast Tiger Palm.
- If talented, cast Chi Burst.
- If talented, cast Rushing Jade Wind.
- Use Touch of Death whenever possible towards the end of the fight.
Defensive Cooldowns
- Celestial Brew
- Provides big on-use absorb. This is your main defensive ability against tank hits.
- Purified Chi increases the absorb amount by up to 200%.
- Gains cooldown reduction from Keg Smash and Tiger Palm.
- Now has 2 charges with Master of Harmony's talent Endless Draught.
- Diffuse Magic
- Your best tool against big magical hits. It offers a 60% magical damage reduction for 6 seconds.
- This also self-dispels and, in certain cases, reflects the spell back to the caster.
- Dampen Harm
- Amazing tool for big hits and dots.
- Offers a 20% to 50% damage reduction based on the hits taken, that's why it's quite strong against a big hit and weaker on multiple smaller hits.
- Fortifying Brew
- Crazy long cooldown of 6 minutes that gets reduced by Keg Smash and Tiger Palm.
- Gives 20% max health and 20% damage reduction, which makes it your most well-rounded defensive.
- Used mainly against big hits and early on so the cooldown reduction can start working on getting it back.
- Invoke Niuzao, the Black Ox
- Used when your Stagger is particularly high since it suffers 40% of your Stagger damage instead of you.
- Zen Meditation
- With a 60% damage reduction, this is your best tool against 1-time big hits.
- The downside is that you can't move or use any ability without canceling the spell.
- Mainly used to soak a mechanic or tank a big dot while you are not getting actively hit.
Offensive Cooldowns
- Weapons of Order
- 10% increased Mastery and Keg Smash inflicts 8% increased damage taken for 10 seconds, stacking up to 4 times on the targets hit.
- Exploding Keg
- Causes melee attacks of targets hit to 100% miss you for 3 seconds.
- Throw a keg that amplifies all your damage with bonus fire damage. Pair with Spinning Crane Kick on AoE.
- Touch of Death
- Clears up to 200% Stagger when casted. Touch of Death is very good to cast on cooldown for both damage and defensive value.
Deep Dive
Stagger
Brewmaster Monks rely on their Stagger mechanic to passively reduce the damage they take which is an essential part of their damage mitigation.
Stagger Phases
Your Stagger is split up into 3 different phases.
- Light Stagger
- Total Staggered damage amount is equal to 1-29% of your maximum health.
- Moderate Stagger
- Total Staggered damage amount is equal to 30-59% of your maximum health.
- Heavy Stagger
- Total Staggered damage amount is equal to 60% or more of your maximum health.
Using Purifying Brew cleanses 50% of the staggered damage thus reducing your Stagger phase and serving as your main mitigation ability. Purifying Brew is best used right after receiving a lot of damage to cut the Stagger damage in half.
Managing Celestial Brew & Purifying Brew
Juggling Celestial Brew & Purifying Brew is your main task and gameplay when it comes to your survivability on Brewmaster Monk.
- Purifying Brew is your main tool to cleanse Stagger like described above.
- Important to note: Purifying Brew is not on the global cooldown, so it can be pressed while using any other ability.
- Celestial Brew is your defensive tool that is empowered by cleansing your Stagger.
Here are some tips and tricks on what to keep in mind when using them:
- Purifying Brew has a few rules you want to keep in mind when juggling your charges:
- Avoid having both charges ready, you are wasting both defensive value and cooldown reduction value from your abilities.
- Use a charge when your Purified Chi is about to expire you don't want to lose your absorb increase on Celestial Brew
- Make sure you always get full cooldown reduction on this from Keg Smash.
- General rule on when to use Purifying Brew the most efficient way:
- After a big hit so you get the most Stagger value cleansed when it is new and at the highest point.
- The other option is to almost fully cleanse yourself of any dangerous Stagger after big hits, this is achieved by getting a very big stagger and then using 2 charges back to back.
- Overall, if you follow a natural flow of gameplay, you should use it quite frequently just to avoid Heavy Stagger and not overcap charges.
- The biggest mistake you can make is to use all charges on cooldown and then end up with none when the Stagger becomes dangerous.
- Celestial Brew is more straightforward to use:
- It's your most frequent active defensive and should be used on most mechanics whenever possible.
- Try to not hold it for too long since you are wasting cooldown reduction, which results in more damage taken in the long run.
- However, you have to hold it for dangerous tank mechanics in certain scenarios, so keep that in mind.
Shuffle
Brewmaster Monks need Stagger to live any mechanic and what enables it to a large extent is Shuffle.
- Shuffle is passively generated by pressing Keg Smash, Spinning Crane Kick and Blackout Kick.
- If you don't stop pressing buttons, Shuffle should never drop and you don't need to pay any attention to it. But there are some scenarios where the buff might run out:
- When mechanics force you out of range and you are unable to reach the boss you might end up dropping it, resulting in a lot more damage taken so watch out for that!
- Starting combat with Keg Smash and running in fast can result in death. Since Shuffle is triggered by the damage of Keg Smash and not the cast, if you are faster than the keg flying, you might get hit without Shuffle up and you die.
Blackout Combo
- Blackout Combo provides you with a variety of options to empower your spells after using Blackout Kick, which happens very often so taking this talent makes it quite difficult to play well.
- Blackout Combo has a number of buffs it can provide but only 2 of them are really worth using:
- Tiger Palm, which gains 100% increased damage
- Breath of Fire, which gains 50% increased damage and 5% additional damage reduction
- The hard part of using Blackout Combo is that you always want to pair it with Tiger Palm. This is very easy to mess up since any other ability consumes Blackout Combo.
- Using the buff on Keg Smash to gain extra 2 seconds of brew cooldown reduction is not the worst but not worth it most of the time.
- Using the buff on Purifying Brew is almost entirely worthless.
- In order to avoid wasting your Blackout Combo, you need to fill the time until your next Tiger Palm with abilities that deal good damage but don’t consume the Blackout Combo, such as Rising Sun Kick, Rushing Jade Wind, Spinning Crane Kick (watch your energy!), and Chi Burst.
Understanding Mechanics
Rotational min-maxing is just one aspect of mastering a specialization, but there are numerous other key mechanics that influence your performance. Use the following guides to improve them.
Liberation of Undermine
The following tips are applicable to Mythic Bosses and how to survive those the best. The recommended builds in this section are going to help you survive each encounter but are not giving you the most damage output.
← Scroll for more Bosses →
Tank mechanics
- Tank Buster is the only tank mechanic of this fight
- This mechanic does physical damage, knocks the active tank back and leaves a physical bleed on them. On Heroic and Mythic difficulties it also leaves an Oil Slick.
- As the inactive tank, taunt when the cast succeeds and move the boss out of the Oil Slick.
Boss Tips and Tricks
- Position the boss in such a way that there are no Oil Slick pools between the boss and the abandoned Geargrinder bikes. Otherwise the launched bikes will get stunned in the pools, which will prevent them from removing Protective Plating.
Tank mechanics
- Flarendo will cast Eruption Stomp on the active tank.
- This is a big magic hit, so be ready with a big defensive such as Diffuse Magic or Fortifying Brew.
- Torq will cast Lightning Bash on the active tank.
- This is a big physical hit, defensives like Dampen Harm or Zen Meditation are very helpful.
- Every time Colossal Clash happens, swap sides and taunt swap the bosses with your co-tank.
Boss Tips and Tricks
- Make sure to help your group soak every Scrapbomb on Flarendo side.
- Look for opportunities to Ring of Peace away Voltaic Images away from boss and closer to the edge of the room on Torq side.
Tank mechanics
- Sonic Blast deals sonic damage in a frontal cone with every melee attack, and applies a stack of Tinnitus.
- Rotate your defensive cooldowns whenever you are tanking the boss and getting more than 5+ stacks.
- Keep an eye out for Tinnitus stacks on your co-tank. Try to keep them from going over 4 stacks, but do not taunt back before your own debuff fades.
- Never face the boss towards the raid so it does not cleave other players with the tank mechanic.
- Do not be in front of the boss when you are not actively tanking to not accidentally extend your stacks.
- Resonance forces you to always keep the boss at least 15 yards apart from Amplifiers. Any of them gaining too much additional power can lead to a raid wipe. This means you have to move the boss away from new spawned Amplifiers after each Amplification! cast.
Boss Tips and Tricks
- Try to move the boss close to Pyrotechnics after Sparkblast Ignition cast to allow an efficient cleave on them. However, keep an eye on nearby Amplifiers - its better to give up on good cleave than to give additional power to an Amplifier.
Tank mechanic
- This fight consists out of 3 tank mechanics.
- Demolish, Meltdown and Rolling Rubbish
- While Demolish and Meltdown are the two tank hits the boss does, Rolling Rubbish is the main mechanic of the fight, that the active tank is forced into when the boss starts casting Electromagnetic Sorting.
- The boss always does Demolish into Electromagnetic Sorting followed by Meltdown so make sure that the off-tank taunts the boss after the main tank has been hit by both Demolish and Rolling Rubbish.
- While affected by Rolling Rubbish make sure to roll over as many Garbage Dump as possible and then straight into the boss for maximum amount of damage.
Boss Tips and Tricks
- Make sure to rotate defensives on tank hits such as Diffuse Magic and Dampen Harm.
Tank mechanics
- Melee hits of Lockenstock apply a stack of Gravi-Gunk to the active tank. Which increases your damage taken and reduces your movement speed per stack.
- Use defensives at high stacks of this debuff.
- Do not get caught off guard by the movement speed slow from this mechanic.
- Pyro Party Pack is a raid-wide AOE that deals fall off damage.
- As the active tank - move away from the raid with this mechanic to minimize the incoming damage to the group.
- As inactive tank - taunt when the cast succeeds.
Boss Tips and Tricks
- Use Tiger's Lust or Roll whenever you have to run away from the group with Pyro Party Pack.
Tank mechanics
- The Big Hit
- The Big Hit is the main tank mechanic of the fight
- The ability does heavy physical damage and leaves a Shocking Field at your location shortly after dealing damage.
- Make sure to not stack any Shocking Field on top of each other, as they will jump out and cause more area denial.
- As the inactive tank, you can taunt at any point during the cast or after it is over as it does not change targets.
- Some of the Token combinations will spawn a Coil as a Fabulous Prize. Activating them will cause Explosive Shrapnel, knocking you back and clearing the 2 closest Shocking Field on top of having an extra effect based on the type of the coil:
- Coils always spawn at the position of an active tank, so be aware of your position when Fabulous Prize is dispensed. It is recommended to place them at the edges of the room to make it easier for the group to deal with the coil mechanics.
- Whenever Reward: Flame and Bomb or Reward: Shock and Bomb are triggered, make sure to help your raid with Leg Sweep and Ring of Peace.
- If you need to clean up the room from Shocking Field then try to prefer clicking the Coil that has spawned from Reward: Coin and Shock.
Boss Tips and Tricks
- Utilize Hasty Provocation to position the boss on top of new adds.
Tank mechanics
- This boss has two tank mechanics, Molten Gold Knuckles and Double Whammy Shot.
- Molten Gold Knuckles does high physical damage and low magic damage, it also knocks you back and applies Golden Drip.
- You will be affected with 30 stacks of Golden Drip to remove these, you simply just have to keep moving your character, Tiger's Lust is a helpful tool for this mechanic.
- Double Whammy Shot is targeted on a random player in the raid, as a tank you have to stand in between the boss and the targeted player and try to mitigate as much damage as possible when the shot goes off, use Dampen Harm or Zen Meditation on top of Celestial Brew for it.
Stat Priority
Understand your secondary stat priority and the tertiary stats needed for optimal performance during Raid boss fights as a Brewmaster Monk. For more detailed information, visit the Stats and Attributes guide.
Higher Item level items are better in most scenarios. For an accurate representation of what item to equip you should use Simcraft! A static "Stat Priority" is just a starting point and can easily shift depending on your individual gear.
All secondary stats are affected by diminishing returns. Click here to learn more!
Tertiary
- Avoidance - Great stat to reduce the damage intake of "Area of Effect" abilities.
- Leech - Provides additional healing through damage dealing.
- Speed - Niche tertiary that can be very useful and has been proven useful in the past. This makes managing certain mechanics a lot easier.
In general, Leech is really strong for tanks, especially in AoE scenarios it can be by far the best stat you can have.
Avoidance is great but most of the time tanks are not struggling to survive the typical Area of Effect abilities.
Gear
| Slot | Item | Location |
|---|---|---|
| Head | Ageless Serpent's Mane | The One-Armed Bandit / Catalyst |
| Neck | Flickering Glowtorc | Darkflame Cleft |
| Shoulder | Ageless Serpent's Shoulderpads | Rik Reverb / Catalyst |
| Cloak | Consecrated Cloak | Crafting |
| Chest | Ageless Serpent's Inked Coils | Sprocketmonger Lockenstock / Catalyst |
| Wrist | Rune-Branded Armbands | Crafting |
| Gloves | Enforcer's Sticky Fingers | Mug'zee, Heads of Security |
| Belt | Durable Information Securing Container | Overcharged Delves |
| Legs | Ageless Serpent's Leggings | Stix Bunkjunker / Catalyst |
| Boots | Ageless Serpent's Ankleweights | Catalyst |
| Ring 1 | Ritual Bone Band | Theater of Pain |
| Ring 2 | The Jastor Diamond | Chrome King Gallywix |
| Trinket 1 | Tome of Light's Devotion | Priory of Sacred Flame |
| Trinket 2 | Improvised Seaforium Pacemaker | Operation: Floodgate |
| 1-Hand Weapon | Capo's Molten Knuckles | Mug'zee, Heads of Security |
| 1-Hand Weapon | Gallywix's Iron Thumb | Chrome King Gallywix |
| 2-Hand Weapon | Giga Bank-Breaker | The One-Armed Bandit |
Below you are presented with a good list of farmable alternatives that are obtainable outside of WoW’s weekly lockout system. While replaced in time as you progress, these offer immediate character power.
| Slot | Item | Location |
|---|---|---|
| Head | Helm of the Righteous Crusade | Priory of Sacred Flame |
| Neck | Flickering Glowtorc | Darkflame Cleft |
| Shoulder | Mechanized Junkpads | Operation: Floodgate |
| Cloak | Candlebearer's Shroud | Darkflame Cleft |
| Chest | Jerkin of Awakened Stone | The Rookery |
| Wrist | Battle-Scarred Fisticuffs | Cinderbrew Meadery |
| Gloves | Self-Sanitizing Handwraps | Operation: Mechagon |
| Belt | Mad King's Sporran | Operation: Mechagon |
| Legs | Squallrider's Kilt | The Rookery |
| Boots | Machinist's Treasured Treads | Operation: Mechagon |
| Ring 1 | Ritual Bone Band | Theater of Pain |
| Ring 2 | Ring of Perpetual Conflict | Theater of Pain |
| Trinket 1 | Ringing Ritual Mud | Operation: Floodgate |
| Trinket 2 | Improvised Seaforium Pacemaker | Operation: Floodgate |
| 1-Hand Weapon | Starforged Seraph's Mace | Priory of Sacred Flame |
| 1-Hand Weapon | Starforged Seraph's Mace | Priory of Sacred Flame |
| Weapon | Gallytech Turbo-Tiller | Operation: Floodgate |
Trinkets
Below you can find active and passive alternatives to our recommended trinkets. Do note that the trinkets recommend above are for optimal damage, if you do not care about your damage and only want to survive I would recommend you to use Chromebustible Bomb Suit and Ringing Ritual Mud.
Active Trinket alternatives
- Chromebustible Bomb Suit
- Very strong 1.5 minute cooldown defensive trinket that gives a huge absorb and works great against any tank busters.
- Ringing Ritual Mud
- This trinkets cooldown is approximately 1.5 minute, it is a great alternative to Chromebustible Bomb Suit.
Passive Trinket alternatives
- Eye of Kezan
- Probably the best trinket for long fights and progression since it provides you a large amount of main stat the longer the fight goes, it is not recommend as BiS anymore since fights now are usually not long enough anymore to get full value out of this trinket.
- Cinderbrew Stein
- A passive trinket that provides primary stat for you and your raid members.
Embellishments
- 2x Elemental Focusing Lens
- Deals a decent amount of damage in Single-Target.
- The optimal slots to craft on are Wrists, Boots, Hands or Waist depending on your available gear.
or
- 2x Dawnthread Lining
- Provides you with more critical strike while above 80% health.
- On Wrists, Boots, Waist, Hands or Cloak depending on your available gear.
or
- Darkmoon Sigil: Symbiosis
- Passive Versatility with almost 100% uptime, the damage taken is very minimal.
- Has to be crafted on a weapon.
- Writhing Armor Banding
- Empowering your Darkmoon Sigil: Symbiosis.
- On Wrists, Boots, Waist, Hands or Cloak depending on your available gear.
or
- Binding of Binding
- If both tanks & all healers wear this ring then it provides a greater raid DPS increase but it is a DPS loss for yourself.
- Either 1x Elemental Focusing Lens or Dawnthread Lining or Darkmoon Sigil: Symbiosis on weapon.
Remaining Sparks
- Crafted items are 681 item level and regular items are 684 on max item level, therefore, it's a small loss to equip crafted items outside of your 2x Embellishments unless you don't have access to other high item level gear on that slot.
Simcraft
To find the best combination of gear available to you or identify the best possible upgrades, visit our Simcraft guide to learn how to utilize Simcraft easily and effectively.
Consumables
- Phials
- Flask of Tempered Versatility
- Food
- Feast of the Divine Day
- Feast of the Midnight Masquerade
- Combat Potion
- Tempered Potion
- Potion Bomb of Power -- group potion, this is a DPS loss for you.
- Health Potion
- Algari Healing Potion
- Weapon Stones
- Ironclaw Whetstone -- usable on Sword, Axe, Polearm.
- Ironclaw Weightstone -- usable on Mace, Staff and Fist Weapon.
- Augment Rune
- Crystallized Augment Rune
- Sockets
- Deadly Sapphire
- Culminating Blasphemite -- Unique, use one of each gem colour to enhance your Blasphemite.
- Deadly Onyx
- Versatile Ruby
Enchantments
| Head | Greater Rune of Echoing Void S.A.D. |
| Neck | Magnificent Jeweler's Setting 2x |
| Cloak | Enchant Cloak - Chant of Leeching Fangs |
| Chest | Enchant Chest - Crystalline Radiance |
| Wrist | Enchant Bracer - Chant of Armored Leech S.A.D. |
| Belt | S.A.D. |
| Legs | Stormbound Armor Kit |
| Boots | Enchant Boots - Defender's March |
| Ring 1 | Enchant Ring - Cursed Critical Strike Magnificent Jeweler's Setting 2x |
| Ring 2 | Enchant Ring - Cursed Critical Strike Magnificent Jeweler's Setting 2x |
| 2-Hand | Enchant Weapon - Authority of the Depths |
| 1-Hand 1 | Enchant Weapon - Authority of the Depths |
| 1-Hand 2 | Enchant Weapon - Authority of the Depths |
You buy S.A.D. from the Great Vault Vendor to add sockets to your Helm, Wrists and Belt.
Races
For min-maxing a Brewmaster Monk in Raids, different racial traits can provide a tremendous benefit to your characters. If this is not your top goal, picking a race that fits your style works just as well.
- Stoneform -- Dwarf
- Is very valuable because you can dispel yourself or remove dangerous bleed effects.
- On top of that using Stoneform gives you 10% physical DR which can be used as a small extra 8 second personal when tanking.
- Use-cases
- Perforating Wound on Mug'zee, Heads of Security
- Arcane Torrent -- Blood Elf
- Strong racial to dispel or purge enemies, the value is very limited but sometimes can come in handy.
- Rocket Jump -- Goblin
- Do a small jump in the direction your character is facing.
- While you're in the Rocket Jump animation you are placed on a global cooldown until your character lands.
- Spatial Rift -- Void Elf
- Spawn a shadow traveling into your facing direction, and activate again to teleport to the rift.
- Maximum range of 100 yards.
Recommendation
As a tank picking a racial for damage is most of the times such a small gain that it's not worth it. If you care about min-maxing your DPS go with the highest DPS racial.
That being said the recommended race for raid tanks is for sure Dwarf for the on-use physical damage reduction and the ability to self-dispel when needed. These features are insanely strong and should not be undervalued!
Macros
Discover recommended macros for Brewmaster Monk for Raids and watch a quick video guide on creating simple macros for your character.
Taunt Macro --- This macro either casts Provoke at your target or your mouseover (very handy to pick up mobs)
#showtooltip Provoke
/cast [@mouseover,exists,harm][@target,exists,harm] Provoke
Boss 1 Taunt --- Casts Provoke on Boss1
/cast [@boss1] ProvokeBoss 2 Taunt --- Casts Provoke on Boss2
/cast [@boss2] ProvokeTiger's Lust --- This macro either casts Tiger's Lust at your target or your mouseover
#showtooltip Tiger's Lust
/cast [@mouseover,exists,noharm][@target,exists,noharm] Tiger's Lust
Paralysis --- Casts Paralysis at your mouseover target
/show tooltip
/use [@mouseover] Paralysis
Mouseover Focus --- This macro sets your mouseover as your focus
/focus [@mouseover]Paralysis --- Casts Paralysis at your focus target
/show tooltip
/use [@focus] Paralysis
Focus Spear Hand Strike --- Casts Spear Hand Strike at your focus target
#showtooltip Spear Hand Strike
/cast [@focus,harm,nodead][] Spear Hand StrikeRing of Peace Cursor --- Casts Ring of Peace at your cursor position without confirmation.
/cast [@cursor] Ring of PeaceCancelaura BoP --- This cancelaura's Blessing of Protection on you, very useful to have when playing with a paladin.
/cancelaura Blessing of ProtectionAddons
Below, you see a screenshot of the author's User Interface for their Brewmaster Monk, outlining which addons are used and how they are utilized in Raids to make your life easier.
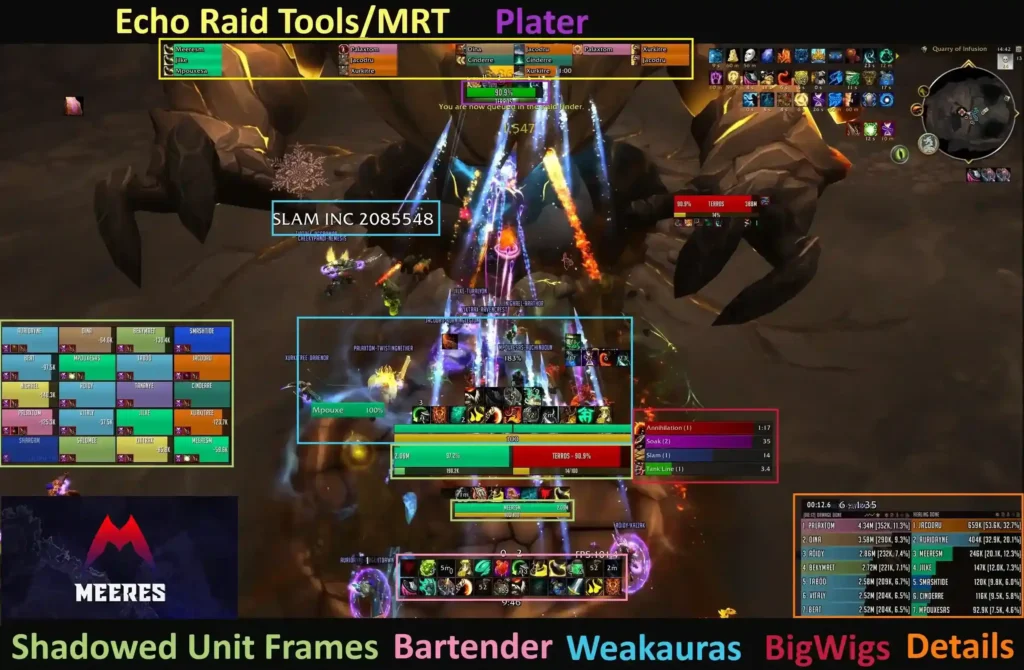
- Shadowed Unit Frames (SUF) -- Full User Interface replacement
- Addon to replace your Unitframes and other UI Elements with a more clean look. Takes quite some time to configure but there are plenty of pre-done profiles that you can easily import and check out.
- BigWigs -- Generic Boss Mod
- BigWigs is a boss encounter add-on. It consists of many individual encounter scripts, or boss modules; mini add-ons that are designed to trigger alert messages, timer bars, sounds, and so forth, for one specific raid encounter.
- Weakauras -- Jack of all trades
- WeakAuras is a powerful and flexible framework that allows the display of highly customizable graphics on World of Warcraft's user interface to indicate buffs, debuffs, and other relevant information. This addon was created to be a lightweight replacement for Power Auras but has since introduced more functionalities while remaining efficient and easy to use.
- Plater -- Advanced Nameplates
- Plater is a nameplate addon with an extraordinary amount of settings, out of the box debuff tracking, threat coloring, and support for scripting similar to WeakAuras and wago.io + the WeakAuras-Companion for Mod/Script/Profile updates.
- Details -- In-depth Damage Meter
- Most powerful, reliable, handsome, damage meter for World of Warcraft.
- MRT -- Notes, Raid cooldowns, and more
- Helpful addon for raiders, especially for raid leaders and officers.
- Echo Raid Tools -- Notes, Raid cooldowns, and more
- Echo Raid Tools is a World of Warcraft addon designed by Echo Esports to enhance raiding efficiency. It offers "Echo Approved" WeakAuras for each raid boss accessible through an in-game Dungeon Journal interface, allowing easy import and customization.
- Bartender -- Action Bar Changer
- Bartender4 is a comprehensive action bar replacement addon for World of Warcraft. It allows full customization of action bars, including scaling, alpha settings, and visibility based on macro conditions.
Stagger bar
Compact stagger bar weakaura.

Purified amount
Shows the amount of damage you purified.
Changes this Patch
Monk
- Paralysis now breaks based on a small damage threshold instead of any damage.
Brewmaster
- Purified Chi maximum stacks reduced to 6 (was 10) and now increases Celestial Brew’s absorb amount by 35% per stack (was 20%).
- Invoke Niuzao now absorbs 40% of Staggered damage while active (was 25%).
- Invoke Niuzao’s Stomp damage increased by 22%.
- All ability damage increased by 15%.
Monk
- Weapons of Order and Jadefire Stomp icons have been updated.
Shado-Pan
- Added an energy tracker aura. This aura shows the player how much energy they have spent towards their next set of Flurry Strikes.
- Flurry Charges are no longer cancelable and no longer have a duration.
- Flurry Strikes unleash energy trigger threshold is now 240 energy (was 300).
- Flurry Strike damage reduced by 8%.
- Flurry Strike Accumulator Threshold increased by 47%.
- Wisdom of the Wall bonus effects duration reduced to 16 seconds (was 20%).
- Against All Odds duration reduced to 5 seconds (was 6 seconds).
Monk
- Healing Elixir now heals for 10% of maximum health (was 15%).
- Yu’lon’s Grace grants an absorb equal to 1% of your maximum health (was 2%) every 3 seconds (was 2 seconds).
- Healing Winds restores 10% of maximum health (was 15%).
- Clash is now a 1 minute cooldown (was 45 seconds).
Brewmaster
- Mastery: Elusive Brawler chance to dodge reduced by 12%.
- All ability damage increased by 15%.
- Brewmaster’s Balance increases Armor by 45% (was 25%).
- Celestial Fortune heals you for 70% of the amount healed (was 80%).
- Amount of damage staggered increased by 5%.
- Percentage of magic damage staggered increased to 58% (was 45%).
- Dance of the Wind chance to dodge reduced to 5% (was 10%).
- Staggering Strikes healing reduced by 28%.
- Spirit of the Ox chance to summon a Healing Sphere reduced by 40%.
- Elixir of Determination healing reduced to 30% of recently purified damage (was 50%), or a minimum of 8% of your maximum health (was 20%).
- Celestial Brew healing reduced by 10%.
- Pretense of Instability grants 10% Dodge (was 15%).
- Dance of the Wind chance to dodge reduced to 5% (was 10%).
- Detox now costs 10 energy (was 20).
- Chi Wave damage reduced by 10%.
- Chi Burst damage reduced by 10%
Monk
- All talent trees have had many talents move locations or have had their pathing updated.
- New Talent: Crashing Momentum – Targets you Roll through are snared by 40% for 5 seconds.
- New Talent: Bounding Agility – Roll and Chi Torpedo travel a small distance further.
- New Talent: Wind's Reach – The range of Disable is increased by 5 yards. The duration of Crashing Momentum is increased by 3 seconds and its snare now reduces movement speed by an additional 20%.
- New Talent: Ancient Arts – Reduces the cooldown of Paralysis by 8/15 seconds and the cooldown of Leg Sweep by 5/10 seconds.
- New Talent: Jade Walk – While out of combat, your movement speed is increased by 15%.
- New Talent: Pressure Points – Paralysis now removes all Enrage effects from its target.
- New Talent: Energy Transfer – Successfully interrupting an enemy reduces the cooldown of Paralysis and Roll by 5 seconds.
- New Talent: Quick Footed – The duration of snare effects on you is reduced by 20%.
- New Talent: Spirit's Essence: Transcendence – Transfer snares targets within 10 yards by 70% for 4 seconds when cast.
- New Talent: Peace and Prosperity – Reduces the cooldown of Ring of Peace by 5 seconds and Song of Chi-Ji's cast time is reduced by 0.5 seconds.
- New Talent: Swift Art – Roll removes a snare effect once every 30 seconds.
- New Talent: Celestial Determination – While your celestial is active, you cannot be slowed below 90% normal movement speed.
- New Talent: Martial Instincts – Increases your Physical damage done by 2/4% and Avoidance increased by 2/4%.
- New Talent: Healing Winds: Transcendence – Transfer immediately heals you for 15% of your maximum health.
- New Talent: Chi Proficiency – Magical damage done increased by 2/4% and healing done increased by 2/4%.
- New Talent: Lighter Than Air – Roll causes you to become lighter than air, allowing you to double jump to dash forward a short distance once within 5 seconds.
- New Talent: Flow of Chi – You gain a bonus effect based on your current health. Above 90% health: Movement speed increased by 5%. This bonus stacks with similar effects. Between 90% and 35% health: Damage taken reduced by 5%. Below 35% health: Healing received increased by 10%.
- New Talent: Rushing Reflexes – Your heightened reflexes allow you to react swiftly to the presence of enemies, causing you to quickly lunge to the nearest enemy within 10 yards after you Roll.
- New Talent: Transcendence: Linked Spirits – Transcendence now tethers your spirit onto an ally for 1 hour. Use Transcendence: Transfer to teleport to your ally's location.
- Tiger Tail Sweep has been redesigned – Increases the range of Leg Sweep by 4 yards. Now a 1-point talent.
- Elusive Mists has been redesigned – Reduces all damage taken by you and your target while channeling Soothing Mists by 6%. Now a 1-point talent.
- Chi Wave has been redesigned – Every 15 seconds, your next Rising Sun Kick or Vivify releases a wave of Chi energy that flows through friends and foes, dealing Nature damage or healing. Bounces up to 7 times to targets within 25 yards.
- Summon White Tiger Statue has been redesigned – Invoking Xuen, the White Tiger also spawns a White Tiger Statue at your location that pulses damage to all enemies ever 2 seconds for 10 seconds.
- Ironshell Brew has been redesigned – Increases your maximum health by an additional 10% and your damage taken is reduced by an additional 10% while Fortifying Brew is active.
- Escape from Reality has been redesigned – After you use Transcendence: Transfer, you can use Transcendence: Transfer again within 10 seconds, ignoring its cooldown.
- Fatal Touch has been redesigned – Touch of Death increases your damage by 5% for 30 seconds after being cast and its cooldown is reduced by 90 seconds. Now a 1-point talent.
- Improved Roll is now learned at level 14 (was a talent).
- Clash has moved to the Class tree (was Brewmaster).
- Fortifying Brew cooldown is now 2 minutes for Mistweaver and Windwalker.
- Vivacious Vivification now additionally increases the healing of your next Vivify.
- The following talents are now 1 point:
- Save Them All
- Bounce Back
- Resonant Fists
- Grace of the Crane
- Fast Feet
- Windwalking
- The following talents have been removed:
- Improved Roll
- Improved Vivify
- Ferocity of Xuen
- Hasty Provocation
- Eye of the Tiger
- Close to Heart
- Generous Pour
- Resonant Fists
- Dampen Harm (removed for Windwalker and Mistweaver)
- Summon Black Ox Statue (removed for Windwalker and Mistweaver)
- Summon White Tiger Statue (removed for Brewmaster and Windwalker)
- Summon Jade Serpent Statue (removed for Brewmaster and Windwalker)
Brewmaster
- New Talent: Elixir of Determination – When you fall below 40% health, you gain an absorb for 50% of your recently Purified damage, or a minimum of 20% of your maximum health. Cannot occur more than once every 15 seconds.
- New Talent: Strike At Dawn – Rising Sun Kick grants a stack of Elusive Brawler.
- New Talent: One With the Wind – You have a 10% chance to not reset your Elusive Brawler stacks on a successful dodge.
- New Talent: August Blessing – When you would be healed above maximum health, you instead convert an amount equal to 40% of your critical strike chance to a heal over time effect.
- New Talent: Ox Stance – Casting Purifying Brew grants charges/stacks of Ox Stance, based on Stagger level. When you take damage that is greater than 60% of your current health, a charge is consumed to increase the amount you Stagger.
- New Talent: Black Ox Adept – Rising Sun Kick grants a stack of Ox Stance.
- New Talent: Heightened Guard – Ox Stance will now trigger when an attack is larger than 40% of your current health.
- Anvil & Stave has been updated – Each time you dodge or an enemy misses, you reduce the remaining cooldown on your Brews by 0.5/1 second. Effect reduced for each recent melee attacker. Was 3 second internal cooldown.
- Improved Invoke Niuzao, the Black Ox has been updated – While Niuzao is active, Purifying Brew increases the damage of Niuzao's next Stomp, based on Stagger level. Damage is split between all enemies (was when purifying Stagger).
- Celestial Brew has an additional effect – Purifying Stagger damage increases absorption by up to 200%.
- Improved Purifying Brew is now learned at level 47 (was a talent).
- Elusive Footwork is now a 1-point talent.
- The following talents have been removed:
- Healing Elixir
- Clash (moved to class tree)
- Graceful Exit
- Bonedust Brew
- Bountiful Brew
- Attenuation
- Fundamental Observation
FAQ
A: There is a high chance Shuffle ran out and you lost the ability to use Stagger properly.
Credits
Written By: Skövte
Reviewed By: Wolfdisco