Assassination Rogue Raid Guide
Welcome to the Assassination Rogue Raid guide for the World of Warcraft patch 11.1.7! This guide covers everything you need to know to understand your character! Are you starting out and leveling up from 70? Check out the leveling guide!
Overview
Hero Talents
- Despite some bugs, Deathstalker is currently tuned ahead of Fatebound and is the go-to Hero Talent tree for the raid.
- Your Ambush marks your target with 3 stacks of Deathstalker's Mark.
- You can only have 1 Deathstalker's Mark active.
- Consume a stack of Deathstalker's Mark by using a 5 Combo Point or more finisher.
- You can only apply the Deathstalker's Mark with Ambush from Stealth or Subterfuge. Blindside does not work.
- After consuming the last stack of Deathstalker's Mark, or if a mob dies while the Deathstalker's Mark is active, you gain Darkest Night..
- When Darkest Night is up, always make sure your next finisher is an Envenom with 7 Combo Points, unless you are playing Supercharger, which case finish at:
- 4 Combo Points or more with Supercharger active.
- When you consume Darkest Night, you apply Deathstalker's Mark on the mob you have targetted.
- When Darkest Night is up, always make sure your next finisher is an Envenom with 7 Combo Points, unless you are playing Supercharger, which case finish at:
Additionally, there are a few more capstones in the tree that are important.
- Clear the Witnesses
- You want to use Fan of Knives even in your single target when you have the buff up.
- Fatal Intent
- This talent is pretty interesting but undertuned currently. Very similar to Dribbling Inkpod trinket from the past. Works in combination with Shiv.
- Bait and Switch
- A defensive node that makes Evasion even stronger in an M+ setting. Ethereal Cloak is also interesting but much more fight specific.
- Much like in the Deathstalker tree, every 5 Combo Point or more finisher that you use has a chance to flip a coin.
- Landing on Fatebound Coin (Heads) increases your damage by 10%. Additional flips landing on Fatebound Coin (Heads) increase damage by 2%. Stacking
- Landing on Fatebound Coin (Tails) does Cosmic damage. Additional flips increase Fatebound Coin (Tails) damage by 10%. Stacking
- Fateful Ending
- Very strong stat buff that you want to get as soon as possible in a fight.
Neither of these flips offer much in terms of gameplay, and you could do without tracking any of them, but there is some minmaxing you can do with the talents in the Fatebound tree.
- Inevitability.
- This could in theory make you hit your Fateful Ending earlier by using Cold Blood when you are at 5 stacks of Fatebound Coin (Heads) or Fatebound Coin (Tails). More on this in the Deep Dive section.
- Double Jeopardy.
- Rolling double of the same coin when you break Stealth or Vanish. Can be used in combination with Inevitability.
- Edge Case.
- Rolling both flips for the next finisher can be pretty useful to get closer to your Fateful Ending capstone.
- Fate Intertwined
- This is a pretty bad talent if the adds are not important damage, but decent otherwise.
- Delivered Doom
- Similar to Fate Intertwined, Fatebound Coin (Tails) does less damage if there are mobs nearby, or 30% more with no mobs, if you prefer to read it that way.
Talents
For simple cleave bosses, swap Internal Bleeding for Caustic Spatter.
Gameplay Altering Talents
Discover all talents that significantly alter your gameplay within the Spec and Class Talent trees. This section gives a concise overview of these talents and their applications but for a more detailed look check out the Rotation and Deep Dive sections below.
Spec Tree
- Zoldyck Recipe
- This is your execute talent. Ideally in a fight, you always want to use at least one set of cooldowns with it. If you can only get 1 more use of Deathmark for the remainder of the fight, it is advised that you save it for when the boss hits 35% or below.
- Kingsbane
- Your shorter cooldown burst ability. This is particularly strong when combined with Deathmark every two minutes.
- Deathmark
- Your big cooldown. Doubles your Garrote, Rupture, and Lethal Poisons on your target.
- Rapid Injection
- A new talent with The War Within, making you always want to Envenom before the buff it puts up expires. Especially strong with Darkest Night.
- Dragon-Tempered Blades
- Enables the use of an additional lethal poison.
- Blindside
- A proc that can save you a lot of Energy as it makes your next Ambush free. It is especially good in execute range as it procs more often.
- Seal Fate
- Helps with building up your Combo Points for a finisher which is another reason why Crit is a good stat for you.
Class Tree
- Thistle Tea
- Enhances your Mastery while boosting your Energy which is crucial during your cooldowns.
- Supercharger
- The new talent replacing Echoing Reprimand. Adds a bit of flavor to Shiv but doesn't significantly change your playstyle.
- If you are trying to hit Darkest Night, finish at:
- 4 Combo Points or more with Supercharger active.
- With any amount of Deathstalker's Mark, finish at 2 Combo Points or more.
- If you are trying to hit Darkest Night, finish at:
- The new talent replacing Echoing Reprimand. Adds a bit of flavor to Shiv but doesn't significantly change your playstyle.
- Atrophic Poison / Numbing Poison
- In a Raid environment, Atrophic Poison is always your primary choice unless you have more than 1 Rogue. The damage reduction it provides, coupled with Master Poisoner is simply too strong. On the other hand, Numbing Poison stacks with similar abilities from other classes, making it an inferior choice.
- Cheat Death / Elusiveness
- For Raid, Cheat Death is usually recommended unless specified otherwise.
Hero Talents
- Lingering Darkness
- Significantly better than Symbolic Victory.
- Shadewalker
- This is very useful when you have to move around a lot. Meanwhile the alternative, Shroud of Night, doesn't offer much, especially in a raid enviroment.
- Bait and Switch
- A very nice addition to our kit that makes Evasion useful in a raid enviroment.
- Ethereal Cloak can also be decent if you need a longer Cloak of Shadows for a specific mechanic.
Poisons
- This build uses the following Poisons:
- Deadly Poison
- Amplifying Poison
- Atrophic Poison -or- Numbing Poison.
When to use this Spec
Use this spec if you're fighting 3 or more enemies for an extended period of the fight.
Talent Adjustments
Listing all the changes within the Class and Spec tree compared to the default build.
Spec Tree
- Added
- Thrown Precision
- Caustic Spatter
- Crimson Tempest
- Removed
- Internal Bleeding
- Improved Garrote
- Master Assassin
When to use this Spec
This spec is currently tuned a bit lower than Deathstalker and is thus not recommended.
Talent Adjustments
Listing all the changes within the Class and Spec tree compared to the default build.
Spec Tree
- Added
- Master Assassin
- Removed
Class Tree
- Added
- Cold Blood
- Great due to Inevitability.
- Cold Blood
- Removed
- Supercharger
Hero Talents
- Added
- Death's Arrival
- Tempted Fate
- Inevitability
Rotation
Tier Set
- 2-Set: Your spells and abilities have a chance to activate a Winning Streak! increasing the damage of your Envenom, Rupture, and Crimson Tempest by 3% stacking up to 10 times. Envenom, Rupture, and Crimson Tempest have a 15% chance to remove Winning Streak!
- 4-Set: When you would lose Winning Streak!, you have a chance to instead gain maximum stacks of Winning Streak! for 4s. These cannot be removed and have 50% additional effect while immune to removal.
Single-Target
Opener
- Your goal is to keep Envenom and Shiv up for the entire duration of your cooldowns. Below, you see an example of how your opener looks when using the recommended Single Target talent spec
- If you are playing Treacherous Transmitter, try to fit it in a few globals before your Deathmark, and depending on what you got, pick up the buff right after your Deathmark, around the time when you apply Shiv or Kingsbane.
- If you play an on use trinket such as House of Cards, simply use it after your Shiv.
Priority List
This is a general priority you aim to maintain throughout the fight.
- Ambush first global.
- Keep up Rupture and Garrote throughout the fight.
- Do not overwrite your Improved Garrote and instead apply Garrote as soon as the buffed one expires.
- Always Envenom at 7 Combo Points with Darkest Night up.
- If Supercharger is up, Finish at 4 or more Combo Points.
- Without Darkest Night and with Supercharger up, finish at 2 Combo Points or more.
- Use Shiv during your Deathmark and Kingsbane combination.
- After Deathmark expires, and during your Lingering Darkness, use 1 charge of Shiv.
- On your non Deathmark Kingsbane, use Shiv on the last 7 seconds of the debuff.
- Be ready to use your Vanish to apply Garrote, Deathmark and Kingsbane as soon as they come off cooldown, start preparing for them once they have approximately 8 seconds remaining on their cooldown.
- You can also start your cooldowns without an Improved Garrote, and instead vanish at the last 6~ seconds of your Kingsbane to apply it.
- Press Mutilate if not at 5 Combo Points without Supercharger.
- Press Fan of Knives with Clear the Witnesses buff.
Opener
- Your goal is to keep Envenom and Shiv up for the entire duration of your cooldowns. Below, you see an example of how your opener looks when using the recommended Single Target talent spec.
- This is one variation of the Fatebound opener, more on this under the Deep Dive section.
- Refer to the Deep Dive section below on how to maximize your chances of getting Lucky Coin in your opener.
- If you are playing Treacherous Transmitter, try to fit it in a few globals before your Deathmark, and depending on what you got, pick up the buff right after your Deathmark, around the time when you apply Shiv or Kingsbane.
- If you play an on use trinket such as House of Cards, simply use it after your Shiv.
Priority List
This is a general priority you aim to maintain throughout the fight.
- Keep up Rupture and Garrote throughout the fight.
- Do not overwrite your Improved Garrote and instead apply Garrote as soon as the buffed one expires.
- Use Cold Blood on Cooldown if talented outside of your opener.
- Only use Shiv during your Kingsbane.
- Be ready to use your Vanish to apply Garrote, Deathmark and Kingsbane as soon as they come off cooldown, start preparing for them once they have approximately 8 seconds remaining on their cooldown.
- You can also start your cooldowns without an Improved Garrote, and instead vanish at the last 6~ seconds of your Kingsbane to apply it.
- Press Mutilate if not at 5 Combo Points without Supercharger.
Multi-Target
On Multi Target fights, referring to ones where you get adds spawning throughout the fights occasionally, your rotation and build remains largely unchanged. The only thing to keep in mind is Caustic Spatter, and, in some cases, Crimson Tempest.
- How to utilize Caustic Spatter:
- Caustic Spatter cleaves from your target, unlike Blade Flurry.
- Always keep Rupture up on your main target. If you have to swap, ideally you already have a Rupture running on your next target, and then your first global should be Mutilate on the new mob to proc Caustic Spatter.
- Keep track of your Caustic Spatter debuff on your target. Refresh it with Mutilate before it runs out.
- Deathmark and Kingsbane augment your Caustic Spatter damage. Always use them on a mob that survives for the full duration.
Opener
- If you are playing Treacherous Transmitter, try to fit it in a few globals before your Deathmark, and depending on what you got, pick up the buff right after yourDeathmark, around the time when you apply Shiv or Kingsbane.
- If you play an on use trinket such as House of Cards, simply use it after your Shiv..
Multi-Target Priority List
- Ambush first global.
- Keep up Rupture and Garrote throughout the fight.
- Do not overwrite your Improved Garrote and instead apply Garrote as soon as the buffed one expires.
- Always Envenom at 7 Combo Points with Darkest Night up.
- If Supercharger is up, Finish at 4 or more Combo Points.
- Without Darkest Night and with Supercharger up, finish at 2 Combo Points or more.
- Use Shiv during your Deathmark and Kingsbane combination.
- After Deathmark expires, and during your Lingering Darkness, use 1 charge of Shiv.
- On your non Deathmark Kingsbane, use Shiv on the last 7 seconds of the debuff.
- Be ready to use your Vanish to apply Garrote, Deathmark and Kingsbane as soon as they come off cooldown, start preparing for them once they have approximately 8 seconds remaining on their cooldown.
- You can also start your cooldowns without an Improved Garrote, and instead vanish at the last 6~ seconds of your Kingsbane to apply it.
- Press Mutilate if not at 5 Combo Points without Supercharger.
- Press Fan of Knives with Clear the Witnesses buff.
On Multi Target fights, referring to ones where you get adds spawning throughout the fights occasionally, your rotation and build remains largely unchanged. The only thing to keep in mind is Caustic Spatter, and, in some cases, Crimson Tempest.
- How to utilize Caustic Spatter:
- Caustic Spatter cleaves from your target, unlike Blade Flurry.
- Always keep Rupture up on your main target. If you have to swap, your first global should be Rupture on the new mob, then Mutilate right after to proc Caustic Spatter.
- Keep track of your Caustic Spatter debuff on your target. Refresh it with Mutilate before it runs out.
- Deathmark and Kingsbane augment your Caustic Spatter damage. Always use them on a mob that survives for the full duration.
Opener
- Refer to the Deep Dive section below on how to maximize your chances of getting Lucky Coin in your opener.
- If you are playing Treacherous Transmitter, try to fit it in a few globals before your Deathmark, and depending on what you got, pick up the buff right after your Deathmark, around the time when you apply Shiv or Kingsbane.
- If you play an on use trinket such as House of Cards, simply use it after your Shiv..
Priority List
This is a general priority you aim to maintain throughout the fight.
- Keep up Rupture and Garrote throughout the fight.
- Do not overwrite your Improved Garrote and instead apply Garrote as soon as the buffed one expires.
- Use Cold Blood on Cooldown if talented outside of your opener.
- Only use Shiv during your Kingsbane.
- Be ready to use your Vanish to apply Garrote, Deathmark and Kingsbane as soon as they come off cooldown, start preparing for them once they have approximately 8 seconds remaining on their cooldown.
- You can also start your cooldowns without an Improved Garrote, and instead vanish at the last 6~ seconds of your Kingsbane to apply it.
- Press Mutilate if not at 5 Combo Points without Supercharger.
AoE
Opener
- In your opener, your goal is to DoT up every mob with your Rupture and Garrote for the duration of your Indiscriminate Carnage, and then set up a Crimson Tempest that ideally hits every target, before going into a Mutilate to proc your Caustic Spatter and start your normal opener.
- Make sure your main target gets a 22s+ Garrote either by pressing it twice on your main target or by cleaving.
- If you are playing Treacherous Transmitter, try to fit it in a few globals before your Deathmark, and depending on what you got, pick up the buff right after your Deathmark, around the time when you apply Shiv or Kingsbane.
- If you play an on use trinket such as House of Cards, simply use it after your Shiv.
Priority List
- Ambush first global.
- Spread Garrote and Rupture during your Indiscriminate Carnage window.
- Crimson Tempest on 2 or more targets if talented.
- Keep up Rupture and Garrote throughout the fight on all enemies that will live its duration. Rupture has priority, Garrote a bit less so on nearby targets unless spread by Indiscriminate Carnage.
- Do not overwrite your Improved Garrote and instead apply Garrote as soon as the buffed one expires.
- Always Envenom at 7 Combo Points with Darkest Night up.
- If Supercharger is up, Finish at 4 or more Combo Points.
- Without Darkest Night and with Supercharger up, finish at 2 Combo Points or more.
- Use Shiv during your Deathmark and Kingsbane combination.
- After Deathmark expires, and during your Lingering Darkness, use 1 charge of Shiv.
- On your non Deathmark Kingsbane, use Shiv on the last 7 seconds of the debuff.
- Be ready to use your Vanish to apply Garrote, Deathmark and Kingsbane as soon as they come off cooldown, start preparing for them once they have approximately 8 seconds remaining on their cooldown.
- You can also start your cooldowns without an Improved Garrote, and instead vanish at the last 6~ seconds of your Kingsbane to apply it.
- Press Fan of Knives at 3 Targets+ if not at 5 or more Combo Points.
- Press Mutilate at less than 3 targets and less than 5 Combo Points or to apply Caustic Spatter.
Opener
- In your opener, your goal is to DoT up every mob with your Rupture and Garrote for the duration of your Indiscriminate Carnage, and then set up a Crimson Tempest that ideally hits every target, before going into a Mutilate to proc your Caustic Spatter and start your normal opener.
- Make sure your main target gets a 22s+ Garrote either by pressing it twice on your main target or by cleaving.
- If you are playing Treacherous Transmitter, try to fit it in a few globals before your Deathmark, and depending on what you got, pick up the buff right after your Deathmark, around the time when you apply Shiv or Kingsbane.
- If you play an on use trinket such as House of Cards, simply use it after your Shiv..
Priority List
- Spread Garrote and Rupture during your Indiscriminate Carnage window.
- Crimson Tempest if talented.
- Keep up Rupture and Garrote throughout the fight on all enemies that will live its duration. Rupture has priority, Garrote a bit less so on nearby targets unless spread by Indiscriminate Carnage.
- Do not overwrite your Improved Garrote and instead apply Garrote as soon as the buffed one expires.
- Only use Shiv during your Kingsbane.
- Be ready to use your Vanishto apply Garrote, Deathmark and Kingsbane as soon as they come off cooldown, start preparing for them once they have approximately 8 seconds remaining on their cooldown. Make sure to dot every mob nearby before going into your cooldowns.
- Press Fan of Knives at 3 Targets+ if not at 5 or more Combo Points.
- Press Mutilate at less than 3 targets and less than 5 Combo Points or to apply Caustic Spatter.
Deep Dive
Min maxing Your Envenom Uptime
- With the addition of Twist the Knife into our toolkit, pooling energy is not as important as it once was. However, you still still run into low energy points during a fight, and in that case you want to pool a bit in order to have at least 1 Envenom up the whole time, which should, in most cases, be managable.
- During cases of high energy, such as during cooldowns, you can use Envenom as soon as it hits pandemic. The pandemic timers for 1 Envenom are as such:
- 5 Combo Points: 1.5s
- 6: 1.8s
- 7: 2.1s
When to Refresh Your Garrote and Rupture
- With Shadow Dance removed from Assassination Rogues, you are no longer able to snapshot your bleeds, with the exception of Garrote with Improved Garrote. Because of this, you need to follow a few rules when refreshing Garrote.
- If your current Garrote is buffed with Improved Garrote, do not overwrite it and leave it to expire before applying it again.
- If your current Garrote is not buffed with Improved Garrote, you do not have cooldowns running, and it has less than 5.2s left on it, refresh it.
- With Rupture being a Combo Point based finisher, it uses a flexible pandemic. This means that regardless of how many Combo Points the current Rupture on your target was used with, the pandemic is calculated with the Combo Points of the new cast of Rupture. The list below are the rules to follow for optimal refreshing:
- If you currently have 5 Combo Points, you can safely refresh your Rupture at 7.2s or less.
- If you currently have 6 Combo Points, you can safely refresh your Rupture at 8.4s or less.
- 1: 2.4s
- 2: 3.6s
- 3: 4.8s
- 4: 6s
- 7: 9.6s
- 8: 10.8s
- 9: 12s
- 10: 13.2s
- As Deathstalker, because of Corrupt the Blood, your Rupture has 3 extra seconds, meaning the Pandemics for the relevant Combo Points are such:
- 4: 6.9s
- 5: 8.1s
- 6: 9.3s
- 7: 10.5s
- 8: 11.7s
- 9: 12.9s
- 10: 14.1s
Maximizing Your Deathmark and Kingsbane window.
- Envenom needs to have 100% uptime during your cooldowns and the same goes for Shiv. It is important that you do not drop Shiv at all, with the last ticks of Kingsbane being the most important.
- Use 2 charges of Thistle Tea when both Kingsbane and Deathmark are up, with your 1 minute Kingsbane window getting only one use of Thistle Tea at less than 6 seconds remaining on the duration of Kingsbane.
- If you have Master Assassin talented, use your Vanish on the last 6 seconds of Kingsbane during your opener, but make sure that your Kingsbane has less than 6 seconds remaining before casting.
Outside of your Opener, your 2 minute cooldown usage is very similar, this is the most important rule to follow when setting up for Deathmark:
- Always refresh your bleeds before using Deathmark if they have 18 seconds or less at the moment that you press it. In particular:
- Refresh your Rupture at 6+ Combo Points.
- Mutilate to 6 Combo Points then Envenom before pressing your Deathmark.
Below is an example of using your Deathmark correctly in the middle of an encounter in Raids.
- This is not a fixed rotation; This is just one example of how to play during your Deathmark window. Blindside procs and critical hits can potentially alter the ability usage.
Maximizing your chances of hitting your Fateful Ending Capstone with Cold Blood.
Fateful Ending is a pretty big DPS increase, and trying to get it during your opener is optimal. However, all you can do is maximize your chances, you can still end up not hitting it.
Generally, your Fatebound opener looks like this. To clarify, Fatebound Coin (Tails) could be Fatebound Coin (Heads) too with the same outcome, and vice versa.
To explain what is happening a bit further
- You gain 2 stacks with your first Rupture because of Double Jeopardy.
- Your first Envenom in this case is hitting 3 stacks of Fatebound Coin (Tails).
- After using your Deathmark, Edge Case will give your next finisher a guarantee of rolling both stacks
- Using your Vanish before your first Envenom after pressing Deathmark guaranteees a double stack roll with Double Jeopardy on the first Edge Case proc. So in this specific case, you will get:
- The first finisher after your Deathmark will give you 5 Fatebound Coin (Tails), and 2 Fatebound Coin (Heads).
- On the second finisher you are going to randomly roll one one of the two. This is the part where you might lose your chance on getting Lucky Coin. In this specific case, you get to keep 6 stacks of Fatebound Coin (Tails).
- After using your Edge Case finishers, you press Cold Blood, and due to Inevitability, you guarantee 7 stacks and Lucky Coin for the remainder of the fight.
- What happens if you first Envenom does not roll into a 3 stack, and instead you get 1 stack.
- This the worse case scenario
- Your first Envenom drops you 2 stacks of Fatebound Coin (Tails) into an 1 stack of Fatebound Coin (Heads).
- Your Edge Case window starts with 1 stack
- In your first Envenom you get 3 stacks of Fatebound Coin (Heads) and 2 of Fatebound Coin (Tails) due to Double Jeopardy.
- On your second Envenom you get unlucky again and instead of rolling Fatebound Coin (Heads) and hit 4 stacks, you roll Fatebound Coin (Tails) and end up with 3 stacks before your Inevitability window.
- At that point, you press your Cold Blood as always and end up at 5 stacks of Fatebound Coin (Tails). You are not going to get your Lucky Coin during your Kingsbane, and unless Mean Streak works in your favor and you roll 2 Envenom back to back into 7 stacks of Fatebound Coin (Tails), you won't get a much better chance at rolling it either.
The opposite of that would be getting to keep your Fatebound Coin (Heads) after your second Envenom in your Edge Case window, as such:
- At that point, your rolls are going to look like this.
- In this case, you are simply 1 Envenom away from your Lucky Coin.
- In short, getting to keep your stacks in your second Envenom of your Edge Case is crucial to maximizing your chances at getting Lucky Coin in your opener.
There are obviously more variations of this, it's merely intended for you to understand the mechanic.
Understanding Mechanics
Rotational min-maxing is just one aspect of mastering a specialization, but there are numerous other key mechanics that influence your performance. Use the following guides to improve them.
Liberation of Undermine
← Scroll for more Bosses →
Offensive Cooldown Usage
- Tune-Up timing depends on when you remove all the Protective Plating.
Boss Tips
- Use your Feint when you get targeted by Incendiary Fire, or Cloak of Shadows if you drop too low.
- When you don't have cooldowns, feel free to jump into the bikes and crash on the boss.
- Use your Kick on Pit Mechanics casting Repair.
- Try to always sync up your cooldowns with Tune-Up.
Offensive Cooldown Usage
Boss Tips
- You can use your Cloak of Shadows on Scrapbomb explosion or simply Feint it.
- Use your Shadowstep on friendly targets to move around the platform quickly, especially if you are targetted by the beam and you need to get into the bomb soak quickly. Or similarly when you swap bosses in the intermission.
Offensive Cooldown Usage
Boss Tips
- Cloak of Shadows can save you in the intermission if you are out of position. Alternatively, Shadowstep on friendly targets is very useful too.
- Feint works on most types of damage on this fight.
Offensive Cooldown Usage
Boss Tips
- Try to always look at the intermission timer and have your Sprint and Shadowstep ready. Use Shadowstep on the boss to stay on him the whole time.
- If you are soaking a mine, always use Feint beforehand.
Boss Tips
- Cloak of Shadows can save you from The Recycler if the cast goes through.
- Use your Kick on the Scrapmaster when he casts Scrap Rockets.
- Use your Feint when you get targetted by Incinerator.
Offensive Cooldown Usage
Boss Tips
- Make sure to position yourself next to the Pay-Line to gain High Roller!, this is especially important during your cooldowns.
Boss Tips
- You can use Evasion to walk through the Physical side of the Bulletstorm.
- Use Feint every time you swap sides.
- Make sure to save your cooldowns if you are going into a Earthshaker Gaol cave.
Boss Tips
- Use your Feint on the group soak in p1 if you are playing Heroic, or on the group soak in p2 if you are playing Mythic.
- You can Cloak of Shadows the Suppression cast in order to stay in.
- Spread your bleeds on the adds in p1, if you need to swap to them, make sure to have Darkest Night running before swapping from the boss.
Stat Priority
Understand your secondary stat priority and the tertiary stats needed for optimal performance during Raid boss fights as a Assassination Rogue. For more detailed information, visit the Stats and Attributes guide.
Higher Item level items are better in most scenarios. For an accurate representation of what item to equip you should use Simcraft! A static "Stat Priority" is just a starting point and can easily shift depending on your individual gear.
- All secondary stats are affected by diminishing returns. Click here to learn more!
Tertiary
- Avoidance - Great stat to reduce the damage intake of "Area of Effect" abilities.
- Leech - Provides additional healing through damage dealing.
- Speed - Niche tertiary that can be very useful and has been proven useful in the past. Makes playing certain mechanics a lot easier.
Gear
| Slot | Item | Location |
|---|---|---|
| Head | Darkfuse Racketeer's Tricorne | Gallywix |
| Neck | Gobfather's Gifted Bling | Mug'Zee |
| Shoulder | Spectral Gambler's Bladed Mantle | Rik Reverb / Catalyst |
| Cloak | Test Pilot's Go-Pack | Vexie and the Geargrinders |
| Chest | Spectral Gambler's Vest | Sprocketmonger Lockenstock / Catalyst |
| Wrist | Rune-Branded Armbands | Crafting |
| Gloves | Spectral Gambler's Gloves | Cauldron of Carnage / Catalyst |
| Belt | Durable Information Securing Container | Delves |
| Legs | Spectral Gambler's Pantaloons | Stix Bunkjunker / Catalyst |
| Boots | Rushed Beta Launchers | Sprocketmonger Lockenstock |
| Ring 1 | The Jastor Diamond | Gallywix |
| Ring 2 | Cyrce's Circlet | Siren Isle |
| Trinket 1 | House of Cards | One-Armed Bandit |
| Trinket 2 | Eye of Kezan | Gallywix |
| Weapon | Random Number Perforator | One-Armed Bandit |
| Weapon | Everforged Stabber | Crafting |
Below you are presented with a good list of farmable alternatives that are obtainable outside of WoW’s weekly lockout system. While replaced in time as you progress, these offer immediate character power.
| Slot | Item | Location |
|---|---|---|
| Head | Helm of the Righteous Crusade | Priory of the Sacred Flame |
| Neck | Strapped Rescue-Keg | Cinderbrew Meadery |
| Shoulder | Extravagant Epaulets | Operation: Mechagon |
| Cloak | Chef Chewie's Towel | Cinderbrew Meadery |
| Chest | Venture Co. Plenipotentiary Vest | The MOTHERLODE!!! |
| Wrist | Battle-Scarred Fisticuffs | Cinderbrew Meadery |
| Gloves | Corrosive Handler's Gloves | The MOTHERLODE!!! |
| Belt | Mekgineer's Championship Belt | The MOTHERLODE!!! |
| Legs | Fearless Challenger's Leggings | Theater of Pain |
| Boots | Backbreaking Bootstrappers | Cinderbrew Meadery |
| Ring 1 | 85-Year Tenure Ring | Cinderbrew Meadery |
| Ring 2 | Hoop of the Blighted | The Rookery |
| Trinket 1 | Signet of the Priory | Priory of the Sacred Flame |
| Trinket 2 | Improvised Seaforium Pacemaker | The MOTHERLODE!!! |
| Weapon | Apex Perforator | The MOTHERLODE!!! |
| Weapon | Apex Perforator | The MOTHERLODE!!! |
Trinkets
Below you can find active and passive alternatives to our recommended trinkets. Do note that some trinkets are better than others depending on the raid boss.
Active Trinket alternatives
- Signet of the Priory
- Similar output to House of Cards
Passive Trinket alternatives
- Most of these trinkets will perform better than Kezan in short fights but are generally very uninteresting.
- Junkmaestro's Mega Magnet
- Geargrinder's Spare Keys
- Mechano-Core Amplifier
- Improvised Seaforium Pacemaker
Embellishments
- Darkmoon Sigil: Ascension on weapon.
- Writhing Armor Banding
or
- Dawnthread Liningx2
Remaining Sparks
- Crafted items are 675 item level and regular items are 678 on max item level, therefore, it's not beneficial to equip crafted items outside of your 2x embellishments unless you don't have access to other high item level gear on that slot.
Simcraft
To find the best combination of gear available to you or identify the best possible upgrades, visit our Simcraft guide to learn how to utilize Simcraft easily and effectively.
Consumables
- Phials
- Flask of Alchemical Chaos -- maximum DPS.
- Flask of Tempered Versatility -- less DPS but more survivability.
- Food
- Feast of the Divine Day
- Combat Potion
- Tempered Potion
- Health Potion
- Algari Healing Potion -- a big burst of healing
- Weapon Oil
- Ironclaw Whetstone
- Augment Rune
- Crystallized Augment Rune
- Sockets
- Deadly Onyx
- Masterful Sapphire x1
- Masterful Ruby x1
- Masterful Emerald x1
- Culminating Blasphemite -- Unique, use one of each gem color to enhance your Culminating Blasphemite.
- As always, sim your character to check for the best gems with your current gear.
Enchantments
| Head | S.A.D. |
| Neck | Magnificent Jeweler's Setting 2x |
| Cloak | Enchant Cloak - Chant of Winged Grace |
| Chest | Enchant Chest - Crystalline Radiance |
| Wrist | Enchant Bracer - Chant of Armored Avoidance S.A.D. |
| Waist | S.A.D. |
| Legs | Stormbound Armor Kit |
| Boots | Enchant Boots - Scout's March |
| Ring 1 | Enchant Ring - Radiant Mastery Magnificent Jeweler's Setting 2x |
| Ring 2 | Enchant Ring - Radiant Mastery Magnificent Jeweler's Setting 2x |
| Weapon | Enchant Weapon - Authority of the Depths |
| Weapon | Enchant Weapon - Authority of the Depths |
You buy S.A.D. from the Great Vault Vendor to add sockets to your Helm, Wrists & Waist.
Races
For min-maxing as an Assassination Rogue in raiding, different racial traits can provide a tremendous benefit to your character. If this is not your top goal, picking a race that fits your style works just as well.
- Stoneform -- Dwarf
- Dispels Magic and Bleed debuffs. Has been useful in the past on some bosses with Bleeds.
- Rocket Jump -- Goblin
- Do a small jump in the direction your character is facing.
- While you're in the Rocket Jump animation you are placed on a global cooldown until your character lands.
- Berserking -- Troll
- Strong DPS racial but lines up poorly with Deathmark
- Blood Fury -- Orc
- Strong racial for damage that very competitive now since it scales with level and lines up with your Deathmark.
- 20% reduced stun duration on you which can be useful in some situations.
- Spatial Rift -- Void Elf
- Spawn a shadow traveling into your facing direction, and activate it again to teleport to it.
- Maximum range of 100 yards.
- Entropic Embrace -- Void Elf
- Decent passive trait.
- Combat Analysis -- Mechagnome
- Fairly strong passive trait that scales with level, hence why it's so strong now.
Recommendation
In general, it's safe to say that if you care about min-maxing your DPS, you should go with the highest DPS racial. That being said, the story is a bit different if it's about progression raiding. Some help out massively to speed up the progression on certain bosses. Notably, Dwarf with their Stoneform helped out on Tindral Sageswift and Fyrakk the Blazing in the latest Race to World First by having easy access to dispelling yourself at crucial points of the fights mentioned.
Macros
Discover recommended macros for Assassination Rogues during Raid encounters and watch a quick video guide on creating simple macros for your character.
Garrote -- Casts Garrote on your mouseover or target.
#showtooltip Garrote
/cast [@mouseover,exists] Garrote;Garrote
Rupture -- Casts Rupture on your mouseover target if it exists, is not dead and is hostile, else Rupture is cast on your target.
#showtooltip
/cast [@mouseover,exists,nodead,harm] Rupture;Rupture
Sets your focus and places a marker on them when you mouseover a mob. This is great for letting you teammates know what you are planning on using your Kick on.
/focus [@mouseover][]
/run SetRaidTarget("mouseover",6)
Shadowstep on your mouseover target
#showtooltip Shadowstep
/cast [@mouseover] Shadowstep
Mouseover Kick if you prefer that over focus target.
#showicon Kick
/cast [target=mouseover] KickShadowstep + Kick on your focus mob. This macro is used as a "ranged" Kick.
/cleartarget
/cast [@focus] Shadowstep
/cast [@focus] Kick
/targetlasttarget
Kick your focus target
#Show Kick
/cast [target=focus] Kick
Cast Gouge on your focus
#showicon Gouge
/cast [target=focus] Gouge
Focus Kidney Shot for extra CC
#showicon Kidney Shot
/cast [@focus] Kidney Shot
Focus Cheap Shot
#showicon Cheap Shot
/cast [@focus] Cheap ShotDeathmark + Power Infusion Macro - Replace "Rycn-Tarrenmill" and "Give PI plz" with the priest you are getting the PI from and what they tell you their PI macro triggers from.
#show Deathmark
/w Rycn-TarrenMill Give PI plz
/cast Deathmark
On this macro you can replace the names with the tanks in your group to make using Tricks of the Trade much easier.
#show Tricks of the Trade
/cast [@Meeresdh] Tricks of the Trade
/cast [@Meeresmana] Tricks of the Trade
/cast [@Méèrès] Tricks of the Trade
Alternative Tricks of the Trade macro that requires this WeakAura to work.
#showtooltip Tricks of the Trade
/click AutoTankMisdirect leftbutton 1
/click AutoTankMisdirect
Addons
Below, you see a screenshot of the author's User Interface for their Assassination Rogue, outlining which addons are used and how they are utilized in Raids to make your life easier.
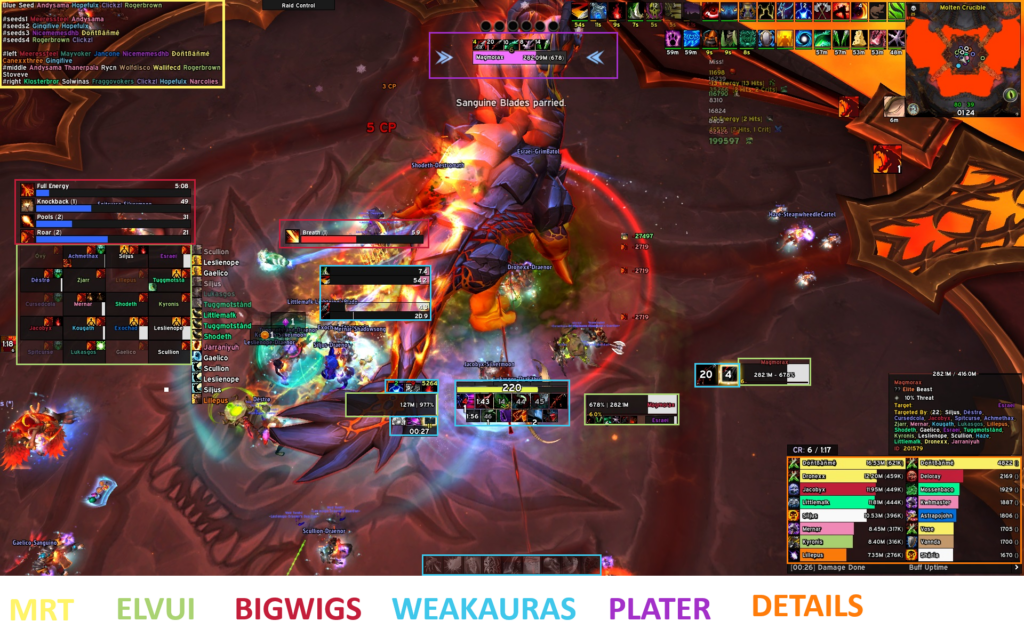
- MRT -- Notes, Raid cooldowns, and more
- Helpful addon for Raiders, especially for Raid leaders and officers.
- ElvUI -- Full User Interface replacement
- A user interface designed around user-friendliness with extra features that are not included in the standard UI.
- Alternatively, you can also use Shadowed Unit Frames (SUF) and an action bar addon of your choice or of course the stock UI.
- BigWigs -- Generic Boss Mod
- BigWigs is a boss encounter add-on. It consists of many individual encounter scripts, or boss modules; mini add-ons that are designed to trigger alert messages, timer bars, sounds, and so forth, for one specific Raid encounter.
- WeakAuras -- Jack of all trades
- WeakAuras is a powerful and flexible framework that allows the display of highly customizable graphics on World of Warcraft's user interface to indicate buffs, debuffs, and other relevant information. This addon was created to be a lightweight replacement for Power Auras but has since introduced more functionalities while remaining efficient and easy to use.
- Plater -- Advanced Nameplates
- Plater is a nameplate addon with an extraordinary amount of settings, out of the box debuff tracking, threat coloring, and support for scripting similar to WeakAuras and wago.io + the WeakAuras-Companion for Mod/Script/Profile updates.
- Details -- In-depth Damage Meter
- Most powerful, reliable, handsome, damage meter.
All public Echo Raid WeakAuras are available to download in-game through Echo Raid Tools.
Changes this Patch
- Rupture damage increased by 6%.
- Blind and Gouge now break on a damage threshold instead of breaking on damage.
- Hero Talents
- Deathstalker
- Fixed several issues with Singular Focus that prevented its application from being reliable.
- Deathstalker
- Assassination
- Crimson Tempest damage increased by 6%.
- Arterial Precision now causes Shiv to strike 8 targets (was 5).
- Sudden Demise now increases Bleed damage by 15% (was 10%).
FAQ
A: During With Deathmark with Lightweight Shiv talented, you always want to press Shiv right before your Kingsbane, and then when your Kingsbane is at below 8 seconds to cover it's full duration.
Without Lightweight Shiv, you simply press it below 8 seconds, and instead cover the gap between your Deathmark and Kingsbane with a builder.
Credits
Written By: Perfecto
Reviewed By: Stove