Support zBarb Guide
Last Updated:June 5, 2025|Changelog
Introduction
View all variants
The support Barbarian (usually called the zBarb because they do "zero" damage) is one of the strongest supports in the game since Season 4 and the addition of Crowd Control Resistance. Its undisputed position has been reaffirmed during Season 16 with the addition of Ground Stomp into the build to pixelpull. Scouting for the group and gathering monsters is their strong suit but they also can provide powerful offensive buffs and pretty much any utility your team might need!
Between the Crowd Control Immunity from Ignore Pain Mob Rule and the Movement Speed from Chilanik's Chain, without forgetting the toughness granted by Ignore Pain and Warcry as well as the damage buffs from Threatening Shout Falter and Strongarm Bracers, zBarb offers a wide variety of utility bonuses to the group. The recent addition of the Horde of the Ninety Savages Set in Season 20 even pushed it one step further with the (2) Bonus granting double effectiveness to Shouts skills.
In Season 27, zBarb had an incredible Sanctified Power to play with. Sanctified Whirlwind allowed the zBarb to pull and drag everything wandering on its path similarly to the Season 1 Raekor Dreadnought Charge!
Not convinced yet? Hold on because the domain where zBarb really shines is its unparalleled capacity to pull and gather monsters through Ancient Spear Rage Flip and then pixelpull them tightly together using Ground Stomp Wrenching Smash, the whole being complemented by an incredible mobility and ability to control monsters at will granted by Furious Charge and The Legacy of Raekor Set. As a result, this build is one of the most engaging but also one of the hardest, if not the hardest build, to master in the entire game (see Mechanics). So let's get into it!
Whirlwind Weeeeeeeeeeeeeeeeeee 😄 ✔
Active Playstyle ✔
META Setup in All Groups ✔
Best Support Build in the Game ✔
❌ Hard to Master
❌ Heavy Cooldown Dependency
❌ Good Communication Needed
❌ Loads of Tasks to Take Care of
Core Setup
Items
- Horde of the Ninety Savages (2) Bonus for the double effectiveness to War Cry and Threatening Shout Grim Harvest. Once your group is comfortable enough, you can drop it in favor of Raekor (6) Bonus.
- The Legacy of Raekor (4) Bonus is optional this season but can be used at some point to move around at a fast pace and control your surroundings with Furious Charge. Same goes for Raekor (6) Bonus to do massive Rage Flips to complement Sanctified Whirlwind.
- Illusory Boots to move unhindered through walls as well as monsters without using Furious Charge and jump into the best spots for Ground Stomp Wrenching Smash pixelpulls. This is not needed anymore due to the Altar of Rites!
- Pride of Cassius to get a permanent uptime for your most important buff Ignore Pain Mob Rule.
- Chilanik's Chain to get a huge 40% Movement Speed boost for everyone in the group.
- Strongarm Bracers for an always welcome 30% additive damage buff.
- Oculus Ring provides a 85% separate damage multiplier to our teammates who stand in the ring.
- Obsidian Ring of the Zodiac helps us reduce the Ignore Pain Cooldown.
- The Flavor of Time for the double Conduit Pylon duration.
- Band of Might grants you a tremendous 80% damage reduction.
- Recommended Potion: Bottomless Potion of Kulle-Aid to further assist your party by destroying walls.
Season Theme - Eternal Conflict
For the duration of this season, all players will benefit from the Pandemonium Kill Streak buff initially available in Season 19. For each stack of this buff, you’ll receive a small boost to movement speed and bonus damage, ultimately capping out at 50% movement speed and 100% damage at 1000 stacks. In addition, reaching certain kill streak goals will trigger a special effect and cause even more mayhem on the battlefield! For full details on how this works, check out this exclusive Seasonal Guide!
The Kill Streak effects are:
- 15 Kills: Exploding Chickens seek and destroy
- 30 Kills: A wide Frost Nova freezes enemies
- 50 Kills: Corpses rain from the sky
- 100 Kills: Five massive Energy Twisters are unleashed
- 150 Kills: Dark Geysers form beneath enemies
- 200 Kills: Treasure Chests fall from the sky
- 300 Kills: A Ring of Fire engulfs everything
- 400 Kills: Meteors hail from above
- 500 Kills: Angels descend upon the battlefield to fight
- 1000 Kills: Diablo appears!
In speedruns, you usually don't profit much from this season theme, however in pushing it opens up a lot of strategic depth by playing around various key kill counts. Especially the Geysers (150), Meteors (400) and Angels (500) are the most impactful and can kill anything in an instant, allowing you to get a significant progression boost if used correctly.
Depending on the situation, it may be best to voluntarily reset your kill streak after 150 to get the Geysers multiple times, or to set up for a boss kill by getting as close as possible to that number and then hoping for a Rift Guardian with adds or a few kills from Nemesis Bracers.
Build Adjustments
This build is a support build, so we don't make any specific adjustments to the setup, but you can still save a significant amount of time by managing to keep a buff stack separately from your group by going away from them then share it again to them once they dropped theirs after proccing an effect so you can trigger on repeat some streak effects like the Geysers at 150 stacks.
Global Stat Priorities
Since we are a support class, we don't need any offensive stats like Critical Hit Chance, Critical Hit Damage, Area Damage, or Elemental Damage. Instead we will gather as much Cooldown Reduction, Attack Speed and Resource Cost Reduction as possible. Aim to get permanent Ignore Pain Mob Rule for you and your teammates, which requires a minimum of 63.50% Cooldown Reduction. You can play with a bit less Cooldown Reduction due to Obsidian Ring of the Zodiac and Messerschmidt's Reaver.
Attack Speed is great to scale Furious Charge ending animation and Rage Flip animation but these skills have narrow Attack Speed Breakpoints, hence every Attack Speed roll will get you to the next Breakpoint, reducing animations of Furious Charge and Rage Flip which leads to a smoother gameplay. See Mechanics section below for more information!
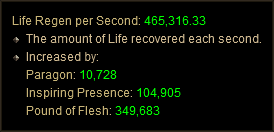
Life Regeneration
Another priority as zBarb for a smooth gameplay is to scale toughness and self-sustain as you are more often than not far away from the group to gather and pull monsters as well as scout ahead and manage Pylon spawns. In order to do so, capitalizing mainly on Relentless but also Inspiring Presence and Pound of Flesh is by a long shot the best way.
These passives gives Vitality more weight than usual. Inspiring Presence and Pound of Flesh gives you Life Regeneration based on your HP pool and you want to have a big enough HP pool to stay alive while being under 35% HP to get all the benefits from Relentless when the environment is hostile. All Resistance and Intelligence are also a top priority as Barbarians lack these stats, as a Strength class, which is why you want to get some pieces of gear with Intelligence as main stat, and augment them with Intelligence as well.
In regard to Pickup Radius, while you want as much as possible for Speed Runs (all the way up to 27 yards), this is a different story for Greater Rift push, where you should aim for around 10-12 yards. The reason is that you want to not have any trouble picking up Globes on your way while moving around, but you also want to be able to keep control of the situation, that is to say, choose not to pick up Progress Globes on purpose in some specific situations in order to spawn a Pylon or eventually go back to an already spawned one on another Greater Rift floor for instance.
Last but not least, your Belt slot is a pretty critical piece of Gear. You want to have a perfect legendary roll on either Pride of Cassius or Chilanik's Chain to equip it and cube the other one. As secondary roll, you want to have Pickup Radius for Speed Runs as seen above, but for Greater Rift push your best option is Maximum Fury as it allows for one more Rage Flip use without having to Furious Charge (which builds up Crowd Control Resistance on monsters) or wait for your Shouts Cooldown to refill your Fury. Finally, Life per Fury Spent is often overlooked at but is extremely strong to self-sustain yourself, especially without zMonk in the group.
1. Do the Challenge Rift for the materials to cube Legendary Powers. You can complete this once a week for additional resources and we always update the guide for you!
2. This is a support build, meaning we deal zero damage and need to farm the pieces/materials with a different build/character. We'll use BloodShards and Crafting Materials to acquire the remaining pieces outlined in the steps below.
3. Gamble from Kadala in this order:
- Gather 4 pieces of The Legacy of Raekor set and 2 pieces of the Horde of the Ninety Savages set. Do not salvage any duplicate pieces you find! Instead convert them to another part of the set with Recipe 4 in Kanai's Cube. If you have extra materials you can use Recipe 3 to craft the remaining pieces, but this is expensive and not recommended for new players.
- Create a level 1 Barbarian and gamble for Band of Might
- Pride of Cassius and Chilanik's Chain
- Strongarm Bracers and Nemesis Bracers
- Leoric's Crown
- Stormshield
- Obsidian Ring of the Zodiac and Oculus Ring
4. Craft using Recipe 3 in Kanai's Cube in this order:
- Create a level 1 Demon Hunter and upgrade Swords to get In-geom
- Create a level 1 Witch Doctor and upgrade Maces to get Echoing Fury
- Swords to get Little Rogue and The Slanderer
- Two-Handed Axes to get Messerschmidt's Reaver and The Executioner
- Rings to get Obsidian Ring of the Zodiac and Oculus Ring
- Anything from the Gamble list in Step 3 that you haven't already acquired.
5. Do Bounties to acquire several important items for this build:
- Act 1: Ring of Royal Grandeur
- Act 2: Illusory Boots
- Act 4: Can drop any bounty item from any act
- Bounty Turn In: Recipe for Cain's Destiny
6. There are final required pieces that are difficult to acquire, The Flavor of Time and Rondal's Locket. With amulets being so expensive to gamble and craft, we'll have to search for them to drop in Nephalem and Greater Rifts. They can drop on any class so try to group up with friends when possible to share your loot!
7. Use Primordial Ashes in Kanai's Cube with the new Curiosity of Lorath Nahr recipe to obtain a free Crafted Primal Ancient. Since you can only equip one of them, choosing the right item to focus matters! Great candidates are Weapons, Offhands, Jewelry or any item with an important multiplier. With that in mind, we recommend getting one of the following items:
- Oculus Ring
- Band of Might
- Strongarm Bracers
- Pride of Cassius
- Chilanik's Chain
| SLOT | ITEM | STAT PRIORITY |
| Weapons | Little Rogue The Slanderer In-geom Echoing Fury Pig Sticker The Executioner (Cubed) Messerschmidt's Reaver (Cubed) | 1. Cooldown Reduction 2. Attack Speed 3. Socket Ramaladni's Gift 4. Resource Cost Reduction 5. Vitality 6. Strength |
| Shield (optional) | Stormshield | 1. Cooldown Reduction 2. Life % 3. All Resistance 4. Elite Damage Reduction 5. Intelligence 6. Vitality |
| Helm | Skull of Savages Raekor's Will Leorics Crown | 1. Socket Flawless Royal Diamond 2. All Resistance 3. Life % 4. Strength or Vitality |
| Gloves | Raekor's Wraps Claws of Savages Cain's Scrivener (Crafted) | 1. Cooldown Reduction 2. Attack Speed 3. Resource Cost Reduction 4. Strength |
| Shoulders | Raekor's Burden Spines of Savages | 1. Cooldown Reduction 2. Resource Cost Reduction 3. All Resistance 4. Life % 5. Strength or Vitality |
| Chest | Raekor's Heart Markings of Savages | 1. Sockets Flawless Royal Diamond 2. All Resistance 3. Life % 4. Elite Damage Reduction |
| Pants | Leggings of Savages Raekor's Breeches Cain's Habit (Crafted) | 1. Sockets Flawless Royal Diamond 2. All Resistance 3. Armor 4. Strength or Vitality |
| Boots | Illusory Boots (Bounties A2) | 1. All Resistance 2. Strength or Intelligence 3. Vitality 4. Armor |
| Ring 1 | Band of Might (Cubed) Obsidian Ring of the Zodiac Oculus Ring (Cubed) | 1. Socket 2. Cooldown Reduction 3. Attack Speed 4. Resource Cost Reduction |
| Ring 2 | Ring of Royal Grandeur (Bounties A1) Hellfire Ring | 1. Socket 2. Cooldown Reduction 3. Attack Speed 4. Resource Cost Reduction |
| Bracers | Strongarm Bracers Nemesis Bracers | 1. All Resistance 2. Strength or Intelligence 3. Vitality 4. Life per hit |
| Amulet | The Flavor of Time Rondal's Locket | 1. Socket 2. Cooldown Reduction 3. Attack Speed 4. Resource Cost Reduction 5. Life % |
| Belt | Pride of Cassius Chilanik's Chain (Cubed) | 1. All Resistance 2. Life % 3. Life per Fury Spent 4. Strength or Vitality |
| Ideally, you want Maximum Fury as Secondary for Greater Rift push to allow for one more Rage Flip use. For everything else, Pickup Radius is the way to go. | ||
| Potion | Bottomless Potion of Kulle-Aid | For breaking walls to pull enemies and increase DPS |
- Gem of Efficacious Toxin is a staple for each support build granting 10% additive damage (stacks) and 10% damage reduction (does not stack). Other supports can also wear this gem because the damage buff stacks.
- Gogok of Swiftness gives 15% Attack Speed, 15% Cooldown Reduction and up to 30% Dodge based on the amount of stacks you have. You gain a stack with each hit up to a maximum of 15, and all stacks are refreshed if you attack every 4 seconds.
- Wreath of Lightning grants you 25% extra Movement Speed and helps to bodypull monsters with the lightning ticks.
- Esoteric Alteration gives 60% non-Physical damage reduction, and can be taken instead of Wreath of Lightning if you cannot survive.
- Iceblink provides 10% increased Critical Hit Chance to the damage dealers, and can be taken instead of Wreath of Lightning (or Gem of Efficacious Toxin if you need Esoteric Alteration). This effect does not stack and can be applied by using Furious Charge Cold Rush. Both zNec and zDH apply chill better than zBarb, so if your group has one of those, they should be the one to run this gem.
- Furious Charge for mobility, fury generation, utility and crowd control.
- Ignore Pain Mob Rule for Crowd Control Immunity as well as 50% damage reduction for you and 25% for the group.
- War Cry for toughness usually with the Veteran's Warning rune due to Horde of the Ninety Savages (2) Bonus.
- Threatening Shout Falter for 50% additive damage or Grim Harvest for Health Globe spawning which is especially useful to fuel Witch Doctors' Gruesome Feast passive or Resource hungry builds wearing Reaper's Wraps or like this season to fuel the Altar of Rites Blood passive to help Squirt's Necklace uptime.
- Ancient Spear Rage Flip for pulling and moving monsters around at your will. This skill is the cornerstone of the zBarb gameplay if well used. Make sure to check out the Mechanics section for in-depth insights about it.
- Ground Stomp Wrenching Smash for pulling and grouping enemies tightly together, creating pixelpulls to tremendously buff the damage output of damage dealers. It is also an easy way to proc Strongarm Bracers. This is not used with Sanctified Whirlwind except to proc Krysbin's Sentence if you play with a Necromancer.
- Other skill variants you can find in Speeds Setups can include Sprint Forced March for Movement Speed, Leap to jump through obstacles, Wrath of the Berserker for an overall Stat boost or Rend Mutilate for 10% additive damage and Iceblink procs.
- Inspiring Presence for double War Cry duration and 3% Life Regeneration for every party member.
- Nerves of Steel as a cheat death to make sure you never die. Don't forget you have a cheat death and make good use of it!
- Relentless for 50% damage reduction as well as doubled RCR and LpFS while under 35% HP. This passive is an insane toughness buff at higher Paragon level due to higher HP pool and damage reduction. With lower toughness, the damage reduction might not be enough to make you survive and you could often die before proccing it.
This passive makes Vitality more interesting to stack as you ideally want to have a big enough HP pool when below 35% HP to benefit from the damage reduction and the Resource Cost Reduction as much as possible. - At lower Paragon level, Relentless should be swapped for Sword and Board with a Stormshield.
- Pound of Flesh for additional Movement Speed and Life Regeneration. If you are too squishy to afford it, swap to Superstition for additional toughness.
- Ideally, you want to be tanky enough to use Relentless + Pound of Flesh but that requires a decent gear and Paragon level. Until then, your progression should be:
- Sword and Board + Superstition at very low Paragon level.
- Sword and Board + Relentless when you get around 1.5m Life.
- Relentless + Superstition at medium Paragon level.
- Relentless + Pound of Flesh at higher Paragon level (around 3m Life).
| Core | Offensive | Defensive | Utility |
| 1. Movement Speed | 1. Cooldown Reduction | 1. All Resistance | 1. Pickup Radius |
| 2. Maximum Fury | 2. Attack Speed | 2. Life % | 2. Resource Cost Reduction |
| 3. Vitality1 | 3. Critical Hit Chance | 3. Armor | 3. Life per Hit |
| 4. Strength | 4. Critical Hit Damage | 4. Life Regeneration |
1 Put all points into Vitality until you reach 3.5 to 4 million HP (due to Relentless, Inspiring Presence and Pound of Flesh), then put the rest into Strength for Armor.
2 Do not take Area Damage as we deal no damage and it will lag the game.
The Altar of Rites is a tree that grants tremendous powers to your entire account in exchange for sacrifices. It requires you to farm Bounties, kill the Ubers, craft the Staff of Herding, and more. Completing all 26 of these tasks, along with sacrificing 6 Primal Ancients grants you extra Damage, Defense, Quality of Life, Increased Drops and 3 Potion Super Powers. Read the full guides on Unlocking the Altar and the Altar Mechanics by Raxxanterax and Chewingnom to learn everything about this fantastic mechanic!
Note: The suggested path assumes you are playing Solo and used the Challenge Rift Cache to help you level up.
Optimal Path
Node 2: Choose Anointed to gain a full set of 70 yellows from level 18-70!
Node 6: Rush to gain double Bounties to help unlock other Nodes in the Altar.
Nodes 7-14: These are the last Nodes you can gain until the Challenge Rift resets. Take at least 1 Node at the bottom of each path to unlock all 3 Potion Super Powers. Pick up the Mirror Node at the top for a colossal 41% extra XP all season. Remember to unlock Father once you clear GR70 solo and have your first Primal!
Nodes 15-26: Pick up the final Quality of Life, Damage, and Defense Nodes (in that order) to finish the Altar.
Potion Super Powers: Take Father first, then Mother, and finally Mortal.
Disclaimer: The Mortal and Mother Potions require you to salvage 2 and 3 Primals respectively. Unlock them as soon as you have those materials as they don't cost a point!
Use the Scroll Bar to see Altar Progression
The zBarb provides massive amounts of damage, toughness and utility buffs and is key to clearing high greater rifts in groups successfully. Here is a list of tasks to pay attention to while playing:
Lead the group
As a zBarb, you are generally the one calling the shots in higher Greater Rifts because:
- You scout the layout for Elites and spots to group on. Look for crossroads spots as they allow you to pull from several sides at the same time.
- You are very mobile with Furious Charge in combination with the The Legacy of Raekor (4) Bonus, Messerschmidt's Reaver or In-geom in speed runs.
- You create the pull with your pulling abilities Ancient Spear Rage Flip and Ground Stomp Wrenching Smash.
- You are tanky enough to survive on your own and pull monsters from far away.
To optimize gameplay and communication, join up the voice application of your choice and talk to your group. Ideally, you want to have the Trashkiller communicating with you about its damage rotation and the group situation especially when you're far away while you pull monsters, guide and plan the next moves of the group. Leading is not easy, but it is something you will eventually get more comfortable with once you get practice and experience.
Creating the Pull
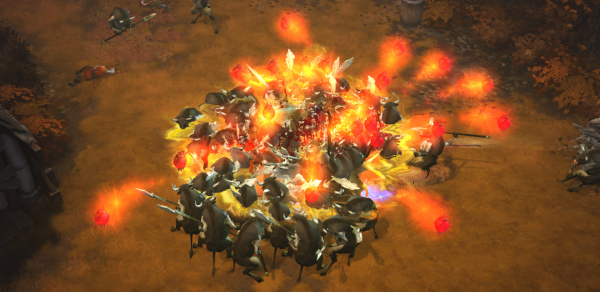
After opening a Greater Rift, start buffing your allies with all your active buffs then proc'd to scout the map using Furious Charge. Monsters in the back should always be pulled along by using Ancient Spear Rage Flip. Call a spot (dropping a banner is the most common way of doing this, default hotkey on PC is G) for your party members to stay and damage the monsters. Pull as many monsters as you can there, focus on the back rather than on the front. Group them tight by using Ancient Spear Rage Flip and Ground Stomp Wrenching Smash. Take care about not charging too much because of monsters' Crowd Control Resistance building up and making your job of Rage Flipping more difficult!
Pylon Management
Pylons are very important and can make the difference between an attempt and a clear. Due to your mobility and your tasks of pulling monsters, you are generally in charge of Pylon management. Here is all you need to know about Pylons:
- Pylon spawn locations are always fixed in every layout. With enough practice, you can be able to tell where every Pylon location is just by looking at the layout!
- Pylon spawn chance is tied to how much progress you did. This chance is resetted to ~1% after spawning a Pylon and scales linearly up to ~50% progress where your chance to find a Pylon on the next spot is 100%.
- It is only possible to spawn up to four Pylons per Greater Rift.
- As the base spawn chance is ~1%, you can get a Pylon at 0% progress, or get two Pylons in a row without doing any progress. That is however very unlikely.
- Due to the aforementioned rules, the optimal progression to actively look for a Pylon is between 20% and 33%. The sooner you find a Pylon, the sooner you can make progress towards spawning another!
- Pylon spawn locations are checked when you are 75 yards away from them, which is further than your screen edges (50 to 60 yards). Take care or you can miss a Pylon!
- Pylon spawn locations all have an independant chance to spawn a Pylon. Because you don't get a Pylon on a spot doesn't mean you can't get one on the next spot without doing any progress! This means you can check two Pylon spawn locations in a row if you have enough at disposition and you did a lot of progress. However, if you don't get any Pylon after checking two locations, you need to make some progress before checking another spot.
- You can check on purpose Pylon spawn locations to "block" them if your team does not want a Pylon on the floor you're fighting on. The same way, you can spawn Pylons on the next floor while your team is fighting on the previous floor.
- Pylon effects are lost if you teleport out of the Greater Rift except for Speed Pylon. This is especially useful for Shield Pylon, as you want to be able to use your Bottomless Potion of Kulle-Aid to break walls.
Rift Guardian Management
As one of the supports it is your job to force teleport the Rift Guardian in a desired spot when needed, control certain of its abilities, tank hits for your allies... For a full Rift Guardian management overview, make sure to check out this post by Chewingnom!
- Force Teleport the Rift Guardian
If you need the Rift Guardian in another spot from where he originally spawned, the whole team but the zBarb should run to the preferred spot. The zBarb stays on the Rift Guardian and keeps the focus on him and then starts teleporting out of the Greater Rift after casting Ignore Pain to not get interrupted. As the Rift Guardian does no longer have a target in range, it will teleport on the party members sitting on the chosen spot. Then the zBarb can go back into the Greater Rift and join up with the group again to buff, assist and control. - Damage Soaking
You want to take as much incoming damage away from your Rift Guardian Killer (RGK) as possible, especially when the RGK plays with Squirt's Necklace. Try to stand in front of the RGK or as close to the boss hitbox as possible at all times. A prime example would be Saxtris as it always attacks one target with its melee attack. Take the hits for the team! - Abilities Control
A lot of Rift Guardian abilities can be interrupted by stunning them: some damaging abilities but also teleport and summon abilities. A prime example would be Skeleton King. You want to stun its summon and teleport animation by using Ground Stomp or Furious Charge. But be careful: you want to stun the Rift Guardian only when necessary to avoid it becoming immune to Crowd Control.
The zBarb can provide the following buffs to the group:
- Additive Damage: 90-100% total
- 50% from Threatening Shout Falter in combination with the Horde of the Ninety Savages (2) Bonus
- 30% from Strongarm Bracers proc'd by Furious Charge, Ancient Spear Rage Flip and/or Ground Stomp Wrenching Smash
- 10% from a level 25 Gem of Efficacious Toxin
- 10% optional from Rend Mutilate
- Toughness
- 25% damage reduction from Ignore Pain Mob Rule
- 10% damage reduction from a level 25 Gem of Efficacious Toxin
- 40% Armor & 60% Dodge Chance from War Cry Veteran's Warning in combination with the Horde of the Ninety Savages (2) Bonus.
- Crowd Control Immunity
Ignore Pain Mob Rule makes it so allies can not be knocked back, stunned, frozen or feared. - Movement Speed
40% from War Cry in combination with Chilanik's Chain
20% optional from Sprint Forced March - Pulling
Ancient Spear Rage Flip is a super useful as an awesome long range pull ability
Ground Stomp Wrenching Smash is perfect to group monsters up very tightly (Pixel Stack) - Oculus Ring
Oculus Ring 85% multiplicative damage after a monster kill if you stand in the gold ring, just like every support build in the game - The Flavor of Time
The Flavor of Time grants double Pylon duration for the extra Conduit Damage - Globes Spawning & Pickup
The zBarb can spawn a huge amount of health globes with Ground Stomp Jarring Slam and Threatening Shout Grim Harvest. The build is very mobile you can pick up the spawned health globes as well as the progression globes very easily if you stack some Pickup Radius on gear. - Bonus Experience
There are a few open item slots in the speed setup so the Barb can wear bonus experience gear to provide a buff to the whole group. To check the in-depth bonuses click here. - The Executioner
If there is no Necromancer with Frailty in the group then the zBarb can also cube The Executioner to cull monsters below 10% HP instantly.
You can see how much the zBarb provides for its allies, all these buffs combined make it a staple in almost any group META runs!
Every Hardcore group generally have a zBarb due to the heavy toughness buffs and overall safety this build provides. You can even save your allies that disconnect by pulling monsters away from them using Ancient Spear Rage Flip.
Make sure to always use Nerves of Steel and eventually Band of Might to not die yourself. If you die you also put your team members in danger and that should obviously be avoided! Check out our dedicated Hardcore Survival Guide to learn more about how to succeed in this game mode!
Variants
Concept
These are fast paced runs usually below the 3 minute mark. In the past the META has been Charge Barb, Vyr Wiz, Rend WW Barb and GoD DH.
Gameplay
You need to group monsters fast and apply all buffs to your allies and debuffs to enemies especially to the Elites and high progression targets like Golgors or Punishers for example. You wanna group Elites together with Ancient Spear Rage Flip, scout for dead ends and call them out if needed. Be careful though as some dead ends have Pylons spots, and you do not want to spawn pylons in there in most cases. Try to pick up every globe, may it be a health or a progression one pretty much instantly and never leave any progression globes behind!
Setups
You can also run 3-5 minutes speed runs that are a little slower but a bit more key efficient. These runs are a nice way to level some medium level augment gems. The playstyle and overall setup are very similar to the sub 3 minutes version.
The only differences are that some people take in The Legacy of Raekor (4) Bonus and then proc Strongarm Bracers with Ground Stomp Wrenching Smash and use Little Rogue & The Slanderer combination.
Concept
In these runs a special zBarb playstyle is required as the zNec freezes all the enemies instantly using Land of the Dead Frozen Lands. That means no monsters can be pulled and actually makes the job as a zBarb relatively easy in comparison to all the other group setups. You are basically "only" buffing and debuffing while moving and taking Progression and Health Globes!
Gameplay
Apply all buffs and debuffs on cooldown. Furious Charge the enemies to proc Strongarm Bracers. Pick globes as soon the elites die, keep up with the group & scout for possible dead ends!
Setups
Feel free to drop the Flawless Royal Ruby in your Helm for a Flawless Royal Diamond if you need more Cooldown Reduction. Apart from that you can switch Hellfire Ring to any other Ring or Amulet you like by equipping Oculus Ring and then cubing items like The Flavor of Time. Leap animation is very slow, so only use it when you need to jump over a wall to keep up with teleporting Necromancers.
Select Build Version
Concept
This is the hardest setup to play and master in Diablo III. You have to do everything written in the Gameplay section and the success of the Greater Rift hugely depends on you. Call, scout, buff, debuff, pull, pixel, scout again and continue!
Gameplay
Play Around Trash Killer's Rotation
The best way to do damage in Diablo III is to create damage bursts using Convention of Elements in combination with temporary buffs like Way of the Hundred Fists Assimilation, Archon, Land of the Dead or accumulated damage from The Barber. You need to communicate with your Trash Killer to know when their damage window is coming up. Your job is to get as many monsters as possible tightly grouped in one spot including the Elites and maintain all your buffs.
Aggro and Pull Monsters
The key is to choose wide open spots (generally crossroads) allowing you to pull from several sides at the same time. Your main priority are monsters in the back as you will move forward later anyways. Bodypull monsters by getting close to them, Wreath of Lightning procs or long ranged Rage Flips. Use Rage Flip to pull monsters from crossroads before dragging them with you using Whirlwind. If you're playing a closed map like Keep Depths or Corvus, monsters can get stuck in narrow doorways causing a "traffic jam", you need to pull some of them backwards to free them up and let them walk through the door. Furious Charge is used to proc Band of Might and as a nervous fast mobility skill.
Setups
Once you feel more comfortable and tnky, you can swap the defensive pieces of gear to get The Legacy of Raekor (4) Bonus which gives you a better field control and mobility while you're not using Sanctified Whirlwind. At higher Paragon, you can even go for The Legacy of Raekor (6) Bonus nd replace Threatening Shout with Rage Flip to do massive screen pulls before starting to use the Sanctified Whirlwind.
The Weapon Cube Slot is flexible and if your group has a Necromancer with Frailty, you can swap The Executioner with Messerschmidt's Reaver to have more lenient cooldowns management and a smoother gameplay. Playing with a Necromancer Trashkiller also generally means you need to play with Ground Stomp in order to have an efficient way to proc Krysbin's Sentence.
For Console, replace Strongarm Bracers and Leoric's Crown with Promise of Glory and Blind Faith in order to spawn Nephalem Globes for the damage dealers (as Nephalem Globes grant a damage increase on Console).
For a complete collection of high endgame zBarb action videos, check out here!
Concept
While the Spin to Win feeling from the Whirlwind zBarb has always been around, it was never the optimal way to play zBarb.
Gameplay
Play Around Trash Killer's Rotation
The best way to do damage in Diablo III is to create damage bursts using Convention of Elements in combination with temporary buffs like Way of the Hundred Fists Assimilation, Archon, Land of the Dead or accumulated damage from The Barber. You need to communicate with your Trash Killer to know when their damage window is coming up. Your job is to get as many monsters as possible tightly grouped in one spot including the Elites and maintain all your buffs.
Aggro and Pull Monsters
The key is to choose wide open spots (generally crossroads) allowing you to pull from several sides at the same time. Your main priority are monsters in the back as you will move forward later anyways. Bodypull monsters by getting close to them, Wreath of Lightning procs or long ranged Rage Flips. Use Rage Flip to pull monsters from crossroads before dragging them with you using Whirlwind. If you're playing a closed map like Keep Depths or Corvus, monsters can get stuck in narrow doorways causing a "traffic jam", you need to pull some of them backwards to free them up and let them walk through the door. Furious Charge is used to proc Band of Might and as a nervous fast mobility skill.
Setups
Once you feel more comfortable and tnky, you can swap the defensive pieces of gear to get The Legacy of Raekor (4) Bonus which gives you a better field control and mobility while you're not using Sanctified Whirlwind. At higher Paragon, you can even go for The Legacy of Raekor (6) Bonus nd replace Threatening Shout with Rage Flip to do massive screen pulls before starting to use the Sanctified Whirlwind.
The Weapon Cube Slot is flexible and if your group has a Necromancer with Frailty, you can swap The Executioner with Messerschmidt's Reaver to have more lenient cooldowns management and a smoother gameplay. Playing with a Necromancer Trashkiller also generally means you need to play with Ground Stomp in order to have an efficient way to proc Krysbin's Sentence.
For Console, replace Strongarm Bracers and Leoric's Crown with Promise of Glory and Blind Faith in order to spawn Nephalem Globes for the damage dealers (as Nephalem Globes grant a damage increase on Console).
For a complete collection of high endgame zBarb action videos, check out here!
Concept
The idea here is that when your group is high Pargon enough, you go for The Legacy of Raekor (6) Bonus and replace Threatening Shout with Rage Flip to do massive screen pulls before starting to use the Sanctified Whirlwind.
Gameplay
Play Around Trash Killer's Rotation
The best way to do damage in Diablo III is to create damage bursts using Convention of Elements in combination with temporary buffs like Way of the Hundred Fists Assimilation, Archon, Land of the Dead or accumulated damage from The Barber. You need to communicate with your Trash Killer to know when their damage window is coming up. Your job is to get as many monsters as possible tightly grouped in one spot including the Elites and maintain all your buffs.
Aggro and Pull Monsters
The key is to choose wide open spots (generally crossroads) allowing you to pull from several sides at the same time. Your main priority are monsters in the back as you will move forward later anyways. Bodypull monsters by getting close to them, Wreath of Lightning procs or long ranged Rage Flips. Use Rage Flip to pull monsters from crossroads before dragging them with you using Whirlwind. If you're playing a closed map like Keep Depths or Corvus, monsters can get stuck in narrow doorways causing a "traffic jam", you need to pull some of them backwards to free them up and let them walk through the door. Furious Charge is used to proc Band of Might and as a nervous fast mobility skill.
Setups
The Weapon Cube Slot is flexible and if your group has a Necromancer with Frailty, you can swap The Executioner with Messerschmidt's Reaver to have more lenient cooldowns management and a smoother gameplay. Playing with a Necromancer Trashkiller also generally means you need to play with Ground Stomp in order to have an efficient way to proc Krysbin's Sentence.
For Console, replace Strongarm Bracers and Leoric's Crown with Promise of Glory and Blind Faith in order to spawn Nephalem Globes for the damage dealers (as Nephalem Globes grant a damage increase on Console).
For a complete collection of high endgame zBarb action videos, check out here!
Concept
The concept is very similar to the 4-Player META where we quickly pull everything together to let Trash Killers burst the pull down. In 2man setups, Movement Speed is not as mandatory so we use both Strongarm Bracers and Nemesis Bracers.
Gameplay
Pull as many monsters as possible together using Ancient Spear Rage Flip and Ground Stomp Wrenching Smash while providing buffs and maintaining Ignore Pain on your damage dealer. Once monsters are grouped up, the damage dealer bursts on its Convention of Elements cycle. Always communicate with your teammate while scouting the Rift by calling out Pylons, dead-end layouts, dangerous or annoying Elite Affixes, monster types etc.
Setups
We cn stack more toughness using Stormshield in combination with Sword and Board. At higher paragon, feel free to use Istvan's Paired Blades and Superstition for smoother gameplay as well as dropping Esoteric Alteration if you use it for Iceblink and switch Furious Charge rune to Cold Rush to proc it. If your damage dealer is a Necromancer with Frailty, you can swap The Executioner with Messerschmidt's Reaver.
Concept
For more information, check out our full Echoing Nightmare Guide and take a look at our Echoing Nightmare Build Tier List and our META post for the best builds and strategies! This build is a support build. Typically we utilize a Greater Rift pushing build with a few tweaks.
Changes
- Replace Ancient Spear Rage Flip with Rend Mutilate for more damage since monsters are immune to Knockback.
Gameplay
- Click Speed Pylon instantly to boost your mobility and dodge Green Meteors.
- Around Wave 90, click Channeling Pylon and Power Pylon.
- After Wave 100, use Conduit Pylon.
- At Wave 122, stop attacking and run to the corner to let the timer run out.
Spam Rend Mutilate, Threatening Shout Falter and keep up Ignore Pain and War Cry on the group. Use Sanctified Whirlwind to proc Strongarm Bracers, the debuff works even if the monsters cannot be moved. Move around to pull monsters.
Video Guide
Mechanics
- The Legacy of Raekor is one of the most important tool in the zBarb arsenal. Understanding and using it properly is a challenge!
- Furious Charge does not have specific Attack Speed Breakpoint. Furious Charge animation is split between the charge animation that scales using your Movement Speed and the ending animation that has a base duration of 30 frames and scales using your sheet Attack Speed. The charge animation has a minimum duration of 10 frames, even if you Wall Charge.
- Furious Charge alternates Weapons, which means Attack Speed matters on both your Weapons.
- The Legacy of Raekor (2) Bonus grants a Furious Charge charge refund if you only hit one enemy. This is very powerful as it allows for a better mobility control as you can purposefully decide to charge through only one enemy on your way to refresh charges during a Greater Rift.
- The Legacy of Raekor (4) Bonus gives you access to all Furious Charge runes, which enables great synergies for mobility, speed and control.
- Stamina makes it so that Furious Charge generates 15 Fury + 10 Fury per monster hit. This means hitting 6 to 7 monsters is enough to completely refill your Fury, making it easier to manage the heavy use and cost of Ancient Spear Rage Flip.
- Cold Rush triggers a 2.5 second Freeze on every monster hit: this is without a doubt one of the best crowd control in the game in combination with The Legacy of Raekor (4) Bonus as you can spam it on demand, and proc it on as many targets as you want. This is the main reason why zBarb is extremely potent at proccing Krysbin's Sentence or Ancient Parthan Defenders, as well as managing Rift Guardians.
- Merciless Assault + Dreadnought in combination allow for crazy mobility by reducing Furious Charge Cooldown by 2 seconds for each enemy hit (up to 10 seconds) while being able to store and manage up to 3 charges of Furious Charge.
- Environmental breakables objects or layout elements such as doors, crates or rocks are able to proc both The Legacy of Raekor (2) Bonus and Merciless Assault to reset your Furious Charge charges. This means you don't necessarily need to charge through monsters to keep up your charges. Note that breakables also count as targets in regard to Stamina.
- When using The Legacy of Raekor (4) Bonus, applying the Strongarm Bracers damage debuff using Furious Charge is troublesome. Indeed regardless of the rune you choose, you inherit the special behavior of Dreadnought which does not knockback enemies you charge through!
It is still possible to proc them using the 20 yard radius Front Cone at the end of Furious Charge animation but this is not reliable enough: this explains why speed setups are generally not using The Legacy of Raekor, in order to not worry about Strongarm Bracers application.
- Ground Stomp has a base animation of 30 frames that does not scale with Attack Speed.
- The 24 yard pull effect happens 0.5 seconds before the 4 second stun and reduce its own duration as the pull will trigger 40% Crowd Control Resistance on monsters.
- Ground Stomp Wrenching Smash ignores the collision boxes of most enemies if cast in an area with enough space for the enemies to land, resulting into pixelpulls. Beware though, a good understanding of Crowd Control Resistance and Monster Hitboxes is absolutely necessary!
- A common trick is to create this space yourself by using Rage Flip when there is no good spot around.
- Monsters are pulled towards you, meaning any obstacles such as layout elements, walls from Waller Affix or even immune monsters can block the way to pullable monsters.
- Juggernaut Rare Elites, Rift Guardians and huge monsters such as Golgors or Mallet Lords cannot be pulled.
When the game refers to Shouts, it refers to the skills from the Tactics category: War Cry, Threatening Shout and Battle Rage. The zBarb always use the first two skills of this list as both bring huge benefits to any group setup.
These skills have a fairly low cooldown and generate a decent amount of Fury, which is great regarding Resource management, as the zBarb generally makes a pretty big usage of its Fury through Ancient Spear Rage Flip. War Cry also possesses a unique and convenient mechanic that completely stops Fury Degeneration for 5 seconds after using it even if you're out of combat or didn't get hit for 5 seconds.
Inspiring Presence is a staple for every zBarb. It doubles the duration of War Cry, so that it lasts 240 seconds instead of 120 but the main reason to use it is the 3% Life Regeneration effect which is a different 120 seconds buff applied on players upon using any Shout skill. The duration of the War Cry Hardened Wrath 5 second 60% additional Armor effect upon cast is not doubled by Inspiring Presence. Threatening Shout 15 second duration is doubled to 30 seconds for every rune but Falter, which duration stays 6 seconds.
Horde of the Ninety Savages (2) Bonus doubles the effectiveness of Shouts. Effectiveness doesn't include base buff effect duration nor range. As the term effectiveness is rather blur and only refers to specific effects, let's take a closer look at what we get in practice:
- War Cry
- Base effect of 20% Armor bonus gets buffed to 40%.
- Hardened Wrath 5 second Armor bonus gets buffed to 120%.
- Charge! is not affected and still generates 50 Fury.
- Invigorate's Life % and Life Regeneration are doubled.
- Impunity grants 40% All Resistance.
- Veteran's Warning Dodge Chance is buffed to an impressive 60%.
- Threatening Shout
- Base effect of 20% Reduced Enemy Damage is buffed to 40%.
- Demoralize Taunt and Terrify Fear duration both get doubled.
- Intimidate 60% Movement Speed Slow becomes a tremendous 90% Slow.
- Grim Harvest Health Globe spawn chance goes from 15% to 30%.
- Falter 25% additive damage buff becomes a 50% buff.
Threatening Shout Falter is usually the rune of choice for most group setups, due to its amazing 50% additive damage debuff (which replaces the base damage reduction debuff) but when playing with a Witch Doctor, Grim Harvest becomes a strong option in order to fuel Gruesome Feast's 50% Intelligence bonus. Nonetheless, bear in mind that Grim Harvest is a hit or miss effect: only the first application of the debuff on monsters has a chance to spawn a Health Globe!
Chilanik's Chain grants a 40% Movement Speed buff for 10 seconds to you and all allies within 100 yards upon casting War Cry. This item legendary effect does not have any specific interaction with Inspiring Presence or Horde of the Ninety Savages (2) Bonus.
Ancient Spear Rage Flip has always been the backbone of the zBarb playstyle. However, this skill is one of the most complicated to understand and manage properly. First of all, its mechanic is unique and fairly unintuitive overall. Secondly, Rage Flip is hard to master in practice as its mechanic offers a wide variety of gameplay applications. Also just like Ground Stomp Wrenching Smash, a good understanding of Crowd Control Resistance and Monster Hitboxes is absolutely necessary.
First of all, note that Rage Flip does not work on Juggernaut Rare Elites, Rift Guardians and huge monsters like Punishers, Mallet Lords, Golgors or Armaddons, as they are immune to Knockbacks. Rage Flip has a maximum range of 60 yards, which represents slightly further than the edges of your screen. Where things become interesting is that targets chained by Rage Flip are thrown behind you at approximately the same range they were in front of you when they got chained. These mechanics put together explain why Rage Flip is so powerful: it allows you to do long range pulls while also allowing you to control the magnitude of the pull.
Rage Flip possesses an innate 1.2 Attack Speed multiplier. This means that at 1 APS, Rage Flip has an animation of 50 frames and at 3 APS it has an animation of 17 frames. Rage Flip does alternate Weapons, which means Attack Speed matters on both your Weapons.
Rage Flip does not work if there is an obstacle in the way between you and monsters' hitboxes. Walls from the Waller Affix are blocking Rage Flips, which is one of the reasons you should always have Bottomless Potion of Kulle-Aid. However, holes and gaps in the layout does not matter if the monster pulled is considered a flying monster like Vile Swarms, Anarchs, Bees or Plague Carriers for instance.
The same way, the landing position needs to be free of monsters and obstacles, otherwise targets will not be thrown behind you, and rather pulled in front of you. Meanwhile this seems to be a bad thing, once we understand this mechanic, we can play around and use it at our own benefit. It is possible to pull on purpose monsters in front of you or even perform Harpoon-like pulls that are effectively pixelpulling monsters with Rage Flip.
Stairs Pull
Rage Flip is thrown towards the targeted monster if you targeted one and will follow a logical path towards this target. This is why aiming is essential and especially important when pulling monsters on a different Z-axis, such as stairs pulls. Don't forget that if aiming is crucial, pull angle and positioning are equally decisive when it comes to perform proper Rage Flips for your group.
Now that we explained the core mechanics of Rage Flip, one thing we only scratched with the importance of aiming and positioning is the general playstyle. The zBarb playstyle at higher level of Greater Rift is extremely fast-paced, you want to be able to accurately aim while moving and charging around... while processing the situation of your surroundings at any time given.
When you're pulling horde of monsters to your group, you want to quickly move forward between each Rage Flip, as it enables you to not waste any time and also avoid some situations where monsters get pulled to you instead of flipped behind because of the surrounding monsters. Instead of quickly moving forward, it is also possible to Furious Charge, which mainly allows you to move further without wasting any time. In practice, you're going to move your cursor back and forth most of the time, while having to aim monsters in the process. If you're a terrible player on FPS games, I'm afraid Rage Flip zBarb might not be the best fit for you!
Don't forget you want to charge through enemies as the ending animation of Furious Charge procs a Knockback! Cold Rush can be used purposefully to lock some targets and help you aiming them with Rage Flip or in case of Elites, prevent them from using their Affixes, such as Shielding or Waller.
The pull range can be slightly extended by using Furious Charge right after you throw the Rage Flip, or getting Wormholed by the Elite Affix. Indeed, the pull angle and cast location are locked only when the Rage Flip reaches its maximum range of 60 yards. This also means you can perform slightly curved pulls by quickly moving or charging after throwing a Rage Flip.
Missile Dampening can even allow for crazy pull angles or enabling you to preshot your next actions as it greatly increases the time it takes for the Rage Flip to travel 60 yards. This Elite Affix is all in all not bad to pull as long as the layout is wide enough, but only if you understand all the mechanics we previously mentioned. As an example, throw your Rage Flip towards a Missile Dampening, position yourself with enough monsters (depending on how far the Elite is) or obstacles behind you... and wait for the magic to happen, the Missile Dampening will be pulled right on you if there is enough space for it to land. Another trick to remember about this Affix is that the Missile Dampening bubble only activates if the monster has aggro on a player.
Keep in mind that this example is only one of the many gameplay applications you can perform with enough practice if you understand the in-depth mechanics behind Rage Flip. Practice, practice... and practice again!
While the Spin to Win feeling from the Whirlwind zBarb has always been around, it was never the optimal way to play zBarb. But Season 27 brought an incredible Sanctified Power to play with; Sanctified Whirlwind allowed the zBarb to pull and drag everything wandering on its path!
Concept & Gameplay
Here are all the special rules from the Sanctified Whirlwind Power:
- Whirlwind pulls and holds all enemies within 25 yards.
- Sanctified Whirlwind completely ignores Crowd Control Resistance.
- It is a continuous knockback effect, meaning it does build CC Resistance on monsters.
- It can pull approximately 70 monsters depending on their hitboxes.
- The pull stop working for some time when a character snapshot occurs:
- When you level up.
- When you drink a Potion.
- When you enter a new Map.
- When you proc some Cheat Death effects (Enchantress).
Summary
- Overall best supporter in the entire game, used in every 4 players setup.
- Be aware of Crowd Control Resistance rules!
- Hard to master but very active and fun to play.
- Carry and lead your group to victory!
I hope this guide gave you great insights about the zBarb and will help you improve your understanding and playstyle. For me playing zBarb is one of the most enjoyable things to do in Diablo III so enjoy the real Barb power!
Credits
Written by Rob & Chewingnom.
Updated by Chewingnom.