Last Updated:June 3, 2025|Changelog
Introduction
View all variants
Spirit Barrage has been a mysterious skill throughout Diablo III's history. The Barber was initially introduced in Season 9, but its first viable build didn't appear until Season 10 when players discovered that Phantasms were considered Pets, which let them benefit from Mask of Jeram, Enforcer, and using Attack Speed as a separate damage multiplier.
After being the top dog in solo and groups in Seasons 10 and 11, LoN Spirit Barrage fell out of relevance due to other builds being buffed. It is only with Season 20 and the addition of Mundunugu's Regalia that Spirit Barrage builds became viable again due to The Barber and Gazing Demise buffs.
Unfortunately, Season 21 brought a significant nerf to the build by removing the ability for Phantasm to benefit from Mask of Jeram and Enforcer. Season 23 further nerfed Spirit Barrage by lowering the Gazing Demise damage multiplier.
While Spirit Barrage is best used with its dedicated Mundunugu's Regalia Set, Legacy of Dreams is an interesting setup choice as it is tankier and allows for more flexibility. Additionally, even though LoN Carnevil dominates on the No Set leaderboard, you can have decent performances with it due to its exceptional scaling with monster density, which however requires a lot of Greater Rift fishing. In Season 27, LoD Spirit Barrage is a serious contender to LoN Carnevil due to the Sanctified Piranhas (Sanctified Haunt). With Season 28, the build gets a slight buff with Manitou dealing more than twice the damage it did previously.
Unlike most others, this is not an Area Damage (AD) build, since all your damage comes from The Barber explosions which cannot proc it. It does replicate it though by redirecting the damage done by Spirit Barrage to all targets within 15 yards. This setup relies on many interactions between Phantasm and Manitou with The Barber, which makes it hands down one of the most complicated builds to fully understand in the entire game (see Mechanics). This guide will steer you through all the mechanics behind Spirit Barrage!
Unique Playstyle ✔
Insane AoE damage ✔
Rewarding Explosions ✔
Rewards Excellent Gameplay ✔
❌ Difficult Execution
❌ Sensitive to Fishing
❌ Complicated Mechanics
❌ Low Single Target Damage
Core Setup
Items
- The Barber is the core item behind the special mechanics of the build and gives us a 500% damage bonus to Spirit Barrage.
- Gazing Demise provides us with a 150% separate damage multiplier, makes Phantasms last twice as long and increases Manitou Attack Rate.
- Voo's Juicer grants us both The Spirit is Willing and Phlebotomize on top of 60% Spirit Barrage damage.
- Ring of Emptiness activated by Locust Swarm Pestilence for another 300% separate damage multiplier.
- Squirt's Necklace is rarely used for Witch Doctors but due to Phantasm accumulation mechanics, it is the most beneficial item for this slot.
- Belt of Transcendence allows us to get an army of 15 Fetishes at all times that we are going to use as meat shields to reduce incoming damage and protect Squirt's Necklace as much as possible.
- Stone Gauntlets provide an outrageous amount of mitigation and their negative effect can be fully negated by Ice Climbers.
- Convention of Elements is another separate damage multiplier, giving you triple damage for Phantasms ticks accumulated during your Cold cycle.
- Aquila Cuirass and Unity grant us two sources of 50% damage reduction.
- Lakumba's Ornament provides us with another 70% damage reduction with Soul Harvest Languish which already gives us 15% Intelligence and 50% Armor.
Season Theme - Eternal Conflict
For the duration of this season, all players will benefit from the Pandemonium Kill Streak buff initially available in Season 19. For each stack of this buff, you’ll receive a small boost to movement speed and bonus damage, ultimately capping out at 50% movement speed and 100% damage at 1000 stacks. In addition, reaching certain kill streak goals will trigger a special effect and cause even more mayhem on the battlefield! For full details on how this works, check out this exclusive Seasonal Guide!
The Kill Streak effects are:
- 15 Kills: Exploding Chickens seek and destroy
- 30 Kills: A wide Frost Nova freezes enemies
- 50 Kills: Corpses rain from the sky
- 100 Kills: Five massive Energy Twisters are unleashed
- 150 Kills: Dark Geysers form beneath enemies
- 200 Kills: Treasure Chests fall from the sky
- 300 Kills: A Ring of Fire engulfs everything
- 400 Kills: Meteors hail from above
- 500 Kills: Angels descend upon the battlefield to fight
- 1000 Kills: Diablo appears!
In speedruns, you usually don't profit much from this season theme, however in pushing it opens up a lot of strategic depth by playing around various key kill counts. Especially the Geysers (150), Meteors (400) and Angels (500) are the most impactful and can kill anything in an instant, allowing you to get a significant progression boost if used correctly.
Depending on the situation, it may be best to voluntarily reset your kill streak after 150 to get the Geysers multiple times, or to set up for a boss kill by getting as close as possible to that number and then hoping for a Rift Guardian with adds or a few kills from Nemesis Bracers.
Build Adjustments
Furthermore, each of these three procs can finish the rift guardian instantly all the way up to GR150, allowing you to push without Bane of the Stricken if you manage to set it up properly. If you are willing to give up consistency for more power, you can replace this gem with Pain Enhancer.
Global Stat Priorities
You want to stack damage stats wherever possible, especially Critical Hit Chance and Damage, Attack Speed as well as Cold Damage and Spirit Barrage Damage. Area Damage is useless in this build (and actively avoided in groups including in Paragon Points) as we only deal damage with The Barber explosions. Cooldown Reduction is not really needed as Grave Injustice will do all the work, especially with some Pickup Radius. It is still a good defensive stat to get on items lacking good offensive options like Shoulders and Off-Hand.
Increased Attack Speed is a good stat as it is a separate multiplier for Phantasms and it helps us out stacking Bane of the Stricken. Manitou does not scale with Attack Speed in any way while Phantasm cast rate depends on Attack Speed Breakpoints when holding down Spirit Barrage, hence it is important to stay away from some Spirit Barrage Breakpoints (see Mechanics).
For toughness, we prioritize Vitality and Elite Damage Reduction on Chest. Phantasm accumulation mechanics require a pretty static playstyle and Manitou grants us a good Life recovery with Phlebotomize. This is why we aim for around 900,000 HP in Greater Rift Solo Push. The next priority would be Armor wherever it is possible, mainly in Chest and Pants sockets using Flawless Royal Emerald if you feel too squishy. Physical, Lightning or Arcane Resistances as a Secondary Affix are generally useful to have as Arcane Enchanted, Orbiter and Mortar Elite Affixes are your worst enemies by a long shot.
While not mandatory, Maximum Mana as secondary Affix is recommended on both Weapon and Mojo as it greatly helps with Aquila Cuirass uptime after casting Locust Swarm or Piranhas. Crowd Control Reduction is an incredibly valuable secondary Affix to roll on both Rings, Amulet and Helmet as we are very sensitive to Hard Crowd Control effects and mitigating these will ease up our gameplay significantly. Make sure to get the Primary Affixes locked in before attempting to get CCR though.
1. Do the Challenge Rift for the materials to cube Legendary Powers. You can complete this once a week for additional resources and we always update the guide for you!
2. This is a Legacy of Dreams build whose success is heavily dependent on this gem's rank. The first order of business is to equip a Legendary or Set item in every slot to take advantage of its power. Make sure to not have any Set Bonuses equipped or the gem will be nullified and you will deal no damage! Farm speed Greater Rifts (in under 5 minute clears) to find the items and get this gem as high as possible. Above Rank 25 ancient pieces of gear will give you even greater power. Note that meanwhile Legacy of Dreams is great to get you started, farming with Mundunugu's Regalia to collect the LoD setup gear is a valid option.
3. Gamble from Kadala in this order:
- Create a level 1 Witch Doctor and gamble for Gazing Demise
This is the only Mojo accessible at level 1 and will help you get started.
Gamble it on a level 70 character afterwards. - Goldwrap, Krelm's Buff Belt, The Witching Hour and Belt of Transcendence
- Warzechian Armguards and Lakumba's Ornament
- Aquila Cuirass
- Frostburn, Stone Gauntlets and St. Archew's Gage
- Blackthorne's Jousting Mail and Hexing Pants of Mr. Yan
- Ring of Emptiness, Convention of Elements, Rechel's Ring of Larceny and Unity
4. Craft using Recipe 3 in Kanai's Cube in this order:
- Ceremonial Knives to get The Barber and Voo's Juicer
- Create a level 1 Demon Hunter and upgrade Swords to get In-geom
- Amulets to get Squirt's Necklace
- Anything from the Gamble list in Step 3 that you haven't already acquired.
5. Do Bounties to acquire several important items for this build:
- Act 1: Ring of Royal Grandeur and Pauldrons of the Skeleton King
- Act 2: Gloves of Worship and Illusory Boots
- Act 3: Avarice Band
- Act 4: Can drop any bounty item from any act
- Bounty Turn In: Recipes for Cain's Destiny and Sage's Journey (for your follower)
6. At this point you can somewhat comfortably farm Nephalem or Speed Greater Rifts where you can find all the remaining items you need for different variants of the build. Spend your materials getting items with better rolls and/or ancient quality.
7. Use Primordial Ashes in Kanai's Cube with the new Curiosity of Lorath Nahr recipe to obtain a free Crafted Primal Ancient. Since you can only equip one of them, choosing the right item to focus matters! Great candidates are Weapons, Offhands, Jewelry or any item with an important multiplier. With that in mind, we recommend getting one of the following items:
- Ring of Emptiness
- Gazing Demise
- Convention of Elements
| SLOT | ITEM | STAT PRIORITY |
| Main-Hand | The Barber Voo's Juicer In-Geom (Cubed) | 1. Damage Range 2. Socket Ramaladni's Gift 3. Attack Speed 4. Damage % 5. Cooldown Reduction 6. Intelligence |
| Keep in mind Voo's Juicer has to be equipped for its 60% Spirit Barrage Damage Affix! | ||
| Off-Hand | Gazing Demise | 1. Critical Hit Chance 2. Spirit Barrage Damage 3. Elite Damage 4. Intelligence 5. Vitality 6. Cooldown Reduction |
| Ideally, you want Maximum Mana as Secondary on Voo's Juicer and Gazing Demise. | ||
| Helm | Andariel's Visage Leoric's Crown | 1. Cold Damage 2. Spirit Barrage Damage 3. Critical Hit Chance 4. Attack Speed 5. Intelligence |
| Gloves | Frostburn St. Archew's Gage Stone Gauntlets (Cubed) | 1. Critical Hit Chance 2. Critical Hit Damage 3. Attack Speed 4. Intelligence |
| Shoulders | Pauldrons of the Skeleton King Homing Pads | 1. Intelligence 2. Cooldown Reduction 3. Armor 4. Vitality 5. Life % |
| Chest | Aquila Cuirass | 1. Sockets Flawless Royal Emerald 2. Intelligence 3. Vitality 4. Elite Damage Reduction 5. Life % 6. Armor |
| Pants | Blackthorne's Jousting Mail Swampland Waders Hexing Pants of Mr. Yan | 1. Cold Damage 2. Intelligence 3. Sockets Flawless Royal Emerald 4. Vitality 5. Armor |
| Boots | Ice Climbers Illusory Boots (A2 Bounties) | 1. Spirit Barrage Damage 2. Intelligence 3. Vitality 4. Armor |
| Ring 1 | Convention of Elements Avarice Band (A3 Bounties) | 1. Socket 2. Critical Hit Chance 3. Critical Hit Damage 4. Attack Speed 5. Damage Range 6. Intelligence |
| Ring 2 | Ring of Emptiness Unity Rechels Ring of Larceny | 1. Socket 2. Critical Hit Chance 3. Critical Hit Damage 4. Attack Speed 5. Damage Range 6. Intelligence |
| Bracers | Lakumba's Ornament Nemesis Bracers Warzechian Armguards (Cubed) | 1. Cold Damage 2. Critical Hit Chance 3. Intelligence 4. Vitality 5. Armor 6. All Resistance |
| Amulet | Squirts Necklace | 1. Socket 2. Critical Hit Damage 3. Cold Damage 4. Critical Hit Chance 5. Intelligence |
| Belt | Belt of Transcendence Goldwrap Krelms Buff Belt The Witching Hour | 1. Intelligence 2. Vitality 3. Life % 4. Armor |
| Potion | Bottomless Potion of Kulle-Aid | For breaking walls to pull enemies and increase DPS |
- Legacy of Dreams is the Legacy of Nightmares Set in a gem, which frees up two ring slots at the cost of removing Gogok of Swiftness. Due to the rings available to us this is a great trade-off to take.
- Bane of the Stricken helps us kill the Rift Guardian. As long as you don't need more than 2 minutes to kill it you can equip Bane of the Powerful instead.
- Bane of the Trapped is equipped since it grants us a nice 1.6 global separate multiplier and is applied by default in this build, since Spirit Barrage applies its slow before the damage instance.
- For Nephalem Rifts, Boon of the Hoarder is always a default include specifically due to its amazing synergy with Avarice Band.
- Spirit Barrage Manitou is our main skill. Phantasm is given for free by Gazing Demise and will deal the bulk of the damage. The Spirit is Willing and Phlebotomize are provided by Voo's Juicer and are great for Mana and Life recovery as they are procced by Manitou.
- Locust Swarm Pestilence is used to enable the Ring of Emptiness damage multiplier and is a great tool for massive bodypulling.
- Spirit Walk Jaunt or Severance for mobility and survival purposes.
- Piranhas Piranhado is used to apply a 15% additive damage debuff and pull enemies together, which synergizes well with the overall playstyle
- Soul Harvest Languish for massive damage and damage reduction buffs with Lakumba's Ornament.
- The final slot is open and can be filled with different options. Big Bad Voodoo Slam Dance provides a small damage boost. Ghost Trance can be used to help you survive and is a better option at lower paragon or to get used to the playstyle. Zombie Dogs can be spawned by changing to Big Bad Voodoo Boogie Man or equipping Summon Zombie Dogs.
- Grave Injustice is the cornerstone of our playstyle. It reduces Cooldowns when you kill enemies, allowing a very high uptime of Spirit Walk and Big Bad Voodoo.
- Confidence Ritual provides us with a separate 1.25 multiplier if our target is within 20 yards. This means we need to adopt a somewhat melee playstyle.
- The last two passives are chosen based on your needs and preferences:
- Swampland Attunement for more toughness.
- Creeping Death makes Locust Swarm Pestilence and the additive damage debuff from Piranhas Piranhado last almost forever, which significantly ease up our gameplay, allowing us to focus on pulling and damage and getting a better Aquila Cuirass uptime.
- Gruesome Feast for some damage and toughness.
- Spirit Vessel to escape death.
- Blood Ritual grants us Life recovery based on our HP pool while also allowing for easier Aquila Cuirass uptime.
- Rush of Essence provides infinite resource, easing up the gameplay mainly regarding Aquila Cuirass uptime.
| Core | Offensive | Defensive | Utility |
| 1. Movement Speed | 1. Attack Speed | 1. Armor | 1. Resource Cost Reduction |
| 2. Maximum Mana | 2. Critical Hit Damage | 2. Life % | 2. Life per Hit |
| 3. Intelligence | 3. Critical Hit Chance | 3. All Resistance | 3. Pickup Radius |
| 4. Vitality1 | 4. Cooldown Reduction | 4. Life Regeneration |
1 Aim for a decent HP pool (~900,000 Life in Solo Push) as Phantasms accumulation requires a pretty static playstyle.
2 Avoid any source of Area Damage as this build doesn't scale with it and it can lag the game.
The Altar of Rites is a tree that grants tremendous powers to your entire account in exchange for sacrifices. It requires you to farm Bounties, kill the Ubers, craft the Staff of Herding, and more. Completing all 26 of these tasks, along with sacrificing 6 Primal Ancients grants you extra Damage, Defense, Quality of Life, Increased Drops and 3 Potion Super Powers. Read the full guides on Unlocking the Altar and the Altar Mechanics by Raxxanterax and Chewingnom to learn everything about this fantastic mechanic!
Note: The suggested path assumes you are playing Solo and used the Challenge Rift Cache to help you level up.
Optimal Path
Node 2: Choose Anointed to gain a full set of 70 yellows from level 18-70!
Node 6: Rush to gain double Bounties to help unlock other Nodes in the Altar.
Node 7: Take Vigor to help your build sustain its resources.
Nodes 8-14: These are the last Nodes you can gain until the Challenge Rift resets. Take at least 1 Node at the bottom of each path to unlock all 3 Potion Super Powers. Pick up the Mirror Node at the top for a colossal 41% extra XP all season. Remember to unlock Father once you clear GR70 solo and have your first Primal!
Nodes 15-26: Pick up the final Quality of Life, Damage, and Defense Nodes (in that order) to finish the Altar.
Potion Super Powers: Take Father first, then Mother, and finally Mortal.
Disclaimer: The Mortal and Mother Potions require you to salvage 2 and 3 Primals respectively. Unlock them as soon as you have those materials as they don't cost a point!
Use the Scroll Bar to see Altar Progression
Patch 2.7.0 revamped the follower system giving all 3 hirelings new powers and the emanate system. The first thing you should do is read our complete follower guide and remember the key takeaways:
- The emanation system allows followers to share certain legendary and set powers with you. The most important ones are: The Flavor of Time, Nemesis Bracers, Avarice Band, Sage’s Journey and Cain’s Destiny. Click the guide above for the full list.
- Follower’s powers are based on their main stat (maxed at 25,000, but they have a 2.5x multiplier so you only need 10,000). This means we stack Intelligence on the Enchantress, Dexterity on the Scoundrel and Strength on the Templar.
- Guardian's Jeopardy (3) Bonus works for followers by improving their inherent stat multiplier from x2.5 to x3.5, making it slightly easier to hit the 25,000 main stat threshold if needed.
- Followers share 20% of their Experience, Magic and Gold Find stats with you.
- Legendary gems do not work on followers, except Esoteric Alteration and Mutilation Guard.
- Cooldown Reduction does not work for any follower skill except the Templar’s Heal.
- Followers never deal significant damage; you’re on your own to clear the content.
Select Follower
For T16 we recommend this Enchantress setup because she is the only follower that gives Cooldown Reduction, allowing you to spam your abilities more. Since this is T16 content, she’ll stay alive with Esoteric Alteration and Mutilation Guard and use Hand of the Prophet to gain all skills. This will give us Cooldown Reduction, Elemental Damage, Reduced Damage from Ranged Attacks, Armor, Attack Speed, and a Cheat Death.
Stat Priorities:Since we do not have the immortality focus, we need to stack survivability on our Enchantress.
Intelligence > Vitality > Life % > Armor > All Resistance > Life Per Hit > Attack Speed.
Key Items:
- The Flavor of Time: For double duration on Pylons.
- Nemesis Bracers: For extra Elites, Death’s Breaths and In-geom procs.
- Avarice Band: For the insane pickup radius.
- Ring of Royal Grandeur: To complete our sets.
- Gloves of Worship: For 10 Minute Shrine Buffs.
- Sage’s Journey: For double Death’s Breaths.
- Cain’s Destiny: For 25% more Greater Rift Keystones.
For Greater Rift with Legacy of Dreams using Unity we recommend this Scoundrel setup for the Critical Hit Chance from Anatomy, 10% increased damage from Piercing Shot, and the insane Critical Hit Chance cloud from Night’s Veil, which perfectly complements Phantasms accumulation playstyle. If you have trouble surviving, the Templar geared with Cooldown Reduction is a good option for his Heal.
Stat Priorities:Since we have the immortality token, we do not need to stack survivability on our Scoundrel.
Dexterity > Attack Speed.
Key Items:
- The Flavor of Time: For double duration on Pylons.
- Nemesis Bracers: For more progression from Elites.
- Oculus Ring: For 85% increased damage.
- Unity: For 50% damage reduction if you're also wearing one.
- Any Bow w/ Attack Speed & Freeze on Hit: To control the Rift Guardian, helping with Squirt's Necklace.
- Ice Climbers: To make your follower immune to Freeze and Immobilize effects.
- Mempo of Twilight, The Witching Hour, Tal Rasha's Relentless Pursuit and Cain's Destiny: For more Attack Speed.
Spirit Barrage has to be used with care and not always spammed. Doing so will usually actively reduce your overall damage output. Activate Big Bad Voodoo whenever you engage with a new pull of monsters. Grave Injustice should ensure you always have it ready. Always cast Big Bad Voodoo before positioning your Phantasms because the Attack Speed and Additive Buff are snapshot by them!
Use Spirit Walk to move through enemies that are in the way, for defense, to dodge affixes and projectiles or similar. Don't waste it when you don't need it! When making a pull, engage several screens of monsters by bodypulling and spreading Locust Swarm Pestilence, then group them up using Piranhas Piranhado. Make sure that Locust Swarm is applied to everything for the Ring of Emptiness effect. Don't forget monster density is extremely important to scale your damage, do not engage with small pulls!
When you are ready to damage monsters:
- Put 3 Phantasms on top of each other on the enemies.
- Pull a bit more enemies together as your initial Phantasms are ticking on the pull. Try to spawn an Oculus Ring by killing as few monsters as possible by quickly recasting Spirit Barrage on top of the stack of enemies until you see one. Go into the Oculus Ring proc and wait for your Phantasms to accumulate damage, using Spirit Walk to avoid incoming damage. While waiting, you can also use Homing Pads damage reduction (equipped on your follower) by teleporting to town and interrupting it.
- When Spirit Walk or Oculus Ring proc are over, or you feel the damage accumulated is enough to kill most targets, detonate 1 Phantasm, or more until you see another Oculus Ring proc. Rinse and repeat. The idea is to time your Spirit Walk with your Phantasm explosions to reset the cooldown immediately (Grave Injustice won't work if Spirit Walk is still active) while maximizing your Oculus Ring uptime.
- Try to never touch Spirit Barrage during Spirit Walk, as Phantasms spawned during Spirit Walk won't accumulate damage until Spirit Walk is over!
On Rift Guardians:
- On a single target, Manitou and Phantasms will both deal approximately half of your damage.
- It is not needed to channel Spirit Barrage, you only need to keep Manitou and 3 Phantasms at all times.
- Do not get hit to maximize Squirt's Necklace stacks. This is where Belt of Transcendence shines as Fetishes are going to tank the Rift Guardian.
- On Bloodmaw, use Spirit Walk whenever the Rift Guardian starts its Leap animation. This interrupts it as Bloodmaw needs to have a target to perform this attack.
- On Voracity, use Spirit Walk while entering Gas Clouds. As AoE ground effects snapshot toughness upon entering them, you will take 0 damage from the Gas Clouds.
- Use the layout and your Fetishes to protect yourself from some Rift Guardians' abilities like on Agnidox, Cold Snap or Erethon. Check out this post about Rift Guardians to learn more!
- Due to Manitou randomly targeting monsters within 40 yards, Rift Guardians with lots of minions like Hamelin or Saxtris are not as good as you would think.
- The Binder is still decent as minions spawn on the boss, being instantly killed by Phantasms and granting you an Oculus Ring.
Witch Doctors are typically not the best class to play in Hardcore as you have no immunity to Crowd Control and only limited defensive utility skills with long Cooldowns. Witch Doctor's defensive playstyle mainly relies on Grave Injustice and Spirit Walk combination. Nevertheless, the build is overall fairly tanky and should have no big issues if you are mindful about Elite affixes.
Don't forget to use the Spirit Vessel passive at all times! Additionally, you can use the Templar as a follower with Cooldown Reduction for his Heal. Check out our dedicated Hardcore Survival Guide to learn more about how to succeed in this game mode!
Variants
Concept
Spirit Barrage constitutes the best Nephalem Rift farmer for the Witch Doctor class. Spirit Barrage Manitou continuously attacks for you even while you are moving; all the damage multipliers from Gazing Demise and The Barber as well as Squirts Necklace (protected by St. Archew's Gage) provide such a massive damage boost that it's not necessary for you to worry for the accumulation mechanics of The Barber. You can use Phantasms to accumulate extra damage on Elites and Rift Guardian, however while moving Manitou will do most of the work.
Gameplay
Cast Summon Zombie Dogs once at the beginning to create minions for your Fierce Loyalty; simply spam-click Horrify, Spirit Walk and Soul Harvest off cooldown. Use Sacrifice Provoke the Pack before casting Phantasms on tougher enemies like Rift Guardians.
Horrify in conjunction with Rechels Ring of Larceny provides you with an incredible amount of Movement Speed, effectively making you fly through Nephalem Rifts while Goldwrap with Boon of the Hoarder and Avarice Band (on your follower) will grant you invincibility.
Setups
Early in a season, if your damage is too low for Manitou to one shot monsters, going for a channeled rune like Well of Souls, Phlebotomize or The Spirit Is Willing is a good option as it allows you to do single target channel on Elites and Rift Guardians.
In groups, swap out Convention of Elements and Stone of Jordan for The Flavor of Time and Avarice Band and replace Warzechian Armguards and Pauldrons of the Skeleton King with Nemesis Bracers and Homing Pads.
Concept & Gameplay
Like in Nephalem Rifts farming, we go for Stone of Jordan as Convention of Elements doesn't really fit in a speedrun playstyle.
As St. Archew's Gage protects our Squirt's Necklace damage multiplier, we can safely use The Witching Hour instead of Belt of Transcendence.
The idea is to farm a Greater Rift tier where you can comfortably clear within 3 to 4 minutes. The gameplay is simply a sped up variant of the solo push one.
Setups
If you feel too squishy, swap Frostburn with Stone Gauntlets and take back Ice Climbers instead of Illusory Boots.
Echoing Fury can bring you a nice 25% Movement Speed buff but unfortunately results in a loss of damage and toughness compared to Voo's Juicer, only consider it if you're going for lower Greater Rift tier farming or if you drop Manitou for a channeled rune.
It is indeed possible to go for a channeled rune like Well of Souls, Phlebotomize or The Spirit is Willing to make perfect use of Echoing Fury in the cube. While the damage output is similar and the gameplay is more active, you gain 25% Movement Speed and playing a channeling rune allows you to accumulate on single targets like Elites and Rift Guardians with adds.
Concept
This is the setup described in the main sections of the guide. While the potential of this build is pretty high, you must plug-in several hundreds of keys before you get a playable rift to push very close to your GR limit, but once all the stars align it will be smooth sailing.
Gameplay
The most common mistake in this setup is attempting to kill monsters while simply holding down Spirit Barrage continuously. The playstyle requires you to pull several screens of monsters via Locust Swarm Pestilence and herd them via Piranhas Piranhado and afterwards place Phantasms on top of the pull.
You must use Spirit Walk in a well timed fashion, while accumulating, and reset its cooldown immediately via Grave Injustice by manually detonating one of your Phantasms. Getting the above standing rotation and timings down properly is key in terms of damage and survivability. Simply, mindlessly spamming Spirit Barrage will get you killed and significantly decrease your overall damage output. For a step-by-step gameplay description on how you should sequence your skills, check out the "Gameplay" section above.
Setups
At lower paragon, replacing Swampland Attunement with Spirit Vessel is a good option. On the contrary if you feel comfortable with your toughness, go for Gruesome Feast instead of Swampland Attunement. Taking the Templar as your follower instead of the Scoundrel can also fix survivability issues. Finally, swapping Big Bad Voodoo Slam Dance with Ghost Trance can help you a lot as well. And for even more survivability, you can always add more Vitality through Paragon.
Concept
For more information, check out our full Echoing Nightmare Guide and take a look at our Echoing Nightmare Build Tier List and our META post for the best builds and strategies! This build is decent for this game mode. Typically we utilize a Greater Rift pushing build with a few tweaks.
Changes
- Replace Piranhado with Wave of Mutilation to increase the range at which you apply the damage debuff.
- Swap Bane of the Stricken for Bane of the Powerful since we are fighting hordes of enemies.
Gameplay
- Click Speed Pylon instantly to boost your mobility and dodge Green Meteors.
- Around Wave 90, click Channeling Pylon and Power Pylon.
- After Wave 100, use Conduit Pylon.
- At Wave 122, stop attacking and run to the corner to let the timer run out.
Manitou will take care of most enemies on its own until Wave 100, just run around the area. We have awesome Big Bad Voodoo and Spirit Walk uptime as we are constantly killing enemies with Grave Injustice. Put 3 Phantasms on top of each other on the enemies. Try to never touch Spirit Barrage during Spirit Walk, as Phantasms spawned during Spirit Walk won't accumulate damage until Spirit Walk is over!
Video Guide
Mechanics
As incentivized in the introduction of this guide, the interactions and mechanics going on in Spirit Barrage builds are "a bit" more complicated than the average build. In order to optimize our Witch Doctor gameplay as much as possible, we must understand everything about it! Earlier in this guide, we talked about 2 different playstyles:
- Channeling Playstyle, which means holding down Spirit Barrage, continuously refreshing Phantasms and detonating the oldest one.
- Delayed Playstyle, which means letting Phantasms accumulate some damage before detonating them.
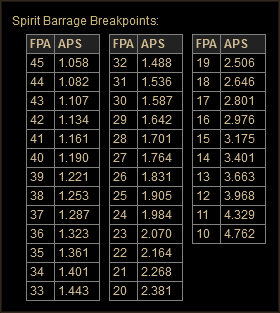
While the channeling playstyle feels like a natural choice, it needs to be avoided as much as possible due to Phantasm mechanics. The idea is that you can have up to 3 Phantasms alive at once, and if you keep casting Spirit Barrage, the oldest one will detonate for the damage accumulated by The Barber. However, Phantasm first accumulation tick happens on the first frame it is cast and then every 30 frames, regardless of your Attack Speed.
This means that depending on your Spirit Barrage Attack Speed Breakpoint, simply holding down and channeling Spirit Barrage will every now and then refresh a Phantasm only a few frames before or even on the exact frame it should have accumulated damage, losing frames towards a tick and significantly reducing your overall damage output.
The best case scenario is to refresh a Phantasm right after an accumulation tick.
This explains why you want to avoid channeling for long periods of time and why there are specific Spirit Barrage Breakpoints you absolutely want to avoid as they are "eating" Phantasm ticks extremely often, the most relevant being the 20 FPA and the 30 FPA Breakpoints. These considerations have been unraveled in this old reddit post.
Lots of Phantasms Ticks lost
Another reason to avoid the channeling playstyle at all costs is that it can effectively reduce your damage burst even more compared to a delayed detonation playstyle. Let's say you have 3 Phantasms accumulating damage on a pack of monsters.
If you detonate one of them, it would be enough to kill half of the pull; however, killing half the pull with one Phantasm would also mean your remaining Phantasms now accumulate damage on half the targets, making it more difficult to kill tougher enemies like Elite Packs. This is why you want to accumulate for as long as you can, and need to be very thoughtful about when to detonate. Monster density is by a long shot your biggest source of damage in this build.
The takeaway is to simply never channel Spirit Barrage, except on single target fights like Rift Guardians with a 21-23 FPA Breakpoint. Manitou does not require us to channel at all times and is not affected by Attack Speed in any way; holding down Spirit Barrage will simply constantly refresh its 20 second duration and Phantasms. Manitou will passively accumulate damage and stack Bane of the Stricken for us, we just need to make sure all 3 Phantasms are positioned on the Rift Guardian hitbox at all times if we don't have a proper Attack Speed Breakpoint to channel.
Another important reason to not mindlessly channel Spirit Barrage is any Phantasm spawned during Spirit Walk will not accumulate damage until Spirit Walk is over! Never touch Spirit Barrage while under the effects of Spirit Walk.
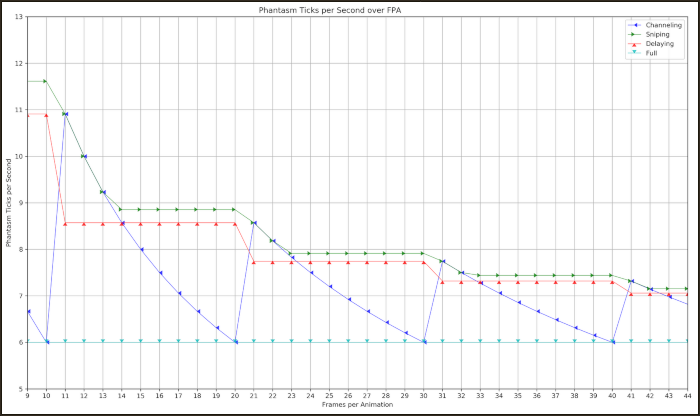
A relative damage output comparison of the possible playstyles can be seen here:
- Spectres from Phantasm are treated as pets and obey to very specific rules, often acting like a pet and sometimes not, which leads to several unique interactions.
- Like other pets, Attack Speed is a separate damage multiplier for Phantasms.
- Similarly, Spirit Barrage damage affix on your equipment is counted as a separate damage multiplier for Phantasm. This reason alone makes Voo's Juicer a solid item choice due to its fifth affix that grants 45-60% Spirit Barrage damage.
- Surprisingly, Ring of Emptiness, an item specifically designed to work with non-pet abilities only, does buff Spirit Barrage Phantasm damage.
- Mask of Jeram and Enforcer do not increase Spirit Barrage Phantasm damage anymore since the Season 21 launched alongside the patch 2.6.9.
- Frostburn's legendary affix granting "Cold skills deal 15-20% increased damage" double dips on Phantasm damage, for a total of 40% additional Cold damage.
- You can have 3 Phantasms at a time.
- They last for 5 seconds (10 seconds with Gazing Demise), ticking once every 0.5 seconds (30 frames).
- With The Barber equipped, they will deal no damage while on the ground. Instead, they will accumulate that damage (as in: add up / remember what they would have done) and then release it in the final explosion at the end of the duration (with the extra damage multiplier).
- Casting Spirit Barrage while you have 3 Phantasms active will detonate the oldest one (with its accumulated damage).
- Each tick is scaled by Attack Speed (sheet APS being a separate damage multiplier), making Pain Enhancer your strongest DPS gem by far in high density situations.
- The Attack Speed multiplier snapshots for each Phantasm individually upon cast. Moving out of the pull and therefore losing Pain Enhancer stacks will not reduce the Attack Speed multiplier of already placed Phantasms.
- Intelligence is snapshot by each Phantasm upon cast, including Soul Harvest and Gruesome Feast bonuses.
- All damage buffs are dynamically calculated for each tick during the accumulation phase with the exception of additive buffs like Sacrifice Provoke the Pack or Big Bad Voodoo Slam Dance, which are snapshot upon Phantasm cast. This means that you accumulate (wait) during DPS buffs like Oculus Ring or Convention of Elements and detonate afterwards. You won't need to have those buffs when the Phantasms explode.
- The explosions from The Barber cannot proc Area Damage as they have proc coefficient of 0, hence why it's not taken as a stat and actively removed from Paragons to reduce lags.
- Casting Spirit Barrage once will activate Manitou, an eerie ghost sentry hovering above your head.
- Manitou lasts 20 seconds and shoots 2 projectiles per second (for up to 40).
- With Gazing Demise, Manitou's Attack Rate is improved by 450%, going from 2 projectiles per second to around 11 projectiles.
- Manitou's Attack Rate is fixed, it does not have Attack Speed Breakpoints, hence adding more Attack Speed does not improve damage any further.
- In conjunction with Voo's Juicer, the numerous projectiles from Manitou are effectively triggering the effects of The Spirit is Willing and Phlebotomize runes.
- Not accumulating for 1.5 second will release the explosion, which means running out of range as you can't stop Manitou Attacks otherwise... or dying but the explosion lacks most damage multipliers in this case.
- Manitou will immediately explode as soon as enough damage has been accumulated to finish off the target, so no time can be lost by waiting too long. You cannot overkill a target (accumulate for too long).
- When accumulating for long periods of time on the same target (especially Rift Guardians), you won't see any damage done to the enemy until The Barber explosion is released.
- If there is more than one nearby enemy, Manitou will randomly switch between targets within 40 yards and create tiny The Barber explosions all the time. In high group Greater Rifts, you should avoid using this rune to reduce lag since all of your damage will come from Phantasm.
- This ability is one of the few ways in the game to pixelpull enemies.
- If used on top of enemies, it pulls them close together but does not pixelpull most of them. In order to get the best pull possible, it has to be used on a spot with no other nearby enemies.
Summary
- Put together the core items and level up the Legacy of Dreams gem.
- Don't stand still and channel Spirit Barrage.
- Pulling off the proper rotation around Grave Injustice and Spirit Walk is the key and is incredibly rewarding.
- Seek out massive monster density and use Locust Swarm to help you pull several screens at once.
- Detonate your way to victory!
Cheers!
Credits
Written by Chewingnom.