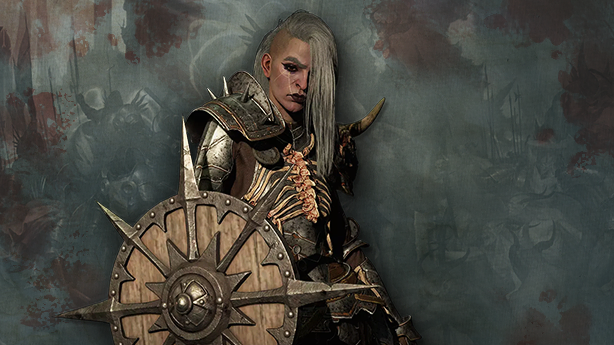
The Blood Lance Necromancer unleashes devastating single-target damage that tries to melt bosses whilst utilizing Blood Orbs and the "Lanced" mechanic to generate AoE attacks which destroy entire screens. The Blood Lance Necromancer deals its peak damage by making use of the guaranteed Overpower abilities provided by the Blood skills which also offer built-in tankiness through Fortify. Its cheap Essence cost means you can spam cast at single targets and output great DPS while the "Lanced" mechanic helps to easily spread your damage across the battlefield.
The "Lanced" mechanic creates a unique playstyle in Diablo 4. Every Blood Lance lingers in an enemy for 3 seconds and subsequent Blood Lances not only inflict damage upon the initially targeted enemy, but also replicate this damage to other enemies currently Lanced.
This build also stacks Critical Strike Chance and Damage to add another multiplier on your Overpower damage. When your primary Lance critically strikes, every Lanced target takes that bonus damage as well. With the ability to apply Vulnerable, the Blood Lance Necromancer gains access to every damage bucket!
This build is easy to respec into if you're coming from the Blood Surge Necromancer Leveling Guide.
This build guide assumes you have a Level 50 Character and finished the Campaign. Level up with our Blood Surge Necromancer Leveling Guide. If you are looking for a different Necromancer play style, check out all of our Necromancer Guides.
Season 4 - Loot Reborn
Skill Tree & Gameplay
- Corpse Explosion is used as corpse consumption for Grim Harvest, Fueled by Death and Flesh-eater.
- Blood Mist is your get out of jail free card. While you are Immune, reposition yourself to gain an advantage.
- Decrepify applies a powerful CC effect that also causes Lucky Hit procs to reduce Cooldowns on your Skills. Prioritize casting this on any new monsters, or when it runs out. This also greatly reduces incoming damage and makes kiting monsters easier.
- Corpse Tendrils is the best CC option in the game and also spawns a ton of Blood Orbs to trigger various benefits.
- Bone Storm provides additional Damage Reduction and Crit Chance.
- Blood Lance pierces through targets, applying its damage to all Lanced enemies, every time it hits a new enemy. Ideally you leave every fight with a few casts already counted towards your next Overpower, so you can guarantee an Overpower earlier into the next fight. Your lances are able to pierce already lanced targets. Whenever a Blood Lance deals damage, all lanced targets also take that damage. If you don't currently have enemies grouped up nicely, try to aim Blood Lance to maximize the number of pierce-able targets and aim for new targets whenever possible
- Rathma's Vigor gives you another source of Overpower procs when you are able to stay Healthy for 12 seconds. Picking up or consuming Blood Orbs decreases the time between guaranteed Overpower procs. Make sure to use your guaranteed Overpower procs on Blood Lance by keeping track of Rathma's Vigor's timer on your buff bar.
- Drain Vitality allows you to quickly stack Fortify to increase your Overpower Damage output as well as decrease incoming damage.
Book of the Dead
There are 3 different Minion types you can choose to summon or sacrifice, located in the Book of the Dead. The Blood Lance Necromancer chooses to sacrifice Skirmishers for the Critical Strike Chance bonus, Bone Mages for the massive increase to Overpower Damage and Iron Golem for Critical Strike Damage bonus.
Learn more details and how to unlock this class specialization in our full Book of the Dead Guide.
Resource & Cooldown Management
One of the most important parts of your endgame journey is acquiring enough Essence to destroy your enemies. With the introduction of +x Essence per Second in Season 4 the Resource management on the Bone Spear Necromancer has become extremely easy. Make sure you have enough +x Essence per Second on your gear to cover your Bone Spear costs. It is important to finetune your +x Essence per Second and your Resource Cost Reduction to smoothen the gameplay experience.
Decrepify is the most important ability when it comes to recovering your cooldowns quickly outside of raw Cooldown Reduction on your gear. With every proc you reduce every currently active cooldown by 1 second which adds up to quite a lot more uses of all of your abilities, especially over the course of a long fight.
Paragon Board
Carefully check your Paragon Boards to ensure correct board rotation. Glyphs go from a radius of 3 to 4 when they reach level 15!
Level the Paragon Board by scrolling. Each step optimizes progression.
Glyphs
You need to level up your Glyphs to increase their power and activate their Additional Bonus with surrounding nodes. Glyphs have a radius of 3 by default, this increases to 4 at Glyph level 15. Complete Nightmare Dungeons to obtain Glyph experience.
Glyph Leveling Priorities
Level 15
- Corporeal
- Exploit
- Control
- NOTE: The three Glyphs above need to be leveled to 15 to be functional and are your priority while progressing in WT3 and WT4.
- Dominate
- Essence
- Sacrificial
- Amplify
Level 21
- Essence
- Control
- Dominate
- Exploit
- Corporeal
- Amplify
- Sacrificial
Also check out our dedicated in-depth guides to learn more about Paragon Boards and Glyphs.
Endgame Progression & Variants
When you start diving into the Endgame Blood Lance Necromancer build, you don't have all the tools available to achieve the final build versions. Let us guide you through different progression points to give you a smooth transition from our Leveling Guides to the final build version.
Progression Goals
Many of your Skill choices depend on what Legendary Aspects and Unique items are available to you. While we can guarantee that everyone has access to the same Codex of Power Aspects, the progression might be different for everyone!
- Unlock the following Aspects from Dungeons:
- Grasping Veins in Corrupted Grotto (Kehjistan)
- Disobedience in Halls of the Damned (Kehjistan)
- Sacrificial in Ruins of Eridu (Hawezar)
- Optional: Blood Seeker's in Mercy's Reach (Fractured Peaks)
- Find the following Legendary Aspects either as a random drop or by gambling with Obols:
- Gore Quills - Gamble Focus.
- Hungry Blood - Gamble Focus.
- Rathma’s Chosen - Gamble Focus.
- Juggernaut's - Gamble Pants.
- Hardened Bones - Gamble Pants.
- Shielding Storm - Gamble Pants.
- Slaughter - Gamble Boots.
- Acquire the following Unique items either as a random drop or by farming specific Boss drops.
- NOTE: You cannot gamble Unique items with obols!
- If you're lucky enough to obtain the following Uber Uniques, they're useful for the build:
- Harlequin Crest - Check the "Endgame & The Pit" variant for how to fit this item into the build.
- Ring of Starless Skies - Check the "Endgame & The Pit" variant for how to fit this item into the build.
Learn more details and how to farm Legendary Aspects and Uniques in our General Farming Guide.
Progression Setups
to 100
& The Pit
Once you have completed the Leveling Guide, only the Codex of Power Aspects are guaranteed. With this setup you can farm the Legendary Aspects you need for the next progression point.
Gear
- Focus on acquiring +x Essence per Second on your Helm, Chest and Boots slots to solve your Essence management. Supplement with Resource Cost Reduction on your Jewelry.
- Maximum Life not only helps you survive, but also directly scales your Overpower damage.
- Grasping Veins provides an increase in Critical Strike Chance and a Damage multiplier.
- Blood Seeker's helps with damage a bit but is not necessary.
Skills
- Iron Maiden provides a huge amount of Essence on demand, but only per hit uncursed enemy.
- Raise Skeleton not only provides additional Essence generation through Skeletal Mages - Cold but also functions as your corpse consumption for Grim Harvest and Fueled by Death
- Corpse Tendrils provides Blood Orbs and collecting them reduces the time between Rathma's Vigor procs.
- Necrotic Carapace allows you to passively gain Fortify.
Book of the Dead
- Essence generation will be increased by incorporating Skeletal Mages - Cold. If you have enough Essence generation, sacrifice Skeletal Mages - Bone instead.
In this setup, you have access to all Legendary Aspects, allowing you to pilot a much stronger version of this build. Additional Legendary Aspects are used to fill slots that may be replaced with Unique items later on.
Gear
- While you keep increasing your +x Essence per Second on your gear you will now also have access to Tempering. You will increase your build's overall strength tremendously by getting accesss to more survivability, utility and damge.
- Hungry Blood and Gore Quills provide much needed AoE for your toolkit.
- Rathma’s Chosen skyrockets your Attack Speed for four seconds after an Overpower proc which helps you towards the next Overpower proc to keep the endless machine gun Blood Lance cycle going.
- Juggernaut's will get you Armor capped at 9230.
- Hardened Bones and Shielding Stormdrastically reduce the amount of damage you take.
Skills
- Pick up Corpse Explosion instead of Raise Skeleton as your main corpse consumption and sacrifice Skeletal Mages - Bone.
- Change Iron Maiden to Decrepify since your Essence generation is handled through your gear now.
Book of the Dead
- You now have enough Essence generation, therefore you can now sacrifice Skeletal Mages - Bone.
In this setup, you have access to all Legendary Aspects and Unique items, unleashing the strongest version of the Blood Lance Necromancer. Be prepared to grind to access some of these highly sought after items!
Gear
- As you continue your character's journey you will now start to focus on acquiring the correct Greater Affixes and correct Masterworking crits on your gear.
- Focus on getting one greater affix of Maximum Life on most gear pieces, while spreading your Masterworking crits to reach all necessary caps and breakpoints detailled in the "Stat Priorities" section below.
- Make sure you are now reaching Attack Speed cap during Rathma’s Chosen with a correctly rolled Blood Attack Speed Temper on your weapon.
- Blood Moon Breeches are crucial for the Blood Lance Necromancer build. Focus on Farming Duriel and Andariel for it.
- Ring of the Sacrilegious Soul now automates your corpse consumption.
Skills
- Ring of the Sacrilegious Soul grants +2 Ranks of All Corpse Skills which frees up the point in Corpse Explosion. That Skill point moves to Necrotic Carapace.
- Necrotic Carapace allows you to passively gain Fortify.
Gear with Uber Uniques
- If you are lucky enough to acquire a Harlequin Crest, you drop Juggernaut's and incorporate one +x Armor roll and two +x% Total Armor Tempers on your gear to offset the Armor lost.
- Ring of Starless Skies solves Resource Costs on its own while providing an incredible damage multiplier. Replaces Gore Quills.
The Blood Lance Necromancer already permanently moves at maximum Movement Speed and therefore doesnt have any changes in the Speedfarming variant.
Gear
- No changes
The Blood Lance Necromancer doesnt have any changes in the Bossing variant.
Gear
- No changes
In this setup, you have access to all Legendary Aspects and Unique items, unleashing the strongest version of the Blood Lance Necromancer. Be prepared to grind to access some of these highly sought after items!
Gear
- Acquire a Lidless Wall from Lord Zir and start using a Shielding Storm.
- The effect roll on Lidless Wall does not matter since we are sacrificing all minions, increasing even the lowest roll by +75%.
Hardcore Adjustments
Hardcore requires you to build into more defenses. Here are some tips to successfully navigate the Blood Lance Necromancer through potentially dangerous situations:
- See the gear changes in the "Hardcore" variant above.
- Swap Golems - Iron for Golems - Blood to maximize your tankiness if absolutely necessary.
Check out our dedicated in-depth guide to learn more survival tricks in Hardcore.
Build Scaling & Stat Priorities
Learn about the important build scaling mechanics and stat weights.
- Overpower: Reads your current Life, maximum Life and Fortify value to calculate its bonus damage. So stacking Maximum Life and Fortify Generation are keys to outputting your maximum damage, in addition to the additive Overpower Damage on gear and in the Paragon boards.
- Crowd Control: CC'ing monsters and pulling them with Corpse Tendrils becomes a direct damage scaler. Not only does it maximize our paragon board bonuses, but it also grants us more time to apply more attacks before Overpower procs.
- Attack Speed: It decreases the length of time before Corpse Tendrils is on the field and how quickly we can spam cast Blood Lance. It's arguably the highest value stat on our gear and Paragon after Maximum Life.
- Critical Strike/Vulnerable: Activating the base 1.5 and 1.2 multipliers from these sources is already powerful enough. The build also has a few multipliers that rely on meeting these requirements to activate.
- Don't Get Hit: Make use of your range advantage and hit enemies from afar whenever you are in dangerous situations. By stutter stepping on the edge of your range, you can avoid most projectiles that come your way.
- Armor: A great deal of defenses comes from your Armor. Disobedience and later Juggernaut's will help you reach the cap of 9230.
- Resistances: As an Intelligence main stat class, the Necromancer naturally accrues a lot of Elemental Resistances. Make sure to reach the 70% cap in World Tier 4, and use Maximum Resistance buffs against particularly deadly enemies and content.
- Unstoppable: You only have Golem to gain Unstoppable. Cooldown Reduction helps making this defensive mechanic available more often.
- Fortify: Necrotic Carapace allows you to passively gain Fortify.
Our Damage Explained article explains how to scale your Offense.
Learn all you need to know to scale Defense with our Defense Explained Article.
Stat Priorities
To enable your build to perform optimally, you need to reach certain Stat "Breakpoints". Some examples are reaching 100% to Critically Strike, or 20 Resource per second. Since there are many values of these stats on different pieces of gear, read the checklist below and refer to the recommended Tempered Affixes and Masterwork Crits ↑. Desirable Greater Affixes will always be the top three recommended Affixes.
Damage Scaling
- 100% Critical Strike Chance during Grasping Veins
- 100% additional Attack Speed during Rathma’s Chosen
- > +2 Ranks to Blood Lance
Defense and Utility
- > 40,000 Maximum Life
- Armor Capped: 9,230
- Resistance Capped: 70%
- 100% Corpse Tendrils Size
- 50% Decrepify Size
- > 50% Resource Cost Reduction
- > 15 Essence per Second
- 100% additional Movement Speed
- Helm: Juggernaut's
- Maximum Life ↑
- Essence per Second
- Intelligence
- Cooldown Reduction
- Resistance to All Elements
- ⚒️ Maximum Life
- ⚒️ Corpse Tendrils Size
- Chest: Hardened Bones
- Maximum Life ↑
- Essence per Second
- Intelligence
- Resistance to All Elements
- ⚒️ Maximum Life
- ⚒️ Corpse Tendrils Size
- Gloves: Hungry Blood
- Ranks to Blood Lance ↑
- Critical Strike Chance ↑
- Maximum Life
- Intelligence
- Critical Strike Damage
- Vulnerable Damage
- ⚒️ Blood Overpower Damage
- ⚒️ Corpse Explosion Size
- Pants: Blood Moon Breeches
- Otherwise Look For: Shielding Storm
- Maximum Life ↑
- Intelligence
- Resistance to All Elements
- ⚒️ Maximum Life
- ⚒️ Corpse Explosion Size
- Boots: Slaughter
- Movement Speed ↑
- Maximum Life ↑
- Essence per Second
- Intelligence
- Resistance to All Elements
- ⚒️ Movement Speed
- ⚒️ Decrepify Size
- Weapon: Grasping Veins (2h-Sword)
- Maximum Life ↑
- Resource Cost Reduction
- Intelligence
- Critical Strike Damage
- Vulnerable Damage
- ⚒️ Blood Attack Speed
- ⚒️ Lucky Hit: Physical Damage
- Amulet: Rathma’s Chosen
- Ranks to Tides of Blood ↑
- Ranks to Coalesced Blood ↑
- Resource Cost Reduction ↑
- Maximum Life
- Cooldown Reduction ↑
- ⚒️ Movement Speed
- ⚒️ Maximum Life
- Ring 1: Ring of the Sacrilegious Soul
- Otherwise Look For: Sacrificial
- Maximum Life ↑
- Critical Strike Chance
- Intelligence
- Critical Strike Damage
- Vulnerable Damage
- ⚒️ Resource Cost Reduction
- ⚒️ Blood Overpower Damage
- Ring 2: Gore Quills
- Maximum Life ↑
- Critical Strike Chance
- Lucky Hit: Vulnerable
- Intelligence
- Critical Strike Damage
- Vulnerable Damage
- ⚒️ Resource Cost Reduction
- ⚒️ Blood Overpower Damage
This build benefits the most from the following consumables:
- Elixirs: Elixir of Fortitude, Elixir of Destruction, Precision Elixir
- Type I Incense: Sage's Whisper
- Type II Incense: Soothing Spices to cap Resistances, Reddamine Buzz
- Type III Incense: Chorus of War
FAQ & Mechanics
Once a guide is released, many players have questions on why and how we are approaching certain choices. In this section you can find the answers to the questions that have been asked the most.
How Does Overpower Work?
Blood Lance
Video Guide
Summary
The Blood Lance Necromancer is incredibly nuanced and rewards the player for learning as much as you can about Overpower mechanics and how to maximize total enemies Lanced at any given time. Its natural tankiness makes it a great option for pushing in The Pit and Hardcore play throughs.
- Blood Lance lingers in a target and deals its total damage to every target Lanced when a new Lance hits a target.
- Overpower has been drastically overhauled in Patch 1.2! It finally plays well with other damage scalers like Critical Strike and Vulnerable.
- Aspect of Gore Quills allows you to "consume" Blood Orbs while spamming Blood Lance, triggering every benefit you normally get from manually retrieving them. Along with Aspect of Hungry Blood, your ability to propagate Lances into every enemy on the screen drastically increases your clear speed.
- Happy blasting 🚀!
Credits
Maintained by Chronikz
Originally Written by MacroBioBoi
Reviewed by MacroBioBoi