Subtlety Rogue Raid Guide
Welcome to the Subtlety Rogue Raid guide for the World of Warcraft patch 11.1.7! This guide covers everything you need to know to understand your character! Are you starting out and leveling up from 70? Check out the leveling guide!
Overview
Hero Talents
- Trickster and Deathstalker are both solid choices for Subtlety Rogues in Mythic+, each bringing their own small niche. Trickster fills in a weakness that Subtlety struggles with; passive cleave. Deathstalker on the other hand, favors sticking to the one target with Deathstalker's Mark. Trickster provides bigger burst windows with lower amounts of consistent damage. Deathstalker on the other hand, provides more consistent damage with your cooldowns being more spread out.
- There are two core mechanics you need to understand in order to play Trickster optimally.
- Fazed
- This is the first core mechanic of the Trickster hero talent tree. It interacts with most of the other talent nodes, and most notably, causes your target to not parry your attacks and take 5% more damage from you.
- Smoke Causes you to take less damage from Fazed targets.
- Surprising Strikes Your combo point generators do more damage to Fazed targets.
- No Scruples Your finishing moves have a higher critical strike chance against Fazed targets.
- This is the first core mechanic of the Trickster hero talent tree. It interacts with most of the other talent nodes, and most notably, causes your target to not parry your attacks and take 5% more damage from you.
- Unseen Blade
- This is the second mechanic you need to understand and is the trigger for the first mentioned mechanic Fazed.
- Every 20 seconds your Backstab and Shadowstrike will trigger Unseen Blade and apply Fazed to your target.
- Devious Distractions causes your Secret Technique to apply Fazed to any targets hit.
- Disorienting Strikes Using Secret Technique will make your next twoBackstabs or Shadowstrikes ignore the cooldown of Unseen Blade.
- Thousand Cuts your auto attacks has a chance to reset your Unseen Blade cooldown.
- Flawless Form is a buff that you get whenever you use Secret Technique or trigger Unseen Blade.
- This is the second mechanic you need to understand and is the trigger for the first mentioned mechanic Fazed.
- Other than the basic mechanics of Trickster there are two noteworthy talents that impact how to play the game:
- Nimble Flurry
- This is the most gameplay changing talent for Trickster. It makes your Eviscerate, Shadowstrike, Backstab and auto-attacks cleave 7 additional targets while Flawless Form is active.
- Coup de Grace
- After 4 Unseen Blade activations your next Eviscerate will count as if it used with 5 more combo points and give you 5 stacks of Flawless Form if your target was Fazed.
- Nimble Flurry
- Deathstalker's Mark is the core mechanic to how this hero talent tree plays out.
- Shadowstrike used from Shadow Dance or Stealth applies 3 stacks of Deathstalker's Mark to unmarked targets, you can only have one mark up at a time.
- Spending 5 or more combo points consumes 1 stack of your Deathstalker's Mark dealing damage increasing the damage of your next Shadowstrike or Backstab.
- There a few talents that interact with your Deathstalker's Mark:
- Shadewalker
- Reduces the cooldown of Shadowstep whenever you consume a stack of Deathstalker's Mark.
- Clear the Witnesses
- Whenever you apply a new Deathstalker's Mark your next Shuriken Storm does extra plague damage and generates an extra combo point.
- Hunt Them Down
- Your auto-attacks do extra plague damage to your marked target.
- Singular Focus
- Your damage dealt to targets other than your marked target causes your marked target to take a small amount of that damage.
- Darkest Night
- After you have consumed all stacks of Deathstalker's Mark your next Eviscerate cast with maximum combo points will be a guaranteed critical strike with 60% increased damage and reapply Deathstalker's Mark.
- Shadewalker
- Other talents that do not interact directly with Deathstalker's Mark but are still worth mentioning are:
- Lingering Darkness
- After your Shadow Blades expires you deal 30% more shadow damage for 30 seconds.
- Corrupt the Blood
- Gives your Rupture an extra dot component.
- Fatal Intent
- Abilities cast on targets above 20% health can apply a stack of Fatal Intent which deals damage whenever the target falls under 20% health.
- Bait and Switch
- Turns your Evasion into a damage reduction spell for magical damage as well as Cloak of Shadows into a physical damage reduction spell. The most interesting part is Evasion reducing magic damage due to the amount of magic damage in raids.
- Lingering Darkness
Talents
Gameplay Altering Talents
Discover all talents that significantly alter your gameplay within the Spec and Class Talent trees. This section gives a concise overview of these talents and their applications but for a more detailed look check out the Rotation and Deep Dive sections below.
Spec Tree
- Death Perception
- Makes your Symbols of Death stronger and gains additional charges.
- Shadow Dance
- Shadow Dance puts you in a stance where you can use all your stealth abilities while buffing your damage for its duration. This is your bread and butter spell for your cooldown windows and is a major contributor to your core gameplay.
- Danse Macabre
- This talent makes it so each unique spell cast during Shadow Dance buffs your damage by 6%.
- Shadowcraft
- This talent modifies your Symbols of Death to generate double combo points from Shadow Techniques and causes your finishers to generate combo points if you have enough to fill your combo point bar. This turns Symbols of Death into a strong cooldown which you should use as often as possible.
- Shadow Blades
- Shadow Blades causes most of your damage to be increased by 20% and all your combo point generators to generate full combo points.
- Flagellation
- Flagellation stacks up to 30 stacks based on combo points spent and buffs your finisher damage for its duration.
- Secret Technique
- Your biggest damage finisher for both AoE & single target situations.
- Weaponmaster
- Gives your Backstab and Shadowstrike a chance to hit again. This causes your combo point generation to be less scripted and is something you need to pay attention to.
Class Tree
- Cold Blood
- Cold Blood is always used in combination with Secret Technique for strong burst damage.
- Cheat Death
- Your strongest defensive utility that lets you play aggressively with no fear of dying.
- Supercharger
- Buffs your next 1/2 finishers after using Symbols of Death.
Hero Talents
- Lingering Darkness
- This is your default pick for all scenarios since Symbolic Victory is significantly weaker numerically.
- Bait and Switch
- This is your default pick or almost all scenarios, Ethereal Cloak may have some value but it's very niche and Bait and Switch is solid all around.
- Shadewalker
- This is your default pick since Shroud of Night does not do anything in raid encounters.
- Momentum of Despair
- This is your default pick for most scenarios, Follow the Blood is the other option. Currently Momentum of Despair seems to be a bit stronger numerically.
When to use this Spec
Use this spec on fights with consistent cleave or AoE scenarios.
Talent Adjustments
Listing all noteworthy changes within the Class and Spec tree compared to the default build.
Spec Tree
- Added
- Replicating Shadows
- Added Replicating Shadows to make your Rupture hit an additional target.
- Finality
- Makes your Rupture, Eviscerate and Black Powder stronger.
- Dark Brew
- Converts your Bleed and Nature damage to Shadow damage and increases it by 10%. Most notably, this makes your Rupture do even more damage and scale with shadow damage modifiers.
- Improved Shuriken Storm
- Makes your Shuriken Storm critical hits apply Find Weakness.
- Replicating Shadows
- Removed
- 1x Death Perception
- The Rotten
- Swift Death
Class Tree
- Added
- Vigor
- Thistle Tea
- An energy generating spell and damage cooldown baked into one. Therefore, you want to use it both inside of your cooldown windows and as an energy restoring spell.
- Removed
- Lethality
- Cold Blood
Hero Talents
Changed Trickster to Deathstalker for more info visit the Hero Talent section above.
- Lingering Darkness
- This is your default pick for all scenarios since Symbolic Victory is significantly weaker numerically.
- Bait and Switch
- This is your default pick or almost all scenarios, Ethereal Cloak may have some value but it's very niche and Bait and Switch is solid all around.
- Shadewalker
- This is your default pick since Shroud of Night does not do anything in raid encounters.
- Momentum of Despair
- This is your default pick for most scenarios, Follow the Blood is the other option. Currently Momentum of Despair seems to be a bit stronger numerically.
When to use this Spec
Use this spec if you prefer the gameplay of Trickster over Deathstalker or if there is a fight with a bunch of passive cleave.
Talent Adjustments
Listing all the changes within the Class and Spec tree compared to the default build.
Hero Talents
Changed to Deathstalker to Trickster for more info visit the Hero Talent section above.
- No Scruples
- This is your default pick for all scenarios since Cloud Cover is not very good.
- Thousand Cuts
- This is your default pick for all scenarios since Flickerstrike seems more like a PvP Talent.
- Smoke
- This is your default pick for all scenarios since Mirrors is worse in comparison.
- So Tricky
- Although not very useful for raiding, the alternative is even more useless.
Rotation
Tier Set
- 2-Set: Your spells and abilities have a chance to activate a Winning Streak! increasing the damage of your Eviscerate, Secret Technique, and Black Powder by 3%, stacking up to 10 times. Eviscerate, Secret Technique, and Black Powder have a 15% chance to remove Winning Streak!
- 4-Set: While Shadow Dance is active, you cannot lose Winning Streak!, gain an additional stack of Winning Streak! each time you would gain one, and deal an additional 6% Shadow damage per Winning Streak! stack.
Single-Target
Opener
- Your main goal with your cooldowns as a Subtlety Rogue is stacking as many of them as possible for maximum burst potential. There are a few priorities and rules when it comes to using your cooldowns as efficiently as possible.
- The Backstab in the opener may be skipped depending on Weaponmaster procs.
Priority List
This is a general priority you aim to maintain throughout the fight.
The rotational priority for Subtlety Rogue changes based on whether you have Shadow Dance active or not:
Shadow Dance Priority
- Cast Eviscerate as your first finisher if above 5 combo points with 4 Escalating Blade stacks if your target is Fazed.
- Cast Secret Technique as your first finisher if above 5 combo points with less than 4 Escalating Blade stacks or if your target is not Fazed.
- Cast Shadowstrike if under 5 combo points.
No Shadow Dance Priority
- Cast Rupture inside of a pandemic window (30% of the spell's original duration).
- Cast Eviscerate with less than 4 Escalating Blade stacks with 6+ combo points.
- Cast Backstab.
Cooldown Usage
- Flagellation with 6+ combo points with Shadow Blades ready.
- Shadow Blades is typically used together with your next spell after Flagellation.
- Symbols of Death on cooldown, always pair two Symbols of Death with your Shadow Blades and Flagellation windows. This means you hold a charge before your cooldowns come up if you only have 1 charge available.
- Thistle Tea is normally paired with your Shadow Dance to buff your finisher damage. The most optimal usage is for it to give you energy and buff your Shadow Dance damage at the same time.
- Shadow Dance is almost always used together with Symbols of Death.
- Cold Blood should only be used together with Secret Technique. Exception may occur where you would use it towards the end of a fight when Secret Technique is on cooldown.
- Vanish when you are not in Shadow Dance with low combo points.
Opener
- Use your Treacherous Transmitter if equipped early to see what your trigger is and then complete the task before your Secret Technique cast if possible.
Priority List
This is a general priority you aim to maintain throughout the fight.
The rotational priority for Subtlety Rogue changes based on whether you have Shadow Dance active or not:
Shadow Dance Priority
- Cast Eviscerate as your first finisher with 5+ combo points. Always build to 7 combo points with Darkest Night buff active.
- Cast Secret Technique as your second finisher with 5+ combo points.
- Cast Shadowstrike if under 5 combo points.
No Shadow Dance Priority
- Cast Eviscerate with 7+ combo points with Darkest Night buff active.
- Cast Rupture at earliest inside of a pandemic window (30% of the spell's original duration). Do not overwrite Finality Ruptures.
- Cast Eviscerate with 5+ combo points.
- Cast Shuriken Storm with Clear the Witnesses active as long as Symbols of Death is not active.
- Cast Backstab.
Cooldown Usage
- Flagellation with 6+ combo points with Shadow Blades ready.
- Shadow Blades is typically used your first Secret Technique in your Flagellation window.
- Symbols of Death on cooldown, always pair two Symbols of Death with your Shadow Blades and Flagellation windows. This means you hold a charge before your cooldowns come up if you only have 1 charge available.
- Thistle Tea is normally paired with your Shadow Dance to buff your finisher damage. The most optimal usage is for it to give you energy and buff your Shadow Dance damage at the same time.
- Shadow Dance is almost always used together with Symbols of Death.
- Cold Blood should only be used together with Secret Technique. Exception may occur where you would use it towards the end of a fight when Secret Technique is on cooldown.
- Vanish when you are not in Shadow Dance with low combo points.
2 Targets
Opener
- Use your Treacherous Transmitter if equipped early to see what your trigger is and then complete the task before your Secret Technique cast if possible.
- The Backstab in the opener may be skipped depending on Weaponmaster procs.
2 Target Priority List
Shadow Dance Priority
- Cast Eviscerate as your first finisher if above 5 combo points with 4 Escalating Blade stacks if your target is Fazed.
- Cast Secret Technique as your first finisher if above 5 combo points with less than 4 Escalating Blade stacks or if your target is not Fazed.
- Cast Shadowstrike if under 5 combo points.
No Shadow Dance Priority
- Cast and maintain Rupture inside of a pandemic window (30% of the spell's original duration) on all priority targets as long as they will not die early.
- Cast Eviscerate with less than 4 Escalating Blade stacks.
- Cast Black Powder if you have 4 Escalating Blade stacks.
- Cast Shuriken Storm.
- Cast Backstab if your target is not Fazed.
Opener
2 Target Priority List
Shadow Dance Priority
- Cast Eviscerate as your first finisher with 5+ combo points. Always build to 7 combo points with Darkest Night buff active.
- Cast Secret Technique as your second finisher with 5+ combo points.
- Cast Shadowstrike if under 5 combo points.
No Shadow Dance Priority
- Cast Eviscerate with 7+ combo points with Darkest Night buff active.
- Cast Rupture at earliest inside of a pandemic window (30% of the spell's original duration) on all priority targets as long as they will not die early. Do not overwrite Finality Ruptures.
- Cast Eviscerate with 5+ combo points.
- Cast Shuriken Storm.
4+ Targets
Opener
- Use your Treacherous Transmitter early to see what your trigger is and then complete the task before your burst.The third Shadowstrike may be skipped depending on Weaponmaster procs.
4+ Targets Priority List
Shadow Dance Priority
- Cast Eviscerate as your first finisher if above 5 combo points with 4 Escalating Blade stacks if your target is Fazed.
- Cast Secret Technique as your first finisher if above 5 combo points with less than 4 Escalating Blade stacks or if your target is not Fazed.
- Cast Shadowstrike if under 5 combo points.
No Shadow Dance Priority
- Cast and maintain Rupture inside of a pandemic window (30% of the spell's original duration) on priority targets.
- Cast Eviscerate with less than 4 Escalating Blade stacks with 5+ combo points.
- Cast Black Powder if you have 4 Escalating Blade stacks or Flawless Form missing with 5+ combo points or at 7+ targets.
- Cast Backstab if Flawless Form is missing to activate it.
- Cast Shuriken Storm.
Trickster Eviscerate or Black Powder
- Black Powder Only replaces Eviscerate with 7+ targets or whenever Flawless Form buff is missing.
Opener
4+ Targets Priority List
Shadow Dance Priority
- Cast Eviscerate at 7 combo points with Darkest Night buff active.
- Cast Secret Technique as your second finisher with 5+ combo points.
- Cast Black Powder at 5+ combo points.
- Cast Shuriken Storm if under 5 combo points.
No Shadow Dance Priority
- Cast Eviscerate with 7+ combo points with Darkest Night buff active.
- Cast Rupture at earliest inside of a pandemic window (30% of the spell's original duration) on all priority targets. Do not overwrite Finality Ruptures.
- Cast Black Powder with 5+ combo points.
- Cast Shuriken Storm.
Deep Dive
Trickster and Deathstalker specific rotational niches.
Trickster
- The following optimizition is very minor and generally not recommended to play around for most players.
- Trickster comes with some pretty specific rotational changes which may seem very unintuitive, such as using Black Powder single target.
- The reason you want to sometimes opt out of using Eviscerate is because of Coup de Grace.
- You want to make sure to have Coup de Grace ready for every time you use Shadow Dance to maximize your burst damage windows.
- Coup de Grace should only be used with Fazed up on your target to not miss out on the Flawless Form stacks. This means that you sometimes have to use Secret Technique before Eviscerate regardless if you have 4 Unseen Blade stacks already.
- There are multiple variations for how to start your Shadow Dance rotation, the following examples are going to be your most normal cases you should look towards achieving.
- You want to make sure to have Coup de Grace ready for every time you use Shadow Dance to maximize your burst damage windows.
Deathstalker
- Deathstalker while not as complicated rotational changes as Trickster still comes with a few optimizations such as:
- Always building to maximum combo points when Darkest Night is up.
- Always using Eviscerate as your first finisher whenever Darkest Night is active, even on AoE.
- Using Shuriken Storm, even for single-target when Clear the Witnesses is up.
Symbols of Death Pooling
- With the removal of Invigorating Shadowdust and the addition of Death Perception, comes a slight change in how we approach the usage of Symbols of Death. The fundamentals remain the same, with trying to use it as often as possible, while also making sure we maintain the buff throughout our cooldown windows. How do to that is very simple, make sure to have two charges of Symbols of Death before it's time to use Shadow Blades. This means you will pool a charge before your cooldown windows.
Eviscerate vs Black Powder
- When to use Eviscerate over Black Powder might seem obvious or easy if you simply refer to your priority. However, the reality is not as black and white.
- A lot of people who play Subtlety Rogue see a bunch of targets and instantly start pressing Black Powder without much thought behind it, however, there are situations where you would want to press Eviscerate, even if at the cost of DPS.
- Priority damage to your main targets is often more useful than so called "pad damage" to targets of lesser importance, which is your main consideration when deciding what finisher you decide to use.
- As a Trickster however, this is much less of a thought than it is for Deathstalker since you use Eviscerate almost always for all scenarios.
Secret Technique Intricacies
- Secret Technique is your hardest hitting spell, so it's important that you understand how it works and some common mistakes.
- Secret Technique has an initial instant damage part and two delayed shadow clone attacks, one of them being delayed by 1 second and the other by 1.3 seconds. To clarify, this means that the latest time you can press Secret Technique to get its full damage in your Shadow Dance window is 1.3 seconds before it ends. This is very important since you lose a lot of damage not getting the damage inside of your Shadow Dance.
Understanding Danse Macabre
- Danse Macabre is very straightforward in its function. However, there are a few misconceptions about how to maximize its effectiveness. Although it may be tempting to gain as many stacks as possible before using your Secret Technique, this is typically not the best approach.
- For most scenarios, Secret Technique should either be your first or second finisher in Shadow Dance during your cooldowns.
Understanding Mechanics
Rotational min-maxing is just one aspect of mastering a specialization, but there are numerous other key mechanics that influence your performance. Use the following guides to improve them.
Liberation of Undermine
← Scroll for more Bosses →
Offensive Cooldown Usage
- Tune-Up timing depends on when you remove all the Protective Plating.
Boss Tips
- Use your Feint when you get targeted by Incendiary Fire, or Cloak of Shadows if you drop too low.
- When you don't have cooldowns, feel free to jump into the bikes and crash on the boss.
- Use your Kick on Pit Mechanics casting Repair.
- Try to always sync up your cooldowns with Tune-Up.
Offensive Cooldown Usage
Boss Tips
- You can use your Cloak of Shadows on Scrapbomb explosion or simply Feint it.
- Use your Shadowstep on friendly targets to move around the platform quickly, especially if you are targetted by the beam and you need to get into the bomb soak quickly. Or similarly when you swap bosses in the intermission.
Offensive Cooldown Usage
Boss Tips
- Position yourself around the Pyrotechnics to cleave them efficiently, you might want to save your cooldowns for that part if you are struggling with them.
- Cloak of Shadows can save you in the intermission if you are out of position. Alternatively, Shadowstep on friendly targets is very useful too.
- Feint works on most types of damage on this fight.
Offensive Cooldown Usage
Boss Tips
- Try to always look at the intermission timer and have your Sprint and Shadowstep ready. Use Shadowstep on the boss to stay on him the whole time.
- If you are soaking a mine, always use Feint beforehand.
Offensive Cooldown Usage
Boss Tips
- Cloak of Shadows can save you from The Recycler if the cast goes through.
- Use your Kick on the Scrapmaster when he casts Scrap Rockets.
- Use your Feint when you get targetted by Incinerator.
Boss Tips
- Make sure to position yourself next to the Pay-Line to gain High Roller!, this is especially important during your cooldowns.
- Have at least a use of Symbols of Death when the add spawns, especially if you are struggling with them. You can also save your cooldowns for them.
Boss Tips
- You can use Evasion to walk through the Physical side of the Bulletstorm.
- Use Feint every time you swap sides.
- Make sure to position yourself properly to cleave the adds with Nimble Flurry.
Boss Tips
- Use your Feint on the group soak in p1 if you are playing Heroic, or on the group soak in p2 if you are playing Mythic.
- You can Cloak of Shadows the Suppression cast in order to stay in.
- Make sure to be specced into Shiv to remove the enrage from the Darkfuse Wrenchmonger.
Stat Priority
Understand your secondary stat priority and the tertiary stats needed for optimal performance during Raid boss fights as a Subtlety Rogue. For more detailed information, visit the Stats and Attributes guide.
Higher Item level items are better in most scenarios. For an accurate representation of what item to equip you should use Simcraft! A static "Stat Priority" is just a starting point and can easily shift depending on your individual gear.
- All secondary stats are affected by diminishing returns. Click here to learn more!
Tertiary
- Avoidance - Avoidance works similarly to Feint, as it provides you with passive AoE damage reduction. Therefore, due to the significant amount of avoidance you already receive from Feint, it loses value compared to other classes.
- Leech - Provides additional healing through damage dealing. Great stat for staying alive and healthy.
- Speed - Speed is the worst out of the three tertiary stats because you are already very fast, it is of course better than nothing.
Gear
| Slot | Item | Location |
|---|---|---|
| Head | Darkfuse Racketeer's Tricorne | One-Armed Bandit |
| Neck | Amulet of Earthen Craftsmanship | Crafting |
| Shoulder | Spectral Gambler's Bladed Mantle | Rik Reverb / Catalyst |
| Cloak | Trashmaster's Mantle | Operation: Mechagon |
| Chest | Spectral Gambler's Vest | Sprocketmonger Lockenstock / Catalyst |
| Wrist | Hustler's Ante-Uppers | One-Armed Bandit |
| Gloves | Rune-Branded Grasps | Crafting |
| Belt | Durable Information Securing Container | Delves |
| Legs | Spectral Gambler's Pantaloons | Stix Bunkjunker / Catalyst |
| Boots | Firebug's Anklegear | BoE |
| Ring 1 | The Jastor Diamond | Gallywix |
| Ring 2 | Ring of Earthen Craftsmanship | Crafting |
| Trinket 1 | House of Cards | One-Armed Bandit |
| Trinket 2 | Eye of Kezan | Gallywix |
| Weapon | Pyrotechnic Needle-Dropper | Rik Reverb |
| Weapon | Pyrotechnic Needle-Dropper | Rik Reverb |
Below you are presented with a good list of farmable alternatives that are obtainable outside of WoW’s weekly lockout system. While replaced in time as you progress, these offer immediate character power.
| Slot | Item | Location |
|---|---|---|
| Head | High Altitude Turban | The MOTHERLODE!!! |
| Neck | Flickering Glowtorc | Darkflame Cleft |
| Shoulder | Extravagant Epaulets | Operation: Mechagon |
| Cloak | Trashmaster's Mantle | Cinderbrew Meadery |
| Chest | Jerkin of Awakened Stone | The Rookery |
| Wrist | Battle-Scarred Fisticuffs | Cinderbrew Meadery |
| Gloves | Corrosive Handler's Gloves | The MOTHERLODE!!! |
| Belt | Mad King's Sporran | Operation: Mechagon |
| Legs | Squallrider's Kilt | The Rookery |
| Boots | Backbreaking Bootstrappers | Cinderbrew Meadery |
| Ring 1 | Radiant Necromancer's Band | Priory of the Sacred Flame |
| Ring 2 | Ritual Bone Band | Theater of Pain |
| Trinket 1 | Suspicious Energy Drink | Delves |
| Trinket 2 | Grim Codex | Theater of Pain |
| Weapon | Shadowskean of the Colossus | The Rookery |
| Weapon | Shadowskean of the Colossus | The Rookery |
Trinkets
Below you can find active and passive alternatives to our recommended trinkets. Do note that some trinkets are better than others depending on the raid boss.
Active Trinket alternatives
- Treacherous Transmitter
Passive Trinket alternatives
- Geargrinder's Spare Keys
- Suspicious Energy Drink
- Zee's Thug Hotline
Embellishments
- 2x Duskthread Lining
- It is a good choice if you have over 80% health most of the time and during your cooldowns which is easily achievable thanks to Exhilarating Execution. It works very well for both single-target and AoE scenarios, which makes it very versatile while also providing a small defensive benefit.
- The optimal slots to craft on are Wrists, Boots, Waist, or Cloak depending on your available gear.
- 2x Elemental Focusing Lens
- This embellishment performs very well in single-target fights, if your only intent is to do single-target damage, it is a solid option.
- The optimal slots to craft on are Wrists, Boots, Waist, or Cloak depending on your available gear. Crafting a weapon with this embellishment is also solid if you are not raiding mythic.
Remaining Sparks
- Crafted items are 636 item level and regular items are 639 on max item level therefore it's not beneficial to equip crafted items outside of your 2x embellishments unless you don't have access to other high item level gear on that slot.
Simcraft
To find the best combination of gear available to you or identify the best possible upgrades, visit our Simcraft guide to learn how to utilize Simcraft easily and effectively.
Consumables
- Phials
- Flask of Alchemical Chaos -- maximum DPS.
- Flask of Tempered Versatility -- less DPS but more survivability.
- Food
- Feast of the Divine Day
- Combat Potion
- Tempered Potion
- Health Potion
- Algari Healing Potion -- a big burst of healing
- Weapon Stone
- Ironclaw Whetstone
- Augment Rune
- Crystallized Augment Rune
- Sockets
- Versatile Onyx
- Culminating Blasphemite -- Unique, use one of each gem color to enhance your Culminating Blasphemite.
- Masterful Sapphire
- Masterful Emerald
- Masterful Ruby
Enchantments
| Head | S.A.D. |
| Neck | Magnificent Jeweler's Setting 2x |
| Cloak | Enchant Cloak - Chant of Winged Grace |
| Chest | Enchant Chest - Crystalline Radiance |
| Wrist | Enchant Bracer - Chant of Armored Avoidance S.A.D. |
| Waist | S.A.D. |
| Legs | Stormbound Armor Kit |
| Boots | Enchant Boots - Defender's March |
| Ring 1 | Enchant Ring - Radiant Mastery Magnificent Jeweler's Setting 2x |
| Ring 2 | Enchant Ring - Radiant Mastery Magnificent Jeweler's Setting 2x |
| Weapon | Enchant Weapon - Authority of the Depths |
| Weapon 2 | Enchant Weapon - Authority of the Depths |
You buy S.A.D. from the Great Vault Vendor to add sockets to your Helm, Wrists & Waist.
Races
For min-maxing a Subtlety Rogue in raiding, different racial traits can provide a tremendous benefit to your character. If this is not your top goal, picking a race that fits your style works just as well.
- Hyper Organic Light Originator -- Mechagnome
- Not a very useful active racial. The two passive racials, however Emergency Failsafe and Combat Analysis are both quite strong, making Mechagnome a solid pick.
- Stoneform -- Dwarf
- Can dispel Magic and Bleed debuffs. Has been useful in the past on some bosses with Bleeds.
- Bull Rush -- Highmountain Tauren
- Charge forward and stun enemies for 1.5 seconds, not the most useful ability for raiding but you do get access to Mountaineer which is a passive versatility increase.
- Blood Fury --Orc
- Strong racial for damage, especially for Dark Brew builds, due to your Shadow Blades being a 2 minute cooldown.
- War Stomp -- Tauren
- Typically not the most useful spell for raiding but similar to dwarf, the Brawn Passive is the main reason why Tauren is a strong dps race.
- Spatial Rift -- Void Elf
- This ability can be quite nice as it acts similar to blink that you first shoot out as a projectile, then re-activate to teleport to the projectile's location. However, the reason why it's a strong dps race is Entropic Embrace.
- Will to Survive -- Human
- There are rarely any good use cases for this spell but it can happen. The main reason why human is a strong choice is thanks to the The Human Spirit passive. Keep in mind that Human scales further the more secondary stats you have so it may not be very good at the start of an expansion but rather later on.
Recommendation
In general, it's safe to say that if you care about min-maxing your DPS, you should go with the highest DPS racial. That being said, the story is a bit different if it's about progression raiding. Some help out massively to speed up the progression on certain bosses. Notably, Dwarf with their Stoneform helped out on Tindral Sageswift and Fyrakk the Blazing in the latest Race to World First by having easy access to dispelling yourself at crucial points of the fights mentioned.
Macros
Discover recommended macros for Subtlety Rogue during Raid encounters and watch a quick video guide on creating simple macros for your character.
Mouseover Rupture Macro - Casts on your mouseover or target if there are is no mouseover target present.
#showtooltip Rupture
/cast [target=mouseover,harm,exists,nodead] rupture; rupture
Mouseover Kidney Shot Macro - Casts on your mouseover or target if there are is no mouseover target present.
#showtooltip Kidney Shot
/use [@mouseover,exists][]Kidney Shot
Mouseover Focus macro - very handy when selecting a focus target to make you not have to target it.
/focus [@mouseover,exists][]Focus Cheap Shot Macro.
#showtooltip Cheap Shot
/cast [@focus] Cheap Shot
Focus Kidney Shot Macro.
#showtooltip Kidney Shot
/cast [@focus] Kidney Shot
Focus Kick Macro.
#showtooltip Kick
/cast [target=focus,exists,nodead] [] KickCold Blood -> Secret Technique Macro - This macro is a one button Cold Blood into Secret Technique.
#showtooltip
/cast cold blood
/cast Secret Technique
Tricks of the Trade Tank Macro - A very nice macro that always uses Tricks of the Trade on your tank, it requires this WeakAura to work: https://wago.io/8xGN251mS/
#showtooltip Tricks of the Trade
/click AutoTankMisdirect leftbutton 1
/click AutoTankMisdirect
Addons
Below, you see a screenshot of the author's User Interface for their Subtlety Rogue, outlining which addons are used and how they are utilized in Raids to make your life easier.
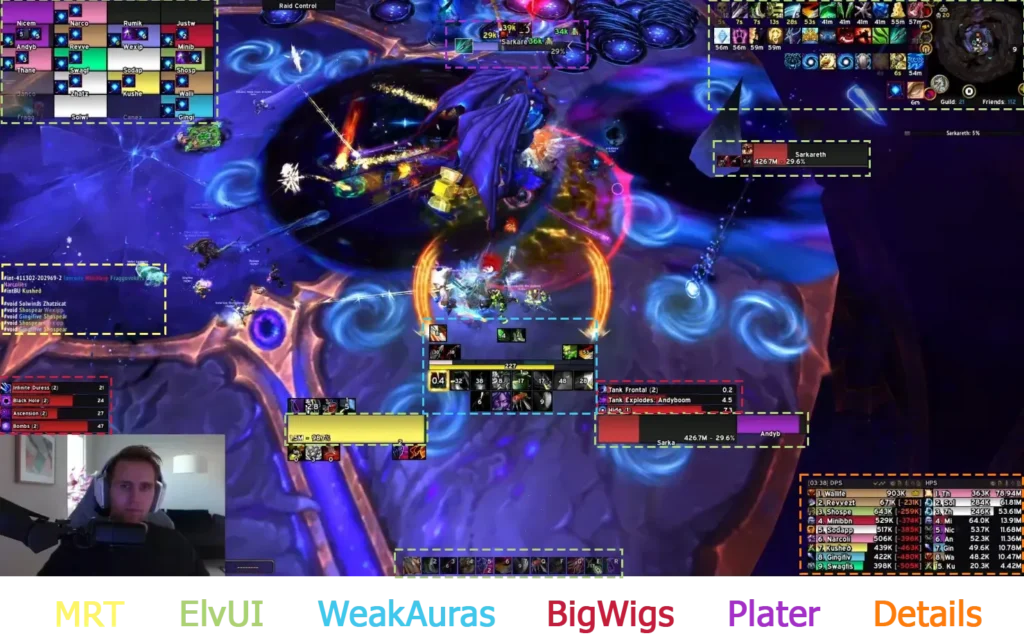
- MRT -- Notes, Raid cooldowns, and more
- Helpful addon for Raiders, especially for Raid leaders and officers.
- ElvUI -- Full User Interface replacement
- A user interface designed around user-friendliness with extra features that are not included in the standard UI.
- Alternatively, you can also use Shadowed Unit Frames (SUF) and an action bar addon of your choice or of course the stock UI.
- BigWigs -- Generic Boss Mod
- BigWigs is a boss encounter add-on. It consists of many individual encounter scripts, or boss modules; mini add-ons that are designed to trigger alert messages, timer bars, sounds, and so forth, for one specific Raid encounter.
- WeakAuras -- Jack of all trades
- WeakAuras is a powerful and flexible framework that allows the display of highly customizable graphics on World of Warcraft's user interface to indicate buffs, debuffs, and other relevant information. This addon was created to be a lightweight replacement for Power Auras but has since introduced more functionalities while remaining efficient and easy to use.
- Plater -- Advanced Nameplates
- Plater is a nameplate addon with an extraordinary amount of settings, out of the box debuff tracking, threat coloring, and support for scripting similar to WeakAuras and wago.io + the WeakAuras-Companion for Mod/Script/Profile updates.
- Details -- In-depth Damage Meter
- Most powerful, reliable, handsome, damage meter.
Luxthos Rogue Weakaura Suit
Customizable Rogue WeakAuras for The War Within.
Changes this Patch
- Rupture damage increased by 6%.
- Blind and Gouge now break on a damage threshold instead of breaking on damage.
- Hero Talent
- Deathstalker
- Fixed several issues with Singular Focus that prevented its application from being reliable.
- Trickster
- Unseen Blade damage increased by 15%.
- Surprising Strikes critical damage bonus increased to 50% (was 25%).
- Thousand Cuts chance to reset Unseen Blade has been increased slightly.
- Coup de Grace now requires its target to be in melee range, and so no longer has a dash component when activated outside of regular melee range.
- Deathstalker
- Subtlety
- All damage increased by 10%.
- Trickster
- Nimble Flurry now causes 60% of listed ability damage to strike nearby enemies (was 50%).
- Hero Talent
FAQ
A: Pooling Energy is a common aspect of Rogue gameplay. It's normal to sometimes feel like you're struggling with energy, even if you're playing correctly.
Credits
Written By: Kush
Reviewed By: Stove