Alaric’s Sanctuary Abyssal Dungeon Guide
Alaric's Sanctuary Introduction
Alaric's Sanctuary is the fifth TIER 2 Abyssal Dungeon and you need to be at least 960 Item Level to enter this Abyssal Dungeon. This dungeon drops Tier 2 Accessories, Ability Stones, Engraving Books, Cards and materials to craft the sets Unyielding Will Greatsword and Mute Guardian Greatsword. After clearing the dungeon, you can pay gold to get additional loot. The recommended Combat Items are HP Potion, Splendid Sacred Charm, Panacea and Whirlwind Grenade.
This is the third water abyssal dungeon, which shares the same Breath Circle mechanic as the previous one. As for the difficulty, it is the most difficult water abyssal dungeon. The bosses here hit harder and have more one shot mechanics than the bosses of the previous dungeons.
This guide assumes that you are familiar with the recommended Raid Build for your class.
First Boss
The first boss fight starts already with a unique mechanic. The raid is split into 2 parties of 4 players each who have to face different bosses in separate areas, at the same time. One party fights the Shark Boss and the other one against a Siren Boss. There is a crucial mechanic between both bosses which needs to be performed flawlessly to prevent a team wipe.
Special Interactions & Patterns
Breath Circle
A circle above each player's head displays the current state of breathable air. This reduces over time and can be reduced immediately if you get hit by attacks with a yellow telegraph. You have to interact with a plant or stand on spots with bubbles to refill it. If you run out of breath, you take high damage every second.
Refill spots are scarce and have a long respawn time. So interact with the plants only if you have below 50% air left.
Catch the Orb
This mechanic starts once the Siren Boss reaches 15 HP bars. She teleports to the center of the other battle area, where the other party is fighting the Shark Boss and prepares for a potential party wipe mechanic. Meanwhile, on the empty battle area where the Siren boss used to be, multiple black orbs and one golden orb appear. The goal here is to destroy the golden orb without hitting any black orbs.
If you hit a black orb, the entire party gets a stacking Blind debuff. The more stacks you get, the less you see. To make it even more difficult, the golden orb travels at high speed through the battle area. Use cleansing skills like the ones from Gunlancer, Soulfist or Paladin to remove blind stacks. Combat Items like Splendid Sacred Charm and Panacea are also useful.
The player who delivers the killing blow to the golden orb will be surrounded by an aura. This aura is mandatory to survive the team wipe mechanic on the other battle area. To teleport to that other area, the party which had to destroy the golden orb needs to use the portal at the bottom part of their battle area. Once both parties are on the same area, make sure to group up immediately around the player with the golden aura. The golden aura protects everyone from the wipe mechanic used by the Siren Boss. This has a long animation wipe mechanic and the Shark Boss will continue to use his attacks. As long as you are protected by the aura, you won't take any damage. Use this opportunity to deal uninterrupted damage to the Shark boss.
After surviving the wipe mechanic, you will fight together both bosses on the battle area simultaneously. After killing the Siren while the Shark is still alive, this mechanic appears once more. This time, you don't need to teleport to another area after killing the golden orb. Just kill it fast and group up to survive the wipe mechanic.
The Parasite
The Siren Boss infects a random player on the same battle area with a parasite once her HP reaches 10 bars. While infected you have a purple icon between your health bar and the breath circle. At the same time, a Parasite debuff appears above your class resource bar. The infected player takes a certain percentage of their health as damage every second. After 10 seconds, the parasite changes host and infects a different member in the party.
To get rid of the parasite, you need to step on the Poison Puddles.
General Patterns
Poison Puddles
The Siren's attacks can create a poison puddle on the ground. Once a player steps on it, he gets a debuff and takes damage. Use this puddle to remove The Parasite. Beside from this, the Siren doesn't have any noteworthy attacks.
Breath Taking
The Shark boss is the more difficult one to fight against. He has a wide range of AoE attacks with yellow telegraphs in his arsenal. Classes with long animation time might struggle more. Always pay attention to your breath circle while fighting this boss.
Second Boss
An easier boss encounter compared to the first duo bosses. But this one also has a team wipe mechanic, which requires quick reaction and position awareness. This boss and the final one don't follow the typical water Abyssal Dungeon breath mechanic, so you don't need to keep track of the Breath Circle.
Special Interactions & Patterns
Four Pillars
Every time the boss loses about 4 HP bars, he slams with his fists on the ground and starts to prepare for an attack targeting a specific player. The target player will be highlighted by an arrow above their head, meanwhile everyone else is surrounded by a red circle.
The goal here is to force the boss to target one of the pillars a few seconds after starting this mechanic. To do so, the targeted player needs to move between the boss and a pillar. Be aware, the other players affected by the red circle send out a shockwave which deals damage and knocks up everyone in the red circle. Make sure to spread out and avoid staying too close to any other party members. None of the red circles should be anywhere near the player targeted by the boss so that they can maneuver freely.
As the targeted player it can be difficult to dodge the boss's attack on time. Pay close attention to his hands, once he spreads them outwards use spacebar or a mobility skill to dodge away. Dodging too early can make the attack miss the pillar. If you successfully manage to force the boss to destroy a pillar, the boss gets incapacitated for a few seconds, which gives you enough time to deal some serious damage.
The difficulty increases with each destroyed pillar. Make sure to keep an eye on the remaining pillars. Don't stray too far, otherwise you might not make it in time to position yourself.
Low Temperature
Once the HP of the boss drops below 10 bars, his attacks apply a stacking debuff on hit. Upon obtaining the 5th stack, you freeze nearby party members.
General Patterns
The Rotation
The boss puts both of his arms on the ground and starts to rotate clockwise. You can get hit multiple times by this high damage attack. To avoid getting hit, rotate clockwise with the boss.
Tornados
Multiple tornadoes spawn close to the boss. After a short delay, they towards the edge of the battle area. Try to move between the tornadoes to avoid getting hit. This attack can hit you multiple times and knock you up.
Water Gun
The boss shoots high pressure water from his chest. On hit it deals damage and knocks up the player. Move to the gaps between the red telegraphs to avoid this attack.
Third Boss
A boss with many Area of Effect (AoE) attacks, team wipe mechanics and 1 shot skills. It will be a long battle where any mistake can lead to an instant death. The boss can freeze players with some attacks and is very mobile, making it harder to hit the boss. If your party lacks damage you might need to use Whirlwind Grenade to incapacitate the boss more often. This gives you additional opportunities to deal uninterrupted damage.
Special Interactions & Patterns
Safe Spot
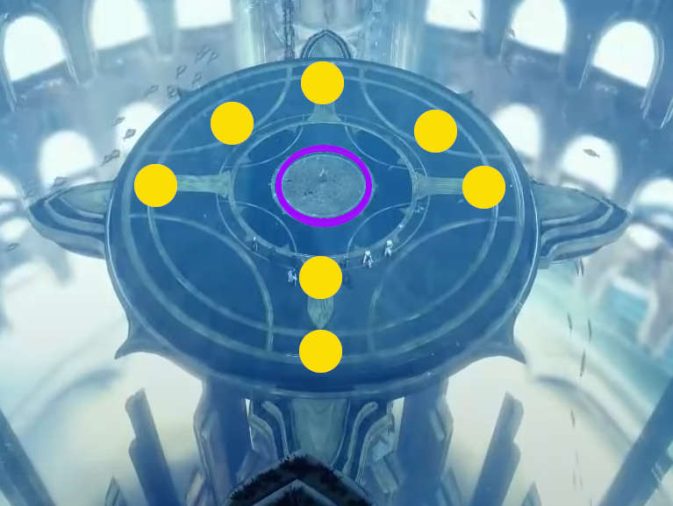
The boss uses this attack in 90 second intervals. The boss teleports to the center and prepares to summon a giant wave that deals massive damage. At the same time, safe spots spawn around the boss at 9, 10.5, 12, 1.5, 3 and 2x 6 o'clock. One of the 6 o'clock spots spawns closer, the other one further away from the boss. The last safe spot spawns at a random spot close to the purple circle marked below. All safe spots together form an upwards pointing arrow shape. Only one player can stay on each of the safe spots, so make sure to assign the positions before you start the boss fight.
During the entire attack animation, the boss takes reduced damage. It is more important to focus on reaching the safe spots than dealing damage.
Annihilation
Upon reaching 28th and 12th HP bar, the boss teleports to the center and starts to absorb the surrounding water. To survive this mechanic, you first need to deal Stagger Damage. If needed, use Whirlwind Grenade. Once the stagger bar depletes, everyone needs to shift their attention towards the yellow orbs spawning at the edge of the battle area. These orbs move slowly towards the water wall surrounding the boss and are absorbed by it on contact. The goal here is to prevent the orbs from reaching the water wall. If too many orbs are absorbed, the Boss deals massive damage to everyone.
Most of the yellow orbs are small and can be easily destroyed with a few skills. But there are also some big yellow orbs which need to be staggered first before you can destroy them. This is really quite difficult, to make it easier throw a Sleep Bomb at it. Keep in mind that dealing damage wakes the orb up, prevent this by using the ping system and warning everyone to not attack the sleeping orb!
If you succeed with everything, the boss performs a backwards movement before then gets incapacitated for a few seconds. Use this opportunity to deal as much damage as possible.
Floating Orbs
During the entire boss fight, floating orbs roam randomly though the battle area. These orbs won't take any damage from the player's skills. But attacks from the boss and damaged caused by the environment can destroy these orbs. Once destroyed, they light up and explode dealing high damage to nearby players.
Low Temperature
Most of the boss's attacks apply a stacking debuff on hit. Upon obtaining the 5th stack, you freeze nearby party members.
Critical Phase
Upon reaching 20 HP bars, the boss strengthens himself. After this, some of his attacks deal more damage or have a bigger AoE.
Freezing Orb
Once the boss is at Critical Phase, a freezing orb spawns in frequent intervals. It surrounds itself with a huge visual effect, which covers almost the entire battle area. If left alone, it explodes and freezes everyone in that huge area. One player needs to move towards the orb in the center and absorb it. Once this happens, only that player gets frozen. If your spacebar is usable, use it to avoid getting frozen while absorbing the orb.
General Patterns
Waves of Imprisonment
The boss spins his trident over head while unleashing 2 water shockwaves around him. These waves won't deal any damage, but imprison 2 random players. The remaining players need to liberate the imprisoned players by attacking them before the boss throws his trident towards them. The trident deals high damage on hit. If both players are liberated in time, the boss throws the trident at a random player instead. In this case, use a mobility skill or spacebar to avoid getting hit.
In another similar attack the boss throws his trident into the air, which splits up and lands on 2 random players. On hit, it imprisons the players and the boss starts to prepare for a leap attack towards those players. You need to liberate the players before the boss starts leaping towards them.
Freezing Spots
The boss rotates his entire body in a huge radius while creating freezing spots at random locations. If a player steps on one they will be surrounded by a huge ice circle that explodes and freezes nearby players. If you accidentally stepon one of the freezing spots, move away from your teammates.
Frontal Lightning
The boss spins his trident while summoning lightning rays in front of him. Avoid staying in front of the boss and use this long animation attack to deal uninterrupted damage. The AoE of this attack is bigger once the boss reaches Critical Phase.
Triple Jump
The boss jumps 3 times towards a player and switches the target after each hit. This attack deals high damage and knocks up on hit. To avoid this attack, spread out and use a mobility skill as soon as the boss leaps towards you.
Gameplay Video
Credits
Written by Perciculum
Reviewed by Facefoot