Recluse Character Guide
Last Updated:June 2, 2025|Changelog
The Recluse is Elden Ring Nightreign's dedicated spellcaster. This witch adeptly wields both Sorceries and Incantations, making her a highly versatile caster. Her low Strength and Dexterity make her ill-equipped to wield most martial weapons, but who needs blades and sticks when you can turn the world around you into an inferno, drop the stars on your foes, or burn them with the flames that kill gods?! In addition to offensive magic, you can use Incantations to support your allies, healing them or providing buffs.
Relics
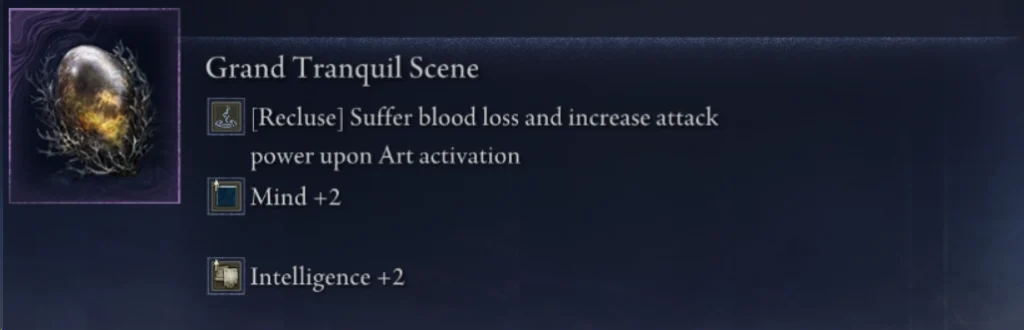
The Recluse has a powerful class-specific mod; "Suffer blood loss and increase attack power upon Art activation". Normally, your ultimate art does not deal damage, but this transforms it into a powerful damage boost, all at the cost of a bit of health. Your other class-specific relic mod gives you the Terra Magica damage buff when you absorb residues. You can use Relics to bolster a specific school of magic, such as Glintstone Sorceries, but it can be a bit difficult to consistently obtain the correct spells in your run.
Night of the Fathom provides a significant boost to health that increases your survivability in expeditions. You can also equip relics that increase your Vigor for more health, Intelligence and Faith for damage, or Mind to give yourself a bigger FP Pool. Gaining some Poise also helps you avoid being staggered by enemies. For a more in-depth explanation on how Relics work, check out our Relic and Relic Rites Guide.
The best way to get strong Relics is by completing Remembrances and progressing your Nightfarer's storyline. You also get powerful Relics either as direct rewards for beating the Nightlords, or from the Small Jar Bazaar after defeating a requisite number of Nightlords.
Talismans
Teardrop Scarabs can be found throughout Limveld and always drop a talisman when killed. Look for Talismans that boost your health to offset Recluse's low Vigor. Dragoncrest Shield Talisman and Pearldrake Talisman bolster your physical and non-physical resistances, respectively.
Spellcasting Talismans
Radagon's Icon massively increases your spellcasting speed, making it easier to weave spells between enemy attacks. This is one of your best talismans. The Carian Filigreed Crest reduces FP consumption, making it easier to use powerful, but high-cost Spells. Finally, there are the Scorpion Charms. These provide a significant damage boost in exchange for a minor increase in damage taken. Your best defense is to not be hit in the first place, so these are well worth grabbing if you get one matching an element you are using.
Weapons
Most of the time on Recluse, you select a weapon based on the spells it offers. Many of your weapons come from the rewards for defeating greater foes, but Merchants and Weapon racks are also very valuable. Forts have a weapon rack that gives staves, and Great Churches give finger seals. Either of these can give you a major advantage in the early game, or a weapon that you can upgrade with Smithing Stones and keep till the Nightlord.
You should also check Merchants (especially those that appear at the Castle or in a Township) as they have a chance to carry rare and powerful weapons. These can be a bit expensive, but are absolutely worth it.
Staves
Usually, the staff you use matters less than the spells it has, however, the higher rarity staves do have better sorcery scaling. If you can both deal with the health loss and properly manage your FP. Staff of the Guilty is an excellent early game pick as Briars of Punishment hits hard and builds blood loss up on enemies. A staff with the Shattering Crystal Spell is another early game option, as this has good damage with decent range. Glintblade Sorceries are also great, as these can be used at a safe distance before you burst down a dangerous foe.
Swift Glintstone Shard / Comet spells (including Night Comet/Glintstone Icecrag) are all great; they are easy to land, cast quickly, and don't have high FP costs. If you can find it, Stars of Ruin is even better as it fires a volley of projectiles. Magma Shot is great against less mobile enemies; the lava puddle it leaves continues to do ticking damage. While rarer, Rancorcall and Ancient Death Rancor consistently put out high damage.
Finally, there's Rennala's Full Moon and Ranni's Dark Moon. These spells have a long cast time but do massive damage when they reach an enemy and explode. Stand back and nuke things if you get these, then use your Character Skill to recover FP. There are many powerful spells in Elden Ring Nightreign, so each time you get a new staff, feel free to experiment with it even if the spell isn't on this list.
Seals
There are a lot of powerful Incantations that you can obtain on Seals. One of the best early game Seals to look out for is the Gravel Stone Seal as the Lightning Spear incantation is both powerful and easy to use. You can even charge it against slower enemies for more damage. Another good early game option is Black Flame, found on the Godslayer's Seal. Flame Sling, found on the Giant's Seal, is similar but does not have the DoT (damage over time) effect. Like with Staves, higher rarity Seals have better scaling, but ultimately, the spells matter more.
Triple Rings of Light is a strong medium-range incantation with a reasonable FP cost; it has good coverage due to firing multiple projectiles. Honed Bolt is a powerful Lightning incantation that can easily be chained together. Scouring Black Flame, Giantsflame Take Thee are two solid late-game fire spells, but you want to charge Giantsflame to maximize it whenever possible. There are a few non-elemental spells to look out for, like Pest Threads and Swarm of Flies, but these are harder to use due to the additional FP management when your spells do not inherently add residues to an enemy.
Lastly, there are a variety of buff spells you can use to aid your allies. Protection of the Erdtree or Golden Vow bolsters them in combat, and Healing spells recover their health (or damage undead foes). Like with Sorceries, the game has a lot of powerful incantations, so feel free to experiment when finding something new.
Other Weapons
The best martial weapon to grab on Recluse is an affinity bow, which can be used to safely revive an ally without expending FP, or to apply residues to an enemy so that you can recover your FP. While Recluse can use weapons that deal Magic, Fire, Lightning, or Holy damage (due to her high Intelligence and Faith), she does not have as many defensive options as the martial Nightfarers. Use the Codex to check weapon scaling, though, as some weapons like Bolt of Gransax may thematically fit the Recluse, but they actually scale off of Strength and Dexterity, making them a poor choice for her.
Weapon Passives
All equipment found has a passive effect, most of which are active regardless of whether the item is equipped or not. For Recluse, take items that help her sustain FP or enhance her spellcasting. Damage increases for Sorceries or Incantations are good, but oftentimes spellcasting speed or FP cost reduction is even better! "Damage Negation Up While Casting Spells" is particularly nice, as you are most likely to get hit when you misjudge the time you need to cast before the boss attacks again.
The equipment doesn't have to be weapons typical to the character; on Recluse, a Hammer's passive is just as strong as a Stave's passive. Additionally, take passives that give a defensive bonus, which helps against the selected Nightlord. There are only six equipment slots, so use them wisely. If a passive effect has this hand symbol, that means it is only active while you are using the weapon.

Passive Character Traits
Also known as traits. These are the rewards you select from after defeating greater foes. They provide your character with upgrades for the current run. Recluse benefits from increased health to offset her low starting pool, reduced FP costs, and FP recovery.
Since she tends to stand back, it's a bit less risky to use the "Flasks recover health over time" modifier. Getting a bit of Poise on Recluse can make a huge difference as this makes it harder for enemies to stagger or stun-lock you.
Passives that generate Glintblades for you are excellent, as this allows you to passively kill weak foes while running past. Lastly, keep an eye out for an enhancement to your evasion. The best defense is not getting hit!
Playstyle
The Recluse is both incredibly straightforward and extremely complex to play. If you have a good Staff and Seal, most of your time is spent blasting enemies with powerful spells while weaving in your Character Skill to recover FP. Where things get a bit trickier is knowing enough about what all of the spells do so that you can find the good ones. Sorceries and Incantations that state they can be cast repeatedly are the easiest to use. Whereas, the most difficult are those that need to be charged, or have a long cast time (especially when the spell is short/medium range).
Character Skill
Recluse's Character Skill, Magic Cocktail, has two uses. First, recovering FP by drawing in residues on enemies and allies. Then second unleashing custom spells by combining various affinities. Magic, Fire, Lightning, and Holy effects generate residues. This makes it a bit tricky to build elemental combinations. You might cast an incantation to leave a Lightning residue on an enemy, but if your Duchess ally hits it with a Fire dagger right after, the enemy ends up with a Fire residue instead. Coordinate with your teammates and plan around their elements in addition to your own.
You can weave your Character Skill into your spellcasting rotation. Use Magic Cocktail to absorb residues, then immediately begin a spell to skip the spell's startup animation and smoothly transition into casting it. This takes a bit of practice to get used to but once mastered makes it easier to cast spells while maintaining your FP.
| Single | Double | Triple |
|---|---|---|
| Fire - deal damage over time and create burning ground. | Fire / Magic - deals damage repeatedly over a duration. | Magic / Fire / Lightning - create a massive gravity bomb. |
| Lightning - enhances your ability to dodge. | Magic / Lightning - a medium-range slash with a magic blade. | Magic / Fire / Holy - a breath attack that damages foes and restores HP/FP for allies. |
| Magic - deal Magic damage 4 times in an area. | Magic / Holy - creates a zone where you and allies don't spend FP. | Fire / Lightning / Holy - create a delayed explosion of lightning. |
| Holy - increase Poise and Damage Negation. | Fire / Lightning - become a fireball, charge forward, and explode. | Magic / Lightning / Holy - encase yourself in ice and generate a storm which rapidly inflicts Frostbite. |
| Fire / Holy - raises ally max hp, and lowers enemy max hp. | ||
| Lightning / Holy - a defensive spell that can parry incoming attacks. |
Stand-out Cocktails
- Magic and Fire are both solid single-element Cocktails. Magic gives you a lot of FP recovery, though it isn't very time efficient, and Fire does great damage so long as the enemy sits in the burning ground.
- Magic / Lightning does good damage and stance damage to enemies. You can hold the blade to delay the cast until a good moment, just keep in mind that you are less mobile while holding the blade.
- Both Magic / Holy and Fire / Holy provide great buffs to yourself and allies. If you have a high-cost spell like Rennala's Full Moon, you can use Magic / Holy to get multiple casts in for free.
- All of the triple Cocktails are powerful, but these are the most difficult to pull off as you need to combine 3 unique elements either by rotating between different weapons or absorbing residues applied by your allies.
- Spend some time experimenting with each of the Cocktails as the spells you have vary from run to run.
Ultimate Art
Soulblood Song deals damage, can help revive allies, and applies a mark to all foes in a wide area. The mark is short-lived, so use it when you (and your allies) can maximize uptime. Hits against marked enemies restore both health and FP. This is a great way to bring your allies back to health right after someone Poise Breaks the boss. Alternatively, you can use the FP recovery to spam a bunch of highly damaging skills and burn through boss health bars.
Summary
The Recluse is a spellcaster who devastates foes from afar. She is adept with both Sorceries and Incantations, giving her a wealth of options when it comes to armaments. In addition, her Character Skill absorbs elemental residues, which she uses to create custom spells. If you are looking for a damage dealer with a different flavor of destruction for every mood, then Recluse is the character for you.
- Use Relics that enhance her Character Skill or increase her survivability.
- Look out for Staves and Seals
- Manage your Cocktails to unleash powerful magics.
- Learn more about the Weapons, Talismans, Relics, and Passives available by browsing our Database!
Credits
Written by: Tenkiei
Reviewed by: IBoilerUp