Nirma Boss Guide
Last Updated:April 17, 2025|Changelog
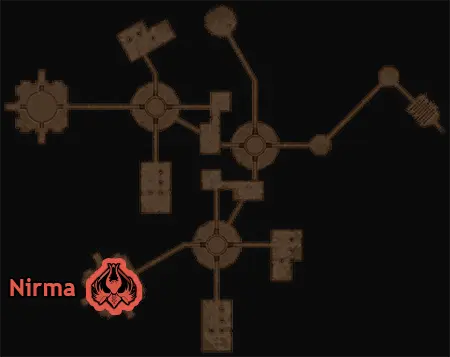
The level 50 boss Nirma spawns on the 5th Floor of Syleus's Abyss in the southwest portion of the map. Similar to Aridus, the doors of this open-world Dungeon close during the night. You can use a Guild Summon Stone to teleport your guildmates inside while the doors are closed.

Location
The easiest way to get to Nirma is to teleport to Syleus's Abyss 6th Floor Dungeon Waypoint and use a Turtle Morph to swim through the lava to reach Nirma via a shortcut shown in the video below at the end of the Nirma tab.
Loot
Guaranteed Loot
- Conquest Participation Award: Nirma
Random Loot
- Nirma's Corrupt Sword
- Transcendental Salvation Pants
- Heavenly Arbiter Shoes
- Destroyer's Choker
- Boulder Destroyer Two-Handed Sword
- Violent Ambush Dagger
- Golem Patroller Crossbow
- Foresight Wand
- Noble Sage's Cloth Gloves
- Mysterious Sage's Linen Pants
- Geode Dracoryft Turtle
Mechanics
Nirma is one of the complicated bosses in Throne and Liberty that requires careful coordination to avoid raid wipes.
The most important thing to understand about Nirma is how it targets players during the entire battle and what this means for all players involved in the fight. When Nirma is engaged, the player furthest from the boss on the platform where it spawns is marked with a Glowing Orb and selected as its primary target.
Fury Attack
- Everyone should position themselves opposite of the marked player to avoid AoE damage and a Fury Attack that bounces to a player near the marked target.
General Patterns
- When Nirma says, "Cry in desperation!" it casts Electrical AoEs that cover a part of the platform in a large cone. The person who is marked must move clockwise or in an agreed direction with their team to kite the Electrical AoEs away from allies.
- Everyone needs to avoid being hit by this AoE as it places a debuff on you that significantly reduces the healing you receive. Getting one stack of this debuff cuts healing in half, and receiving two stacks makes all heals you receive (including your potions) restore pretty much nothing. During this mechanic, Nirma simultaneously casts AoE blasts toward the marked player, including the same Fury Attack that you must block.
- When Nirma Spins and Raises its Staff in the air while gathering electrical currents toward its body, it casts an AoE attack that hits everyone on the platform. You must learn to time your jump to avoid the AoE blast. You can also face tank the damage and rely on your healer to restore your health.
Tips
- Learn the following mechanics well, especially for Conflict spawns, as understanding Nirma's mechanics and arena layout is essential in successfully strategizing during battle.
- It is helpful to pair whoever is marked throughout the fight with a healer who plays at long range or understands the mechanics of the boss. If the person marked has stacks of the healing debuff, multiple healers should coordinate the use of Blessed Barrier and the shield from Curse Explosion to prevent them from receiving damage if they are hit.
Gameplay
Credits
Written by Eli
Reviewed by Yaen