Field and Guild Boss Guide
Last Updated:April 17, 2025|Changelog
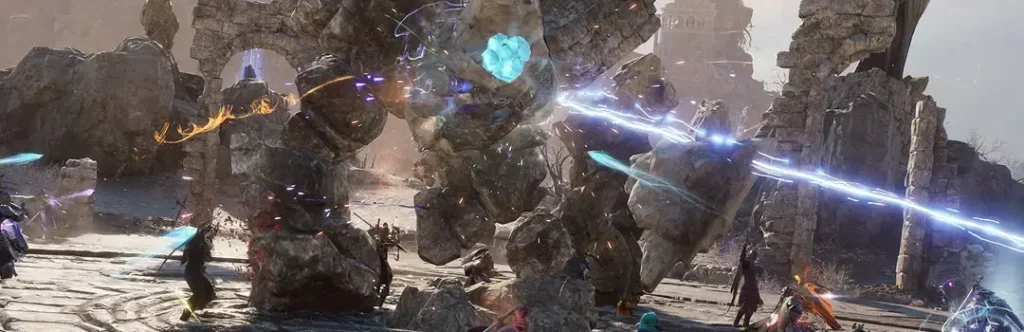
Guild Bosses, Field Bosses, and Archbosses are the three types of Open World bosses in Throne and Liberty. This guide focuses on sharing all you need to know about Field and Guild Bosses. Field Bosses are found at unique locations in the open world and drop Best in Slot gear for all players. Guild Bosses are the same Field Bosses you'd find in the Open World but are accessed through the Guild Raid Portal located in your Guild Base.
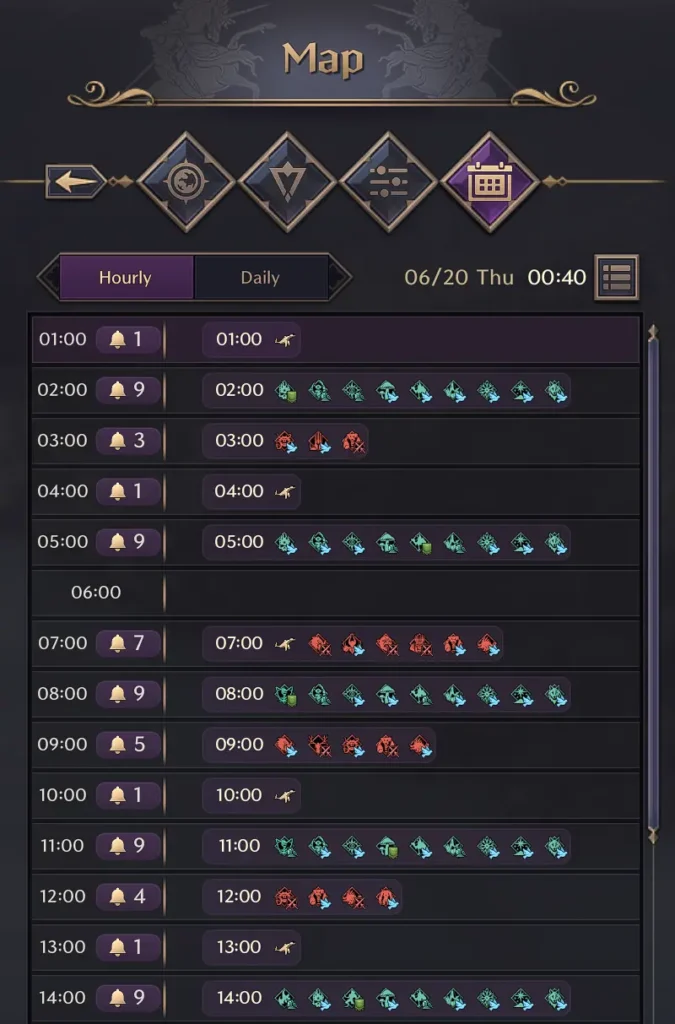
There are a total of 14 Level 50 bosses and 4 Level 55 bosses. You can conveniently check the spawn timers of Field Bosses by looking at the Timetable, which is accessed by opening up your Map (M).
By selecting 'Hourly,' the Timetable displays all events happening every hour throughout the day. When selecting 'Daily,' the Timetable shows weekly events.
The icon with three dots and three lines at the top right enlarges and shrinks icons to improve readability.
An alternative option to check current or upcoming bosses is the Schedule icon, located at the top right of your screen, just to the left of your Minimap. This function only displays bosses that are active or arriving within the next hour.
When Field Bosses are set to spawn, three instance portals spawn: Peace, Dominion, and GvG. Choosing Peace will teleport you into a PvE-only instance. Choosing Dominion will teleport you into a PvPvE event where you are put into one of three factions. Choosing Guild will sign you up for a GvG or GvGvG event.
Talandre Field Bosses
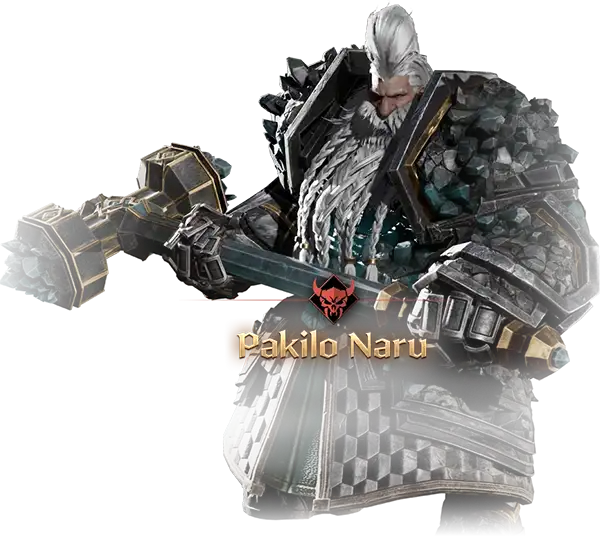
Pakilo Naru spawns at the very top of Black Anvil Forge at Black Anvil, next to the Refinery.
To get up there, you can take the ramps or use the steam system to propel yourself upward.
Guaranteed Loot
- Conquest Participation Award: Pakilo Naru
Random Loot
- Naru's Frenzied Greatblade
- Naru's Sawfang Spear
- Spectral Overseer's Tunic
- Royal Praetor's Plate Armor
- Imperial Seeker's Tunic
- Sacred Repose Garb
- Chosen Vanquisher's Trousers
- Effortless Victory Greaves
- Runed Band of the Black Anvil
- Symbol of Nature's Advance
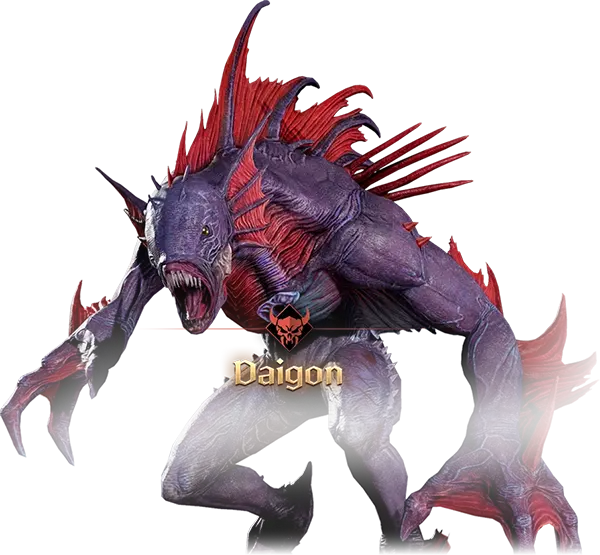
Daigon spawns at the center of Island of Despair in Quietis's Demesne.
Guaranteed Loot
- Conquest Participation Award: Daigon
Random Loot
- Daigon's Charred Emberstaff
- Daigon's Stormblade
- Spectral Overseer's Trousers
- Royal Praetor's Gaiters
- Imperial Seeker's Trousers
- Sacred Repose Pants
- Immortal Legionnaire's Helm
- Chosen Vanquisher's Visage
- Deep Fathom Grasp
- Deep Draconic GorgetDeep Draconic Gorget
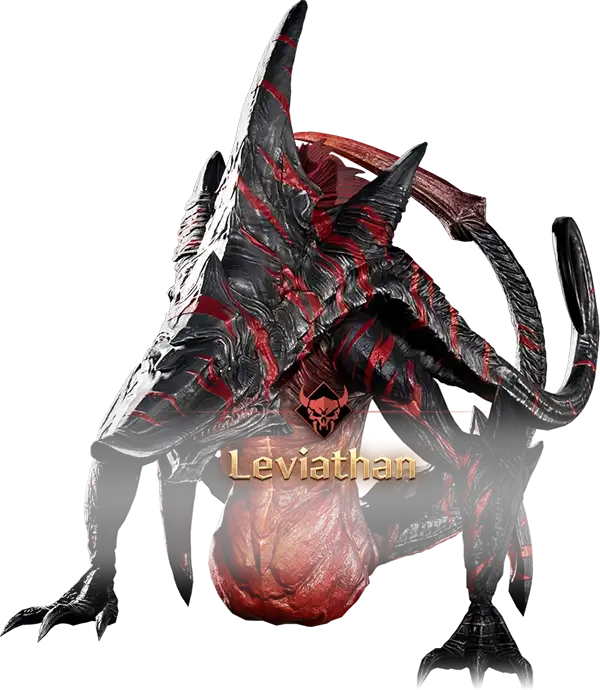
Leviathan spawns in Leviathan's Nest in the Swamp of Silence.
Guaranteed Loot
- Conquest Participation Award: Leviathan
Random Loot
- Leviathan's Bladed Tendrils
- Leviathan's Bloodstorm Longbow
- Spectral Overseer's Handguards
- Royal Praetor's Gauntlets
- Imperial Seeker's Gloves
- Sacred Repose Gloves
- First Light's Halo
- Band of Ancestor's Blood
- Bracelet of the Violent Undertow
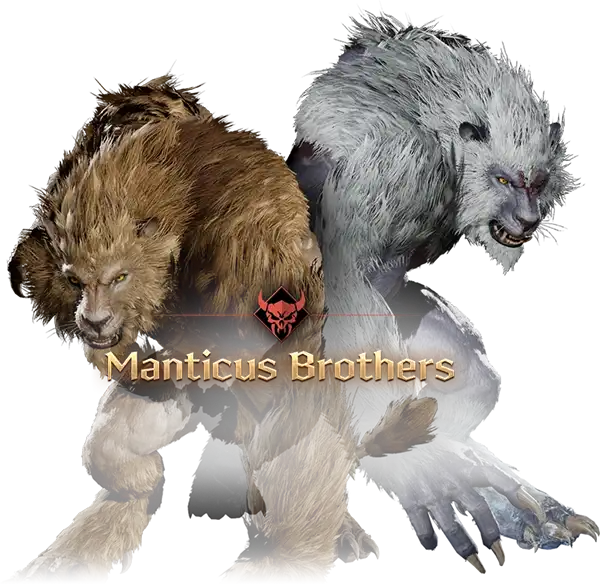
The Manticus Brothers spawn at Lightning Forest at Crimson Manor. There are two bosses to kill here: Akman and Deckman.
Guaranteed Loot
- Conquest Participation Award: Manticus
Random Loot
- Akman's Bloodletting Crossbows
- Deckman's Balefire Scepter
- Spectral Overseer's Boots
- Royal Praetor's Sabatons
- Sacred Repose Shoes
- Immortal Legionnaire's Greaves
- First Light's Pants
- Pristine Primalfang Pants
- Primal Ritual Collar
Laslan Field Bosses
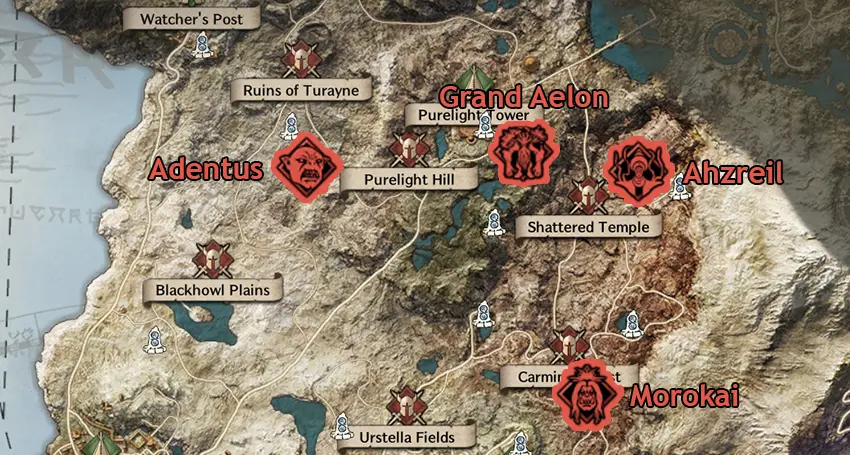

The level 40 boss Morokai is the first open-world Boss that is unlocked through the Milestone system in Throne and Liberty. Morokai spawns in the southeastern portion of Carmine Forest.
There are two ways of getting to Morokai. Either you fly northeast of the Starlight Observatory Ruins, or you run southwest of the Carmine Forest Waypoint.
Guaranteed Loot
- Conquest Participation Award: Morokai
Random Loot
- Morokai's Corrupt Sword
- Pitch Black Punishment Gloves
- Abyssal Flame Necklace
- Cast Iron Golem Smasher
- Berserk Charge Blade
- Golem Overwatcher's Horn Bow
- Sharp Spiked Horn Bow
- Cold Witch's Cloth Gloves
- Great Spirit's Blessing Magic Gaiters
- Prepared Adventurer Glynt
Morokai Mechanics and Tips
As the first boss unlocked through the Milestone system in Throne and Liberty, Morokai has more straightforward mechanics to learn and is repeated as follows:
- Like all Field Bosses, Morokai has a Fury Attack that can be avoided by using your motionless Block. Morokai's Fury Attack can bounce between nearby players.
- Avoid this mechanic by running behind one of the Four Pillars when Morokai lifts its staff and says, "I will burn everything I see!" At sub 50% Health, Morokai starts to use a new mechanic that activates the Four Pillars surrounding the boss with purple lightning. When Morokai lifts its staff and says, "I will burn everything I see!", run behind one of the Four Pillars. After about three seconds, Morokai shoots lightning from its staff at a large number of players selected at random to deal massive damage.

Ahzreil is a level 50 boss that spawns in the southwest area of the Light Sanctum Ruins.
You can easily make it to Ahrezil's spawn location by traveling northwest and across the bridge from the Shattered Temple Waypoint or using the grappling hooks located on the southwest wall of the Ruins.
You can also fly from the hills located northwest of Aelon's Sanctuary to reach the Light Sanctum Ruins.
Guaranteed Loot
- Conquest Participation Award: Ahzreil
Random Loot
- Ahzreil's Demonic Blade
- Mysteries of Mother Nature Pants
- Heavenly Arbiter Pants
- Holy Warrior's Resolve
- Berserk Charge Blade
- Immortal Severance Blade
- Immortal Ruin Staff
- Destiny Worship Barbaric Staff
- Infuriated Sage's Hood
- Destiny Worship Barbaric Staff
- Monarch Raven
Ahzreil Mechanics and Tips
Compared to other bosses in Throne and Liberty, Ahzreil has few mechanics and can be considered an easier fight. However, the few attacks Ahzreil does deal massive damage and one-shot players if done incorrectly. Make sure you understand the following mechanics before entering the fight:
- Ahzreil spawns a line of Blue Fire towards whoever is holding aggro. Players caught in the AoE can run out or dodge to the sides to avoid damage.
- Throughout the fight, Ahzreil spawns Blue Circles on the ground under the feet of randomly selected players. These circles are telegraphs letting you know that a meteor is about to fall from the sky to deal AoE damage. Run out of these circles immediately.
- Ahzreil's signature move involves more fire and totems. Three Totems spawn randomly around the arena close to Ahzreil. Multiple players are also simultaneously sucked into Ahzreil and three of them become randomly selected to receive an AoE ticking Time Bomb floating above their heads. The selected players must use these bombs to explode and destroy the totems or all players take high damage.
- A trick to avoid the explosion AoE wipe from the totem phase that is especially helpful during uncoordinated open-world spawns is running behind one of the large cylinder pillars at the edges of the Temple.

In the southern portion of the Ruins of Turayne is the level 50 boss, Adentus.
To get to Adentus, you can easily run South from the Ruins of Turayne Waypoint and use the stairs or grapple hook to get to the boss arena. If you fly down from the cliffs towards the east in Purelight Hill, Ranged DPS can take advantage of the trees to snipe enemies.
Guaranteed Loot
- Conquest Participation Award: Adentus
Random Loot
- Adentus's Savage Blade
- Reaper's Black Mask
- Holy Warrior's Judgment Headgear
- Skulls Spectral Belt
- Elite Resistance Knife
- Lethal Venom Cobra Arbalest
- Destiny Worship Barbaric Staff
- Elite Resistance Magic Scepter
- Indomitable Knight's Visor
- Reflection Mind Hood
- Loyal Fist Dentwerp
Adentus Mechanics and Tips
Adentus has simple boss mechanics and is one of the top 3 most contested bosses during a Conflict spawn. Make sure to fully understand the following mechanics to avoid simple mistakes that can cost you boss loot and the overall fight against enemy raids:
- When Adentus says, "Overrun!" it casts a telegraphed attack that involves Three Glowing Lines on the ground that erupts once the boss smashes its hammer on the ground. The boss hits the ground three times and if you are caught in the AoE, you receive minor damage and become Stunned. This attack is easy to avoid if you pay attention to the telegraph on the ground during the mechanic.
- When Adentus flips its hammer in the air and says, "Overrun!" again, it spawns a bunch of yellow circles on the ground that explode very quickly, damaging and Knocking Up players caught in the air.
- Adentu's Fury Attack involves him shouting, "This will be your grave!" while preparing an AoE attack that chain Pulls all players caught in it towards him.

On the Eastern edge of Purelight Hill is the Field Boss of Grand Aelon, a level 50 boss.
To get to Grand Aelon, you can either travel North of the Purelight Hill Waypoint or fly southeast from the Purelight Tower Waypoint.
The fighting zone for Grand Aelon is surrounded by trees, which range players can take advantage of to snipe enemies from above during PvP.
Guaranteed Loot
- Conquest Participation Award: Grand Aelon
Random Loot
- Grand Aelon's Sacred Bow
- General's Melee Gaiters
- Pitch Black Dark Pants
- Great Sage's Necklace
- Deadly Single Edge Two-Handed Sword
- Cast Iron Golem Smasher
- Violent Ambush Dagger
- Golem Overwatcher's Horn Bow
- Mysterious Sage's Magic Shoes
- Seasoned Veteran Necklace
- Forest Protector Grover
Grand Aelon Mechanics and Tips
Grand Aelon is the tankiest boss in Throne and Liberty and drops some of the best tank gear. The mechanics are pretty simple and don't require much effort to learn. They include the following:
- Grand Aelon's signature mechanic is the Thorn Cages, which spawn to Ensnare and trap randomly selected players. The boss says, "Stuggle... rootless ones!" before locking the players inside the Cages. Players must break the Cages as quickly as possible to save those inside from dying. If you have a Green AoE Circle underneath you during this mechanic, run away from players, or you trap them with you.
Stonegard Field Bosses
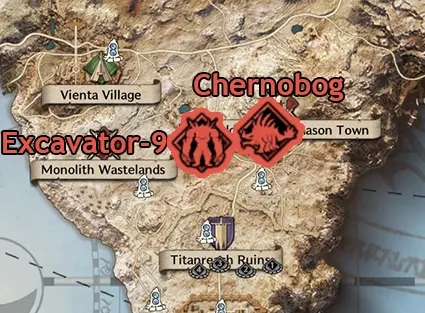

Excavator-9 is a level 42 boss that can be found on the far east side of the Monolith Wastelands.
There are two ways to reach the boss. You travel northeast of the Monolith Wastelands Waypoint and use the grappling hooks to get on top of the elevated boss arena, or you fly down northwest from the Abandoned Stonemason Town Waypoint.
Guaranteed Loot
- Conquest Participation Award: Excavator-9
Random Loot
- Excavator's Mysterious Scepter
- Special Resistance Hawk Pants
- Barbarian's Stone Ring
- Deadly Single Edge Two-Handed Sword
- Immortal Destruction Blade
- Violent Ambush Dagger
- Eternal Rest Longbow
- Corrupt Witch's Hat
- Impure Witch's Linen Pants
- Raging Eagle
Excavator-9 Mechanics and Tips
Excavator-9 also has simple boss mechanics similar to Morokai. The arena surrounding the boss is quite large allowing for great PvP fights during Conflict spawns. The boss's mechanics are as follows:
- When initially engaged, the boss slams the ground three times, dealing minimal damage.
- Excavator-9 uses a mix of melee and mid-range basic attacks. The melee-range basic attacks deal large damage and are directed toward the tank holding aggro on the boss. The mid-range basic attacks occur after Excavator-9 shouts, "Wide-range operation!". Excavator-9 then proceeds to slam the ground three times, time your jumps to avoid the damage. When the boss gathers purple particles in its left hand, it unleashes another mid-range AoE attack. You can dodge this ability by jumping.
- Excavator-9 has another mid-range basic attack that occurs at random, where it slams its hammer into the ground creating a fissure in the ground that launches players in the air. Afterward, the boss follows up with an AoE attack, shooting Black Smoke that turns players hit into stone. Make sure to fly down in morph form if you are launched into the air to avoid fall damage.
- The Fury Attack from Excavator-9 involves a large windup, and Excavator-9 shouts once again, "Wide-range operation!" Afterward, the boss begins to spin three times, dealing AoE damage in a large radius. Watch for the Purple Fury Attack indicator to time your Block.
- You can fly on top of the pillars surrounding Excavator-9's spawn location when traveling from the Abandoned Stonemason Waypoint to snipe enemies from above.

In the Northern edge of the Abandoned Stonemason Town, is the Level 44 Field Boss, Chernobog.
You can easily get to Chernobog by teleporting to the Abandoned Stonemason Town Waypoint and traveling directly North.
Guaranteed Loot
- Conquest Participation Award: Excavator-9
Random Loot
- Chernobog's Beheading Sword
- General's Fury Headgear
- Pitch Black Silence Shoes
- Lethal Venom Scorpion Cloak
- Elite Resistance Knife
- Elite Resistance Longbow
- Lethal Venom Cobra Arbalest
- Foresight Wand
- Great Spirit's Grace Visor
- Reflection Strike Gloves
- Ghost Skoll
Chernobog Mechanics and Tips
Chernobog is not a difficult boss once you learn the mechanics and understand the timings required to avoid major mechanics. The following are Cherno's mechanics:
- When Chernobog spawns, it ascends from the ground Knocking surrounding players up in a large AoE while dealing damage. Keep a ten-metre distance from Cherno's spawn location to avoid getting launched.
- Chernobog deals poisonous basic attacks to players throughout the fight. The DoT damage from these attacks is non-lethal and easily manageable with a healer or Nature's Blessing.
- Cherno's Fury Attack involves a small windup into an AoE Tail Swipe that Stuns and pushes players who fail to Block back directly behind the boss. The boss says an illegible phrase before attacking. The Purple Fury Attack indicator for this ability is quite slow, so it is very easy to Block.
- One of the boss's key moves is a Burrow attack that can occur at random. The boss once again says a longer intelligible phrase before diving underground and poking its head up at a random nearby location to Stun and Knock players back. The boss burrows again after this and ascends from the ground the second time Knocking surrounding players into the air. Once the boss lands, it emits a Grey Petrifying Spray that turns all enemies caught in it into stone. When Burrowing, the boss can perform multiple burrows before ascending from the ground. If you are Poisoned by Cherno during this mechanic and undergeared, you can avoid death to the DoT by getting Petrified by the boss.

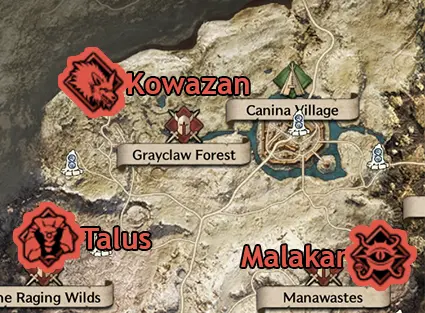
One of the earlier level bosses is Talus, a Level 46 boss that spawns in the western portion of The Raging Wilds.
It is very easy to get to Talus, as you simply travel directly west of The Raging Wilds Waypoint.
Talus spawns in the middle of a crater surrounded by cliffs with elevated ledges that provide Ranged DPS a higher ground advantage during PvP.
Guaranteed Loot
- Conquest Participation Award: Talus
Random Loot
- Talus's Resonance Staff
- Ghost Wolf Alter Ego Mask
- Holy Warrior's Sacred Armor
- Wild Gold Bracers
- Deadly Single Edge Two-Handed Sword
- Elite Resistance Sword
- Elite Resistance Magic Scepter
- Sharp Spiked Horn Bow
- Bloody Shadow Mask
- Indomitable Strength Iron Gloves
- Sprouting Talem
Talus Mechanics and Tips
When fighting Talus, make sure you pay attention to the mechanics to avoid death. During a Conflict spawn, Talus is an incredibly fun boss to PvP around. The most successful groups use Talus' mechanics to their advantage, which include the following:
- Talus deals melee range basic attacks, and if no players are within range, it emits pulsating damage in an AoE that also knocks players back. Make sure always to have a tank on Talus to prevent AoE damage and CC.
- The majority of Talus' fight involves a series of three large AoE mechanics, which you can avoid by watching out for the following telegraphs:
- Talus raises its hands and then smashes the ground, knocking all players within the inner arena into the air. Most players face tank this mechanic and rely on the healer to use Clay's Salvation afterward.
- When Talus says, "Expel...magic...!" it splits apart and begins to spin uncontrollably, spawning a massive Windstorm that covers the entire boss arena. Run to the center of the arena to avoid the massive damage that occurs at the end of the animation. You can also avoid damage by running outside of the AoE, but then you lose DPS on Talus.
- Lastly, when Talus says, "Damage...restores...!" it spawns Three Stones at the edges of the inner arena. All players must run to one of these stones to obtain a Blue Shield that protects them from being one-shot at the end of the animation. You must touch the stone with your body to get the shield.
- Range DPS during a Conflict spawn can use the cliffs at the outer edges of the boss arena to kill players at max range.

Malakar the great Eyes of Desires, is a level 48 boss that can be found in the northeast portion of Manawastes, above ground.
You can not travel to Malakar from the Sanctum of Desire Waypoint, so you must travel to the Manawastes Waypoint and run north to reach the Field Boss.
Guaranteed Loot
- Conquest Participation Award: Malakar
Random Loot
- Malakar's Lethal Crossbow
- Grand General's Command Visor
- Black Lion Brutality
- Worshiper's Magic Bracers
- Elite Resistance Broadsword
- Elite Resistance Sword
- Berserk Charge Blade
- Sharp Spiked Horn Bow
- Blessing of Grace Plate Boots
- Bloody Wind Leather Boots
- Clear-eyed Figment
Malakar Mechanics and Tips
Malakar can be one of the most fun and frustrating bosses to fight in Throne and Liberty because of how easily the mechanics can be messed up by players. During a Conflict spawn, Malakar can be taken advantage of to wipe enemy raids if you understand the following:
- Pay attention to Malakar's Purple Fury Attack indicator, which is cast frequently during the fight. Malakar charges up electrical projectiles that must be blocked to avoid being stunned.
- Throughout the fight, Malakar casts 1 to 2 red eyes above players within range. If there are 2 red eyes, the one that is open shows who Malakar is focusing on.
- Melee with the eye needs to kite Malakar around so it does not catch up to them.
- If Malakar catches the person with an eye, it begins smashing the ground with a large AoE multiple times, dealing massive damage to all players within range.
- Malakar casts purple projectiles randomly at players throughout the fight. Dodge the projectiles before they hit the ground to avoid the AoE damage.
- Malakar's iconic mechanic involves a Teleport, Petrify Stun, and mass AoE pull that reaches more than half of the arena. Malakar teleports to the furthest player within its aggro pool, casts a massive AoE Petrify Stun, and then Pulls all players using the same long-range AoE.
- To counter this mechanic, it's important to pre-select, preferably a DPS playing at max range to bait the Teleport, and they can turn Malakar around to face away from allies and players so they don't get sucked in. This must happen very fast, so having a DPS with good movement speed is helpful to counter this mechanic.
- In a Conflict fight, players can bait the Teleport and Vacuum mechanic by using it to suck in enemy players. Or, players can wait for the Pull before rushing in to wipe enemy raids who are Vacuumed and Stunned by Malakar.
- A clever way to avoid the pull mechanic when the fight is disorganized is by positioning yourself behind a solid structure at the edge of the arena when Malakar Teleports. This stops your body from being Pulled towards Malakar. Unfortunately, this is not an easy thing to achieve for Melee DPS, who are normally in Melee range.

Deep in the Northwest ends of the Grayclaw Forest, you find the level 50 Kowazan and Lycan Kowazan bosses. Kowazan spawns during the daytime. Lycan Kowazan spawns during nigthttime.
You can reach Kowazan by either traveling north of the Grayclaw Forest Waypoint or traveling west from the southwest exit of Canina Village.
Guaranteed Loot
- (Kowazan Only) Conquest Participation Award: Kowazan
- (Lycan Kowazan Only) Conquest Participation Award: Lycan Kowazan
Random Loot
- (Kowazan Only) Kowazan's Twilight Blade
- Grand General's Invincibility Gaiters
- Slaughterer's Collar
- Pitch Black Sorcery Hat
- Deadly Single Edge Two-Handed Sword
- Immortal Piercing Crossbow
- (Lycan Kowazan Only) Kowazan's Killer Crossbow
- Sharp Spiked Horn Bow
- Stone-Melting Magic Scepter
- Bloody Fog Leather Pants
- Guard's Endurance Necklace
- Fenrian Skoll
Kowazan and Lycan Kowazan Mechanics and Tips
Kowazan and Lycan Kowazan are difficult bosses in Throne and Liberty, despite having very few mechanics. A healer is key to saving the party when mechanics fail. Make sure everyone is aware of the following mechanics to avoid failed attempts at killing this boss:
Kowazan
- Kowazan has Melee and Ranged basic attacks that are used depending on who holds aggro on Kowazan. If a Ranged player steals aggro, the boss swaps to Range attacks and then jumps on top of the target. Try to always keep aggro on a tank.
- After saying, "Are you the leader?" Kowazan spawns a Glowing Green Aura underneath a random player in the arena. The Green Light emits from the ground, and the boss throws multiple Knives in almost a 180-degree AoE cone that deals damage and stacks Poison on anyone hit.
- When Kowazan says, "Filthy...useless...! I'll take you all down in an instant!" he gathers Green Smoke towards him while sucking randomly selected players in. After the Vacuum Pull, Kowazan deals an AoE blast that marks and debuffs the selected players with a Knife and Green Aura above their heads. If you are marked, you have to run and touch the bodies of other players who are unmarked to spread the debuff. If you fail to spread the debuff you are then Lifted into the air and killed.
- Kowazan, randomly, casts AoE Poison Knives all around him in a large radius twice in a row that can't be dodged if you're in range. Players should be able to simply face tank the Knives and rely on a healer to recover any lost Health. After the second cast of Knives, the boss uses a melee range Fury Attack that can be Blocked by paying attention to the Purple Fury Attack indicator.
Lycan Kowazan
- Lycan Kowazan has similar Basic Attack patterns to Kowazan.
- The Fury Attack from Lycan Kowazan is fairly simple and entails a large AoE attack that covers the majority of the arena. Pay attention to the Purple Fury Attack indicator and Block at the right moment.
- The boss pushes players back in a large AoE and marks 6 random players in the arena with Blue Moon symbols. Players must match their Moon with another to form a Yellow Full Moon. A yellow AoE also appears at random where one of the Blue Moons was matched. Stand in this AoE to receive a damage buff.
- Lycan Kowazan sucks players in and six to seven at random are marked with a Red Moon. Additionally, several other players are marked with Red Light. Players with a Red Moon above their heads must immediately run to the boss as fast as possible and hug it. If even one person with a Red Moon is late, Lycan Kowazan begins killing players who were marked with the Red Light at random.
Open World Dungeon Field Bosses

On the 3rd Floor of Syleus's Abyss is level 50 Field Boss, Cornelius, located in the center of the Hall of Immortality. If it's nighttime, the doors of this dungeon are closed so make sure to enter on time. You can use a Guild Summon Stone to teleport your guildmates inside while the doors are closed.
There are multiple ways you can get to Cornelius, but the easiest is entering the open-world Dungeon through the First Floor and running straight through until you see the first big crack in the ground. Drop down into the crack and fly towards your right which takes you directly into the Hall of Immortality.
Guaranteed Loot
- Conquest Participation Award: Cornelius
Random Loot
- Cornelius's Explosive Blade
- Transcendental Clairvoyance
- Heavenly Arbiter Attire
- Abyssal Wind Wristband
- Elite Resistance Broadsword
- Elite Resistance Crossbow
- Berserk Charge Blade
- Destiny Worship Barbaric Staff
- Blessing of Grace Iron Gloves
- Reflection Alter Ego Secret Art Pants
- Obsidian Knight Ossic
Cornelius Mechanics and Tips
When fighting Cornelius, make sure you remain aware of any AoEs cast at your feet or nearby players to avoid massive damage or being killed. The following mechanics must be understood to successfully fight Cornelius:
- When Cornelius spawns, it encloses the entire arena in a Blue Forcefield that prevents players on the floor from entering or leaving. To enter, players must go to the top of the surrounding coliseum and fly over the Blue Forcefield to get into the fight. Alternatively, you can stay inside the arena before Cornelius spawns to avoid getting locked out.
- The Blue and Red mechanic is Cornelius' signature move:
- Blue: Cornelius selects players at random and spawns a Blue Mark over their heads. Players with the Blue Mark must distance themselves from allies to avoid killing them. After three seconds, the Marker spawns five Blue AoE Explosions that follow the target and damage surrounding players.
- Red: Cornelius also selects players at random and spawns a Red Mark over their heads, separate from the Blue mechanic. Similarly to the Blue mechanic, the mark spawns a single large Red AoE Explosion that damages surrounding players. Distance yourself from your allies to avoid harming or killing them.

The lvl 50 Field Boss Minezerok spawns in the Shadowed Crypt on the 1st Floor. When you enter this Open World Dungeon, you simply run directly north to reach the room Minezerok spawns in.
Teleport to the Shadowed Crypt Waypoint to enter the open-world Dungeon, and make sure to take advantage of boss mechanics during PvP to quickly turn the tides of your battles.
Guaranteed Loot
- Conquest Participation Award: Minezeroks
Random Loot
- Minezerok's Dagger
- Breath of Mother Nature Hat
- Heavenly Arbiter Gloves
- Holy Warrior's Choker
- Violent Ambush Dagger
- Elite Resistance Crossbow
- Elite Resistance Longbow
- Foresight Wand
- Indomitable Evasion Chain Gaiters
- Indomitable Charge Plated Boots
- Serious Magician Glynt
Minezerok Mechanics and Tips
Minezerok is a difficult boss that requires attentive teammates who are coordinated to counter instant death mechanics. Make sure to understand the following information and tricks to ensure you are not accidentally setting yourself or others up to die:
- Minezerok deals melee range damage to the tank holding aggro. A tank must aggro throughout the fight to control the direction of the 30-Degree AoE Cone mechanic that deals massive damage and can easily kill players behind the tank or who are caught in a CC.
- Players must watch out for when Minezerok charges its staff for about three seconds before delivering the powerful cone blast.
- The boss spawns multiple Expanding Lines of Black Smoke and particles on random players that repeatedly deal damage starting from one edge of the line to the other. Run out immediately as they deal massive damage if you stand in them.
- Minezerok has a mechanic commonly called the Soul mechanic. The boss selects players at random to Stun and attempts to steal their souls. Players must CC or heavily damage the souls walking toward Minezerok from the bodies of the chosen players to prevent them from dying.
- Following the Soul mechanic, Minezerok always casts a 180 Degree Red AoE Cone that one-shots most players within range toward the furthest player in its aggro pool. A Ranged DPS with the furthest attack range needs to bait the direction Minezerok blasts with AoE damage.
- Minzerok's Fury Attack is connected to a one-shot arena-wide AoE mechanic. Pay attention to the Purple Fury Attack indicator and make sure to Block at the correct moment. After blocking, the boss releases dark magic all around itself and transforms into a Black Hole Pulling in all players within the arena. Wait about eight to nine seconds before you begin morph sprinting toward one of the Grapple Hooks located on the Northwest and Southeast sides of the arena near Minezerok. Make sure to spam your grapple hook button to ensure you dodge the Wave of Dark Energy moving towards you that 1-shots almost all players it touches.

Junobote is a level 50 Field Boss that spawns on the 1st Floor of the Sanctum of Desire in the center of the Hall of Intelligence.
The Sanctum of Desire can be accessed through the Sanctum of Desire Waypoint, but keep in mind that this Open World Dungeon only opens its doors while it's raining. Players can enter while the doors are open and use a Guild Summon Stone to teleport guildmates inside if the doors are closed during the boss spawn time. Transcending Power: Heavy Rain could also open the doors of the Sanctum of Desire.
Guaranteed Loot
- Conquest Participation Award: Junobote
Random Loot
- Junobote's Destroyer Blade
- Pitch Black Celebration Cloth
- Reaper's Interring Pants
- Commandant's Grandeur
- Immortal Destruction Blade
- Lethal Venom Cobra Arbalest
- Eternal Rest Longbow
- Foresight Wand
- Battlefield Gladiator's Belt
- Chief Priest's Ring
- Bluish Figment
Junobote Mechanics and Tips
Junobote is a fun boss forcing you into a group trivia event. Pay attention to the question asked during the True or False trivia phase and answer correctly. If you can successfully pass the short test, this boss is fairly easy to do. Pay attention to the following mechanics:
- It is Quiz Time when Junobote says, "You have two choices. Be right or be dead!". The two statues in the arena will light up, and players must gather within the green AoE under The Statue of Truth if the answer to the question Junobote asks is true or The Statute of Falsehood if the answer is false. If you gather under the incorrect statue, Junobote deals damage and knocks all players who were wrong out of the arena, requiring them to fly back in.
True Statements
- "The specialty of Vienta Village is wine. Correct?"
- "Immorti dominate the Ruins of Turayne. Correct?"
- "The Shadowed Crypt is the location of the Sylavean Order. Correct?"
- "The majority of the Steel Trust Union staff consists of goblins. Correct?"
- "There is a statue of Reville Lupius standing in Kastleton. Correct?"
- "It was Skultus who sent down the cursed rain to turn Stonegard into a wasteland. Correct?"
- "The name of the shiny flower in Urstella Fields is Starcluster Flower. Correct?"
- "Lord Fernan was removed from Stonegard Castle by the Allied Resistance Forces' attack. Correct?"
- "Honey doesn't go bad, even after centuries. Correct?"
- "There are more trees in the world than stars in the galaxy. Correct?"
- "Clouds are heavier than whales. Correct?"
- "There's a 50% chance that two people in a group of 23 share the same birthday. Correct?"
- "The thigh bone is the strongest human bone. Correct?"
- "Squids have three hearts. Correct?"
- "Elves and dark elves were originally the same people. Correct?"
- "Each of the two heads of a Two-Headed Ogre has a brain. Correct?"
- "Underlying principles of white magic and dark magic are the same. Correct?"
- "Belluatan is the second Grand Elder of the Sylavean Order. Correct?"
- "Skultus is the third and fourth Grand Elder of the Sylavean Order. Correct?"
- "Ahzreil is the sixth Grand Elder of the Sylavean Order. Correct?"
- "Legend has it that dragons are the children of Sylaveth. Correct?"
- "Morokai's heart is hanging from his staff. Correct?"
- "Xeroth and Ahzreil have a longstanding relationship. Correct?"
- "Travis VI gifted Kazar's Oath Artifact to Sion Lupius. Correct?"
- "The former name of the Shattered Temple in Laslan was the Temple of Light. Correct?"
- "The name of the first Archwizard of Venelux is Hale Verpheus. Correct?"
- "The speed of a whip is faster than the speed of sound. Correct?"
- "Humans move faster downhill, while fire moves faster uphill. Correct?"
- "Parrots can live for over 90 years. Correct?"
- "Younger female spiders are less likely to eat the male after mating. Correct?"
- "Some ants lay eggs, even if they are not the queen. Correct?"
- "Humans can break their ribs by coughing or sneezing. Correct?"
- "Pigs cannot look up at the sky. Correct?"
- "Fish also have ears. Correct?"
- "Trees growing in tropical regions do not have rings. Correct?"
- "Some fish can change their gender at will. Correct?"
- "The speed of a sneeze is faster than that of a storm. Correct?"
- "Blue flames are hotter than red flames. Correct?"
- "There is no sound that does not echo. Correct?"
- "The name of the huge Sandworm dwelling in Stonegard is Queen Bellandir. Correct?"
- "The largest Basilisk in Stonegard is Chernobog. Correct?"
- "The item containing a Guardian obtained through a special ceremony is called a Guardian's Pledge. Correct?"
- "The ants of the Stonegard Wastelands like Blood Mushrooms. Correct?"
False Statements
- "Of all living things, Morokai loves ants the most. Correct?"
- "Reville Lupius is the third Elder of the Sylavean Order. Correct?"
- "The leader of the Allied Resistance Forces, Captain DaVinci, is from the Arkeum Legion. Correct?"
- "Martinay is also known as the Two-Faced Witch. Correct?"
- "There is a passage to the Port from Stonegard Castle. Correct?"
- "The specialty of Vienta Village is wands. Correct?"
- "Flamakan created dwarves using souls of fire. Correct?"
- "Mafrion breathed spirit into the earth and created orcs. Correct?"
- "Jacque Hander is the elder of Whisp Island. Correct?"
- "There are sounds that don't echo. Correct?"
- "Gold tastes like salt. Correct?"
- "Humans regenerate all their bones once every ten years. Correct?"
- "Mitrans grow weak when it rains. Correct?"
- "The name of the very first Diston was Stone-0. Correct?"
- "Einar is the god of death and destruction. Correct?"
- "I, Junobote, was the first Grand Elder of Sylaveth. Correct?"
- "The Einardens who fought the ancient giants were orcs, elves, and goblins. Correct?"
- "Harvesters run around the Urstella Fields in an attempt to gather Stardust. Correct?"
- "Shadowmancers create the Adentus using corpses. Correct?"
- "Shadowmancers raised the ancient Golems to invade Stonegard Castle. Correct?"
- "Iskale received the Sylaveth Star Fragment in Carmine Forest. Correct?"
- "Janice Cartair was the first female Archwizard of Venelux. Correct?"
- "Bon Slyte created the Stonegard Oasis. Correct?"
- "The name of the giant trees growing on Whisp Island is World Tree Branch. Correct?"
- "The Ruins of Turayne were once an agricultural town called Turayne Village. Correct?"
- "The person who made the barrier stopping Tevent is the Wizard Clay. Correct?"
- "The giant Queen Ant living in Stonegard is called Bacuine. Correct?"
- "The Sylavean Order is an order that worships the goddess Sylaveth, mistress of darkness. Correct?"
- "Human fingernails grow even after death. Correct?"
- "Red flames are hotter than blue flames. Correct?"
- "Nomads have developed longer intestines than farmers. Correct?"
- "Pigeons eat sand to kill parasites. Correct?"
- "Carnivores have a longer digestive tract than herbivores. Correct?"
- "Cranes stand on alternating legs to relieve fatigue. Correct?"
- "Putting their lips together is a sign of affection for tropical fish. Correct?"
- "Humans' left lungs are heavier than their right lungs. Correct?"
- "All metals are solid at room temperature. Correct?"

The level 50 boss Nirma spawns on the 5th Floor of Syleus's Abyss in the southwest portion of the map. Similar to Aridus, the doors of this open-world Dungeon close during the night. You can use a Guild Summon Stone to teleport your guildmates inside while the doors are closed.
The easiest way to get to Nirma is to teleport to Syleus's Abyss 6th Floor Dungeon Waypoint and use a Turtle Morph to swim through the lava to reach Nirma via a shortcut shown in the video below at the end of the Nirma tab.
Guaranteed Loot
- Conquest Participation Award: Nirma
Random Loot
- Nirma's Corrupt Sword
- Transcendental Salvation Pants
- Heavenly Arbiter Shoes
- Destroyer's Choker
- Boulder Destroyer Two-Handed Sword
- Violent Ambush Dagger
- Golem Patroller Crossbow
- Foresight Wand
- Noble Sage's Cloth Gloves
- Mysterious Sage's Linen Pants
- Geode Dracoryft Turtle
Nirma Mechanics and Tips
Nirma is one of the most complicated bosses in Throne and Liberty, requiring careful coordination to avoid raid wipes. Learn the following mechanics well, especially for Conflict spawns, as understanding Nirma's mechanics and arena layout is essential in successfully strategizing during battle:
- The most important thing to understand about Nirma is how it targets players during the entire battle and what this means for all players involved in the fight. When Nirma is engaged, the player furthest from the boss on the platform where it spawns is marked with a Glowing Orb and selected as its primary target. Everyone should position themselves opposite the marked player to avoid AoE damage and a Fury Attack that bounces to a player near the marked target.
- When Nirma says, "Cry in desperation!" it casts Electrical AoEs that cover a part of the platform in a large cone. The person who is marked must move clockwise or in an agreed direction with their team to kite the Electrical AoEs away from allies. Everyone needs to avoid being hit by this AoE as it places a debuff on you that significantly reduces the healing you receive. Getting one stack of this debuff cuts healing in half, and receiving two stacks makes all heals you receive (including your potions) restore pretty much nothing. During this mechanic, Nirma simultaneously casts AoE blasts toward the marked player, including the same Fury Attack that you must block.

Aridus is a level 50 Field Boss that spawns on the 5th floor of Syleus's Abyss. If Aridus is spawning during the night, make sure to be inside this open-world dungeon, as the doors close, preventing more players from entering. You can use a Guild Summon Stone to teleport your guildmates inside while the doors are closed.
The quickest way to Aridus is to use the Syleus's Abyss 1st Floor Dungeon Waypoint to teleport to the 6th Floor, and then turn around to enter the 5th Floor. From here, you simply travel north to the boss's spawn location.
Guaranteed Loot
- Conquest Participation Award: Aridus
Random Loot
- Aridus's Dark Staff
- Ghost Wolf Alter Ego Pants
- Grim Judicator's Pants
- Tycan's Bloodlust Belt
- Rock-Cutting Dagger
- Lethal Venom Cobra Arbalest
- Golem Heart Extraction Staff
- Destiny Worship Barbaric Staff
- Bloody Shadow Gloves
- Knight's Resistance Bracelet
- Forest Light Grover
Aridus Mechanics and Tips
Aridus, also known as the sleepy-time boss, is similar to Nirma, requiring precise coordination to complete successfully without many headaches. The following mechanics are what you need to know:
- Throughout the fight, Wasps follow three randomly selected players marked by a Green Light. The Wasps deal damage in a small AoE when they are near players.
- The Wasps are needed during the Sleep mechanic. Please do not kill them! New Wasps spawn after the Sleep mechanic ends to prepare you for the next one.
- The Sleep mechanic is Aridus' signature move. To successfully get past the Sleep mechanic, remember the following:
- Aridus puts everyone on the platform to Sleep.
- The three players with the Wasps and those around them are woken up first by the Wasp's AoE damage.
- If you are Slept within the inner circle of the platform, you're safe from instant death.
- If you're Slept on the outer ring, the players with the Wasps have to run past you allowing it to deal damage to you so you can wake up and move to the inner circle.
- After a delay, those who aren't woken up in the outer ring instantly die.
- Players with the Wasps should stay near the edge of the arena and rotate around a section of the platform so that their teammates are aware of their location and aren't being unnecessarily damaged by the Wasps' area of effect (AoE).
Credits
Written by EliEli
Reviewed by Tenkiei, Yaen