Abyss League Guide
Last Updated:March 2, 2024|Changelog
Introduction
Welcome to our Abyss Guide, Exile!
This League Mechanic was introduced alongside the War for the Atlas expansion that brought Shaper and Elder into the game in December 2017 (Patch 3.1.0). After the League ended, it became a core mechanic that is still relevant to this day for its special rewards, specifically the Stygian Vise Belts and Abyss Jewels (see below).
The mechanic itself is pretty straightforward as there is not much strategy or setup involved to play it effectively. This post shows you how it works and all the rewards you can earn!
Map Encounter
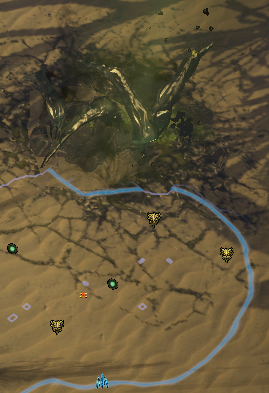
In the Campaign you can randomly find Abysses, but more often once you reach Maps. They are indicated by a green dot on the minimap and walking over them starts the encounter.
In addition to random encounters, you can also force Abysses on a Map through Scarabs and Kirac Mods if it's part of his mod pool for the League.
- Rusted Abyss Scarab
- Polished Abyss Scarab
- Gilded Abyss Scarab
- Winged Abyss Scarab
Chasing the Abyss
When an Abyss is triggered, it starts moving around the area in a random direction, prompting you to follow it. As it travels, small trash monsters spawn from the cracks it leaves behind. These monsters are neither dangerous nor worth much, instead your objective is to follow the Abyss around and defeat the waves of monsters that crawl out of the hole in the ground when it stops. You have a limited time to complete the whole encounter or else the Abyss collapses and you lose your chance for a reward.
There's no way to predict which direction an Abyss takes once triggered. Typically an Abyss takes 1 to 3 stops where it opens up a large pit in the ground that continuously spawns hoards of monsters until enough of them are defeated. If you finish it in time, the encounter either ends with a reward or the Abyss moves to the next spot where the process repeats.
As long as the initial Abyss node is not triggered yet, you can take your time to clean up the surrounding area. Once triggered, the clock starts ticking (with no indicator). When the Abyss is traveling and out of range (around 1.5 screens away), it will freeze and wait for you catch up. During this time you can explore other areas before moving closer as this effect also freezes the hidden clock. It's only when the Abyss stops and opens that you need to stay and fight until the encounter ends.
Abyssal Monsters
Abysses spawn special types of rare monsters that are dangerous and need to be dealt with appropriately, as they are far more dangerous than regular monsters you encounter in Maps. It's recommended to complete Abyss encounters only if you have a good combination of defensive layers, especially Chaos Resistance and Armour. Some notable monsters are:
- Rays: They dive on you and deal a heavy circular Chaos Damage AoE that should be avoided.
- Headless: These stay at range and throw projectiles at you. They also generate a mine-field of Chaos that explodes after a short duration.
- Stalkers: Periodically go invisible to chase you down with a heavy hit. Try to side-step when they arrive.
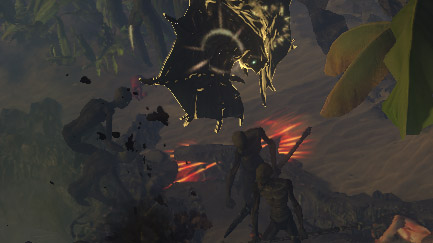
Abyssal Depths
Once you reach level 40, there is a chance that instead of the Abyssal Trove you will open Abyssal Depths at the end of an encounter. These are a separate side-instance that leads you into the Abyssal underworld. Your objective here is to make it to the arena at the end and destroy the Stygian Spire.
Abyssal Depths have Area Level +1 so it's possible to acquire very high item level bases easily when you run them in the highest tier Maps. This can be raised further through Atlas Tree Passives. Along the path there are Abyssal Hoards, which are similar to small loot chests you can find in Maps. They don't offer a lot of value so it's fine too skip them and rush straight to the end for the encounter if you are only interested in the final reward.
Upon entering Abyssal Depths, it's also possible that the instance loads with a boss encounter at the end. You can tell the outcome based on the loading screen without having to run through the entire zone first:
- Sirus/Red Map Device = Boss encounter
- Twilight Strand = Stygian Spire
Bosses
Inside Abyssal Depths there is a chance that the Stygian Spire encounter is replaced with one of the following two bosses. These drop special Abyss unique items and have multiple phases each. Be aware that the encounter can be failed if you are too slow or die. At 75%, 50% and 25% respectively, these bosses enter an intermission phase where they open a door to a side-room that spawns multiple Abyss pits and you have limited time to destroy the central Stygian Spire before you can return to the boss arena. Focus on the Spires as you defeat the onslaught of incoming Abyss monsters.
Both of these bosses are relatively simple mechanically but have a few noteworthy abilities to be aware of. In short: stay mobile and dodge green stuff, especially when your Chaos Resistance is low.
Ulaman, Sovereign of the Well
- Performs a series of Teleport Strikes, slashing the area in front of him. Make sure to stay mobile.
- Throws a Chaos wave in a cone-shape in front of himself.
Amanu, Liege of the Lightless
- Summons Stygian Hearts, making the boss invulnerable until destroyed.
- Sprays shards on the ground which explode after a short delay.
Rewards
Stygian Vises
A Stygian Vise is typically considered one of the best possible Belt options for many builds that don't wear a unique in this slot. Its special implicit "Has 1 Abyssal Socket" allows it to gain more combined stats than most other Belt types (Heavy Belt, Leather Belt, Rustic Sash, etc.). Some notable exceptions are Energy Shield based builds with a Crystal Belt or attribute-stacking builds with synthesised implicits.
The strength of the Stygian Vise's implicit bonus relies on the power of your Abyss Jewel. They are not as powerful in early progression but become better as you improve your gear. The Belts only come from Abyssal Depths, making high item level bases quite rare and expensive during a League start. They can't drop with any influence type, instead influence has to be added manually through other means such as an Awakener's Orb or Conqueror Exalted Orbs: Warlord's Exalted Orb, Redeemer's Exalted Orb, Hunter's Exalted Orb, Crusader's Exalted Orb.
Abyss Jewels
There are 4 different types of Abyss Jewels that roll special affixes and work for different builds (uniques below). They roll different affixes depending on their theme:
- Ghastly Eye Jewel (Minions, Spells)
- Hypnotic Eye Jewel (Caster, Spells)
- Murderous Eye Jewel (Melee, Attacks)
- Searching Eye Jewel (Ranged, Attacks)
Some noteworthy affixes found on Abyss Jewels are:
- Flat +Maximum Life/+Maximum Mana/+Maximum Energy Shield
- Flat +Damage of all types to Attacks/Spells (for you or Minions)
- Increased Attack/Cast Speed if you've dealt a Critical Strike recently
- Increased Cooldown Recovery Rate
- % of Damage taken Recouped as Mana
- Chance on Kill to proc Phasing (Searching Eye, Hypnotic Eye)
- Chance on Kill to proc Unholy Might (Murderous Eye)
- Chance on Hit to Blind (Murderous Eye, Searching Eye)
- Chance to Hinder enemies with Spells/Minions (Ghastly Eye, Hypnotic Eye)
- Chance on Hit/with Minions to Taunt enemies (Murderous Eye, Ghastly Eye)
- Chance to gain Onslaught when you use a Flask (Fossil craft)
There are many other useful stats such as Attributes, Defenses, Resistances, Critical Strike Chance/Multiplier and more. To check out a full list of their potential affixes, take a look at the Database under Jewels!
Note: Compared to regular Jewels - which can roll any mod at any level - Abyss Jewel mods have several tiers that can roll higher values at higher item levels. For the best results, farming the highest Map tiers is recommended!
Abyss Uniques
Both bosses can drop all of the Abyss-specific uniques, with a chance to drop more than one.
Jewels:
- Amanamu's Gaze
- Kurgal's Gaze
- Tecrod's Gaze
- Ulaman's Gaze
Armour items:
- Bubonic Trail
- Darkness Enthroned
- Lightpoacher
- Shroud of the Lightless
- Tombfist
Belt and Body Armour have no variations and drop with either 1 (Armour) or 2 (Belt) Abyssal Sockets. Gloves, Boots and Helm can have either 1 or 2 with the latter being much more rare and typically much more sought after as the effects of all these uniques scale with the amount of Abyss Jewels equipped.
Atlas Passive Tree
The Abyss-related Atlas Passives are located on the right side of the Atlas Passive Tree, spread between 4 wheels with a total of 6 Notables. Leading up to them there are also small nodes with similar synergistic effects.
Most of these passives are focused on either increasing monster level, pack size, or interact with the Abyss mechanic in a special way. It's a great choice if you want to farm extra experience and stack up more monsters in your Maps for other mechanics such as Delirium. A special highlight are also the 5-6 modifier corrupted Abyss Jewels from Corrupted Gaze that cannot be acquired in any other way, giving you the chance to find some of the best Jewels possible for many builds with a lucky roll.
Small Passives
- Abyss Chance
- Your Maps have +1% chance to contain an Abyss
- Abyss and Abyssal Depths Chances
- Your Maps have +1% chance to contain an Abyss
- Abysses in your Maps have 10% increased chance to lead to an Abyssal Depths
- Abyssal Depths Item Quantity
- 10% increased Quantity of Items dropped in Abyssal Depths in your Maps
- Abyss Monster Count
- Abyssal Depths in your Maps have 15% increased Pack Size
- Abysses in your Maps spawn 15% increased Monsters
- Abyss Monster Count
- Abysses in your Maps spawn 10% increased Monsters
Notables
- Corrupted Gaze
- Abyss Jewels found in Areas have 20% chance to be Corrupted and have 5 or 6 random modifiers
- Awakened Depths
- Abysses in Areas have 50% increased chance to lead to an Abyssal Depths
- Abyssal Depths in Areas have 100% increased chance to contain a Lich
- Lightless Legion
- Abyssal Depths in Areas have +3 to Monster Level
- Abyssal Depths in Areas have 100% more Magic Monsters
- Abyssal Depths in Areas have 100% more Rare Monsters
- Abyssal Depths in Areas have 50% increased Pack Size
- Votive Hoard
- Abyssal Troves in Areas have 20% chance to drop a Rare Item with an Abyssal Socket
- Abyssal Army
- Abyss Monsters in Areas grant 50% increased Experience
- Abysses in Area spawn 100% increased Monsters
- Underground Kingdom
- Areas have 1% chance to contain an Abyss per 2% increased Pack Size
Summary
- Abysses randomly appear in Campaign zones and Maps and can also be force-spawned through Scarabs and Kirac Mods.
- Trigger an Abyss by walking over it, then chase it and defeat waves of enemies until the encounter is complete. You only have a limited amount of time to do so.
- When successful, Abyssal Troves reward you with extra loot including Abyss Jewels. Occasionally, Abyssal Depths will open, rewarding you with either a Stygian Vise or a boss encounter with unique rewards.
- Stygian Vises and Abyss Jewels are sought-after endgame items for many builds. Abyss Jewels offer a variety of build-enhancing stats and procs that are difficult to acquire from other sources.
- Abysses are a great source of extra monsters & experience in Maps.
Credits
Written by wudijo
Reviewed by mbXtreme, Facefoot