Ivory Tower Gate 3
Introduction
Ivory Tower is the new Abyssal Dungeon introduced in Voldis. It acts as a Legion Raid clear, so you can replace it with an existing raid for 3/3 to earn Gold. You can drop in and out of the gates just like Legion Raids. Rewards include items which you need to craft Elixirs.
Enemy Information
| Normal Mode | Hard Mode | Monster Type | Weakness |
| 1600 Item Level | 1610 Item Level | Ancient | None |
- HP Potion of your choice
- Destruction Bomb
- Dark Grenade or Whirlwind Grenade
- Time Stop Potion, Atropine Potion or Stimulant
Rewards
| Gold | Material | Box Material | Box Cost | Auction Material | |
| Normal | |||||
| Gate 1 | 1500 | 2x | 2x | 500 | |
| Gate 2 | 2000 | 2x | 2x | 550 | |
| Gate 3 | 3000 | 4x 1x | 4x 1x | 900 | 1x |
| Total | 6500 | ||||
| Hard | |||||
| Gate 1 | 3000 | 4x | 4x | 750 | |
| Gate 2 | 4000 | 4x | 4x | 900 | |
| Gate 3 | 6000 | 8x 2x | 8x 2x | 1,350 | 2x |
| Total | 13000 | ||||
Learn about Ivory Tower Abyssal Raid Gate: 1 / 2
Cheatsheets
During Raid
Stage Destruction
Avoid getting pushed into Red tiles
Purple & Normal Tiles are safe
Recover tiles by staggering boss and guiding red orb to broken tiles
x160 (Part 1)
Pizza

Move to 3x Positions
Dodge first two slices and mirror explosion
Guide the 3rd slice towards the mirror
Move clockwise & repeat 2 more times
x160 (Part 2)
Stagger
Stagger Boss
Split into group of 2 and stagger bottom mirrors (Whirlwind Grenade)
x110
Mirror Counter
Method: “11223344”
Counter the real Mirrors
Real Mirror: Boss Stabbed & Red Thorn
Fake Mirror: Boss fake stabbed & Purple Thorn
Use Stagger skills on Boss in between counters
x60 (Part 1)
Sword Destruction
Move to 3x Positions and use Destruction Bomb
Stagger Boss
Use Weak Point skills on the sword
x60 (Part 2)
Guardian Fight
(Lowest) DD should get tethered
Tethered player dictates throw direction ⇾ Mirror
Grab order: (highest) DD ⇾ Sup ⇾ DD
Grab timing: Move after 2nd circle to the front of the boss
Kill Guardian ⇾ Low Stagger Player gets grabbed ⇾ Stagger Boss Whirlwind Grenade
x40
Rage Phase
Mirrors spawn at 3x
Method 1: Focus boss and ignore mirrors
Method 2: Stagger mirror at 6 and fight at the bottom side
Pink Debuff 3 stacks ⇾ Use shield or DR skills
During Raid
Stage Destruction
Avoid getting pushed into Red tiles
Purple & Normal Tiles are safe
Recover tiles by staggering boss and guiding red orb to broken tiles
x160 (Part 1)
Pizza
Move to 3 O'clock Position
Dodge first two slices and mirror explosion
Guide the 3rd slice towards the mirror
Move clockwise & repeat 2 more times
x160 (Part 2)
Stagger

Stagger Boss
Stagger at least the 2 bottom mirrors
using (Whirlwind Grenade) & skills
x110
Mirror Counter
Counter the real Mirrors
Real Mirror: Boss Stabbed & Red Thorn
Fake Mirror: Boss fake stabbed & Purple Thorn
Use Stagger skills on Boss in between counters
x60 (Part 1)
Sword Destruction
Use Destruction Bomb on the Mirror at 6 O'clock
Stagger Boss
Use Weak Point skills on the sword
x60 (Part 2)
Guardian Fight
Grab timing: Move after 2nd circle to the front of the boss
Kill Guardian
Stagger Boss Whirlwind Grenade
x40
Rage Phase
Mirrors spawn at 3x
Method 1: Focus boss and ignore mirrors
Method 2: Stagger mirror at 6 and fight at the bottom side
Main Mechanics
Main mechanics occur at certain HP intervals or Phases.
Description
- Certain patterns of the boss can destroy the outer part (tiles) of the octagon shaped arena.
- Broken tiles have red effects on them. If you get pushed on those tiles, you will die.
- Some patterns allow you to recover broken tiles, which then turn purple. Purple and normal tiles are safe, you won't die if you get pushed on top of these tiles.
What To Do
- Try to succeed patterns, which can destroy tiles upon failure.
- To recover destroyed tiles, do as followed:
- Deplete the normal Stagger bar of the boss first.
- Succeed the Destruction check.
- Guide the big red orb, which spawns at the boss and follows the closest player towards a broken tile.
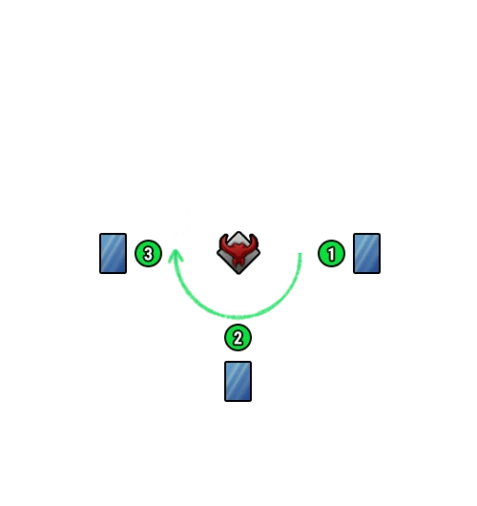
Telegraph
- Boss teleports to the center of the stage.
- A mirror appears at each 3x (cardinal) position.
- Each player gets targeted by 2 red pizza slices and 1 slice with golden edge. Boss repeats this segment of the 3 slices two additional times.
- While the players are targeted by the pizza slices, each mirror casts a different shape of explosion around it, highlighted in yellow.
Description
- Your goal is to fill the 3 black orbs above each mirror. Every time the third pizza slice with the golden edge hits a mirror, it fills one of the black orbs.
- If you fail to fill up all 3 orbs of a mirror by the end of the mechanic, the tile behind it will be destroyed.
- On hit, the red pizza slice applies an Attack Power debuff to the player.
What To Do
- Once the pattern starts, go to 3x positions around the boss.
- Dodge the first 2 slices and the mirror attack first before guiding the 3rd slice towards the mirror on your assigned position.
- The slices are easier to dodge and readjust, the closer you are to the boss.
- Don't panic because of the yellow explosions caused by the mirror. It always explodes first before the 3rd slice locks on a position. So you can safely dodge that explosion first and should still have a second left to readjust the 3rd slice.
- Rotate clockwise towards the next mirror and repeat step 2. Upon completion, rotate one final time clockwise towards the next mirror to repeat step 2.
Telegraph
- After succeeding the x160 Pizza phase, a Stagger bar appears below the boss.
- Old mirrors disappear and new mirrors spawn at 3x+1 positions with a Stagger bar.
Description
- You need to Stagger boss and as many mirrors as possible.
- Since the mirrors require high Stagger, your goal is to stagger 2 bottom mirrors only.
- The mirrors at the top will destroy the tiles behind them at the end of the mechanic.
What To Do
- Stagger the boss first.
- Stagger the mirrors at the bottom of the stage.
- Everyone throws Whirlwind Grenade at the mirror at 7 O'Clock.
- Everyone uses Stagger skills to stagger the mirror at 5 O'clock.
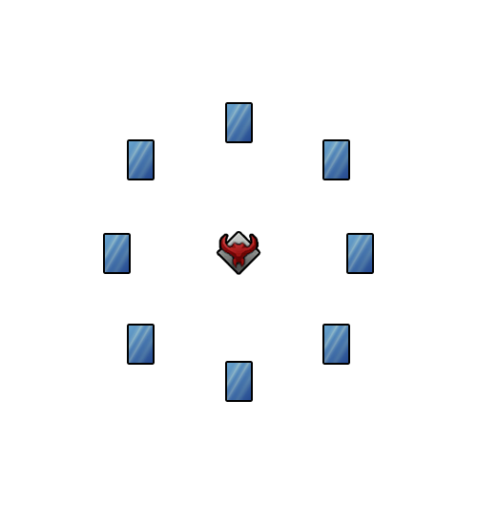
Telegraph
- Boss moves to the center to summons mirrors at 3x and 3x+1 positions around him.
- A Stagger bar appears below the boss.
- He starts to stab or pretend to stab mirrors with his swords.
- In specific intervals, a thorn appears out of each mirror and flashes blue.
Description
- To succeed this mechanic, you need to Stagger the boss before the mechanic ends.
- The required Stagger is high, but by countering the correct mirrors, you get a Stagger buff to assist you.
- Countering the wrong mirrors or missing the Counter timing increases the Stagger difficulty and deals high damage to everyone.
- Failing to stagger the boss on time leads to a raid wipe.
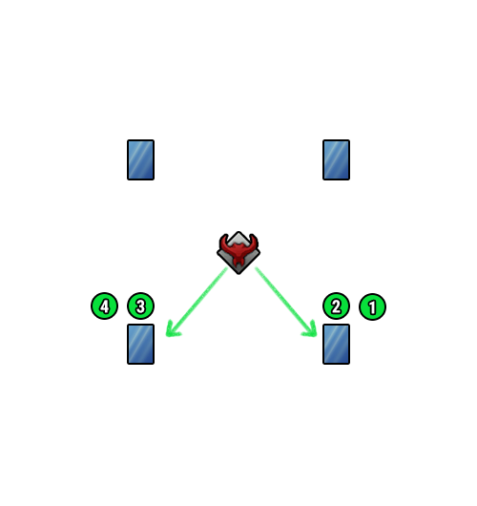
What To Do
- We will use the “11223344” strategy for this mechanic. This means, player 1 is assigned to the first two mirrors the boss stabs into, player 2 is assigned to the 3rd and 4th mirror the boss stabs into, etc.
- Example 1: You are player 2 and see that the 3rd stab is a real one, which pierces the mirror at 3 O'Clock. The 4th stab is a fake one towards the mirror at 11 O'Clock, which means his sword did not pierce the mirror. Based on this, you have to counter the mirror at 3 O'Clock, every time a thorn comes out and it flashes blue.
- Upon successfully countering the correct mirror, your counter skill will reset.
- The 2 mirrors assigned to you by the stabbing order of the boss will frequently request a counter. So make sure to keep an eye on those mirrors, but don't forget to use Stagger skills on the boss while your mirrors are on “cooldown”.
- Tips
- Boss always stabs 6 mirrors and pretend to stab 2.
- In case you forgot, the color of the thorn helps to differentiate between the correct and wrong mirror to counter. Red thorn indicates the correct mirror and purple one only comes out of the wrong one.
Telegraph
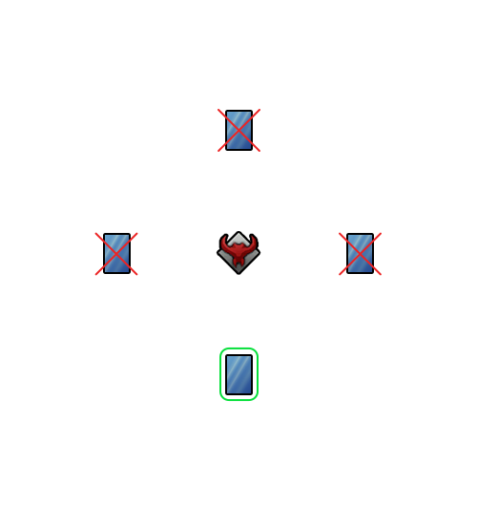
- Boss moves to the center to summons mirrors at 3x positions around him, which can be destroyed.
- A Stagger bar appears below the boss once the mirrors are destroyed.
- Upon successful Stagger, the boss drops his sword, which can be destroyed too.
Description
- To proceed to part 2 of this mechanic, you need to successfully destroy the mirrors, stagger the boss and destroy his sword.
- Destroying a mirror gives you a Stagger buff. Failing to destroy any of the mirrors increases the chance of you failing the Stagger check.
- A raid wipe occurs, if you fail to Stagger the boss or to destroy his sword.
What To Do
- Go to 3x positions and throw a Destruction Bomb towards the mirror at your position, which will destroy it.
- Stagger boss and use Whirlwind Grenade in case someone failed to destroy a mirror.
- Use skills with Weak Point affix on the sword to destroy it.
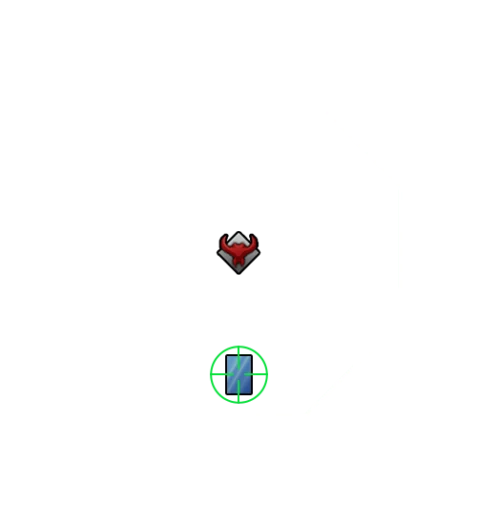
Telegraph
- After succeeding the x60 Sword Destruction phase, a random player will be tethered to the boss indicated by a golden crosshair below the feet.
- 3 delayed explosions occur below each player.
- Between the 2nd and 3rd explosion, the boss will attempt to grab a player in front of him to throw towards the tethered player. He will repeat this process 2 additional times.
- Players thrown into the mirrors at 3x positions enter a separate arena (inside) to fight a guardian.
- After killing the guardian, the 3 players will be teleported to the main arena.
- Boss will attempt to grab towards a random spot. If he grabs a player, a Stagger bar appears below the boss.
Description
- To survive this mechanic, you need to kill the guardian and succeed the final Stagger check.
- Make sure that the boss always grabs and throws the player towards a mirror to enter the guardian arena.
- If no one gets grabbed, everyone outside takes massive damage and in case there is no one inside fighting the guardian, the boss will heal back to 80hp. This means, you have to redo the entire x60 mechanic.
- If no one gets grabbed, but there is a player inside fighting the guardian, the boss won't heal back up. But since the boss only attempts to grab 3 times, player inside need to kill the guardian with fewer players.
- The players fighting the guardian die, if the guardian is not killed before the dial in the arena vanishes.
- After killing the guardian, a player needs to get grabbed and the rest need to succeed the Stagger check. Otherwise, it leads to a raid wipe.
What To Do
- If possible, assign the Damage Dealer with the lowest dps to get tethered with the boss. You can change the tether to a different player by interrupting the connecting line.
- If possible, the none tethered players should let them get grabbed in the following order.
Highest DD ⇾ Support ⇾ Second highest DD
Once inside, try to kill the guardian before the time runs out.- The ideal timing to move infront of the boss to get grabbed is right after the 2nd ground explosion circle appears below you. The third circle only explodes after the grab and won't deal any damage to the grabbed player.
- The tethered player's task is to force the boss to throw the grabbed player towards a mirror, since he will always aim towards you. Once a player enters through a specific mirror, it will disappear. So make sure to keep an eye on the positions of the remaining mirrors.
- The throw itself deals damage to players on its path. The ideal timing to move away, after aligning the throw towards a mirror, is once the cone in front't of the boss disappears.
- After killing the guardian, everyone will unite once more. The player with the lowest Stagger should try to get himself grabbed by the boss, which usually happens towards the left side of the boss.
- Once a player got grabbed, the other 3 should try to Stagger the boss and use Whirlwind Grenade if possible.
Telegraph
- Boss teleports to the center and channels energy to transition into the rage phase.
- Mirrors spawn at 3x positions with a Stagger bar.
- Boss enters rage phase.
Description
- Failing to Stagger the mirrors causes the tiles behind each of it to get destroyed.
- During the rage phase, which lasts until you kill the boss, the boss applies periodically 2 separate stacking debuffs to everyone.
- Incoming Damage increase, which is displayed with a shield break icon.
- Once the debuff with the pink icon reaches 3 stacks, the boss will cast an unavoidable attack, which deals high damage.
- This is basically a damage test, since the fight gets significantly more difficult the longer you take to kill him because of the 2 debuffs.
What To Do
- Method 1: Ignore the mirrors and focus on dealing damage to the boss. Since 4 tiles will be destroyed because of the mirrors, you need to play carefully to avoid getting pushed into those.
- Method 2: Destroy the Mirror at 6 = O'Clock and try to fight the boss at the bottom part of the arena. This gives you more space to fight, but you have to sacrifice some damage during the transition to stagger the mirror.
- Supports should time shield and damage reduction skills to reduce the damage taken by the unavoidable attack of the boss. This occurs once the pink debuff reaches 3 stacks.
Counterable Patterns
Telegraph
- Boss faces a player and an expanding cone appears in front of him.
- He flashes blue.
What To Do
- Try to use a Counter skill as soon as he flashes blue.
- If not countered, he will impale the players in front and throw them towards a random direction.
Telegraph
- The boss slashes towards the ground slowly and causes a small explosion on impact.
- The boss summons big cones on his front and back while facing a player.
- Boss flashes blue.
What To Do
- Try to use a Counter skill as soon as he flashes blue.
- Failing this counter leads to destruction of all tiles hit by the cones.
Telegraph
- Boss teleports to the center and becomes invincible.
- Mirrors appear around him and start to rotate.
- Boss dashes around with high speed while summoning an explosion below each player's feet.
- A red telegraph appears, indicating the charge path. Players hit by this charge will be grabbed.
- Boss repeats step 3 & 4 two additional times.
- A red orb appears in the center and splits into 4 moving towards the cardinal direction.
- 3 Clones and the boss appear from the orb.
- The (real) boss will flash blue.
What To Do
- Dodge the ground explosions and the 3 charges if possible.
- Counter the real boss.
- If a player got grabbed, you can locate the real boss by checking the mini-map. Alternatively, the grabbed player can ping the location.
- If no one got grabbed, pay attention to the hp bar. The clones have full hp bar, the real one has the accurate hp displayed above the head.
Telegraph
- Boss remains stationary and hold his swords above the head pointing forward.
- He flashes blue before charging forward.
What To Do
- Counter the boss once he flashes blue to interrupt the charge.
Notable Patterns I
Telegraph
- Boss gathers red energy and shoots a laser towards the sky.
- Mirrors appear and cast yellow telegraphed explosions .
What To Do
- As soon as you see the mirrors appear, pay attention to the yellow telegraphs and avoid standing on it.
Telegraph
- Boss teleports to either 3 or 9 O'Clock position and takes reduced damage.
- The boss shoots a giant red orb, which slowly moves towards a mirror on the opposite side.
What To Do
- Destroy the orb as soon as possible by dealing damage. Be aware, don't deal damage from the sides with a red cone, since it reflects the damage dealt back to you!
- Once you destroy the orb, the boss gets staggered for a brief moment.
- If you fail to destroy it, everyone takes massive damage. Time Stop Potion can be sued to avoid taking damage.
Telegraph
- Boss remains stationary and points his sword towards his front.
- He briefly moves his sword towards his left side before charging forward.
- He impales and grabs players on his path.
- If no one got impaled, the boss will throw the sword towards a random location, which causes as an explosion after a short delay.
- If someone got impaled, the boss turns around to create a Wi-Fi shaped attack in front of him while tossing away the impaled players.
What To Do
- Don't mistake this for the counterable simple charge attack, which looks pretty similar. He moves his sword towards his left side only during this pattern. Once you see this happening, don't try to counter, instead move away from his charging path.
- If no one got impaled, move to the location of the sword to avoid getting hit by the explosion.
- If someone got impaled, try to either move fast to the back of the boss or super armor / dash through the Wi-Fi attack.
Telegraph
- The boss anchors the sword to the ground and spins around it, while creating rectangle shaped explosions.
- A purple telegraph appears in front of the boss. The boss grabs all players standing on that telegraph.
- Grabbed players have to do a typing test.
- Meanwhile, a safe zone spawns on top of a random player.
- If no one got grabbed, the boss will shoot a laser towards a random player after the yellow telegraphed explosion.
What To Do
- Dodge the rectangle shaped explosions.
- Make sure that at least 1 player gets grabbed by the boss.
- The remaining players should get into the safe zone.
- In case you are too far away from the safe zone, let yourself get grabbed. It is fine if multiple players get grabbed.
- Once the grabbed players succeed the typing test, the boss will be staggered for a brief moment.
This pattern is part of the Mirror pattern.
Telegraph
- Doors summon a huge purple aura on the arena.
- After a short delay, a purple orb gets summoned to a random spot on the arena.
- If not consumed, the purple orb explodes and destroys all tiles in its radius.
What To Do
- Once the purple orb spawns, walk through it to consume. Ideally, you should use spacebar to consume it. Otherwise, the player who touches and consumes the orb will get imprisoned.
Telegraph
- Boss floats towards the sky for a brief moment and summons a golden circle below him.
- If at least one player stands on the golden circle, it will disappear and the boss will crash to the ground followed by a bigger yellow explosion expanding outwards.
- If no one stood in the golden circle, the boss will immediately start to slash multiple times towards a player and cause explosions at the end of his path.
What To Do
- Make sure that at least one player stands on the circle before it disappears.
- Once the golden circle disappears, move out of it to avoid taking damage from his landing attack.
- After the landing explosion, move immediately to the boss to avoid the big yellow explosions.
- If none managed to stand on the golden circle, avoid the multi slash attack completely or dodge away at the end before the explosions occur.
Telegraph
- A donut shaped red telegraphed appears around the boss, followed by an explosion.
- If someone got hit by the explosion, the boss will shoot a laser indicated by a yellow telegraph towards a random player.
What To Do
- Dodge the first explosion by either moving close to the boss or running further away from him.
- If someone got hit by the first explosion, dodge away from the yellow telegraph to avoid the laser.
Notable Patterns II
Telegraph
- Multiple explosions occur around the boss.
- Boss stabs a few times towards his front.
- Boss shoots a laser towards a random player.
What To Do
- Avoid the explosions by moving away from the boss.
- If no one gets hit by the explosions, he won't do any follow-up attacks.
- After his stab attack, pay attention to the yellow telegraph and stay from it.
Telegraph
- A huge outwards expanding red telegraph appears around the boss, with the area close to him being the safe zone.
- A red line appears in front of the boss, which indicates his stabbing direction.
- Boss turns multiple times before unleashing a fury of attacks, which impales players hit by it.
- At the end of this pattern, the boss turns towards a random spot and shoots a laser. Impaled players will be shot towards that direction.
What To Do
- Avoid standing outside the safe zone, since the surrounding area deals massive damage.
- Stay away from the red line indicating the poke direction.
Telegraph
- The boss leans back with his sword, which glows red for a brief moment.
- He performs a single thrust attack towards the front.
- If a player gets hit by it, a small explosion occurs in front of the boss.
- After a short delay, the boss starts to spin and causes a big explosion.
- If no one got hit by the stab, the explosions won't occur.
What To Do
- Ideally, you manage to dodge the stab attack as soon as you see the sword glow and boss leaning back.
- If someone got hit, pay attention to the ground effects, since there are 2 possible explosion variants.
- Explosion covering the areas to the front and sides of the boss. Safe zone is behind the boss.
- Explosion covering the area further away from the boss. You are safe, if you stay close to the boss.
- In both cases, you can simply stay close but behind the boss to avoid getting hit by the explosions.
Telegraph
- The boss slowly floats towards the air while gathering red aura.
- Boss summons a rectangle shaped area on 2 randoms player in a specific order.
- These rectangle areas follow the player and drop a puddle which explodes multiple times.
- After the 2nd puddle was dropped, a red telegraph appears below the player who got the rectangle first.
- A safe zone appears below the player who got the rectangle second.
What To Do
- Pay attention and figure out which player got the first rectangle and which one the second.
- Those 2 players should spread out a little bit to place the first puddle but move a little bit closer to place the 2nd one.
- As soon as the red telegraph appears below the first player, everyone should try to group up with the second player to stand in the safe zone the player drops.
- Don't group up too early, since it can cause the red telegraph being dropped on top of the safezone.
Telegraph
- The boss thrusts his sword towards his front while summoning multiple moving thorns from the ground at random locations.
- Each player gets a cone attached to them which fans out towards their back.
- After a short delay, a big yellow telegraph appears followed by an explosion covering the front and sides of each player.
What To Do
- As soon as everyone get the cone attached to them, spread out and move to the edge of the arena and face towards the outside.
- In case 2 players started to run towards the same direction, turn 90° and move away from each other.
- Wait for the yellow telegraph to appear before moving back to the boss.
Solo Mode Main Mechanics
What To Do
- Certain patterns of the boss can destroy the outer part (tiles) of the octagon shaped arena.
- Broken tiles have red effects on them. If you get pushed on those tiles, you will die.
- Some patterns allow you to recover broken tiles, which then turn purple. Purple and normal tiles are safe, you won't die if you get pushed on top of these tiles.
- To recover destroyed tiles, do as followed:
- Deplete the normal Stagger bar of the boss first.
- Succeed the Destruction check.
- Guide the big red orb, which spawns at the boss and follows the closest player towards a broken tile.
What To Do
- Once the pattern starts, go to the 3 O'clock position to the right of the boss.
- Dodge the first 2 slices and the mirror attack first before guiding the 3rd slice towards the mirror on that position.
- The slices are easier to dodge and readjust, the closer you are to the boss.
- Don't panic because of the yellow explosions caused by the mirror. It always explodes first before the 3rd slice locks on a position. So you can safely dodge that explosion first and should still have a second left to readjust the 3rd slice.
- Rotate clockwise towards the next mirror and repeat step 2. Upon completion, rotate one final time clockwise towards the next mirror to repeat step 2.
What To Do
- Stagger the boss first.
- Stagger at least the two bottom mirrors by using Whirlwind Grenade and stagger skills.
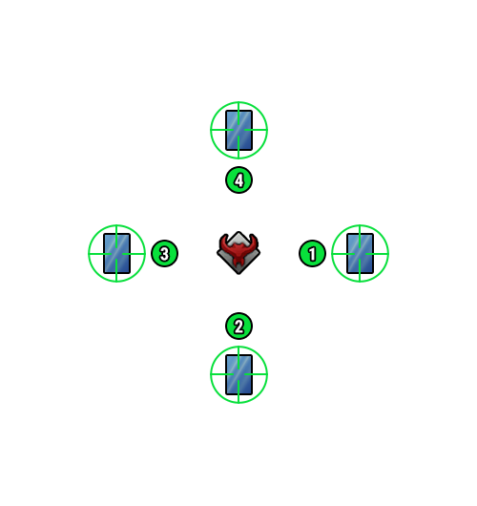
What To Do
- To succeed this mechanic, you need to Stagger the boss.
- The required Stagger is high, but by countering the correct mirrors, you get a Stagger buff to assist you.
- Countering the wrong mirrors or missing the Counter timing increases the Stagger difficulty and deals high damage.
- Counter Mirrors which the sword pierces.
- Ignore mirrors which aren't pierced by the boss' sword.
- Upon successfully countering the correct mirror, your counter skill will reset.
- Attack the boss after each counter, to reduce his stagger bar!
- Tips
- Boss always stabs 2 mirrors and pretend to stab 2. (4 in total)
- In case you forgot, the color of the thorn helps to differentiate between the correct and wrong mirror to counter. Red thorn indicates the correct mirror and purple one only comes out of the wrong one.
What To Do
- Use Destruction Bomb on the Mirror at 6 O'clock position, to destroy it.
- Stagger boss and use Whirlwind Grenade if needed.
- Use skills with Weak Point affix on the sword to destroy it.
What To Do
- Move to the front of the boss after the 2nd circle spawns below you, to get grabbed.
- Ignore the 3rd circle, since the boss will grab you before it explodes.
- Kill the Guardian.
- Stagger the boss.
What To Do
- Method 1: Ignore the mirrors and focus on dealing damage to the boss. Since 4 tiles will be destroyed because of the mirrors, you need to play carefully to avoid getting pushed into those.
- Method 2: Destroy the Mirror at 6 = O'Clock and try to fight the boss at the bottom part of the arena. This gives you more space to fight, but you have to sacrifice some damage during the transition to stagger the mirror.
What To Do
- Try to use a Counter skill as soon as he flashes blue.
- Failing this counter leads to destruction of all tiles hit by the cones.
Credits
Written by Perciculum
Footage from Saintone