Temporal Sanctum Dungeon – Julra Boss Guide
Last Updated:April 21, 2025|Changelog
Temporal Sanctum was the first Dungeon ever released for Last Epoch, and is arguably the most rewarding. It features a straightforward time based mechanic, valuable rewards including Legendaries, and one of the most challenging boss fights in the game at Tier 4
In this guide we'll cover layout, boss mechanics, and the rewards you can obtain from the Dungeon.
If you're new to Dungeons, we also recommend checking out our Dungeon Guide.
Accessing the Dungeon
To get into the Dungeon you need a Temporal Sanctum Key. They drop randomly from enemies but can also be target farmed from Timeline Bosses and the Arena of Champions (Arena not recommended due to low drop rate). Nodes on the Weaver Tree can also juice your odds of finding keys.
Once you've obtained a Key (or Keys), you need to head to the Temporal Sanctum in the Ruined Era. Start in the Shining Cove in the Imperial Era. From the Portal head northeast until you see a large stone door. Open the door and head through the Portal to the Ruined Coast. Head south in the Ruined Coast, but the way is blocked so you have to start by heading northwest. Traverse the abandoned ships and work your way down until you reach the bridge. Pull the lever, and kill Ortra'ek the Survivor. The door to the east of you will open, and you can now enter the Temporal Sanctum. Right clicking the Temporal Sanctum Key brings you to the correct position on the map.
For more information on farming Keys from Timeline Bosses, check out our Monolith Advanced Strategies Guide.
For more information on farming Keys from Arena of Champions, check out our Arena of Champions Guide.
For more information on the Weaver Tree, see our Woven Faction Overview.
Dungeon Rewards
There are many valuable rewards in the Temporal Sanctum including Legendaries, boss specific Uniques and Dungeon modifier rewards.
Legendaries
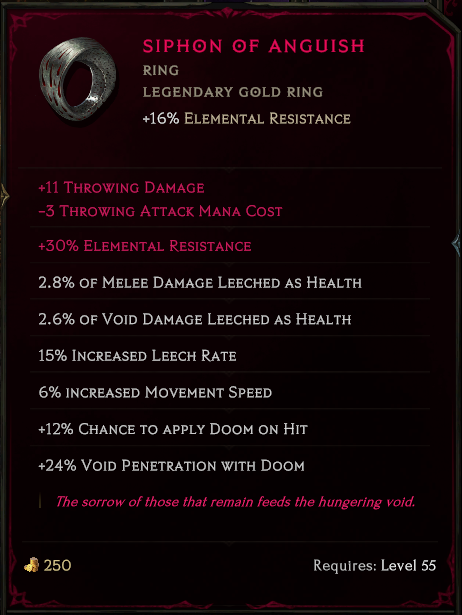
The most notable reward is the ability to make Legendaries (see our guide on Legendaries here). The ability to apply Affixes from Exalted items to Uniques is powerful and benefits almost every endgame build in some way. That makes this Dungeon a must for pursuing best in slot items.
In order to make a Legendary item, you must first complete the Dungeon by defeating Chronomancer Julra. Upon completion, a door opens that leads to the Eternity Cache. Here you can place a Unique with Legendary Potential and an Exalted item with at least 4 non sealed affixes. Choose an affix from the Exalted that you want to guarantee transfers over (only available for tier 2 and higher), then use your Dungeon ability to change from the Divine Timeline to the Ruined Timeline and collect your reward. Note: you can only make one Legendary per Dungeon run, so if you want to make multiple Legendaries, you have to do multiple Dungeon runs. The item level of the Unique must also be below the maximum level allowed for each tier.
For more information on Legendaries, check out our Legendary Items Crafting Guide
Uniques
There are 4 different Uniques that Julra can drop, with different tier requirements for each:
- Julra's Stardial drops from tier 1 and higher.
- Somnia drops from tier 2 and higher.
- Julra's Obsession drops from tier 3 and higher.
- Vessel of Strife only drops from tier 4.
Dungeon Modifier Rewards
When running a Dungeon you stack modifiers that have both a positive and a negative effect. There are two sources of modifiers:
- Any tier of Dungeon beyond tier 1 has a modifier attached to it. This modifier changes daily. Consider saving some keys for a particularly good modifier that you can farm.
- Every door you open to move to the next part of the Dungeon adds a modifier. There are two doors in total, one to go from floor 1 to floor 2, and one from floor 2 to Julra.
Dungeon Modifiers
There are many modifiers that the player can encounter from increased chance to find a certain type of Exalted item, to increased crafting materials. Higher tier Dungeons have better versions of the lower tier modifiers as well as new ones (See Difficulty for more info on tiers).
Floor 1
No modifiers
Floor 2
- Enemies drop slightly more Exalted Amulets
- Enemies drop slightly more Exalted Helmets
- Enemies drop slightly more Exalted Relics
- Enemies drop slightly more Exalted Rings
- Enemies drop slightly more Exalted Weapons
- Enemies drop slightly more Glyphs
- Enemies drop slightly more Runes
Floor 3
- The Dungeon boss drops Exalted Jewelry
- The Dungeon boss drops additional Exalted Items
- The Dungeon boss drops additional Exalted Weapons
- The Dungeon boss drops additional Glyphs
- The Dungeon boss drops additional Idols
- The Dungeon boss drops additional Runes
Floor 1
- The Dungeon boss drops Exalted Jewelry
- Enemies drop slightly more Glyphs
- Enemies drop slightly more exalted Relics
- The Dungeon boss drops additional Idols
- Enemies drop slightly more Exalted Amulets
- The Dungeon boss drops additional Exalted Weapons
- Enemies drop slightly more Exalted Helmets
- The Dungeon boss drops a Set Item
- Enemies drop slightly more Exalted Rings
- Enemies drop slightly more Exalted Weapons
- Enemies drop slightly more Runes
Floor 2
- Enemies drop slightly more Exalted Amulets
- Enemies drop slightly more Exalted Helmets
- Enemies drop slightly more Exalted Relics
- Enemies drop slightly more Exalted Rings
- Enemies drop slightly more Exalted Weapons
- Enemies drop slightly more Glyphs
- Enemies drop slightly more Runes
Floor 3
- The Dungeon boss drops Exalted Jewelry
- The Dungeon boss drops additional Exalted Items
- The Dungeon boss drops additional Exalted Weapons
- The Dungeon boss drops additional Glyphs
- The Dungeon boss drops additional Idols
- The Dungeon boss drops additional Runes
- The Dungeon boss drops a Set Item
Floor 1
- The Dungeon boss drops much Exalted Jewelry
- Enemies drop more Glyphs
- Enemies drop more Exalted Relics
- The Dungeon boss drops many Idols
- Enemies drop more Exalted Amulets
- The Dungeon boss drops many Exalted Weapons
- Enemies drop more Exalted Helmets
- The Dungeon boss drops a Unique Item
- Enemies drop more Exalted Rings
- Enemies drop more Exalted Weapons
- Enemies drop more Runes
Floor 2
- Enemies drop more Exalted Amulets
- Enemies drop more Exalted Helmets
- Enemies drop more Exalted Relics
- Enemies drop more Exalted Rings
- Enemies drop more Exalted Weapons
- Enemies drop more Glyphs
- Enemies drop more Runes
Floor 3
- The Dungeon boss drops much Exalted Jewelry
- The Dungeon boss drops many Exalted Items
- The Dungeon boss drops many Exalted Weapons
- The Dungeon boss drops many Glyphs
- The Dungeon boss drops many Idols
- The Dungeon boss drops many Runes
- The Dungeon boss drops a Unique Item
Floor 1
- The Dungeon boss drops a horde of Exalted Jewelry
- Enemies drop substantially more Exalted Relics
- The Dungeon boss drops a horde of Exalted Weapons
- The Dungeon boss drops a horde of Runes
- Enemies drop substantially more Exalted Amulets
- The Dungeon boss drops a Glyph of Despair
- The Dungeon boss drops a Unique Weapon
- Enemies drop substantially more Glyphs
- The Dungeon boss drops 2 Unique Items
- Enemies drop substantially more Exalted Helmets
- The Dungeon boss drops a horde of Idols
- The Dungeon boss drops a horde of Exalted Items
- Enemies drop substantially more Exalted Rings
- The Dungeon boss drops a horde of Glyphs
- Enemies drop substantially more Exalted Weapons
- Enemies drop substantially more Runes
Floor 2
- Enemies drop substantially more Exalted Amulets
- Enemies drop substantially more Exalted Helmets
- Enemies drop substantially more Exalted Relics
- Enemies drop substantially more Exalted Rings
- Enemies drop substantially more Exalted Weapons
- Enemies drop substantially more Glyphs
- Enemies drop substantially more Runes
Floor 3
- The Dungeon boss drops a horde of Exalted Jewelry
- The Dungeon boss drops a horde of Exalted Items
- The Dungeon boss drops a horde of Exalted Weapons
- The Dungeon boss drops a Glyph of Despair
- The Dungeon boss drops a horde of Glyphs
- The Dungeon boss drops a horde of Idols
- The Dungeon boss drops a horde of Runes
- The Dungeon boss drops a Unique Weapon
- The Dungeon boss drops 2 Unique Items
Dungeon Ability
Temporal Shift is a Dungeon specific ability that allows the player to switch between the Divine Era and Ruined Era Timelines at will (default button is 'D'). Doing so changes the map to reflect the different Era, the enemies to Timeline appropriate ones and allows the player to traverse areas that are blocked in the other Timeline. This can also be used to avoid boss mechanics (more in the Boss section).
Temporal Sanctum actually has two layouts to every area, both with their own set of enemies. If you so choose, both layouts can be fully cleared by jumping back and forth between both Timelines. You can also use Temporal Shift to traverse the Dungeon more quickly by avoiding obstacles, as well as avoiding enemies in your path (more on this in the Pre Boss Strategy section).
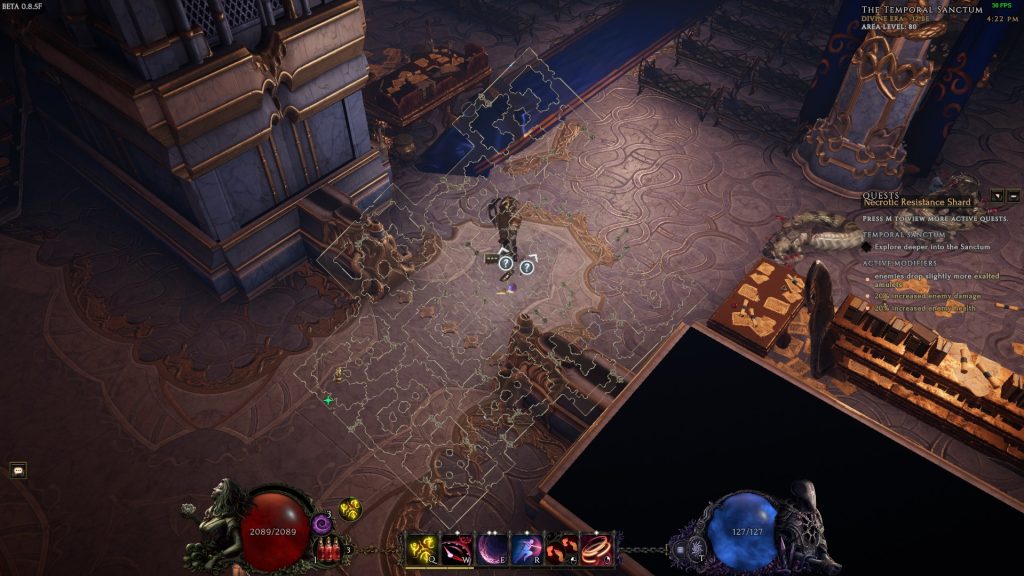
Layout
The Temporal Sanctum has several map layouts, all with a somewhat rectangular shape. Each layout has a Divine Era and Ruined Era version that you can switch between with Temporal Shift. The two versions are identical except for where the roadblocks are located.
Speaking of roadblocks, all Dungeons have a system of pseudo randomized roadblocks. These change every Dungeon you run, and their purpose is to block some paths while leaving others open. This is no different in Temporal Sanctum. However, in Temporal Sanctum you can avoid many of the roadblocks by simply switching timelines with Temporal Shift.
Enemies
While any enemy can be deadly at a high enough difficulty, the normal enemies in Temporal Sanctum are not especially dangerous compared to most enemies in the game. However, there are a few enemies with mechanics that need to be avoided.
This large snake drops a Poison tornado in front of it as it backs up. The tornado does very high Poison damage over time and grows larger the longer it exists.
Be careful when running directly towards a Gorgon. Doing so puts you into the tornado's path.
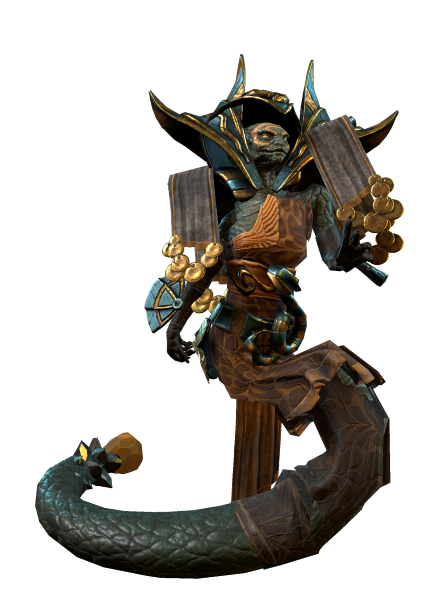
These snakes come in small packs and have blue scales with green claws. They chase and teleport to the player across timelines, and they have a melee attack that applies five stacks of Poison. Getting hit by several of these at once can be deadly.
These look like purple skitterers with long, spider-like legs. They do fairly high Melee Physical and Void damage, and can shred both Armour and Void Resistance. Face tanking them at higher difficulties isn't realistic for many builds.
Unlike the others, these Nagasa are only found in the Ruined Era. They continuously fire an arching Void Snake at the player that does moderate Void Damage.
The normal versions aren't particularly dangerous, but the Rare version gains a new skill called Putrefying Beam, that encircles an area and does high Void Damage Over Time. Be on the lookout for the rare version and if you find it, be sure to stay out of Putrefying Beam.
These enemies have two attacks to look out for. The first, Void Charge, causes the enemy to charge the player, doing high Void and Physical Damage. The second, Piercing Void, fires a beam at the player that does high Void Damage.
Both attacks have a 'windup' telegraph and can easily be avoided by strafing during the windup. Before Void Charge, the enemy rears back a little before charging. Before Piercing Void, the head of the enemy glows.
Difficulty
Difficulty scales through Dungeon Tiers and Modifiers. There's also an added layer of difficulty through the 'roguelike' aspect of Dungeons.
Dungeon Tiers
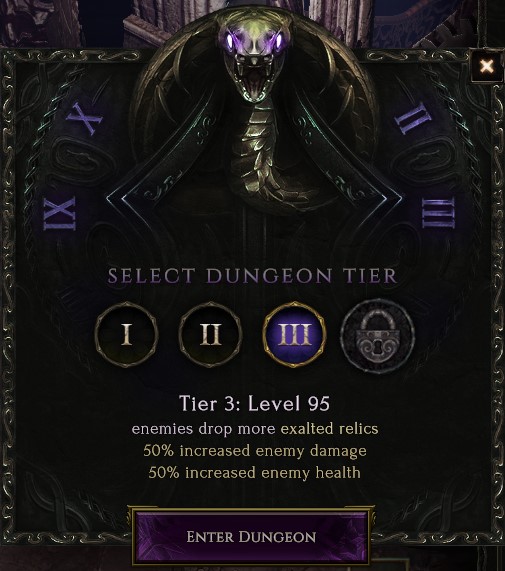
Every Dungeon has 4 tiers that you can choose from once they're unlocked. Tier 1 is available by default, and once you complete the Dungeon it unlocks tier 2, etc. Higher tiers have higher level enemies while also adding stronger modifiers. You also need to complete higher tier Dungeons to get certain Uniques from Julra as well as create Legendaries from higher level uniques (see Dungeon Rewards for more info).
Modifiers
Selecting any Dungeon above tier one grants your first modifier. This modifier offers a certain reward, but also increases the difficulty of the Dungeon by adding Increased Damage and Increased Health to all of the enemies (including the boss). You also need to use two doors to progress through the Dungeon (one to go from level one to level 2, and one to go from level 2 to the boss room). Each door also adds a modifier to your run from that point forward, making subsequent rooms more difficult, but also more rewarding, than the previous room.
Lower tier Dungeons have small modifiers, while higher tier Dungeons get substantially more difficult. For example, the strongest modifier at tier 1 adds 30% Increased Health and damage to enemies, while the strongest tier modifier at tier 4 adds 180%. When selecting your modifiers in a Dungeon, don't just pay attention to the rewards it offers, make sure you can also handle the difficulty scaling.


You only Get One Shot, Unless...
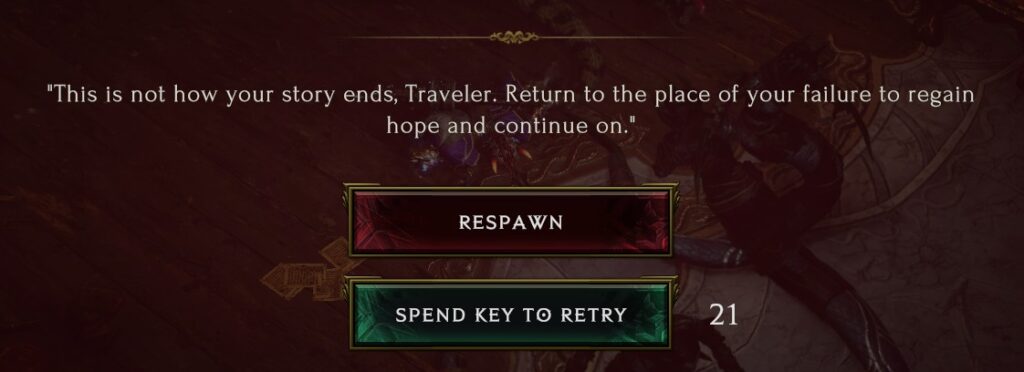
By default, there are no extra attempts in Dungeons. If you die at any point in the Dungeon, you are ported out of the Dungeon and lose all of your progress. However, if you have an additional Dungeon Key you can spend it for an additional attempt without losing your current progress. There is no limit to how many keys you can spend, so every key you have in your inventory is another attempt you can make.
Pre Boss Strategy
Whether you want to clear a map or rush straight to the boss depends on the modifiers you pick up. For example, if you get a modifier that increases the drop rate of Exalted Amulets, it may be worth your time to clear the map. Keep in mind that higher tier Dungeons offer higher drop rates on modifiers. This means that full clearing lower dungeon tiers is unlikely to be rewarding and you're better off pushing to higher tiers and farming there.
If the modifiers aren't enticing enough to farm the Dungeon (and they often won't be) then it may be best to skip directly to the boss. This can be accomplished by using a Portal Charm by placing it in the Dungeon entrance UI along with your key. If you don't have one, you can visit the Black Market Key Trader in Maj'Elka and spend three Dungeon Keys to purchase one.
Boss - Julra
Julra is a more difficult fight than most of the other bosses in the game, so understanding the mechanics is pivotal to your success.
Mechanics
Boss Strategy
The fight is chaotic, with no clear phases or other structured segments, and no clear pattern to many of the skills that she uses. This chaos makes explaining the fight more difficult. We do our best to describe the fight in a logical way, but players should bear in mind that most of Julra's abilities are available to her at any given time, so you have to be prepared for all of them.
After engaging with Julra, expect her to open up with Catastrophic Implosion. You can continue to do damage as the clock winds, but make sure to use Temporal Shift before the clock strikes 12. The Implosion kills most players with appropriate builds for the content, and one shots almost all builds at tier 4, so don't get caught in it! If you happen to get caught and survive, you should immediately cleanse the Doom stacks that were applied to you.
Once you've shifted eras, Julra follows you and immediately casts Dimension Tear under your feet (Note: If you time it correctly, you can use Temporal Shift right before Catastrophic Implosion, then immediately use Temporal Shift to avoid creating a Dimension Tear). It takes a short while for the puddle to form, and follows you until it finishes. Use this time to position the puddle to the edges of the room. As the fight goes on, Julra continues to use Catastrophic Implosion at fairly regular intervals, which forces the player to switch Eras, in turn creating more Dimension Tears. As puddles accumulate they stay in their era, so poor positioning can cause the player to jump directly into a puddle and can also limit room to dodge mechanics. Once the puddle is created, immediately run out (or use a movement skill if you have one).
Throughout the fight, lookout for both Catastrophic Implosion and Unraveling Decay. Handle Catastrophic Implosion the same way you did the first time. For Unraveling Decay you need to stand in the gap between the beams, while also avoiding the other attacks. This can be a particularly tough part of the fight for Melee Leech builds because Julra can stand in her own beams out of reach of the character, preventing Leech, so make sure to save some potions for this part of the fight.
Destroy any Healing Fountains as soon as you can to limit the healing they provide, but don't risk standing in damaging attacks to do so. The healing from this is solid, but not overwhelming to builds with good damage. If Julra uses Summon Pillars while in the Divine Era, kill these as soon as you can. If you're in the Ruined Era, you have to dodge the attacks until you switch eras. You may be tempted to switch eras immediately, but doing so causes Julra to use another Dimension Tear. If you switch eras too often, these begin to pile up and could become overwhelming, so switch eras only when you need to.
The rest of the mechanics are relatively easy to deal with. It's the sheer number of these that Julra can use, overlapped with Unraveling Decay and Dimension Tear that make the fight challenging. Generally the best strategy is to keep moving to naturally dodge some of the mechanics, because over time it becomes hard to see them all and some (Temporal Shot, Lightning Bolt from Summon Pillars) happen quickly, making them difficult to time.
Prioritize the mechanics of the fight over dealing damage. While it can be tempting to try and burn Julra down to avoid too many puddles from Dimension Tear, a poorly placed puddle is far more difficult to deal with than a lot of well placed ones. Properly time your uses of Temporal Shift to avoid Catastrophic Implosion, consistently place the puddles from Dimension Tear, avoid the beams from Unraveling Decay and stay moving to avoid Julra's other attacks to successfully complete this boss, even on tier 4.
Summary
- The ability to make Legendaries makes this Dungeon highly valuable content.
- The Dungeon Ability Temporal Shift plays a role in both traversing the Dungeon and avoiding Catastrophic Implosion from Julra.
- Enemies are relatively easy, but be on the lookout for Gorgons, Temporal Hunters, Festering Cultists, Void Husk Nagasa, and Void Nightmare.
- Dying in the dungeon causes the player to fail, lose all progress, and lose the Temporal Sanctum Key they used!
- Julra is a difficult fight. You need to know all of the mechanics, but especially look out for Catastrophic Implosion, Dimension Tear, and Unraveling Decay. Make sure you know how these work before attempting the boss on higher tiers.
Credits
Written by McFluffin.
Reviewed by Facefoot, Lizard_IRL, Raxxanterax.