Lightless Arbor Dungeon – The Mountain Beneath Boss Guide
Last Updated:April 13, 2025|Changelog
Lightless Arbor is a dungeon themed around darkness whose primary function is to serve as a gold sink. It features a light based mechanic that buffs players and debuffs enemies, valuable rewards through a 'juicing' mechanic where spending gold increases rewards, and a boss fight with two very different stages.
In this guide we'll cover layout, boss mechanics, and the rewards you can obtain from the Dungeon.
If you're new to Dungeons, we also recommend checking out our Dungeon Guide.
Accessing the Dungeon
To get into the Dungeon you need a Lightless Arbor Key. They drop randomly from enemies but can also be target farmed from Timeline Bosses and the Arena of Champions (Arena not recommended due to low drop rate). Nodes on the Weaver Tree can also juice your odds of finding keys.
Once you've obtained a Key (or Keys), you need to head to the Lightless Arbor in the Ruined Era. Start at The Surface waypoint and head to the entrance to the north that leads to The Shrouded Ridge. Upon arriving in The Shrouded Ridge head directly north until you reach the entrance to the Lightless Arbor. Right clicking on your Lightless Arbor Key will highlight this section of the map.
For more information on farming Keys from Timeline Bosses, check out our Monolith Advanced Strategies Guide.
For more information on farming Keys from Arena of Champions, check out our Arena of Champions Guide.
Dungeon Rewards
There are many valuable rewards in the Lightless Arbor including Items you acquire through The Vaults of Uncertain Fate, boss specific Uniques and Dungeon modifier rewards.
The Vaults of Uncertain Fate
The most notable reward is the ability to spend gold on modifiers that increase the rewards found behind The Vaults of Uncertain Fate. Upon killing The Mountain Beneath and entering the next area you will a door that leads to the Vaults. Interacting with this door starts a series of choices. You can choose to add a modifier to the vault for gold or skip it. Every additional choice beyond the first increases the cost of adding additional modifiers, eventually reaching the point where you either reach your modifier limit or every modifier is too expensive.
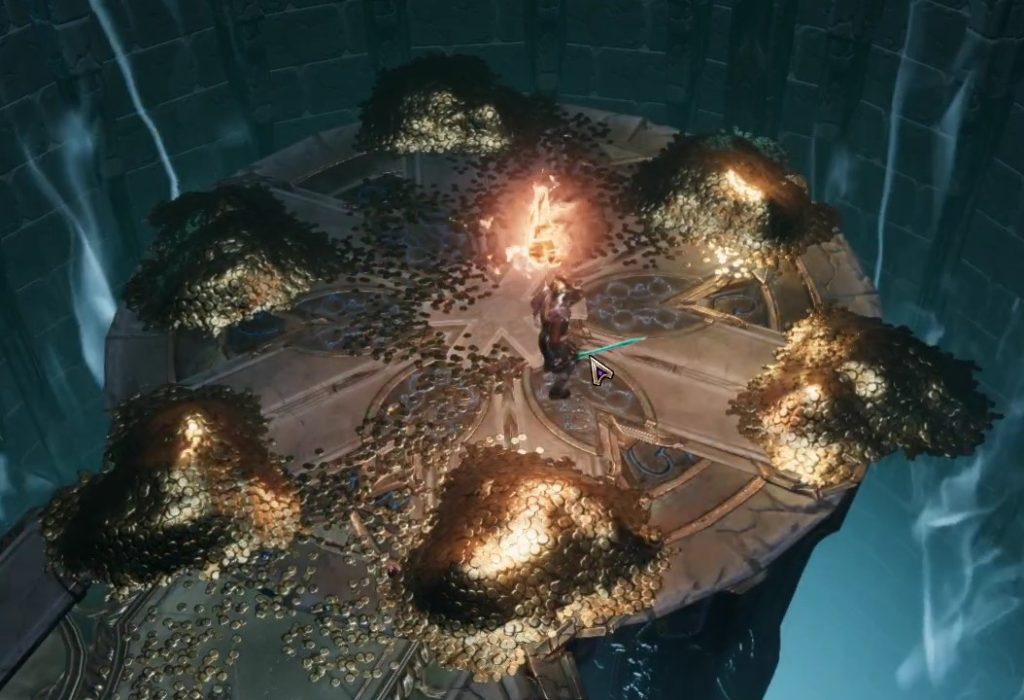
Once you're done choosing modifiers you can open the vault. All of the modifiers you selected will be accounted for and the reward will be inside one or more chests. If enough modifiers were selected this will result in an explosion of items!
Uniques
There are 4 different Uniques that The Mountain Beneath can drop, with different tier requirements for each:
- Peak of the Mountain drops from tier 1 and higher.
- Foot of the Mountain drops from tier 2 and higher.
- Face of the Mountain drops from tier 3 and higher.
- Core of the Mountain only drops from tier 4.
Dungeon Modifier Rewards
When running a Dungeon you stack modifiers that have both a positive and a negative effect. There are two sources of modifiers:
- Any tier of Dungeon beyond tier 1 has a modifier attached to it. This modifier changes daily. Consider saving some keys for a particularly good modifier that you can farm.
- Every door you open to move to the next part of the Dungeon adds a modifier. There are two doors in total, one to go from floor 1 to floor 2, and one from floor 2 to The Mountain Beneath.
Lightless Arbor features an additional set of modifiers for The Vaults of Uncertain Fate. When interacting with the vaults players choose these modifiers by paying gold.

Dungeon Modifiers
There are many modifiers that the player can encounter from increased chance to find a certain type of Exalted item, to increased crafting materials. Higher tier Dungeons have better versions of the lower tier modifiers as well as new ones (See Difficulty for more info on tiers).
Door Modifiers
Floor 1
No modifiers
Floor 2
- Enemies drop slightly more Glyphs
- Enemies drop more Rare armor
- Enemies drop more Rare helmets
- Enemies drop more Rare jewelry
- Enemies drop more Rare relics
- Enemies drop more Rare weapons
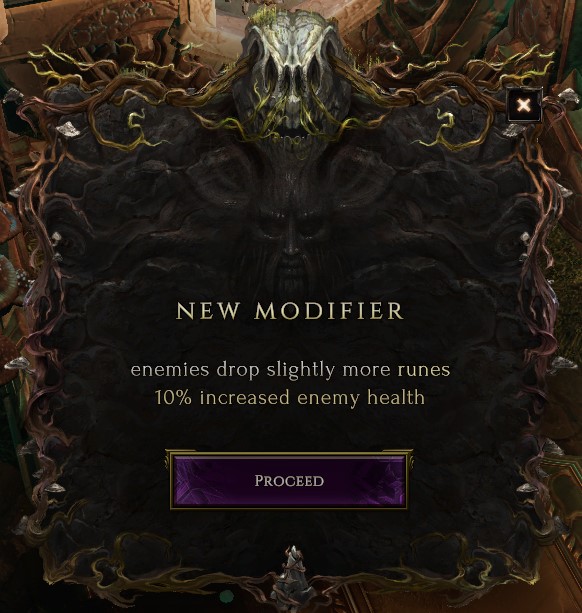
- Enemies drop slightly more Runes
Floor 3
- The dungeon boss drops Rare Jewelry
- The dungeon boss drops additional Glyphs
- The dungeon boss drops additional Rare Weapons
- The dungeon boss drops additional Rare Items
- The dungeon boss drops additional Runes
Floor 1
- The dungeon boss drops Exalted Jewelry
- The dungeon boss drops additional Exalted Items
- The dungeon boss drops additional Exalted Weapons
- The dungeon boss drops additional Glyphs
- The dungeon boss drops additional Idols
- The dungeon boss drops additional Runes
- The dungeon boss drops a
SetItem
Floor 2
- Enemies drop slightly more Exalted amulets
- Enemies drop slightly more Exalted helmets
- Enemies drop slightly more Exalted relics
- Enemies drop slightly more Exalted rings
- Enemies drop slightly more Exalted weapons
- Enemies drop slightly more Glyphs
- Enemies drop slightly more Runes
Floor 3
- The dungeon boss drops Exalted Jewelry
- The dungeon boss drops additional Exalted Items
- The dungeon boss drops additional Exalted Weapons
- The dungeon boss drops additional Glyphs
- The dungeon boss drops additional Idols
- The dungeon boss drops additional Runes
- The dungeon boss drops a Set Item
Floor 1
- Enemies drop more Exalted amulets
- Enemies drop more Exalted helmets
- Enemies drop more Exalted relics
- Enemies drop more Exalted rings
- Enemies drop more Exalted weapons
- Enemies drop more Glyphs
- Enemies drop more Runes
- The dungeon boss drops a Unique Item
- The dungeon boss drops many Idols
Floor 2
- Enemies drop more Exalted amulets
- Enemies drop more Exalted helmets
- Enemies drop more Exalted relics
- Enemies drop more Exalted rings
- Enemies drop more Exalted weapons
- Enemies drop more Glyphs
- Enemies drop more Runes
Floor 3
- The dungeon boss drops much Exalted Jewelry
- The dungeon boss drops many Exalted Items
- The dungeon boss drops many Exalted Weapons
- The dungeon boss drops many Glyphs
- The dungeon boss drops many Idols
- The dungeon boss drops many Runes
- The dungeon boss drops a Unique Item
Floor 1
- Enemies drop substantially more Exalted amulets
- Enemies drop substantially more Exalted helmets
- Enemies drop substantially more Exalted relics
- Enemies drop substantially more Exalted rings
- Enemies drop substantially more Exalted weapons
- The dungeon boss drops a Unique Weapon
- Enemies drop substantially more Glyphs
- Enemies drop substantially more Runes
- The dungeon boss drops a horde of Idols
Floor 2
- Enemies drop substantially more Exalted amulets
- Enemies drop substantially more Exalted helmets
- Enemies drop substantially more Exalted relics
- Enemies drop substantially more Exalted rings
- Enemies drop substantially more Exalted weapons
- Enemies drop substantially more Glyphs
- Enemies drop substantially more Runes
Floor 3
- The dungeon boss drops a horde of Exalted Jewelry
- The dungeon boss drops a horde of Exalted Items
- The dungeon boss drops a horde of Exalted Weapons
- The dungeon boss drops a Glyph of Despair
- The dungeon boss drops a horde of Glyphs
- The dungeon boss drops a horde of Idols
- The dungeon boss drops a horde of Runes
- The dungeon boss drops a Unique Weapon
- The dungeon boss drops 2 Unique Items
Vault Modifiers
These directly affect the rewards that will be found in The Vaults of Uncertain Fate. Tier 1 has lower quality choices than tiers 2-4 largely due to not being able to drop Exalted items. Because of area level the tier 4 dungeon is the only one that can drop Exalted items with a tier 7 affix. Additionally, the maximum number of modifiers that can be purchased increases with tier level:
- Tier 1: 8 modifiers
- Tier 2: 9 modifiers
- Tier 3: 10 modifiers
- Tier 4: 11 modifiers
- A random chests drops 25% more items (multiplicative with other modifiers)
- A random chests drops 45% more items (multiplicative with other modifiers)
- Adds a Chest that drops a Magic item, a Rare item, and a Unique item.
- Adds a Chest that drops a Rare helmet, Rare body armor, Rare gloves, and Rare boots.
- Adds a Chest that drops many Affix Shards.
- Adds a Chest that drops many Runes and Glyphs.
- Adds a Chest that drops several Idols.
- Adds a Chest that drops several Rare helmets.
- Adds a Chest that drops several Rare items.
- Adds a Chest that drops several Rare pairs of boots.
- Adds a Lightless Arbor Key to a Random Chest
- Adds a Unique Item to a Random Chest
- Adds a Unique Item to Every Chest
- Adds additional Rare pair of Boots to All Chests
- Adds an additional Glyph of Chaos to All Chests
- Adds an additional Glyph of Hope to All Chests
- Adds an additional Rare Item to All Chests
- Adds an additional Rune of Shattering to All Chests
- Adds an Idol to Every Chest
- Adds many Glyphs to a Random Chest
- Adds many Runes to a Random Chest
- Adds several pieces of Rare Jewelry to a Random Chest
- Adds several Rare Weapons to a Random Chest
- All chests drop 15% more items (multiplicative with other modifiers)
- All chests drop 30% more items (multiplicative with other modifiers)
- All items from Every Chest have a 20% chance to be duplicated. This is additive with other item duplication effects. Duplication chance above 100% can result in even more copies.
- All items from Every Chest have a 50% chance to be duplicated. This is additive with other item duplication effects. Duplication chance above 100% can result in even more copies.
- Duplicates all items from a Random Chest. This is additive with other item duplication effects
- Duplicates all Unique items from every Chest This is additive with other item duplication effects
- Duplicates every chest. This occurs after modifiers that apply to a random chest have already been applied
- Triplicates every chest. This occurs after modifiers that apply to a random chest have already been applied
- A random chests drops 25% more items (multiplicative with other modifiers)
- A random chests drops 45% more items (multiplicative with other modifiers)
- Adds a Chest that drops a Rare item, an Exalted item, a Unique item, and a Set item.
- Adds a Chest that drops a Rare weapon, an Exalted weapon, and a Unique weapon.
- Adds a Chest that drops an Exalted helmet, Exalted body armor, Exalted gloves, and Exalted boots.
- Adds a Chest that drops many Affix Shards.
- Adds a Chest that drops many Runes and Glyphs.
- Adds a Chest that drops several Exalted helmets.
- Adds a Chest that drops several Exalted items.
- Adds a Chest that drops several Idols.
- Adds a Lightless Arbor Key to a Random Chest
- Adds a Set Item to a Random Chest
- Adds a Unique Item to a Random Chest
- Adds a Unique Item to Every Chest
- Adds a Unique Weapon to a Random Chest
- Adds additional Exalted Relic to All Chests
- Adds an additional Exalted Item to All Chests
- Adds an additional Glyph of Chaos to All Chests
- Adds an additional Glyph of Despair to All Chests
- Adds an additional Rune of Shatteringto All Chests
- Adds an additional Set Item to All Chests
- Adds an Idol to Every Chest
- Adds many Glyphs to a Random Chest
- Adds many Runes to a Random Chest
- Adds several Exalted Weapons to a Random Chest
- Adds several pieces of Exalted Jewellery to a Random Chest
- All chests drop 15% more items (multiplicative with other modifiers)
- All chests drop 20% more exalted items (multiplicative with other modifiers)
- All chests drop 30% more items (multiplicative with other modifiers)
- All items from Every Chest have a 20% chance to be duplicated. This is additive with other item duplication effects. Duplication chance above 100% can result in even more copies.
- All items from Every Chest have a 50% chance to be duplicated. This is additive with other item duplication effects. Duplication chance above 100% can result in even more copies.
- Duplicates all items from a Random Chest This is additive with other item duplication effects
- Duplicates all Unique items from every Chest This is additive with other item duplication effects
- Duplicates every chest This occurs after modifiers that apply to a random chest have already been applied
- Triplicates every chest This occurs after modifiers that apply to a random chest have already been applied
- A random chests drops 25% more items (multiplicative with other modifiers)
- A random chests drops 45% more items (multiplicative with other modifiers)
- Adds a Chest that drops a Rare item, an Exalted item, a Unique item, and a Set item.
- Adds a Chest that drops a Rare weapon, an Exalted weapon, and a Unique weapon.
- Adds a Chest that drops an Exalted helmet, Exalted body armor, Exalted gloves, and Exalted boots.
- Adds a Chest that drops many Affix Shards.
- Adds a Chest that drops many Runes and Glyphs.
- Adds a Chest that drops several Exalted helmets.
- Adds a Chest that drops several Exalted items.
- Adds a Chest that drops several Idols.
- Adds a Lightless Arbor Key to a Random Chest
- Adds a Set Item to a Random Chest
- Adds a Unique Item to a Random Chest
- Adds a Unique Item to Every Chest
- Adds a Unique Weapon to a Random Chest
- Adds additional Exalted Relic to All Chests
- Adds an additional Exalted Item to All Chests
- Adds an additional Glyph of Chaos to All Chests
- Adds an additional Glyph of Despair to All Chests
- Adds an additional Rune of Ascendance to All Chests
- Adds an additional Set Item to All Chests
- Adds an Idol to Every Chest
- Adds many Glyphs to a Random Chest
- Adds many Runes to a Random Chest
- Adds several Exalted Weapons to a Random Chest
- Adds several pieces of Exalted Jewellery to a Random Chest
- All chests drop 15% more items (multiplicative with other modifiers)
- All chests drop 20% more exalted items (multiplicative with other modifiers)
- All chests drop 30% more items (multiplicative with other modifiers)
- All items from Every Chest have a 20% chance to be duplicated. This is additive with other item duplication effects. Duplication chance above 100% can result in even more copies.
- All items from Every Chest have a 50% chance to be duplicated. This is additive with other item duplication effects. Duplication chance above 100% can result in even more copies.
- Duplicates all items from a Random Chest This is additive with other item duplication effects
- Duplicates all Unique items from every Chest This is additive with other item duplication effects
- Duplicates every chest This occurs after modifiers that apply to a random chest have already been applied
- Triplicates every chest This occurs after modifiers that apply to a random chest have already been applied
Dungeon Ability
Upon starting the dungeon you have Burning Amber attached to you which illuminates the area around you. Enemies outside of the illumination deal much more damage and take much less damage. You are also able to move the amber to a target location and recall it by activating your ability. This ability lets you target enemies but is also used to burn pyres, which is necessary to progress through the dungeon as well as defeat the boss (more in the Boss section).
You can leave the Burning Amber attached to you, but being hit while it's attached results in the amber losing some of its illumination (the amount you lose depends on how much damage is dealt) . The illumination can be restored by slaying an Amber Elemental.
Layout
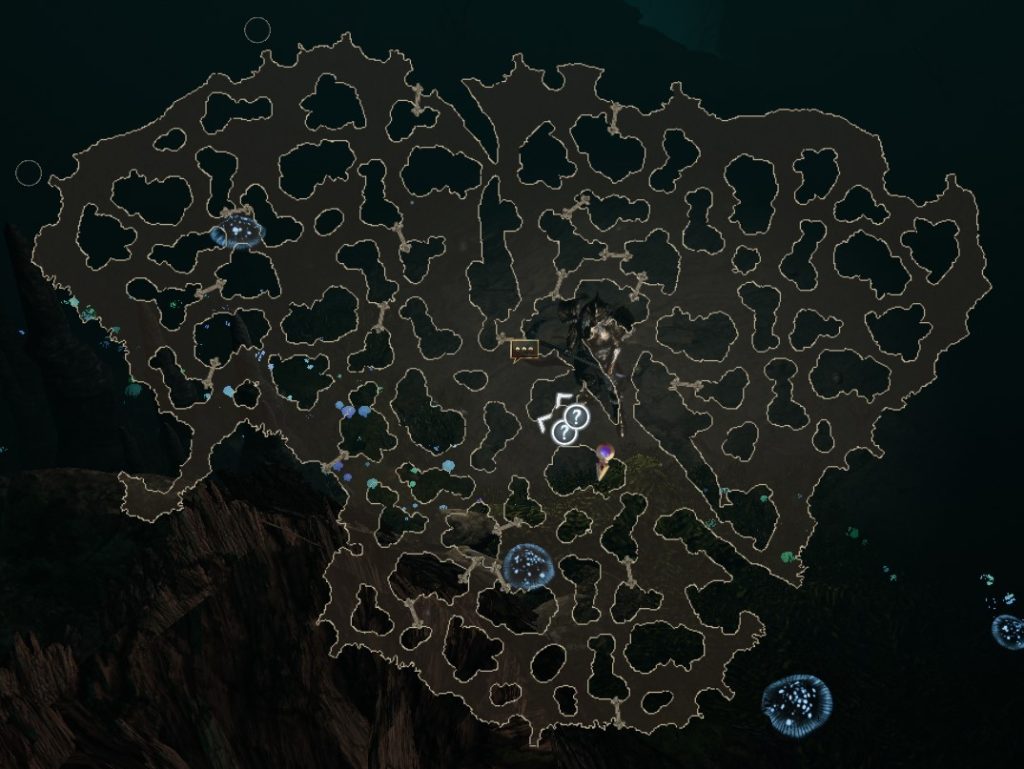
The Lightless Arbor has several map layouts, all with a somewhat oval shape. On top of the layouts all Dungeons have a system of pseudo randomized roadblocks. These change every Dungeon you run, and their purpose is to block some paths while leaving others open.
Each run consists of two different maps with one for each floor, followed by the boss which is always in the same arena.
Enemies
While the normal enemies in Lightless Arbor are not especially dangerous compared to most enemies in the game, the large amounts of Poison Damage can cause issues for builds susceptible to DoT damage and there are a few enemies with mechanics that need to be avoided.
Difficulty
Difficulty scales through Dungeon Tiers and Modifiers. There's also an added layer of difficulty through the 'roguelike' aspect of Dungeons.
Dungeon Tiers
Every Dungeon has 4 tiers that you can choose from once they're unlocked. Tier 1 is available by default, and once you complete the Dungeon it unlocks tier 2, etc (Tier 2 of this dungeon will also unlock at level 65 if it hasn't been already). Higher tiers have higher level enemies while also adding stronger modifiers. You also need to complete higher tier Dungeons to get certain Uniques from The Mountain Beneath as well as add more maximum modifiers to the Vaults of Uncertain Fate (see Dungeon Rewards for more info).
Modifiers
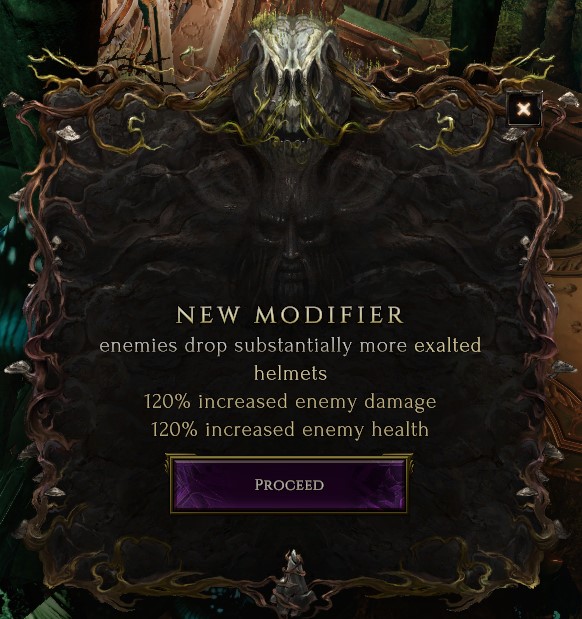
Selecting any Dungeon above tier one grants your first modifier. This modifier offers a certain reward, but also increases the difficulty of the Dungeon by adding Increased Damage and Increased Health to all of the enemies (including the boss). You also need to use two doors to progress through the Dungeon (one to go from level one to level 2, and one to go from level 2 to the boss room). Each door also adds a modifier to your run from that point forward, making subsequent rooms more difficult, but also more rewarding, than the previous room.
Lower tier Dungeons have small modifiers, while higher tier Dungeons get substantially more difficult. For example, the strongest modifier at tier 1 adds 30% Increased Health and damage to enemies, while the strongest tier modifier at tier 4 adds 180%. When selecting your modifiers in a Dungeon, don't just pay attention to the rewards it offers, make sure you can also handle the difficulty scaling.
You only Get One Shot, Unless...
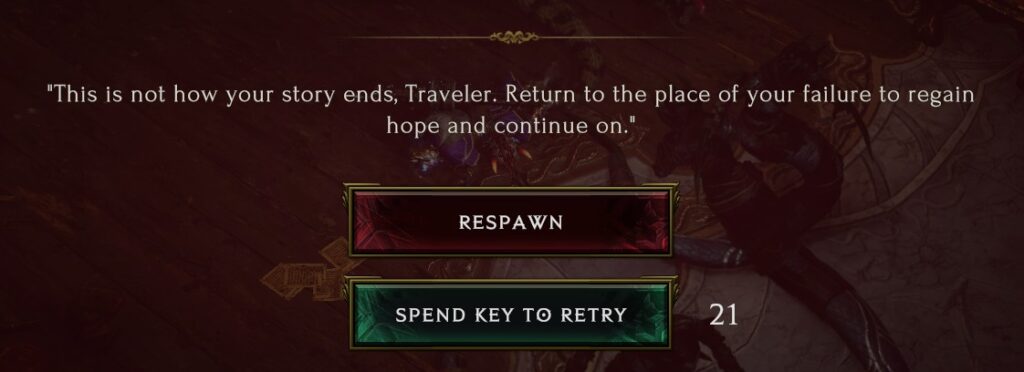
By default, there are no extra attempts in Dungeons. If you die at any point in the Dungeon, you are ported out of the Dungeon and lose all of your progress. However, if you have an additional Dungeon Key you can spend it for an additional attempt without losing your current progress. There is no limit to how many keys you can spend, so every key you have in your inventory is another attempt you can make.
Pre Boss Strategy
Whether you want to clear a map or rush straight to the boss depends on the modifiers you pick up. For example, if you get a modifier that increases the drop rate of Exalted Amulets, it may be worth your time to clear the map. Keep in mind that higher tier Dungeons offer higher drop rates on modifiers. This means that full clearing lower dungeon tiers is unlikely to be rewarding and you're better off pushing to higher tiers and farming there.
If the modifiers aren't enticing enough to farm the Dungeon (and they often won't be) then it may be best to skip directly to the boss. This can be accomplished by using a Portal Charm by placing it in the Dungeon entrance UI along with your key. If you don't have one, you can visit the Black Market Key Trader in Maj'Elka and spend three Dungeon Keys to purchase one.
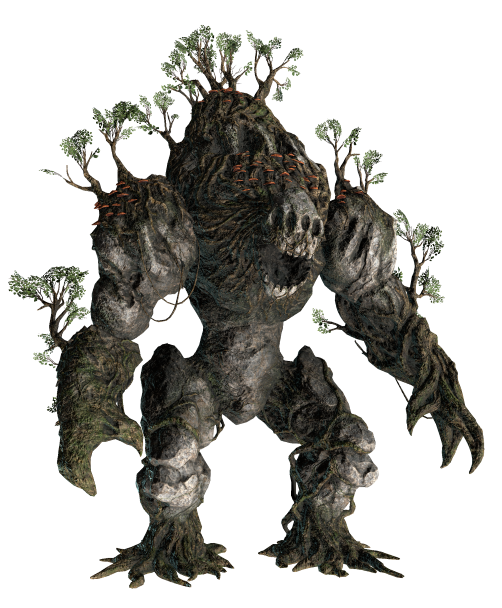
Boss - The Mountain Beneath
The Mountain Beneath is a fight with several one shot/near one shot attacks as well as two phases (The Mountain Beneath and Stone Titan's Heart). You will not be able to defeat this boss without knowing how his mechanics work.
Mechanics
Boss Strategy
There are two phases to the fight. The first involves fighting The Mountain Beneath on a platform. He's invulnerable so the real goal is to burn both Pyres with Burning Amber. Once both Pyres have burned The Mountain Beneath will fall over and his mouth becomes a doorway to the second phase where you need to kill Stone Titan's Heart. Here are some strategies for each phase of the fight:
The Mountain Beneath
- At the start of the fight immediately head towards the right Pyre on the far right side of the arena. Starting on the right side will make it easier to dodge the first round of Shockwave. You need to destroy the Root Wall that is blocking the Pyre first. Once destroyed, place your Burning Amber on the Pyre and head towards the center of the arena.
- Try to avoid Rockfall and kill any Titanspawn and Mountain's Roots while waiting for the first Shockwave. Once The Mountain Beneath uses Shockwave he attacks on the left side first, so stay center-right to easily avoid it. As soon as the left side attack is over immediately move to that side of the arena to avoid the right Shockwave.
- As soon as the right Pyre is lit recall your Burning Amber and head to the left Pyre. Take out the Root Wall and place your Burning Amber. Now head back to the center and repeat step two. If you're fast enough in destroying the Pyres there won't be a second round of Shockwave but if not you'll need to deal with it one more time
- As soon as both Pyres are lit The Mountain Beneath falls over and you can enter the second phase through his mouth.
Stone Titan's Heart
- Unlike The Mountain Beneath, Stone Titan's Heart is attackable and needs to be killed to end the fight so deal as much damage as you can while avoiding his more threatening mechanics
- Titanflesh in this phase aren't very threatening but should be dealt with when possible to avoid being overwhelmed from multiple damage sources.
- Spore Beam is the most dangerous mechanic in this phase. As soon as you see the beam head to the opposite side. The beam won't cover the entire arena but on higher phases it will cover most of it, so make sure your positioning is solid.
- Energy Wave does a lot of Poison Damage. You can either cleanse the Poison or avoid the mechanic altogether. Be aware that sometimes the safe zone for Spore Beam and the damaging area of Energy Wave can overlap and the only way to avoid both is a very well timed movement ability or exceptional move speed (and some luck) making cleanse the more reliable option.
- All of the other abilities are either very well telegraphed and easy to avoid or deal low enough damage to not be especially threatening on their own. Avoiding Spore Beam and Energy Wave are the most important parts of this phase.
The shear number of mechanics in this fight and the distinct differences between the phases can be overwhelming for new players, but in reality there are only a few mechanics that players need to learn in order to reliably defeat this boss. Understanding how the Pyres work and then avoiding Shockwave, Spore Beam and Energy Wave are the keys to your success.
Summary
- The Vaults of Uncertain Fate is a valuable gold sink that can only be accessed through this dungeon
- Burning Amber is a dungeon mechanic whose usage is required in order to complete the dungeon and defeat the boss.
- Enemies are relatively easy, but be on the lookout for Rotweavers, Rotting Hollows, Lightless Hive & Gloom Stingers, Hollow Spriggans, and Amber Elementals.
- Dying in the dungeon causes the player to fail, lose all progress, and lose the Lightless Arbor Key they used!
- The Mountain Beneath is a two phased fight with several mechanics that you need to know in order to defeat him. Know how to destroy Pyres as well as how to avoid Shockwave, Spore Beam and Energy Wave.
Credits
Written by McFluffin.
Reviewed by Facefoot, Lizard_IRL, Raxxanterax.