Soulfire Bastion Dungeon – Cremorus Boss Guide
Last Updated:April 13, 2025|Changelog
Soulfire Bastion is a dungeon themed around Fire, Necrotic, and the gathering of Souls. It features a mechanic that allows players to switch between two types of damage invulnerability, rewards through the collection of Souls that are then traded to a gambler, and a boss fight that demands the player's full attention in recognizing the damage type that is being used.
In this guide we'll cover layout, boss mechanics, and the rewards you can obtain from the Dungeon.
If you're new to Dungeons, we also recommend checking out our Dungeon Guide.
Accessing the Dungeon
To get into any Dungeon you need a Soulfire Bastion Key. They drop randomly from enemies but can also be target farmed from Timeline Bosses and the Arena of Champions (Arena not recommended due to low drop rate). Nodes on the Weaver Tree can also juice your odds of finding keys.
Once you've obtained a Key (or Keys), you need to head to the Soulfire Bastion in the Imperial Era. Start at the Risen Lake waypoint . From the waypoint head west then east at the crossroads. That will lead you to an entrance for The Felled Wood. Upon entering The Felled Wood head Northeast over a bridge until you arrive at the entrance to Soulfire Bastion Do not take the door directly east as it leads to a different area. Right click on the Soulfire Bastion Key will highlight this section of the map.
For more information on farming Keys from Timeline Bosses, check out our Monolith Advanced Strategies Guide.
For more information on farming Keys from Arena of Champions, check out our Arena of Champions Guide.
For more information on the Weaver Tree, see our Woven Faction Overview.
Dungeon Rewards
There are three primary rewards you can obtain from Soulfire Bastion: Items you purchase from The Soul Gambler, boss specific Uniques, and modifiers that modify the rewards that The Soul Gambler offers.
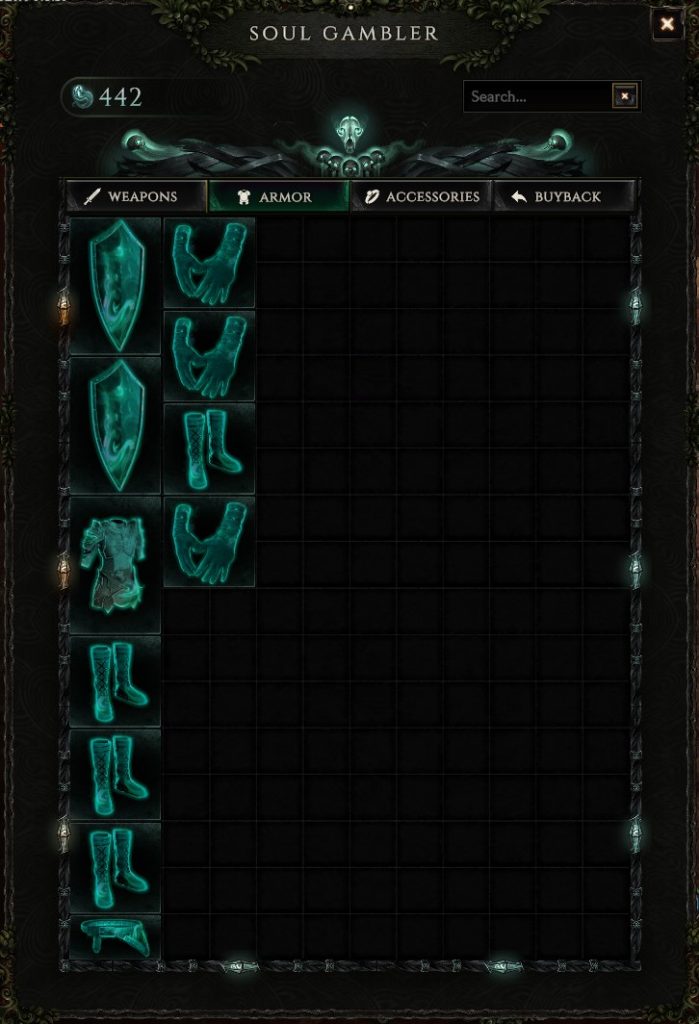
The Soul Gambler
The most notable rewards comes from the ability to gamble for items with Souls. Throughout the dungeon you collect the Souls of fallen enemies. Upon killing Cremorus and entering the next area you will be greeted by the Soul Gambler. He has a stash of items that change in quantity, diversity and cost each time you run the dungeon. Buying items from him costs an amount of Souls. You can buy as many items as you want as long as you still have the required number of souls to make the purchase.
While much of the Soul Gambler's inventory is random, the items he carries and the outcome of the purchase can itself can be modified by choices you make along the way (scroll to Dungeon Modifier Rewards for more info).
The highest upside rewards come from the modifiers that provide a Sealed affix. The Soul Gambler is the only way to get a Tier 5 Sealed affix on an item (aside from Experimental Affixes) which means these items have some of the highest overall Tier potential in the game.
Uniques
There are 4 different Uniques that Cremorus can drop, with different tier requirements for each:
- Ashes of Mortality drops from tier 1 and higher.
- Lich's Envy drops from tier 2 and higher.
- Immolator's Oblation drops from tier 3 and higher.
- Pyre of Affliction only drops from tier 4.
Dungeon Modifier Rewards
When running a Dungeon you stack modifiers that have both a positive and a negative effect. There are two sources of modifiers:
- Any tier of Dungeon beyond tier 1 has a modifier attached to it. This modifier changes daily. Consider saving some keys for a particularly good modifier that you can farm.
- Every door you open to move to the next part of the Dungeon adds a modifier. There are two doors in total, one to go from floor 1 to floor 2, and one from floor 2 to Cremorus.
Dungeon Modifiers
There are many modifiers that the player can encounter and all of them affect the inventory of the Soul Gambler. The first modifier increases the inventory of a certain item while the rest of the modifiers affect the quality of items. Higher tier Dungeons have better versions of the lower tier modifiers as well as new ones (See Difficulty for more info on tiers).
Floor 1
No modifiers
Floor 2
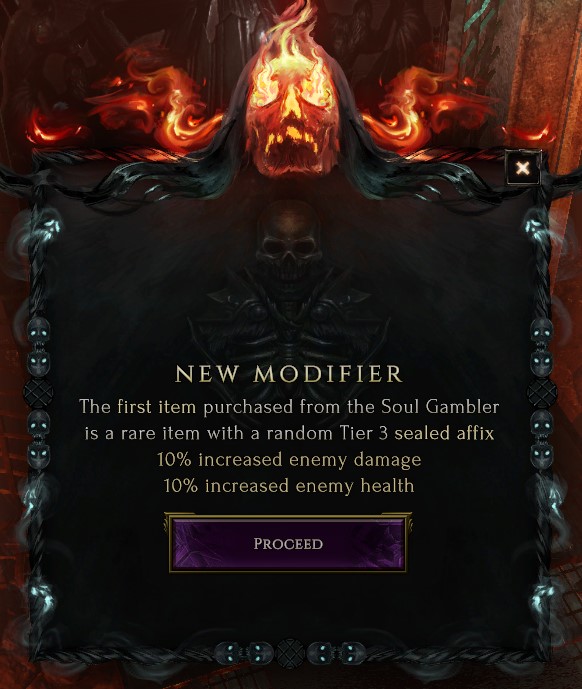
- The first item purchased from the Soul Gambler is a Rare item with a random Tier 3 sealed affix
- The first item purchased from the Soul Gambler has a 30% chance to be a Unique or Set item
- The first item purchased from the Soul Gambler has its soul ember cost refunded
- 10% of the soul cost of each item purchased at the Soul Gambler is refunded
- Rare items from the Soul Gambler have a random Tier 1 Sealed Affix
- 15% chance to refund the cost of each item purchased at the Soul Gambler
Floor 3
- Each non-exalted affix on an Exalted item from the Soul Gambler has a 20% chance to roll twice within in its range and pick the higher value
- The lowest tier affix of a Rare or Exalted item from the Soul Gambler has a 40% chance to gain a tier
Uniques from the Soul Gambler have a 10% increased chance to have at least 1 Legendary Potential - The lowest tier affix of each Exalted item from the Soul Gambler has a 40% chance to roll perfectly within its tier
- The lowest tier affix of each Rare item from the Soul Gambler has a 50% chance to roll perfectly within its tie
- The forging potential of each item from the Soul Gambler has a 20% chance to roll twice and pick the higher value
- Each implicit mod on a Rare or Exalted item from the Soul Gambler has a 15% chance to roll twice within in its range and pick the higher value
- Each affix on a Rare item from the Soul Gambler has a 20% chance to roll twice within in its range and pick the higher value
- Each implicit mod on a Unique or Set item from the Soul Gambler has a 12% chance to roll twice within in its range and pick the higher
Floor 1
- The Soul Gambler's inventory contains 2 additional axes
- The Soul Gambler's inventory contains 2 additional belts
- The Soul Gambler's inventory contains 2 additional body armours
- The Soul Gambler's inventory contains 2 additional pairs of boots
- The Soul Gambler's inventory contains 2 additional bows
- The Soul Gambler's inventory contains 2 additional catalysts
- The Soul Gambler's inventory contains 2 additional pairs of gloves
- The Soul Gambler's inventory contains 2 additional helmets
- The Soul Gambler's inventory contains 2 additional maces
- The Soul Gambler's inventory contains 2 additional sceptres
- The Soul Gambler's inventory contains 2 additional shields
- The Soul Gambler's inventory contains 2 additional staves
- The Soul Gambler's inventory contains 2 additional swords
Floor 2
- The first item purchased from the Soul Gambler is a Rare item with a random Tier 3 sealed affix
- The first item purchased from the Soul Gambler has a 30% chance to be a Unique or Set item
- The first item purchased from the Soul Gambler has its soul ember cost refunded
- 10% of the soul cost of each item purchased at the Soul Gambler is refunded
- Rare items from the Soul Gambler have a random Tier 1 Sealed Affix
- 15% chance to refund the cost of each item purchased at the Soul Gambler
Floor 3
- Each non-exalted affix on an Exalted item from the Soul Gambler has a 20% chance to roll twice within in its range and pick the higher value
- The lowest tier affix of a Rare or Exalted item from the Soul Gambler has a 40% chance to gain a tier
- Uniques from the Soul Gambler have a 10% increased chance to have at least 1 Legendary Potential
- The lowest tier affix of each Exalted item from the Soul Gambler has a 40% chance to roll perfectly within its tier
- The lowest tier affix of each Rare item from the Soul Gambler has a 50% chance to roll perfectly within its tier
- The forging potential of each item from the Soul Gambler has a 20% chance to roll twice and pick the higher value
- Each implicit mod on a Rare or Exalted item from the Soul Gambler has a 15% chance to roll twice within in its range and pick the higher value
- Each affix on a Rare item from the Soul Gambler has a 20% chance to roll twice within in its range and pick the higher value
- Each implicit mod on a Unique or Set item from the Soul Gambler has a 12% chance to roll twice within in its range and pick the higher value
Floor 1
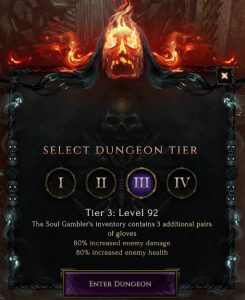
- The Soul Gambler's inventory contains 3 additional axes
- The Soul Gambler's inventory contains 3 additional belts
- The Soul Gambler's inventory contains 3 additional body armours
- The Soul Gambler's inventory contains 3 additional pairs of boots
- The Soul Gambler's inventory contains 3 additional bows
- The Soul Gambler's inventory contains 3 additional catalysts
- The Soul Gambler's inventory contains 3 additional pairs of gloves
- The Soul Gambler's inventory contains 3 additional helmets
- The Soul Gambler's inventory contains 3 additional maces
- The Soul Gambler's inventory contains 3 additional sceptres
- The Soul Gambler's inventory contains 3 additional shields
- The Soul Gambler's inventory contains 3 additional staves
- The Soul Gambler's inventory contains 3 additional swords
Floor 2
- The first item purchased from the Soul Gambler is an Exalted item with a random Tier 1 sealed affix
- The first item purchased from the Soul Gambler is a Rare item with a random Tier 4 sealed affix
- The first item purchased from the Soul Gambler has a 50% chance to be a Unique or Set item
- The first 2 items purchased from the Soul Gambler have their soul ember cost refunded
- 15% of the soul cost of each item purchased at the Soul Gambler is refunded
- Rare items from the Soul Gambler have a random Tier 2 Sealed Affix
- 20% chance to refund the cost of each item purchased at the Soul Gambler
Floor 3
- Each non-exalted affix on an Exalted item from the Soul Gambler has a 25% chance to roll twice within in its range and pick the higher value
- The lowest tier affix of a Rare or Exalted item from the Soul Gambler has a 60% chance to gain a tier
- Uniques from the Soul Gambler have a 15% increased chance to have at least 1 Legendary Potential
- The lowest tier affix of each Exalted item from the Soul Gambler has a 60% chance to roll perfectly within its tier
- The lowest tier affix of each Rare item from the Soul Gambler has a 70% chance to roll perfectly within its tier
- The forging potential of each item from the Soul Gambler has a 30% chance to roll twice and pick the higher value
- Each implicit mod on a Rare or Exalted item from the Soul Gambler has a 20% chance to roll twice within in its range and pick the higher value
- Each affix on a Rare item from the Soul Gambler has a 25% chance to roll twice within in its range and pick the higher value
- Each implicit mod on a Unique or Set item from the Soul Gambler has a 16% chance to roll twice within in its range and pick the higher value
Floor 1
- The Soul Gambler's inventory contains 4 additional axes
- The Soul Gambler's inventory contains 4 additional belts
- The Soul Gambler's inventory contains 4 additional body armours
- The Soul Gambler's inventory contains 4 additional pairs of boots
- The Soul Gambler's inventory contains 4 additional bows
- The Soul Gambler's inventory contains 4 additional catalysts
- The Soul Gambler's inventory contains 4 additional pairs of gloves
- The Soul Gambler's inventory contains 4 additional helmets
- The Soul Gambler's inventory contains 4 additional maces
- The Soul Gambler's inventory contains 4 additional sceptres
- The Soul Gambler's inventory contains 4 additional shields
- The Soul Gambler's inventory contains 4 additional staves
- The Soul Gambler's inventory contains 4 additional swords
Floor 2
- Exalted items from the Soul Gambler have a Tier 1 Sealed Affix
- The first item purchased from the Soul Gambler is an Exalted item with a random Tier 2 sealed affix
- The first item purchased from the Soul Gambler is a Rare item with a random Tier 5 sealed affix
- The first item purchased from the Soul Gambler will be a Unique or Set item
- The first 3 items purchased from the Soul Gambler have their soul ember cost refunded
- 20% of the soul cost of each item purchased at the Soul Gambler is refunded
- Rare items from the Soul Gambler have a random Tier 3 Sealed Affix
- 25% chance to refund the cost of each item purchased at the Soul Gambler
Floor 3
- Each non-exalted affix on an Exalted item from the Soul Gambler has a 30% chance to roll twice within in its range and pick the higher value
- The lowest tier affix of a rare or exalted item from the Soul Gambler has an 80% chance to gain a tier
- Uniques from the Soul Gambler have a 20% increased chance to have at least 1 Legendary Potential
- The lowest tier affix of each Exalted item from the Soul Gambler has a 80% chance to roll perfectly within its tier
- The lowest tier affix of each Rare item from the Soul Gambler has a 90% chance to roll perfectly within its tier
- The forging potential of each item from the Soul Gambler has a 40% chance to roll twice and pick the higher value
- Each implicit mod on a Rare or Exalted item from the Soul Gambler has a 25% chance to roll twice within in its range and pick the higher value
- Each affix on a Rare item from the Soul Gambler has a 30% chance to roll twice within in its range and pick the higher value
- Each implicit mod on a Unique or Set item from the Soul Gambler has a 20% chance to roll twice within in its range and pick the higher value
Dungeon Ability
Soulfire Shield is a Dungeon specific ability that allows the player to switch between Fire and Necrotic immunity. The dungeon is primarily themed around these two damage types so being in the right immunity can avoid all incoming damage from many attacks. This can also be used to avoid boss mechanics since Cremorus is also themed around the same two damage types (more in the Boss section). Using Soulfire Shield costs Souls which are acquired by killing enemies and also used to purchase items at the Soul Gambler.
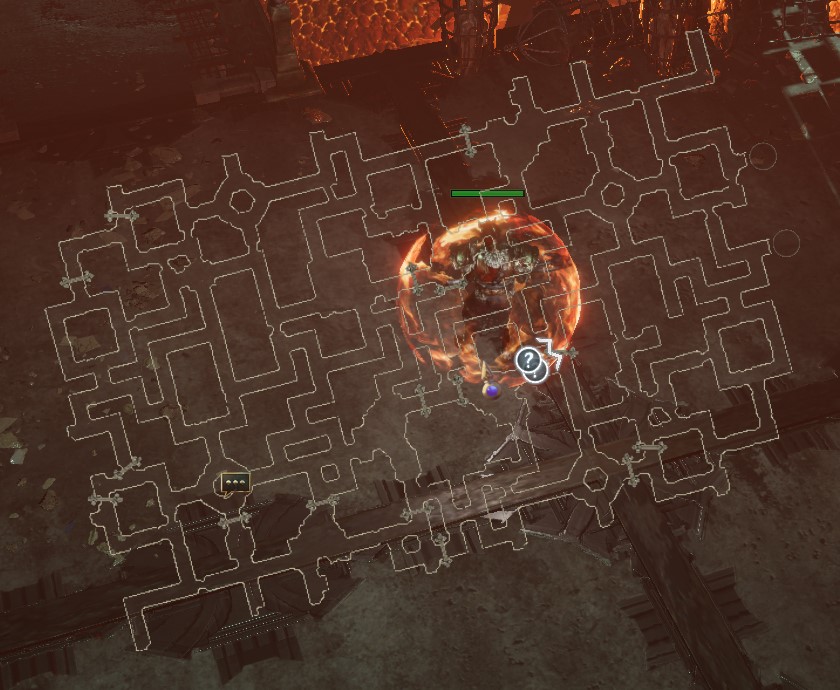
Layout
Soulfire Bastion has several map layouts, all with a somewhat rectangular shape. On top of the layouts all Dungeons have a system of pseudo randomized roadblocks. These change every Dungeon you run, and their purpose is to block some paths while leaving others open.
Enemies
Soulfire Bastion has several very dangerous enemies throughout the dungeon. To make matters worse, some of their mechanics are not immediately obvious and can lead to frustration for players who don't know what to look for. While Soulfire Shield can help, you need to choose which damage type to remain vulnerable to at any given time, so understanding the mechanics of these enemies is a must.
Difficulty
Difficulty scales through Dungeon Tiers and Modifiers. There's also an added layer of difficulty through the 'roguelike' aspect of Dungeons.
Dungeon Tiers
Every Dungeon has 4 tiers that you can choose from once they're unlocked. Tier 1 is available by default, and once you complete the Dungeon it unlocks tier 2, etc. Higher tiers have higher level enemies while also adding stronger modifiers. You also need to complete higher tier Dungeons to get certain Uniques from Cremorus as well receive better modifiers for The Soul Gambler (see Dungeon Rewards for more info).
Modifiers
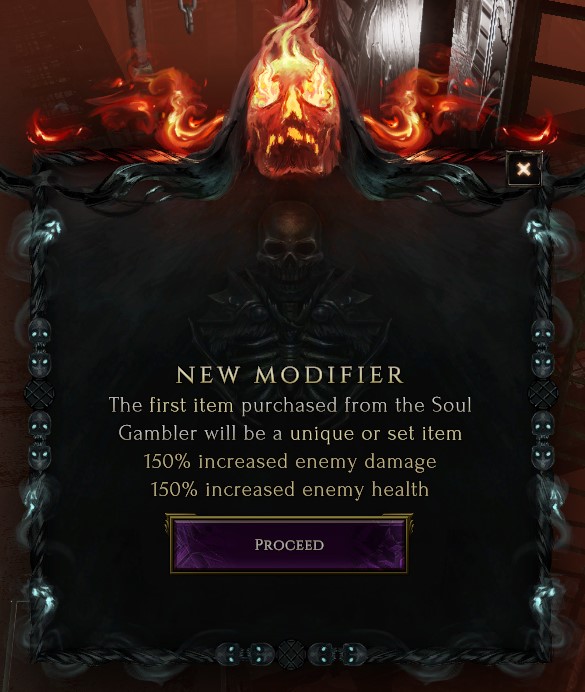
Selecting any Dungeon above tier one grants your first modifier. This modifier offers a certain reward, but also increases the difficulty of the Dungeon by adding Increased Damage and Increased Health to all of the enemies (including the boss). You also need to use two doors to progress through the Dungeon (one to go from level one to level 2, and one to go from level 2 to the boss room). Each door also adds a modifier to your run from that point forward, making subsequent rooms more difficult, but also more rewarding, than the previous room.
Lower tier Dungeons have small modifiers, while higher tier Dungeons get substantially more difficult. For example, the strongest modifier at tier 1 adds 30% Increased Health and damage to enemies, while the strongest tier modifier at tier 4 adds 180%. When selecting your modifiers in a Dungeon don't just pay attention to the rewards it offers, make sure you can also handle the difficulty scaling.
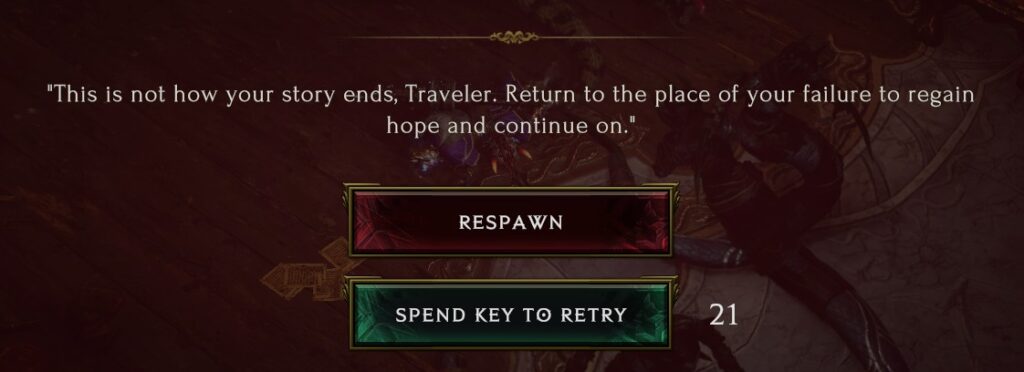
You only Get One Shot, Unless...
By default, there are no extra attempts in Dungeons. If you die at any point in the Dungeon, you are ported out of the Dungeon and lose all of your progress. However, if you have an additional Dungeon Key you can spend it for an additional attempt without losing your current progress. There is no limit to how many keys you can spend, so every key you have in your inventory is another attempt you can make.
Pre Boss Strategy
Unlike the other two dungeons, you always want to clear trash in Soulfire Bastion. Killing enemies drops souls which can be picked up and used at the Soul Gambler to purchase gear that has the potential to be very good. Exactly how much of the dungeon you should clear depends on the modifiers you receive and the number of purchases you want to make. As a general rule, killing more enemies is better since it will provide an opportunity to purchase more items for the Soul Gambler, so you typically don't want to rush this dungeon.
If you're just after the boss specific Uniques, then it may be best to skip directly to the boss. This can be accomplished by using a Portal Charm by placing it in the Dungeon entrance UI along with your key. If you don't have one, you can visit the Black Market Key Trader in Maj'Elka and spend three Dungeon Keys to purchase one.
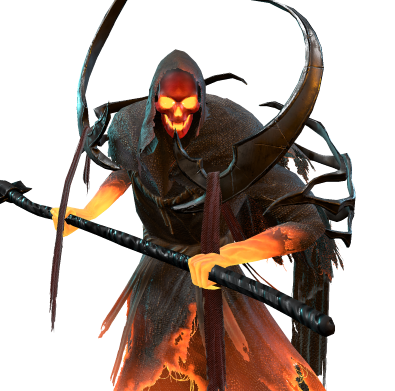
Boss - Cremorus
Cremorus has a full complement of skills that are generally broken up between fire and necrotic damage, which allows players to take advantage of the Soulfire Shield ability.
Mechanics
Boss Strategy
Cremorus is a single phase fight that gets progressively more difficult due to the floor becoming increasingly covered in a damaging effect that switches between Necrotic and Fire, eventually covering the entire floor and forcing players to use their immunity to avoid damage. This also creates scenarios where Cremorus uses an ability of the opposite damage type to the floor that is impossible to avoid for some builds, forcing those builds to tank the damage. For tier 3 and below this shouldn't be a problem as most builds can find enough defenses to mitigate the damage. For tier 4 we recommend using builds with:
- A movement ability that has an invincibility frame (i.e. Teleport, Shift with Shadowslip, Transplant, Lunge with Unstoppable and Paranoia). Sentinels can also use Rebuke to tank the damage.
- A Cleanse to deal with DoTs while switching. You can get this from either the Ward and Ailment Cleansing on Potion Use affix or skills like Shift with Molting). Potions are more readily available throughout the fights since they don't have a cooldown so the belt affix is preferred.
For builds that use Teleport, check out our Mage Build Guides.
For builds that use Shift, check out our Rogue Build Guides.
For builds that use Transplant, check out our Acolyte Build Guides.
The rest of the fight is relatively straightforward and once you get the hang of his abilities they should all be avoided with relative ease. Here are some useful tips for the fight:
- Once the entire floor is covered in the damaging effect be ready to switch immunities quickly. The floor does high damage and will kill almost every build at tier 4.
- When switching immunities keep track of debuffs and cleanse if necessary. Switching from Fire to Necrotic while being Ignited can be deadly.
- Avoid Incendiary Torrent. Even if you're Fire immune the Ignites can quickly kill a player who's switching during a ground transition.
- Avoid Disintegration. It does a lot of damage and also applies Marked for Death which increases the damage you take from all sources.
- When Cremorus summons a Thrall run from it until it explodes.
- Wall of Fire and Collapsing Decay can both be avoided with a movement skill that has an invincibility frame (i.e. Teleport, Shift with Shadowslip, Transplant, Lunge with Unstoppable and Paranoia).
Mastering the floor transition and keeping track of Ignites when switching from Fire to Necrotic immunity is the most difficult part of this fight. The right build can handle Cremorus with relative ease, but builds without a movement ability that has an invincibility frame and a Cleanse will always struggle unless they're exceptionally tanky. If you want to farm Tier 4 make sure to use a build that can handle the mechanics.
Summary
- Because the Soul Gambler is the only way to acquire Tier 5 Sealed affixes (aside from Experimental Affixes) it has the highest overall Tier potential in the game.
- The Dungeon Ability Soulfire Shield provides immunity to either Fire or Necrotic damage and is a necessary mechanic for defeating Cremorus.
- Enemies are especially dangerous. Be on the lookout for Immortal Incinerator, Searing Flesh, Possessed Construct and Possessed Golem.
- Dying in the dungeon causes the player to fail, lose all progress, and lose the Temporal Sanctum Key they used!
- Cremorus is a difficult fight for builds without an Invincibility Frame and a Cleanse.
- The keys to the fights are switching immunity to match the floor, avoiding high damage attacks like Wall of Fire and Collapsing Decay and using Cleanse to avoid switching out of Fire immunity while Ignited.
Credits
Written by McFluffin.
Reviewed by Facefoot, Lizard_IRL, Raxxanterax.