Hades 2 Beginner’s Guide
Last Updated:June 17, 2025|Changelog
This Hades 2 Beginner's Guide goes over everything you need to know to get started killing Time. The game drops you right into the action and then slowly reveals new areas and meta-progression systems to interact with. You don't have to learn everything at once, take your time and get comfortable with each system as it's introduced then, return later for more.
Hades 2 is currently in early access, as development continues expect new content and balance changes. Pin the guide to be notified of future updates.
First Steps
Hades 2 drops you right into the action, here are a few game systems to keep in mind as you take your first steps through Erebus. This section of the Hades 2 beginner's guide teaches you about Boons, combat, and exploration choices to arm yourself on your journey to defeat the titan Chronos.
Controls
These are the default controls, but Hades 2 supports key remapping.
Gamepad
- Attack - X
- Dash - A
- Cast - B
- Special - Y
- Hex - Right Trigger
- Interact - Right Bumper
- Movement - Left Thumb Stick
- Gift/Alter - Right Trigger
Keyboard & Mouse
- Attack - Left Click
- Dash - Space
- Cast - Q
- Special - Right Click
- Hex - F
- Interact - E
- Movement - WASD
- Gift/Alter - G
If you're struggling with the game, or just want to enjoy the story you can turn on "God Mode" in the startup menu.
Your First Boon
Various Olympians and Chthonic gods aid you on your journey. This help comes in many forms but the most common is Boons. By default, you encounter 3 Olympians within each run.
These Boons modify your Attack, Special, Dash, and Cast to change their properties in combat creating a build that feels unique to that run. Your Moves are affected by 1 Boon at a time, but you're able to take multiple passive Boons from each god.
As you progress in Hades 2, you gain access to more gods, a powerful Hex, and systems which offer synergy between your boons.
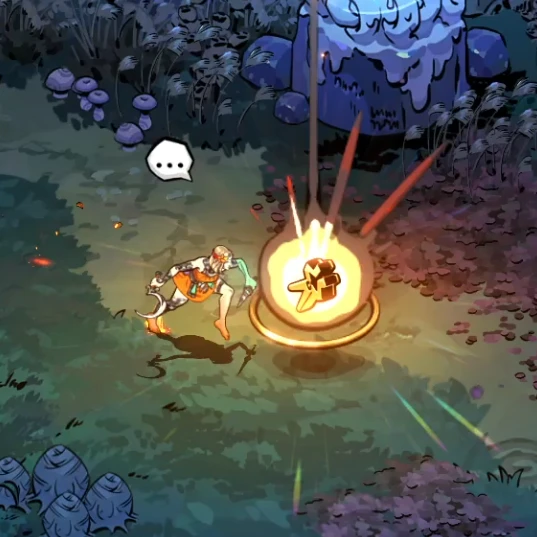
When you first encounter a new God, experiment a bit with their boons. This helps you get a feel for the playstyle each God enables so you can find something that you enjoy.
Combat Basics
You begin your first run with the Witch's Staff which is easy to use and beginner friendly. Combat consists of mixing your Attack, Special, and Cast to damage foes while using Dash and Sprint to avoid their strikes. In addition, your Attack, Special, and Cast have an Omega version which is charged by expending Magick for greater effect.
- Attack - Strike foes with your weapon executing a combo that ends in a more powerful finishing move.
- Special - The weapon's secondary attack covers for a weakness in the primary. Some examples include adding a ranged option, increasing your mobility, or blocking damage.
- Cast - Snare enemies in a radius around your location.
- Dash - A quick dodge with iframes, this recharges after a short duration, indicated by the green trail returning to Melinoe.
- Hold your Dash button to Sprint, this increases your movement speed enabling you to easily avoid enemy attacks but does not grant iframes.
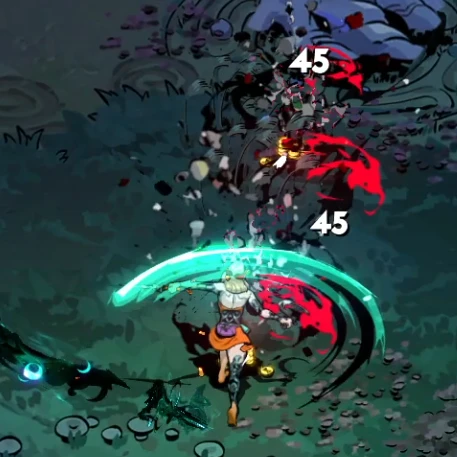
Your Attack and Special are unique to the weapon you use. Whereas, your Cast, Dash, and Sprint are shared across all weapons. After unlocking a weapon, try it out on Commander Schelemeus to get a feel for the move set. If you chain your Dash and then Attack, you get a special "Dash-Strike".
On the Witch's Staff your Attack is a combo that strikes in front of Melinoe, the special is a ranged projectile used to damage foes from a safe distance. Normally, your attacks interrupt enemies as you damage them but look out for Armored foes with yellow health bars. Armor protects an enemy from interruption and leaves them able to strike you as you're dealing damage.
Unlike in the original Hades, you cannot destroy enemy projectiles without the aid of a boon.
Exploration and Choice

As you explore, you're frequently offered choices. In this example, do you go left to face a mini-boss for a blessing from Demeter or to the right facing a mini-boss for a blessing from Poseidon? Some rooms only have one exit but many offer 2 choices. You need to balance your decisions between Boons, Coinage, or a Pom of Power which helps you progress within the run, or various resources used to advance your meta-progression across multiple runs.
Each region has a series of rooms including combat encounters, special events, Charon's shop, and mini-bosses. But they all end in a unique boss encounter, the first region of Erebus for example ends in a challenge against Hecate the Witch of the Crossroads.
Along the way, each region offers unique resources in the form of Ore/Stone, Flowers, Seeds, Fish, and Psyche which you use to progress the game's various systems and increase your odds of success on the next run.
The Crossroads
After each run, you return to the Crossroads. Here, you speak to various NPCs to advance the story while interacting with the game's various meta-progression systems to make your next trip down easier. There are 3 main areas, Melinoe's tent, the main room, and the training grounds where you set out for the next run.
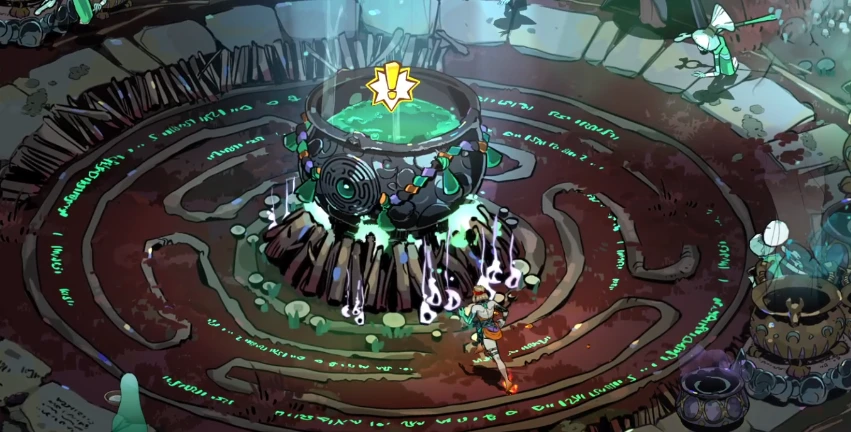
Early on you need to focus on the Cauldron and Arcana. But with each run, you gain new Incantations that unlock further meta-progression systems. Use the resources you gather to complete these Incantations.
Combat
Hades 2 takes the same combat formula from the original game and evolves it through the addition of Omega Moves. These require a charging time and consume Magick but do significantly more damage than the base version.
Weapons
- Witch's Staff - This weapon combines a series of close range strikes with ranged projectiles from the special to make a well rounded weapon. While these Moves have good range they lack AoE which is where the Omega Attack and Special come in, providing a linear attack and explosive projectile.
- Sister Blades - These two blades unleash a flurry of blows ending in a large slash. The special is a single thrown dagger used to deal damage at a distance. These blades excel at close range damage but the ranged special is clunky to chain. The Omega attack is a wide sweeping slash and the special throws a fan of knives that overlap at close range.
- Twin Flames - Use the dual wands to strike your foes from a distance. Your attack releases projectiles that bounce off terrain whereas the special creates projectiles that spiral out from your location. The omega attack launches a steady stream of projectiles, whereas the Special creates 2 orbiting projectiles that follow Melinoe.
- Moonstone Axe - Execute enemies with wide sweeping combos ending in a heavy overhead chop, the special creates a spectral shield protecting you from damage. The Moonstone Axe has an awesome Omega attack where you spin-to-win unleashing a flurry of blows for a short time.
- Argent Skull - This is the only weapon with an ammo system, you begin with 3 Shells used to execute your attack. Then the special is a charge, which deals damage to the side when charged. The omega attack fires a shell at range which explodes dealing damage in a large area.
- The Black Coat combines a punchy Attack that can block enemy strikes, with a ranged Special that fires rockets from a safe distance. This weapon is more difficult to play due to the limited duration of the shield from your Attack, but when executed well is incredibly satisfying!
Aspects
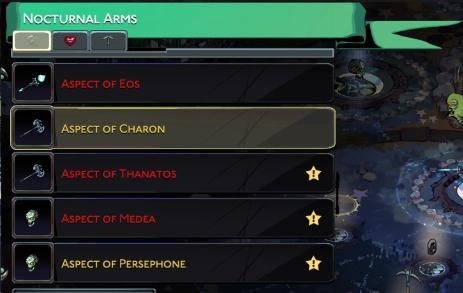
After completing the correct Incantation at the Cauldron in the Crossroads you unlock weapon Aspects. This invokes the memory of a previous wielder, modifying its move set to emulate their style. By default, you begin using the Aspect of Melinoe which is enhanced at the Silver Pool in the Crossroads.
For example, the Moonstone Axe's Aspect of Charon increases your cast duration by +3 sec and causes it to erupt dealing damage to enemies caught within the blast when struck by your Omega Special.
This lets you focus on damaging Casts or play a one-two punch playstyle where you drop your Cast on an enemy and then detonate it with your Special while blocking enemy attacks in the process.
Each of the Nocturnal Arms has a unique playstyle and each Aspect further modifies this to create a diverse range of builds. Unlock everything and experiment to find your favorite or check out our Weapon Overview to learn more about what's on offer.
Attacking
Whether you focus on your Attack or special depends on your weapon, aspect, boons, the enemies you're facing, and personal preference. Most of the time your bread and butter will be using a mix of both. Beyond that, look for openings to unleash powerful Omega Attacks and Specials to deal massive damage. Your cast is useful for snaring enemies, keeping them at a safe distance. The Omega version ends with a burst of damage. When an enemy counters, use your dash to avoid damage or sprint away to build distance and then counter attack from range.
Your attacks cause most enemies to flinch when they connect, interrupting their attacks. Bosses are unfortunately immune to this effect.
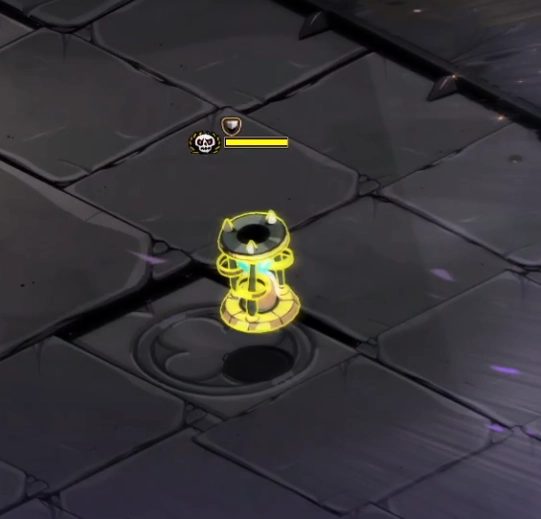
Keep an eye out for armored foes, and enemies with visible yellow health bars. Armor protects an enemy from damage and keeps you from interrupting their attacks until you break the armor.
If you're struggling against armored foes and bosses pick up Demeter's boon to inflict a freeze. This stops enemies from moving or attacking and greatly slows bosses.
Magick
The blue bar above your health represents Magick. This powers Omega Moves along with certain special effects from your Boons. To unleash your Hex, you need to expend enough Magick within an encounter. Magick does not regenerate naturally, but there are effects to restore it if you want to spam your Omega Moves within combat.
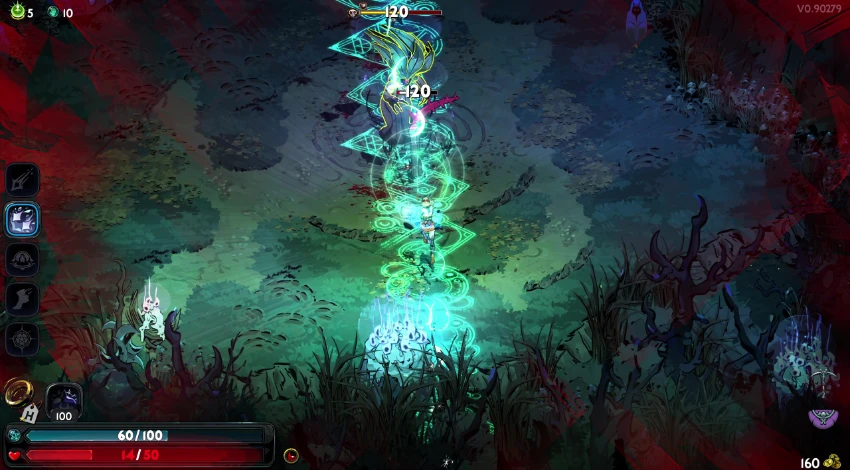
The Soul Tonic is a reward you find throughout your journey, it grants +30 maximum Magick. There are a variety of Boons and Arcana that interact with Magick and Omega Moves. The Sorceress Arcana is particularly helpful as it gives a time slow while you channel an Omega Move. This lets you use these Moves more easily within combat and unleash their significant damage potential.
Boons, Hammer, and Hex
There are 3 systems you interact with each night to further customize your build. Boons from the various Olympian gods, the Hammer of Daedalus which enhances your weapon's innate properties, and Selene's Hex which is further bolstered by the Path of Stars.
Olympian Boons
Whenever you encounter an Olympian, they offer you their Boon. Pick from 3 options to enhance your Attack, Special, Cast, Dash, or give yourself a passive bonus. Boons are cleared at the end of each run, so each time your build is slightly different. In this example, Volcanic Flourish enhances the Special, Smithy Sprint enhances the Dash and Fixed Gain is a passive.
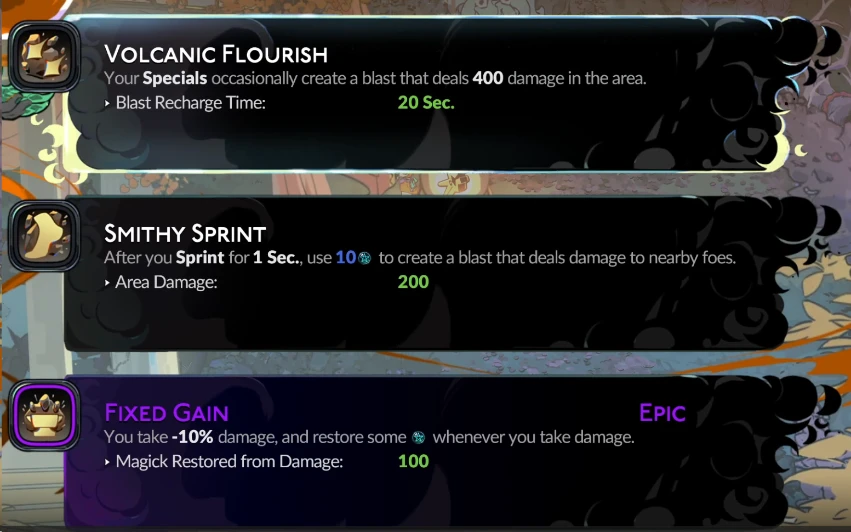
You can only have 1 Boon on your Attack, Special, Cast, and Dash but you can have as many passives as you want. Boons have different rarity tiers, Common, Rare, Epic, and Heroic. The higher a Boon's tier, the more potent its effects are. Each Olympian has their own unique theme. For example, Hephaestus offers proc based enhancements on a cooldown and interacts with Armor. On the other hand, Aphrodite offers bonuses against close enemies and allows you to inflict Weak on your foes, reducing the damage they deal.
Learn more about the Olympians and their Boons with our Boons and Gods Guide.
Special Boons
Legendary Boons offer special unique effects, a normal boon cannot be upgraded into a Legendary.
When you collect the favor of multiple Olympians, choose specific Boon combinations to access a special type of Boon called a Duo Boon. This triggers a synergistic effect when you combine statuses from two different Olympians. For example, a Hephaestus / Demeter duo Boon where your Blast effects clear the debuff left on an enemy after Freezing them so they can immediately be re-Frozen.
Once you unlock the Divination of the Elements Incantation, you reveal a Boon's elemental nature. Some Boons grant bonuses for having enough Boons of the same element.
Chaos Boons
In addition to the Olympians, Primordial Chaos offers you their Boons. These function a bit differently, first up you need to pay blood (health) to enter the realm of Chaos. Once you do, each Boon offers a bonus and a curse. You need to endure the curse for a set number of Encounters before the Boon transforms into a bonus. The passive bonuses from Chaos Boons are powerful but you need to carefully consider if you can endure the risk.
Hammer of Daedalus
Lastly, there's one more boon not tied to any deity, the Hammer of Daedalus. The Hammer offers bonuses that apply to and directly modify your equipped weapon's move set.
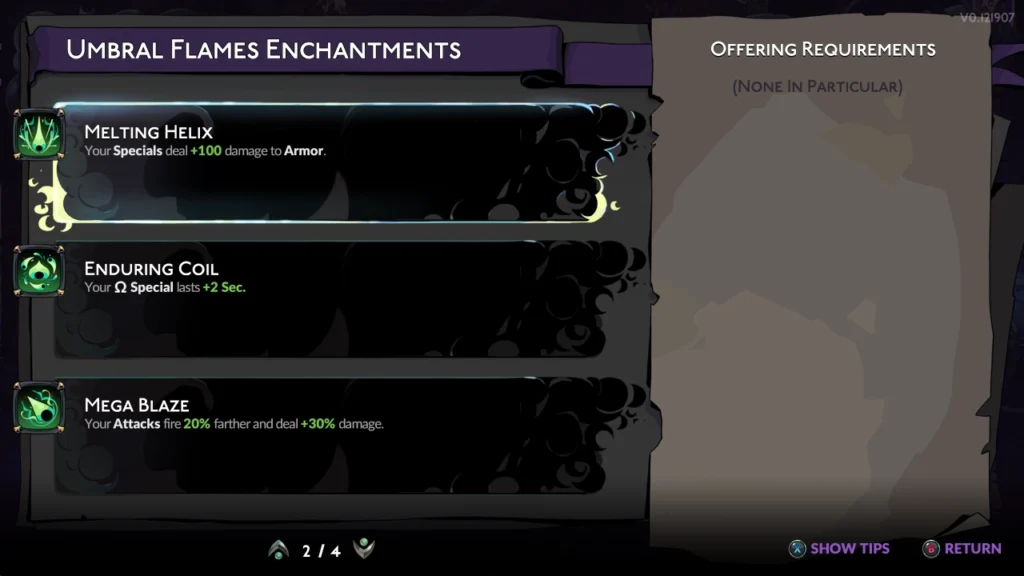
The bonuses offered by Daedalus are unique to each weapon. Some of them, transform a Move to make it vastly more powerful, others are numerical bonuses. In the example above, Melting Helix makes your specials more effective against armored foes, Enduring Coil increases the duration, making it easier to maintain, and Mega Blaze boosts attack damage and range.
Check out our Daedalus Upgrades Guide to learn more about the upgrades available.
Hex and Path of Stars
Each night when you interact with Selene, the moon goddess she grants you a powerful Hex. This is charged by spending Magick, once the icon fully illuminates you're ready to unleash its effects.
In this example, the Moon Water Hex restores 25 heath and stores 3 uses. Each time you interact with a Fountain these uses are restored. Health is a tightly controlled resource in Hades and this Hex helps you recover from your mistakes.
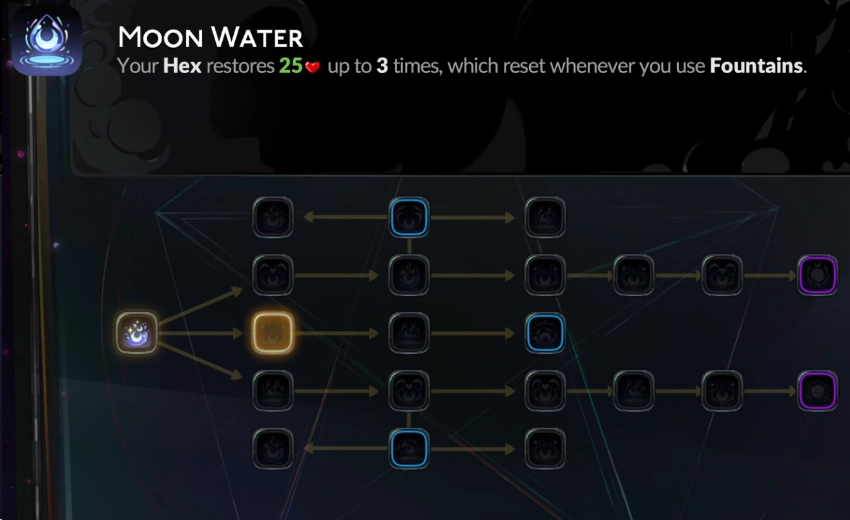
When you encounter Selene again, she grants you points to use in the Path of Stars. This is a series of bonuses which enhance your current Hex. The Path of Stars includes cost reduction, additional damage, or mechanical changes. For example, causing Fountains to give Moon Water uses each time, even when you already have 3, allowing you to stack them up for a tough fight. If you have a Keepsake or Boon from the compatible Olympian, you can also infuse their power into your Hex, creating a Godsent Hex.
Check out our Hex Guide to learn more about following the Path of Stars.
Exploration
Each run in Hades 2 is broken up into 4 regions. Each region is capped off with a boss. During the run, you need to gather Boons, Gold, and resources to prepare for the boss battle while conserving your precious health. Progressing in Hades 2 is all about balancing risk vs reward. You need bonuses that apply during the run like Boons, Gold, Poms of Power, and Health to increase your chances of success. But you need to balance this with gathering Ashes, Bones, and Nectar to advance the meta-progression systems.
As you explore, you encounter a variety of random events. Some of them are positive like Artemis coming to your aid in a tough fight. Others are more mixed, Nemesis shows up and sometimes helps you, sometimes challenges you, or steals your resources. Each region has a special NPC, all of them aid you in their own ways on your quest to defeat Chronos.
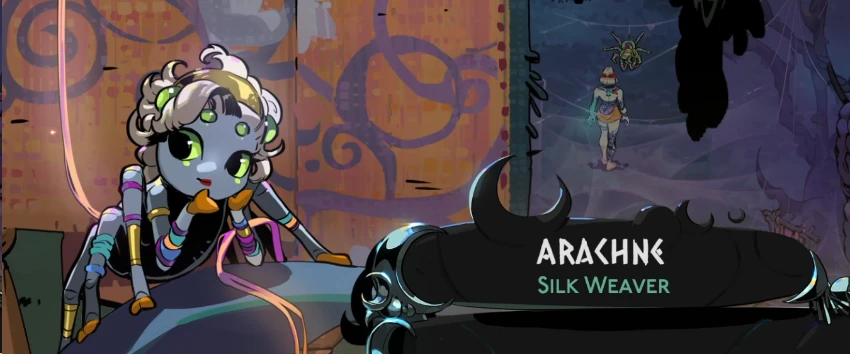
Charon's Shop offers you a brief respite from combat and the option to purchase valuable items. His shop appears twice in each region, once randomly and then a second time in the room before the boss. If you're low on Gold, take the other option but otherwise, Charon's Shop is a great way to grab a power boost right before a boss. You can unlock more systems at the Cauldron, adding healing fountains or the Well of Charon where you can spend Gold to purchase items that aid you on your journey.
Bosses and Mini-Bosses
Rooms marked with a Skull contain a mini-boss. These Armored enemies have their own unique move sets. This adds quite a bit of risk, so only enter the room if you're comfortable with your build and have health to spare.

Each region ends with a boss encounter. These boss fights are all unique and quite challenging. Bosses execute a series of telegraphed moves that you can practice and learn. If you fail against a boss don't worry, this is perfectly normal. Use some of your resources in the Crossroads to increase your odds of success next time.
Cauldron
Use the Cauldron at the Crossroads to cast Incantations, unlocking many of the game's other systems. You get these Incantations through repeated runs and by triggering certain events. This system allows Hades 2 to present a straightforward gameplay experience for new players. Then slowly, the mechanical complexity builds as each unlock gives you something new to interact with. If you find yourself unable to interact with something, it's probably locked behind an Incantation you haven't yet discovered.

To cast Incantations, you need materials. These are gathered by defeating enemies and with the tools from Night's Craftwork. There are 4 tools each of which gathers 1 type of resource.
- Pickaxe - Gather Ore and Stone.
- Tablet - Gather Psyche from Shades.
- Shovel - Dig up Seeds to plant at the Crossroads.
- Fishing Rod - Catch Fish that are sold for Bones.
Arcana
The Arcana cards are your main source of character-focused meta progression. They act similarly to the Mirror of Night from the original Hades. You spend Ashes to unlock the Arcana cards, then Activate them using Grasp. You increase your Grasp by collecting Psyche from shades. Some Arcana Cards cost 0, these activate when special conditions are met like activating cards with a cost of 1 through 5.
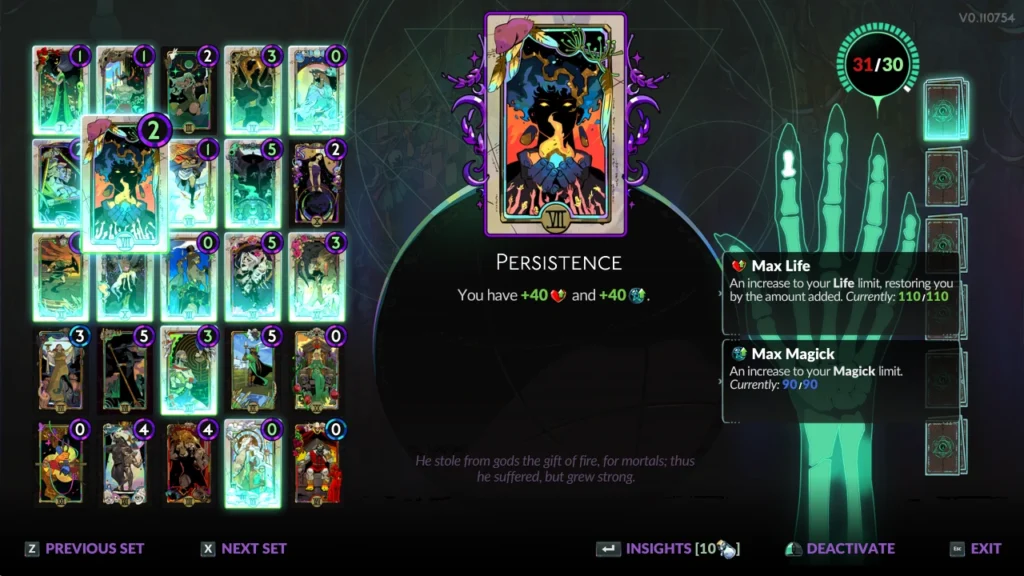
After completing the Consecration of Ashes Incantation, you gain Insight into your Arcanas. This allows you to spend M. Dust to further enhance the bonuses they offer. Unlocking all of the Arcanas, raising your Grasp and powering them up via Insight is a key step on the road to defeat Chronos. We recommend you start by activating the following Arcana Cards for a good early game experience. The grasp they consume is denoted in parenthesis next to the name.
- The Wayward Son (1)
- This provides a reliable trickle of healing which ensures you remain healthy for the challenges ahead. It's especially effective when you don't have much Grasp.
- Eternity (3)
- Makes it easier to pull off Omega Moves by slowing time while you channel.
- Persistence (2)
- Getting an additional +20 Maximum Life and +20 Maximum Magick significantly improves your baseline survivability. This can be enhanced with Insight to increase the bonuses to +40.
- Death (4)
- Death's Defiance restores you to 40% Health and Magick when you would otherwise die, giving you a second chance to persevere.
- The Unseen (5)
- If you want to make an Omega build and need a steady source of Magick Recovery this is one of your best options early on.
- Consider adding The Sorceress to make the channel faster too!
Check out our Arcana Guide to learn more about refining your Witchcraft.
Keepsakes
Give the gift of Nectar to the Olympians and various NPCs around the Crossroads to earn their keepsakes. Then, level the keepsakes up by using them each night to increase the potency of the bonus offered.
Don't mind their simple appearance, right now. Keepsakes have filler assets during Early Access. You can equip a Keepsake when you set out each night to gain a bonus.
With the Incantation Kindred Keepsakes, you can swap your Keepsake in the room between each region. Rank 3 Keepsakes offer powerful bonuses, swap them out often to maximize your advantage in the fight against Chronos.
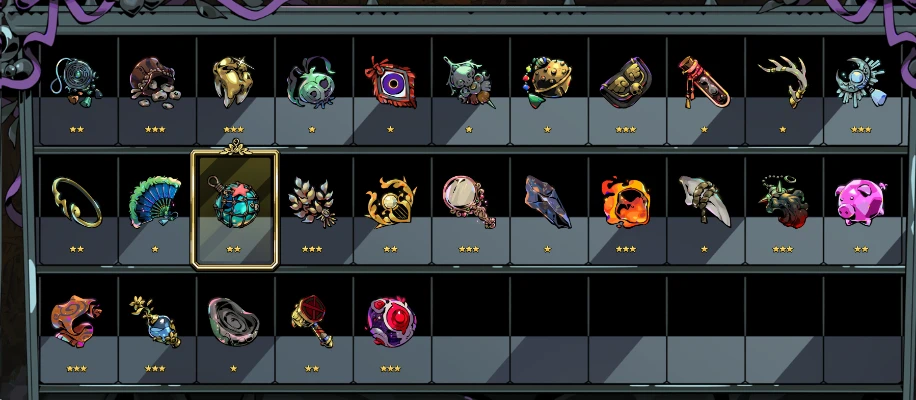
Keepsakes to obtain early:
- Luckier Tooth (Schelemeus)
- This acts as a Death's Defiance restoring you to a fixed amount of health when you would otherwise die. Equip it when you're progressing on a boss to give yourself another chance should you make a fatal mistake.
- Silver Wheel (Hecate)
- Raises your Max Magick making it easier to sustain Omega Moves without high regen.
- Gold Purse (Charon)
- Starting out with more Gold gives you more options. This bonus triggers when you begin a run so be sure to swap off of it afterward to maximize the value you get from your Keepsakes. This is nice to have when you don't need Boons from a specific Olympian at the start of your run.
- Knuckle Bones (Odysseus)
- A lot of your runs end due to a boss. So equip the Knuckle Bones once reaching a zone you've been struggling with. Depending on how much health you have and how many Death's Defiance, this may outperform Luckier Tooth.
- Transcendent Embryo (Primordial Chaos)
- Normally, obtaining a Chaos Boon means sacrificing your health but not with this Keepsake! Simply by equipping it you get a Boon of Chaos that rotates every few encounters, but if you get something you like near the end of a region you can unequip the Keepsake to keep the Boon for the rest of the run.
Check out our Keepsake Guide to learn more about the rewards for earning an Olympian's favor.
Other Systems
There are several other game systems unlocked at the Cauldron which are a bit outside the scope of this Hades 2 beginner's guide. Familiars give you passive bonuses, harvest some resources, and sometimes block enemy attacks. The Trials of Chaos are a series of challenge runs where you can push your Moves to the edge for unique rewards. Or you can journey into the overworld and attempt to fight your way through the armies of Chronos to reach Olympus itself. These are a few of the systems you experience as you continue to progress in Hades 2.
Video
Learn more tips and tricks with this video from Tenkiei.
Summary
Hades 2 is a character driven roguelike with a wealth of mechanical systems to interact with. This Hades 2 Beginner's guide covers the basics of combat, boons, exploration, Incantations, and more which you need to take your first steps into Erebus. As you continue to play, there's a wealth of systems that build on this foundation making the game more complex in an approachable manner.
Written by: Tenkiei
Reviewed by: Dredscythe
