Queen Bellandir Archboss Guide
Last Updated:April 17, 2025|Changelog
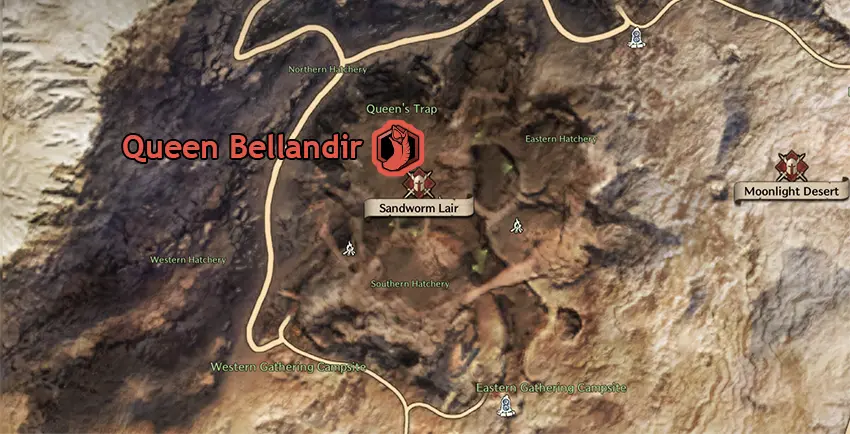
Queen Bellandir is the first Archboss unlocked through the Milestone system and is a level 50 gigantic worm that spawns in the Queen's Trap in the northwestern portion of the Sandworm Lair.

Location
There are two ways of reaching Bellandir's spawn. You can run southwest from the Ant Nest Waypoint or travel northwest from the Sandworm Lair Waypoint. She is scheduled to appear on Saturdays at 22:00 Server time. The event alternates as either a Conflict or Peace event every week.

Loot
Guaranteed Loot
- Conquest Participation Award: Queen Bellandir
Random Loot
- Queen Bellandir's Blade
- Queen Bellandir's Annihilation Crossbow
- Queen Bellandir's Domination Wand
- General's Charge Boots
- Ghost Wolf Stealth Boots
- Transcendental Wing Shoes
- Transcendent Magic Ring
- Queen Bellandir's Carapace
- Queen Bellandir's Abyss (only when raining)
- Queen Bellandir's Core
- Morrigan Raven
Mechanics
Bellandir's mechanics are not so complex once you understand them. Knowing the mechanics described below provides you with a huge advantage in eliminating your enemies using the boss's mechanics.
Fury Attack
- Pay attention to Bellandir's two Fury Attacks, which are frequently cast during the fight.
- If you fail to block one of her Fury Attacks, it grabs you and launches you into the air, dealing massive damage.
- The second Fury Attack is more dangerous as it one shots most players and deals massive damage to players.
- Both of her Fury Attacks are melee to mid range, so long range players hardly have to worry about them.
General Patterns
- When Queen Bellandir spawns, it stuns all nearby players for a few seconds.
- During the fight, Bellandir shouts inaudible words and then digs its head underground, spawning a massive Sandstorm that covers the majority of the arena and sucks players into the center. Do your best to keep away from the middle of the Sandstorm or try to run out of it, or else you get one shot once the mechanic ends.
- Throughout the fight, Bellandir also launches larvae, similar to the ones during the last boss fight of the Cave of Destruction, which latch onto randomly selected players. These players must run quickly away from their teammates because the Worms explode, one shotting most players caught in the AoE.
- Pay attention to when Bellandir is about to hit 10% health as it leaps into the air and land, dealing massive damage to everyone within melee range.
Tips
- Bellandir poisons everyone in the arena throughout the fight with a strong Poison DoT. When you are hit with the DoT, use the Queen's Venom Neutralizer to cleanse it quickly. This mechanic happens quickly and also includes a brown shockwave or blast to help notify you of the mechanic.
- Have at least 20 to 40 Queen's Venom Neutralizer to be prepared for Bellandir. Purchase them from a Guild Merchant using your Guild Coins.
- When Bellandir spawns, an AoE stuns all nearby players so take advantage of this opportunity to quickly kill enemies and reduce their damage output on the boss.
- During the Sandstorm, players who didn't get out in time are forced to morph and try to keep as far away from the center. Use ranged abilities to secure easy kills on these players.
- If a Worm latches on to you, use them to blow up enemy raids and thin their numbers.
Credits
Written by Eli
Reviewed by Yaen