Delve Farming Guide
Last Updated:January 30, 2025|Changelog
In this guide you will learn how farm Delve to maximize your rewards and profitability. This guide assumes you know the basics of Delving in Path of Exile, if you need a refresher check the community Wiki.
Farming Delve differs from most other mechanics in that your time spent farming is outside of Maps. This means that your Atlas Passive Tree can help with Sulphite Generation and provide extra Azurite while you collect Sulphite to Delve, but doesn't contribute to rewards within the Delve itself. The deeper you go into the mine, the greater the rewards, and the more dangerous enemies become. If you want to farm Delve, you should get to a depth of at least 500 but deeper is better. Just remember that it's not efficient to go so deep that you consistently fail nodes, so know your limits and don't be afraid to delve sideways if you run up against your build's current limit.
Mechanics
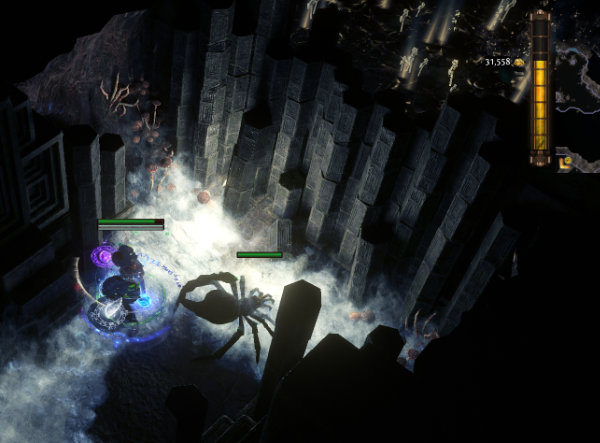
The way you approach Delving as a whole, differs from the way you approach an individual node. In most cases, Delve encounters are a variant on the "King of the Hill" formula where you follow the Crawler to an end point then survive a short battle. If you're completing an Azurite Node for example, you want to avoid puddles on the ground, kill all enemies, fight the boss (on tier III), and then collect the loot.
Special Fossils
These come from special encounters, one for each Biome. Encounters like this often spawn behind Fractured walls so keep an eye out for them on your map.
- Haunted Tomb (Fungal Caverns) - Tangled Fossil.
- Begin the encounter to release the spirits of Tormented Miners.
- Slay these along side a few skeletons to spawn the Awoken Giant.
- This encounter is easy but unrewarding.
- Stonewood Hollow (Petrified Forest) - Bloodstained Fossil.
- Hit 4 levers to fight resurrected Vaal enemies, at the end there's a boss you need to defeat for the Fossil.
- This encounter takes a long time, and the Fossil price rarely justifies the time spent.
- Crystal Spire (Abyssal Depths) - Hollow Fossil.
- This node contains a Stygian Spire and some Abyssal monsters, defeat them then collect your fossil.
- Keep an eye out for stragglers!
- Time-Lost Cavern (Frozen Hollow) - Glyphic Fossil.
- Click the pillar in the center of the room to activate multiple Possessed Essence monsters.
- This encounter can be quite dangerous depending on the exact modifiers the monsters bear.
- Molten Cavity (Magma Fissure) - Faceted Fossil.
- Enter an area guarded by a magma-themed version of Izaro's pet, Argus.
- Try to kill Argus at range because few builds have the defenses to withstand his attacks.
- While extremely dangerous, this is well worth it.
- Humid Fissure (Sulphur Vents) - Fractured Fossil.
- Encounter Petrified remnants guarded by a Gorgon type enemy along side various elementals.
- Defeat the Gorgon to stop the waves of enemies from spawning, and then collect your Fossil.
Cities
When running a City Node, run to the end point (looking for Fractures Walls along the way) then enter the city itself. The chests located on the far Left, and Right contain a bulk of the profits. Stand on the Circular floor panels to light up an area, or toss a few flares to go faster. Keep an eye out for various Boxes like Abandoned Charts as they contain Maps or other rewards. Primeval Ruins rarely contain a box full of Azurite, these are extremely valuable and make Primeval Ruins the most desirable city.
- Primeval Ruins - Azurite, Currency and Maps.
- The enemies contained within are more dangerous than the other cities, but with increased risk comes increased rewards.
- Aul the Crystal King - Unique Items and Divination Cards.
- Aul has extremely high Cold damage, be careful of his Shield Charge breaking Cocoons around the room.
- Break too many and he unlocks a special move transforming the fight into a bullet hell!
- If you're struggling, use Dynamite to stun him interrupting his attacks.
- Abyssal City - Currency and Maps.
- Don't worry about killing enemies, just rush the chests and get out.
- Kurgal the Black Blooded - Unique Items.
- Be aware of Kurgal's Physical and Chaos DoT damage.
- When fighting him keep track of which pillars are active and avoid the explosions when he activates them.
- His second phase is dangerous but you can avoid most of the damage by moving behind him when he raises his arms.
- Vaal Outpost - Currency and Maps.
- Most of the Vaal enemies aren't too dangerous, but be sure to avoid the telegraphed Flicker Strike from the Enhanced Vaal Fallen.
- Ahuatotli the Blind - Unique Items and Vaal Aspect.
- Make sure you have a way to deal with Ahuatotli's Physical damage.
- Move in circles to avoid most of his abilities.
- Take special care to avoid the Bleed-Lasers during the transition phase.
- This boss is relatively easy, especially at lower depths, and highly rewarding as he sometimes drops Doryani's Machinarium.
Specialty Nodes
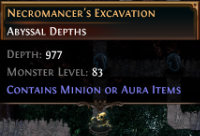
A variety of specialty nodes appear in your Delve. These are of particular note early in a league due to offering items with drop only affixes including "Subterranean" Prefixes, and "Of the Underground" Suffixes. To find one on your map, look for nodes marked as "Contains ___ items." Early in a league "Contains Minion or Aura Items" and "Contains Chaos Items" are often particularly valuable. But nodes which contain Fire, Cold, Lightning, Physical, and Mana or Curse items can also be worth chasing to get items with Fractured drop only modifiers.
These Specialty Nodes consist of an encounter against a few enemies, and sometimes a mini-boss. After that you get to open a series of chests which may contain valuable items. If you see one of these icons on your Delve Chart, then it's probably worth the Sulphite to go investigate. But these nodes aren't your biggest priority so don't worry about exploring just to find these. Early league, Specialty Nodes are a great source of Curse on Hit rings that sell very easily, later in the league they have big drops in the form of Fractured items. So don't give up if the first couple aren't rewarding! Remember, big drops are really fun but a majority of your profits come from the accumulation of smaller items!
How To Run It
When Mapping you need to collect Voltaxic Sulphite to power the Crawler in Niko's mine. If you want to focus exclusively on Delving you should ignore regular monsters in the map, click the 3 Voltaxic Sulphite piles then leave and start a new one. But it's more profitable to farm Delve along side other league mechanics as part of your mapping strategy. In which case you want to use Packed with Energy to make it easier to clear the rest of the map or deal with dangerous Rare monsters tied to other League mechanics.
First - Run the map normally until you encounter a pile of Voltaxic Sulphite.
Second - Clear all monsters surrounding the area (pay close attention to monsters from Guarded Hoards which grant Sulphite).
Third - Click the Voltaxic Sulphite.
Finally - Return to running the map normally.
Within the Mine
Start by delving down until you reach a depth of at least 500. After that keep an eye out for Molten Cavity, Specialty Nodes, and of course Cities. Primeval Ruins are the best but Vaal Outposts and Abyssal City are also highly profitable. When looking at your Subterranean Chart and deciding where to go use the following steps to guide you.
First - Look for a nearby City biome, especially one with a boss.
Second - If there aren't any cities, look for Specialty nodes to collect Rare Fossils or Nodes that offer rewards such as "Contains Minion Items" or "Contains Physical Items"
Finally - Pass through a Biome with good Fossil rewards such as Fungal Caverns or Petrified Forest grabbing Tier 3 Azurite, Currency, and Atlas Nodes along the way.
Fractured Walls
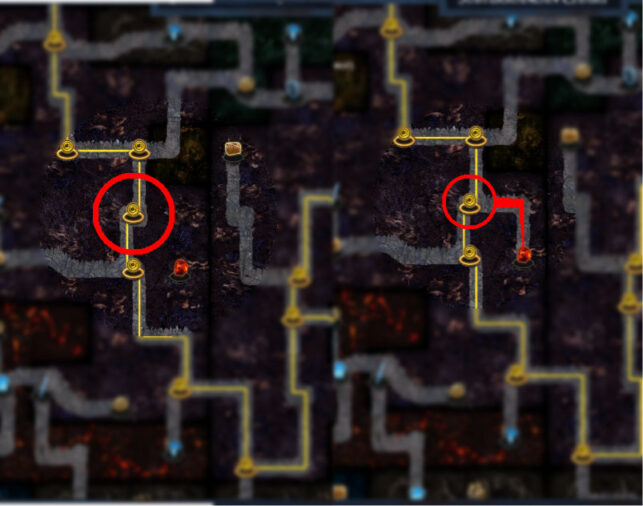
As you're delving, be careful of ranged enemies hiding in the Darkness. Be sure to liberally use your Flares to illuminate the area and Dynamite to break Fractured Walls or stun tough enemies. Fractured walls usually appear at junctions where the path branches off and contain Fossils or Chests which offer Currency, Resonators, and Unique items.
This requires heading off into the Darkness, so an expanded Flare capacity or excellent recovery is useful. Some nodes are located behind Fractured Walls as demonstrated in the image to the right. The rule of thumb is that Nodes have 1, 3, or 4 connections and not 2 so if you see something connected to 2 other nodes that's a huge tip off to look for a Fractured Wall.
Look For These

When Delving, many of your most exciting drops like Aul's Uprising come from bosses but these are quite rare. Therefore you need consistent profits from collecting Azurite to turn in for Resonators, Currency, and Maps. Don't forget to upgrade your Sulphite Capacity!
As you're Delving keep an eye out for the following nodes; Azurite Fissures, Contains (type) Items, Contains Maps, Time-Lost Cavern, Molten Cavity, Crystal Spire, The Grand Architect's Temple, and The Crystal King's Throne.
As you delve deeper into the mine these nodes appear more frequently. This is why deeper is better, just know your limits. When you find yourself frequently failing nodes, or become concerned about modifiers that means it's time to backtrack for a bit, and farm some currency to improve your build. Once you're comfortable with the level of rewards from your Depth, you Delve sideways grabbing valuable nodes along the way.
Atlas Passives
Atlas Passives do not apply within the mine itself, but they're incredibly useful when gathering Sulphite, so pay attention to the following Notables. This mechanic doesn't require a lot of Atlas Passive Points and combos well with "Rush" strategies.
- Sulphite Infusion
- Allocate this for 500 Voltaxic Sulphite on Red Map completion.
- The more Sulphite you have, the more time you get to spend in the mines!
- Mining Byproducts
- Exchange your Azurite for Primitive Chaotic Resonators and sell them in bulk for profit.
- There are 3 piles of Sulphite in your map, so this provides a small but steady stream of profits.
- Guarded Hoards
- Is not as important to the strategy, but still nice if you have the spare points.
- The Delve Sulphite Quantity nodes before it provide Sulphite which is quite nice.
- Packed with Energy
- Should always be taken! It's only 2 Atlas Passive points and helps you complete maps faster.
- You get up to 45% Movement speed, which is essentially a free Quicksilver Flask for the rest of your map!
- Frantic Mining
- Getting 100% chance for Maps to Contain Niko is possible.
- This is good if your goal is to focus exclusively on Delving and ignore Maps.
- These nodes can be replaced with a Sulphite Scarab if you wish to mix Delve into other strategies.
- The Price of Progress
- Adds a special Ghost which gives a reward.
- Not crucial to farming Delve but can be taken if you're not mixing Delve into other strategies.
Scaling Loot
Encountering Niko
Niko is the mad master in charge of Delve. His missions spawn piles of Voltaxic Sulphite within your Map. Remember that Sulphite values scale based off of Map tier, encountering Niko in lower tier Maps is less valuable than higher tier Maps.
Multipliers
Increased Item Quantity - A Map's Quantity bonus scales the amount of Sulphite you receive so rolling your Maps for Quantity is important. On the other hand, player Quantity does NOT scale your Sulphite. You get a Sulphite bonus from Party Quantity as well, but Sulphite is split between all party members in the instance.
Increased Item Rarity & Increased Pack Size - These multipliers do not scale the amount of Sulphite you get within your maps, this might be important for the additional mechanics you add but doesn't matter for Delve.
Scarabs
- Sulphite Scarab
- Sulphite Scarab of Greed
- Sulphite Scarab of Fumes
When maximizing Delve, use Sulphite Scarab of Greed for 150% more Sulphite per Map. If you plan to mix Delve into another farming Strategy, you may need to use a Sulphite Scarab to ensure Niko appears on every Map.
Allflame
In addition to Scarabs you can use the Allflame Ember of Sulphite to gather Sulphite more efficiently from your Maps.
Map Choice
If you're only farming Delve, then look for maps where you can quickly collect Voltaxic Sulphite while ignoring monsters. Otherwise, run whatever Maps are optimal for the other mechanics you're engaging with.
| Toxic Sewer Map | This is a small layout that's easy to run making it quick and easy to collect Sulphite. |
| Atoll Map | Sulphite is very likely to spawn near the central hub making it easy to collect. |
| Strand Map | It's fast and running in a line is easy. |
Selling Your Loot
Here are the drops you can expect to acquire with this strategy, as well as some advice on how to sell them effectively and quickly. Follow our Bulk Selling guide to learn more.
Fossils are best sold in bulk, pay close attention to the *Hot* fossils as those are particularly valuable in most league economies. Fossils marked with *Low* on the other hand, tend to be extremely common or aren't useful for crafting and you shouldn't go out of your way to obtain them.
Common Fossils
- Aberrant Fossil
- Aetheric Fossil
- Bound Fossil
- Corroded Fossil
- Deft Fossil
- Dense Fossil
- Frigid Fossil
- Jagged Fossil
- Metallic Fossil
- Perfect Fossil *Hot*
- Prismatic Fossil
- Pristine Fossil
- Scorched Fossil
- Serrated Fossil
- Shuddering Fossil
Rare Fossils
- Fundamental Fossil
- Gilded Fossil
- Lucent Fossil
- Sanctified Fossil *Hot*
Special Fossils
- Bloodstained Fossil
- Faceted Fossil *Hot*
- Fractured Fossil *Hot*
- Glyphic Fossil *Hot*
- Hollow Fossil
- Tangled Fossil *Low*
Break walls and spend Azurite to obtain Resonators.
- Primitive Chaotic Resonators (Use your Azurite to purchase more.)
- Potent Chaotic Resonators
- Powerful Chaotic Resonators
- Prime Chaotic Resonators
Here are some common drops from Delve which you should sell:
- Tier 14+ Maps drop commonly when delving and should be sold in bulk.
Check the price of all items with "Subterranean" and "of the Underground" modifiers. You can see this with Advanced Mod Descriptions. Fractured versions are often extremely valuable, here are a few examples;
- Curse on Hit rings (Amethyst Ring)
- Special Minion Gear (Vaal Regalia, Slink Gloves)
- Phys Taken as Helmets (Samnite Helmet)
- Minion Damage Rings (Unset Ring)
Price check Unique items and Keys dropped by bosses, here are a few examples of especially valuable drops;
Delve Rings
- Uzaza's Valley dropped by Aul is used to make the Precursor's Emblem Unique Ring, and often sells for a high price when Frenzy Charge modifiers are desirable. Note: prices on this item are highly unstable.
- Uzaza's Mountain dropped by Kurgal also sells for a high price when Frenzy Charge modifiers are desirable.
- Other rings include:
- Uzaza's Meadow
- Putembo's Meadow
- Putembo's Mountain
- Putembo's Valley
- Ahkeli's Meadow
- Ahkeli's Mountain
- Ahkeli's Valley
Valuable Uniques
- Aul's Uprising dropped by Aul can be extremely valuable, but like with a Watcher's Eye rolls a random Aura. Therefore it's safest to sell this Unidentified, instead of gambling on what could be 20 Chaos Orbs or 20 Divine Orbs.
- Crown of the Tyrant dropped by Aul is often valuable near the start of a League, but its value tends to drop later on.
- Doryani's Machinarium dropped by Ahuatotli is highly valuable and used to create Doryani's Delusion.
- Curiosity, Vaal Aspect dropped by Ahuatotli is one of the 4 Aspects used to create the Adorned.
Divination Cards
- Desecrated Virtue and Luminous Trove dropped by Aul are valuable Divination cards.
Filtering
Make sure all Fossils, Resonators, Boss Uniques, Maps and identified Rare items are visible on your filter.
Credits
Written by Tenkiei.
Reviewed by Crouching_Tuna, Facefoot