Once Human Beginners Guide
This Once Human beginners guide covers general mechanics and tips about character creation, tutorials, starter weapons, territories, navigating UI menus, and more. Once Human stretches across many genres and therefore comes with a lot of mechanics that players might be unfamiliar with. With several different crafting benches, upgrade options, ways to obtain blueprints, endgame content, and survival aspects it is tough to keep track of everything going on. Not to mention the number of menus and key binds to get to everything. There is twenty years of stardust pollution to cleanup so there is no time to waste getting lost in all the UIs.
Server Selection
There are two different types of servers to choose from, PvE and PvP. Once Human is mostly a PvE game with optional PvP for certain events or areas. Although on PvP specific servers you have more options to fight with other Meta-Humans for loot and resources. PvE servers have Meta-Humans working together to defeat difficult enemies in Prime Wars and other world events. Metas in the PvE server gather materials then combine resources to craft ammo, molotovs, and missiles in preparation for Prime Wars. Prime Wars are 40+ players defending a Starroid Restrainer from being destroyed by a powerful boss. Everyone on the server has access to build in the Prime War area and anyone can show up till the player limit is reached.
Worlds
Each server is separated in several worlds to leave enough room for all players territories. If you are on a different world from other players then you wont be able to see them. However you can switch between worlds freely. Resources are separate between worlds as well, meaning you can farm them on one world and then swap to another world to farm them again.
Playing With Friends
You need to be on the same region, server, and server type to play with your friends. You also need to be sure you are in the same world after completing the tutorial. The world you're in is located in the top right above the minimap. You can join the same party but if you aren't in the same world then you can't see each other. Head to a teleport tower either in the open world or at a settlement to swap to the same world. For more details on how to play with your friends be sure to check out the How to Team Up in Once Human guide.
Character Creation
Once Human has extensive character creation options. You have plenty of presets to choose from and even more sliders to customize your appearance. Tall, short, fat, skinny, big nose, small ears, pointy chin… everything is possible. Feel free to get creative and make some unique meta-humans.
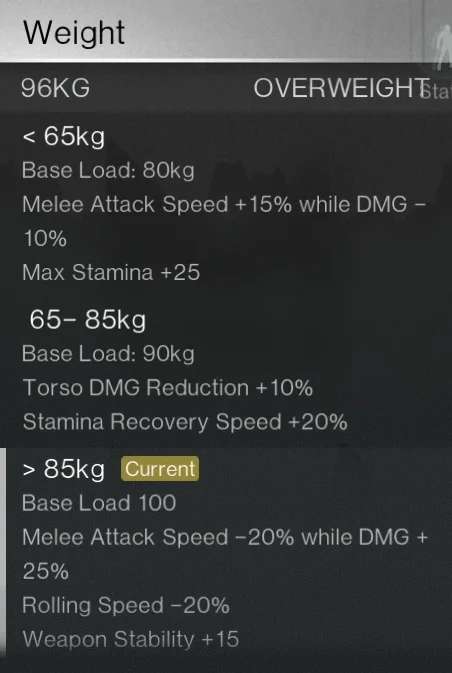
One important thing though, when choosing the weight of your character be sure to check out the player indicator in the bottom right to see what benefits and downsides each tier of weight has. If your character is overweight then your roll speed is reduced, but recoil control is better. There are ways to increase and lose weight after character selection if you want to change later.
Tutorial
The tutorial does a great job of showing you the ropes. Once you get to the house with Mitsuko you have to go collect materials and learn how to craft. This zone is still a tutorial zone but it happens to have an abundance of resources. After you get the Crude Pickaxe it wouldn't hurt to go around the zone and collect some extra materials before continuing. It has plenty of wood, gravel, copper, and water for you to collect. Rushing past the tutorial leads you to dropping into the open world and needing the materials anyway. So stock up before you fight the final tutorial boss.
Landing Spot
Upon finishing the tutorial you are sent flying above the starter zone in Nalcott. You can open your map by pressing "M" and mark anywhere or anything by right clicking. You should be above a ruined monolith. It looks like a giant tower sticking into the sky. The first few quests are in this area so it's a good idea to land near it and follow the main quest from there.
Main Quest
The main quest acts as a continuation of the tutorial as you explore Nalcott. If you don't follow the main quest certain content is locked so it's recommended that you stick to it. The general loop of the main quests is to fight a ghost of a boss. Then activate rift anchors to gain access to the real boss fight, in a monolith. After defeating the boss you go to the next region and repeat. When sent to activate the rift anchors you are free to activate the ones you want, as long as they are in the right region. Be sure before you enter a monolith boss fight, you teleport back to your base and stock up on ammo and meds. There is always a teleporter in the area next to a monolith.
Meyers Market
After killing the first boss in the main quest you head back to Deadsville to let everyone know and then travel to Meyers Market. Meyers Market is the second settlement and is where you meet Maxie. When you arrive at the town you talk to Maxie near the entrance and she unlocks the Cradle Override for you. The Cradle is your backpack that you hold combat Deviations in as well as socketing powerful passive buffs into it. These powerful passive buffs unlock by leveling up your character with crafting, challenges, and quests throughout Nalcott. The Cradle Override slots are unlocked by defeating monoliths and silos. Access the Cradle Override by pressing "O". For a more in depth look at the Cradle Override have a look at the Cradle Override Guide. Don't forget to check your Cradle Override again after defeating new monoliths or silos to add another powerful passive buff to your character.
Your Territory
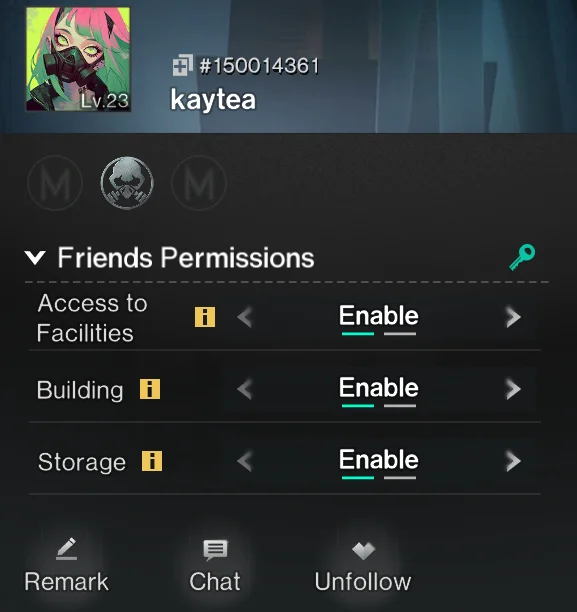
The main quest has you place your territory when you land in Nalcott, but don't worry you can move your base at any time to a new location. You can also give permissions to your friends to use your crafting benches, storage, and even build in your territory. To do this add your friend and then in the friends list click their name and enable the permissions you want.
You can also move your base across the map and to different worlds. To move your base press "B" from anywhere in Nalcott and then press "Z". This shows you a blueprint of your base that you can move around, raise, lower, and rotate until it's in the spot you want. There is a ten minute cooldown on this feature. To get a more in depth look at how to move your base and where you might want to put it, take a look at the How to Move Your Base guide.
Status Indicators
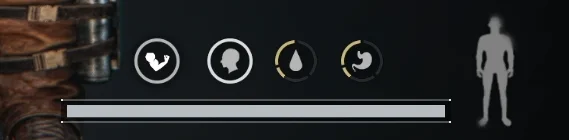
The four survival status indicators are located just above your health bar in the bottom middle of your screen. They are stamina, sanity, hydration, and hunger. While in your inventory screen they are in the bottom right and you can hover them for more info. You can also see the weight of your character and any whims affecting you there. Whims are special negative or positive effects on your character which can be applied from low sanity or from Deviation elixirs.
Health
Your health is the white bar at the bottom of the screen. To heal up your health bar you can use Activators or sleep in a bed. Activators are crafted in the supplies workbench and the starter Activators heal you for 50%. Sleeping in a bed slowly heals your character and bigger beds heal you faster. You can buy bigger beds from vendors in settlements.
Stamina
In Once Human stamina is incredibly generous. You use stamina when you sprint, chop trees, mine ore, and roll. For sprinting, chopping trees, and mining ore stamina drain isn't that noticeable. However rolling does take a good chunk of stamina. Stamina regenerates quickly and you can make meals using deer or rabbit meat to increase it temporarily. The weight of your character also effects stamina so be sure to check your weight bracket in the bottom right of your inventory.
Sanity
Stardust pollution is all around Nalcott and makes it hard to stay sane. Eating raw food, swimming in contaminated water, getting hit by mob attacks, and high pollution zones can drain your sanity. When your sanity is lowered some of you max health is consumed but you can restore your sanity in many ways. For example sanity gummies, fruit tea, grilled mushrooms, corn ale, sleeping, and more. To learn everything you need to know about sanity head over to the "How to Restore Sanity" guide.
Hydration
One of the survival mechanics of Once Human is Hydration. If your hydration is low you have reduced movement speed and slower stamina recovery. Whereas if your hydration is full you have increased sprint speed and stamina cost reduction. You can get dirty water from any inland water source and boil it in a stove to drink it. If you aren't near a inland water source you could setup a rainwater collection system which you can unlock through the memetic tree. Water is fairly simple to maintain and shouldn't be much of an issue.
Hunger
You can solve hunger by hunting animals and gathering fruits and vegetables while adventuring. If your hunger is low you lose the strength to carry as many items. On the other hand, when it is full you get a boost to your maximum health and deal a bit more melee damage. As you progress toward the endgame in Once Human you unlock recipes for different foods that give special effects like; fifty percent more acid from mobs you kill or increased damage with certain weapon effects.
Astral Dewlets
You receive 20 Astral Dewlets every day and can use them to buy a variety of things, most of which apply to the status indicators. You can buy sanity gummies (restore sanity), activators (healing syringe), an adrenaline shot (self revive), flatbread (food), or orange juice (drink). To get to the Astral Dewlets page go to the Esc Menu and click Events tab on the left or hit F3. Then go to the Regular Event tab. If you're ever out adventuring and you forgot to bring some supplies with you, then check the Astral Dewlets menu to see if you can grab what you need.
UI Menus
There are a lot of menus in Once Human. You open a menu, to click another menu, to access another menu. A lot of the menus have rewards to claim and experience to collect. The menus you should keep an eye on are weekly commissions, season journey, journey, and the battlepass.
Commissions
Commissions are weekly quests that you choose five of and complete to earn experience, energy, and controllers. Most weekly quests are easy and get completed soon after taking them. You can see some examples in the picture above like make 30 boiled water, make 20 food, craft 200 rounds of ammo and so on. You have to progress the main quest to access these commissions. Once you progress far enough you can get to the commissions screen by either going to a commissions vendor in a settlement or by holding "Tab" and asking your guide bird V to show them to you. Each commission you complete in the early game gives you almost enough experience to level. Not to mention the bonus experience for completing all 5 weekly commissions. You can also reroll commissions your not interested in by clicking the reroll button in the top right corner of the commission.
Season Journey
The season journey challenges are incredibly rewarding and you should keep an eye on these each week to ensure you collect all the bonus loot. Once you complete a season journey challenge you can claim the Mitsuko Marks from it. Mitsuko Marks are used for cosmetic items from the Season Shop in the top right of the season goals menu. Also the claimed Mitsuko Marks go on the left and begin to fill in the circle. When you get enough to unlock the rewards at the bottom then you can claim them for large chunks of Starchrom and memetic points. You also get one specialization cleaner to reroll one of your memetic specializations. As the weeks go on the season journey rewards only get bigger so be sure to check back each week.
Journey
You complete basic journey tasks as you play through the game. Once a journey task is complete you can click it to claim the reward. Journey task give you experience and energy. After you complete a full journey section you can claim the completion bonus which gives controllers and Starchrom. To get to the journey menu press "J".
Battlepass
The battlepass has a lot of valuable consumables in the free tiers, along with 6k starchrom. Basically everything you do in the game that gives you experience also give you battlepass experience. The payed tier of the battlepass only contains cosmetic items. The battlepass goes from 1-60 levels and you can get to it by pressing "Esc" and click Stardust's Advent on the right.
Memetic Tree
The Memetic tree is basically your tech tree or skill tree where you allocate points to gain access to different crafts. Knowing your way around the memetic tree is essential. The four sections it is broken up into are infrastructure, crafting, logistics, and building. You can allocate memetics by click them and holding "F". If you allocate a node on accident or decide you don't want one then you can easily refund it. Be aware when you refund allocated memetics you lose a part of the energy that you used to allocate it. There are two ways to refund your allocated memetics. You can click the individual memetic you want refunded and press "R" to refund it. As well as pressing "R" with no memetic selected to refund the whole memetic tree.
Infrastructure
The infrastructure memetics tree contains a disassemble bench, a furnace, and tools you need to farm materials. In the main quest line you unlock the disassembly bench and use it to break down scrap items to usable materials. It also has you unlock the furnace and use it to smelt ore. You can allocate the center path to unlock the higher tier tools and eventually an electric furnace that smelts two materials at once. Resource Detection shows nearby ores but didn't seem that useful since you could just see the ores with your eyes. So if there is no change to resource detection then you can save your memetic points and skip them.
Crafting
The crafting memetics are the most important memetics in the game. In this memetic tree you can unlock the supplies workbench, gear workbench, meds, ammo, basic gear, and various weapons. The supplies workbench is used to craft ammo, meds, tools, elixirs, and fishing items. The gear workbench is used to craft weapons and armor. As well as repairing your gear and calibrating your weapons and armor to increase their stats.
You can unlock the memetic for meds like Activators and Adrenaline. The basic Activators heal you for 50% and Adrenaline gets you up after being downed. There is a cooldown after you use an Adrenaline so try not to get downed consecutively. You can unlock various tiers of ammo which give bigger damage boosts per tier. As you follow the Basic Gear memetic path you unlock blueprints for an armor set and several weapons.
Logistics
The logistics memetics unlock recipes and blueprints for cooking, planting, water collection, water processing, and electrical facilities. The basic cooking gives you the ability to cook meats into small rations. Then the higher tier cooking memetics give you the recipes to cook them into meals. Meals take a bit more ingredients but come with extra benefits and/or give more energy per. Water collection, water processing, and electrical facilities are essential to power your base in the endgame. At the start it doesn't hurt to rush solar panels and electrical benches as it saves you on having to constantly farm wood to cook and smelt. Also the Electric Stove cooks two dishes at once, and the Electric Furnace smelts two ores at once saving you time.
Planting
Planting is essential for more complex recipes. When you grow a plant it has a chance to become deviated. Deviated plants are rare but you can add certain types of fertilizer and use Deviations to increase your chance to grow one. Some endgame recipes are strong and require deviated ingredients so it's a good idea at some point to spec in planting memetics and start growing the ingredients you need.
Building
The building memetics unlock all building components, territory expansions, storage, and the garage. The building components consist of roofs, foundations, doors, windows, stairs, and furniture that come in wood, stone, and metal. You can expand your territory twice, gaining size and increasing your base build limits. The base build limits are how many facilities you can place, generators you can have, and decorations allowed around your base. The storage memetic is essential to be able to build chests to store all your loot. The facilities in your territory can see all the materials in storage boxes at your base. Which means you don't have to go find the materials every time you want to craft an item. Storage containers in Once Human are generous in size. The most important memetic in the building section is the garage. You need the garage memetic to repair and upgrade your vehicles.
Memetic Specializations
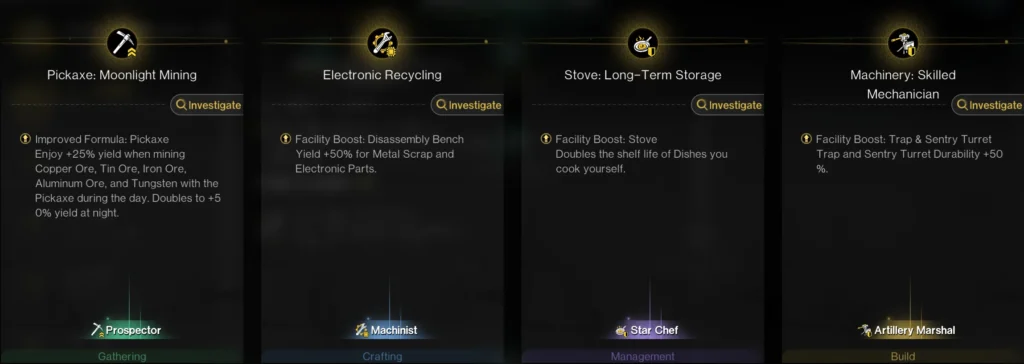
Memetic specializations are hard to summarize because of how many there are and how strong they can be. Along with it being entirely RNG to the point of people wanting to reroll their characters just for a chance at different ones. You can reset these with a Specialization Cleaner. You get 5 of them from the season journeys rewards, so once a week you can reset your least favorite memetic specialization. On the other hand, you could save them till you get max level and then you can choose the worst one you have to reroll. Every five levels you get to choose a memetic specialization. Some examples of specializations you can get are item based specializations, passive crafting station buffs, and exclusive material conversions.
Item based specializations
Item based specializations are craftable items that give a buff when in the inventory or are powerful tools you can use to gather materials. You can also trade these item based specializations so if you get a good one you can sell them to other players or give them to your friends. These items you craft last 14 days and work by just being in your inventory. A few examples are Backpack Expansion, Chef's Knife, and Electronic Grabber. The Backpack Expansion increases the size of your inventory. The Chef's Knife gives you more loot from animals that you skin. The Electronic Grabber would yield more electronic parts when looting crates.
Passive Crafting Station Buffs
You can get a memetic specialization to buff some of your crafting stations. For example you can get Electric Furnace Efficiency which cuts the power consumption in half and reduces the crafting duration by 60%. Another buff for the Electric Furnace is getting double yield when smelting the late game ingots, Aluminum and Tungsten. Having these memetic specializations are a game changer because it doesn't cost you anything extra, you just get the buffs. Also when I say you get the buffs I don't mean you character. The Electric Furnaces you place get the buff so you could place super buffed furnaces for your friends if they give you permission to build in your territory. On the other hand you could sell your buffed furnaces to other players with a one time instalment fee. And that is just one of the many combos you can get from memetic specializations.
Exclusive Material Conversions
There are some material conversions that you can only do by unlocking the memetic specialization for them. A good example of this would be gold and silver ingots. Gold ore and silver ore can be found around Nalcott and used for some higher end upgrades on some memetic specialization items. However if you get the specialization to smelt them into ingot then you can sell them straight to the vendor for a good amount of energy. Another good material conversion specialization is turning basic fuel and startrace ore into stardust source. Stardust source being one of the most important endgame resources make it a no brainer to trade in some basic fuel and startrace ore for it. The last example of material conversion specs would be the best one, sulphur to acid. Sounds basic but that's all it is. One of the basic beginner resources, sulphur, turns straight into an endgame resource that you can never have too much of with a little bit of energy cost. Definitely keep an eye out for the material conversion memetics as you level.
Facilities
The different facilities in Once Human all have a purpose. From breaking down scrap items to useable parts for crafting or making the clothes on your character and the gun on your back. Lets go over a few of them and explain how they work. Crafting benches use all the materials from any storage crate you have within your territory, but when the text for a craft is red you are missing materials to make it.
Disassembly Bench
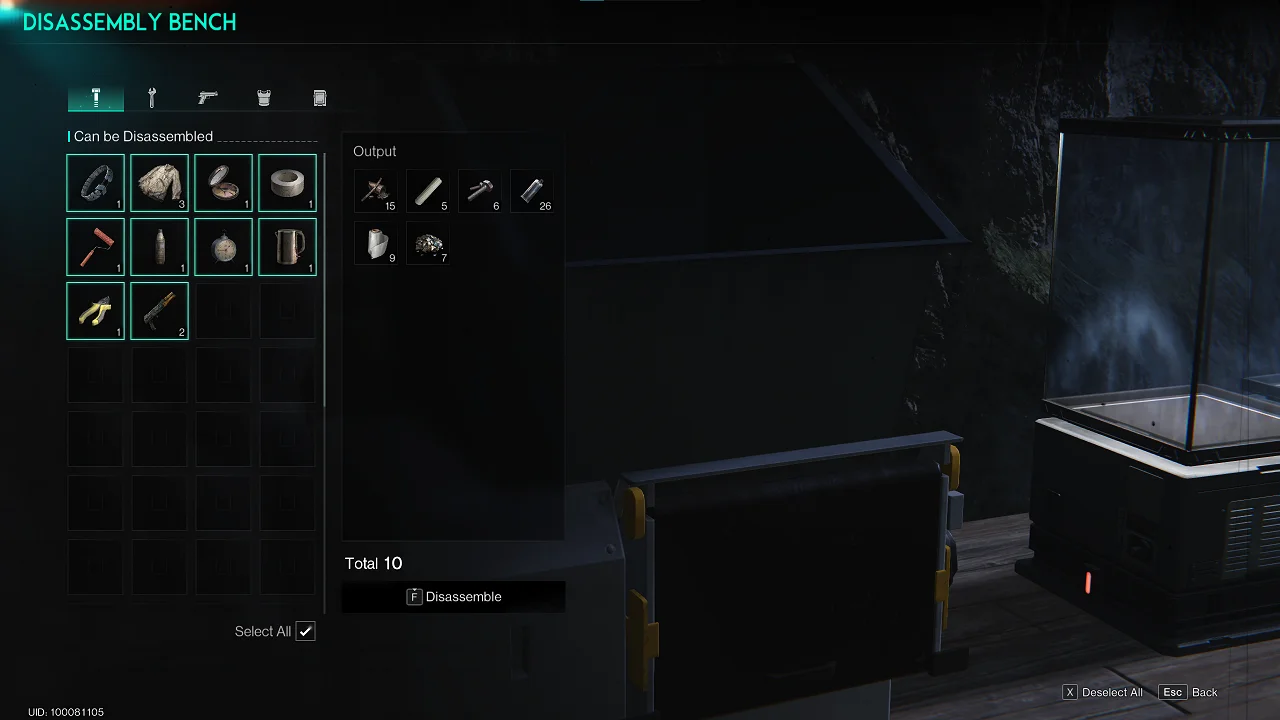
You unlock a Disassembly bench in the memetics tree under the infrastructure tab and its node is called "Disassembly Techniques". In a Disassembly bench you can disassemble scrap, ammo, tools, throwables, guns, armor, and mods. You can select the ones you want to disassemble individually or click the "select all" button at the bottom. Once you decide what you want to scrap, hold "F" to disassemble. You can only disassemble one tab at a time.
General Crafting Bench Mechanics
This applies to the furnaces, stoves, supplies workbench, and synthesis workbench. Once you select something to craft you can move the slider to decide exactly how much to make. After you press "F" to craft, it shows up in the crafting queue at the bottom. While in this queue you can see the remaining time left, how much has complete, and everything else in the queue behind it. You can queue up to five things at once. Be aware you don't need to wait for the craft to finish fully before claiming it. So if you do a stack of 99 and it is 42/99 then you can click it and take the 42 out. You can also hover over the queued craft and hit the X in the top corner of it to cancel the craft. This returns the materials unused to your inventory.
Furnace
You unlock the furnace in the memetics tree under the infrastructure tab and its node is called "smelting essentials". Furnaces smelt ores into ingots for use in other crafting benches. Inside the furnace you can see the available smelting options on the left. As you unlock more memetics, you can see more ingots inside the furnace.
Stove
You unlock a stove in the memetics tree under the logistics tab and its node is called "Stoves". You can cook food, water, and sanity restoring consumables in a stove. As you travel through Nalcott there is recipes for special food and water consumables. These are normally found inside restaurants and diners. Be sure to grab all the recipes you see and then head into your inventory to activate the recipes by pressing "F" on them. Then you can cook them in your stove.
Supplies Workbench
You unlock a supplies workbench in the memetics tree under the crafting tab and its node is called "Essential Tools". The supplies workbench is used to craft ammo, meds, tools, Deviation items/elixirs, and fishing items.
Gear Workbench
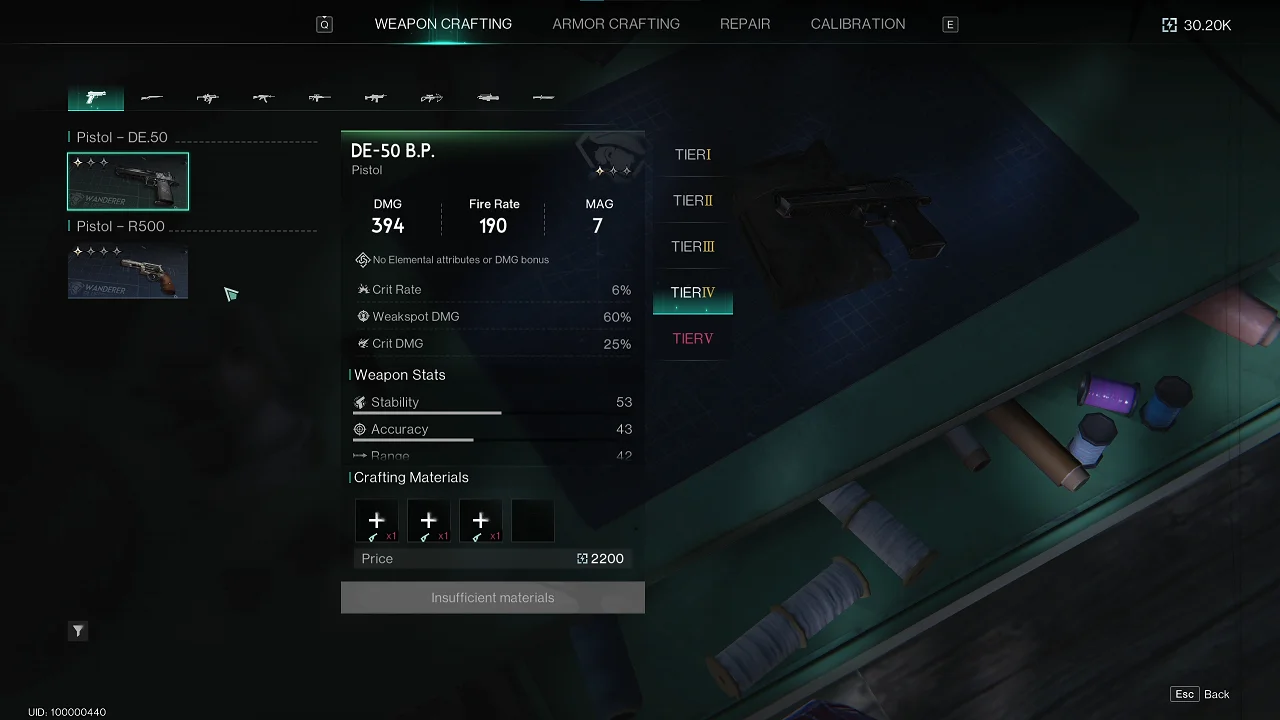
The Gear Workbench works a little differently that the other benches. This is no crafting time or crafting que, and you can only craft the things you have a completed blueprint for. You can also craft five different tiers which generally correspond with materials you get per 10 levels. The zones that fall within these tiers generally give you the materials for that tier. You can't equip Tier II gear till you are level 10, or Tier III gear till you are level 20. So the crafting tiers go like this:
- Tier I
- Level 1-10
- Tier II
- Level 11-20
- Tier III
- Level 21-30
- Tier IV
- Level 31-40
- Tier V
- Level 41-50
How to Craft Inside The Gear Workbench
To craft a weapon or armor in the gear workbench you need to first put together the parts for it. You click each + at the bottom middle and press "F" to use the materials on the right to craft a part. Once you craft all the parts you can then hold "F" and craft the finished item. Any gear you craft yourself can be repaired over and over in the repair tab. No gear or weapons crafted or found can be dropped for your friends or other players. You can disassemble them in the disassembly bench to get back some materials it was crafted with.
Weapons and Armor
There are many types of weapons and gear found in Once Human. Some you gain access to by unlocking a memetic for them in the memetic tree. Others are unlocked from opening mystical crates found inside towns. Mystical crates give static rewards so basically the same guaranteed blueprint for every person who loots it. However you can only loot it once so you can't keep farming it for additional blueprint fragments. In weapon and gear crates you occasionally get full items. These items can't be repaired and are basically a free trial of the armor or weapon until it breaks. However, they can be disassembled to get more materials to craft your own items.
Calibration
The base stats of weapons and armor increase after calibration. The first few times you calibrate gear it only costs a few basic materials. When you upgrade to new gear, your old gear can be disassembled to get 100% of the basic materials used back. As you calibrate an item more the materials go up in rarity. The rarer the material, the less you get back from disassembling. It's recommended that you calibrate you gear with only the basic materials at the start. Once it asks for Stardust Source you should stop calibrating and save the Stardust Source for calibrating your endgame gear. Also if you are low on materials you should calibrate your weapons before armor.
Mods
As you loot weapon and gear crates in Once Human you acquire mods. You also get a lot of mods from clearing monoliths and silos. After defeating the final boss in either, the boss becomes a floating shard. When you walk up to it you can choose to spend a controller for max loot or don't spend anything and take min loot. Max loot gives you a handful of mods and Stardust Source, where min loot just gives you a few materials. You use these controllers in endgame to farm silos and monoliths for "best in slot" mods. While leveling it's ok to spend some controllers on max loot so you can get a few mods to socket into your gear. The low tier mods are also generic and should be easy to toss on a few in that apply to you.
Socketing Mods
To socket the mods head into your gear menu "K" and in the bottom left of each gear piece you see a mod slot. Right click any gear piece missing a mod and you can pick a mod to socket into it. Mods come in five tiers normal (grey), standard (green), fine (blue), excellent (purple), and legendary (gold). Excellent and legendary mods have unique core effects.
Starter Weapons
From the start of the game you quickly gain access to all weapon types and all of them are good at defeating deviants. However, some options are much better at conserving ammo. Just remember, you can just use the weapon you enjoy the most and they are all cheap to craft so feel free to test them.
Rustic Crossbow
During the tutorial you make a Rustic Crossbow and it happens to be one of the best weapons. What makes crossbows such a good option early is the fact you can retrieve the arrows you shoot. So instead of needing to constantly make ammo you just get most of the arrows you shoot back. It also happens to good damage, especially when hitting headshots on the basic mobs at the start. With a few calibrations and upgrading the tiers of you crossbow as you level, you can easily use the crossbow to clear towns and bosses. The gunpowder you save can be used to make ammo for endgame farming.
DE-50 (Desert Eagle)
The Desert Eagle is a powerful pistol option at the start. Add a few calibrations to this pistol and no mobs stand a chance. You unlock the DE-50 after you spec into the gear workbench memetic.
Melee
Surprisingly another great starter weapon option is melee weapons. Most melee weapons do high damage and knockback/stagger the enemies which makes them pretty safe. At the start of the game you only fight deviants in the form of basically zombies. There are a few flying mobs that you want to have a ranged weapon for, but melee handles the rest. Later on instead of fighting deviants you encounter Rosetta soldiers and Vultures which are equipped with guns to shoot back. At that point you might want to step away from the melees a bit and focus more on guns.
Sniper
For safely clearing towns with long range one-shot headshots, the sniper is perfect. To unlock the sniper you have to spend a bit more points in the memetic tree. Press "O" and click memetics on the left. Once in the tree go to the crafting section, then follow the far right path down to Long-range Firepower.
Ammo
Different ammo types give small increases to overall damage. The basic copper ammo give no additional dmg and just lets you shoot you guns base damage. The limiting resource for making ammo is usually acid, and acid is used for a lot of stuff other than ammo. You should avoid crafting gunpowder unless you need it, because it uses up your acid. Although, when you find gun powder feel free to use it to make whatever ammo you need. As you progress through the regions you start to run into enemies that give gunpowder instead of acid on death. The enemies that do this are usually using guns of their own. You can also find gunpowder in small blue storage crates throughout towns.
"AP" Ammo
You shouldn't make any "AP" ammo types. The AP ammo types use stardust source which is the main upgrading resource you use in the endgame and you need thousands. The additional damage gained from AP ammo isn't worth using up such an important resource. You can however make the basic ammo types which are copper, steel, and tungsten ammo. Acid and stardust source are important endgame resources so you should try to avoid spending them whenever you can.
Blueprints
Blueprints are the main way of unlocking new weapons and armor. You can find full blueprints which give you the ability to craft the item immediately. However you can also find blueprint fragments which might not be enough fragments to unlock the full gun. Mystical crates give blueprint fragments and it's always enough to fully unlock the blueprint. Also mystical crates from the same region can give blueprint fragments for a set of armor. It gives you enough fragments to craft a single piece of the armor set per mystical crate. You can use this to mix and match the slots you unlock between two different sets so that you get multiple set bonuses active. For example if the current three piece set your wearing is with your pants boots and gloves, then you can unlock the helm, mask, and chest of a second set. This is because the blueprint fragments aren't specific to the armor slots but instead to the set of armor.
Wish machine
The Wish Machine is a slot machine like game where you gamble your Starchrom for a chance at legendary blueprints and blueprint fragments. When you first use the Wish Machine it is discounted and you are guaranteed to get a SOCR - Outsider. The SOCR - Outsider is a purple assault rifle blueprint that has the Power Surge weapon effect, which adds lighting to your attacks. You farm as much Starchrom as you can every week to try to unlock more and more blueprints. When the season ends you keep all the unlocked blueprints you got that season and can try to upgrade them or get the ones you're missing in the next season.
Wish Machine Blueprint Shop
When you walk up to the wish machine you can press "G" to enter the blueprint shop. Here you can spend your starchrom to unlock specific blueprints rather than spamming RNG rolls in hopes of getting one. The weapons cost around 8k for most, and the armors around 3k each. You can buy a lot of the weapons and armors in the wish machine blueprint shop so be sure to check it out before spending your starchrom on the random rolls.
Deviations
Deviations are helpful friends that you capture to fight along side you or collect resources for you. The three types of Deviations are combat, territory, and crafting. Check the top right of a Deviation's tooltip to see its type. Combat Deviations are synchronized to your Cradle and assist you while fighting. Territory Deviations work around your territory grabbing various supplies, enhancing you benches, or defending your base from enemies. crafting Deviations produce materials for you to use to craft unique items and elixirs. Elixirs give you special effects like increased jump height or the ability to leave spider webs when you roll. For a full run down or how to capture Deviations, synchronize them to your Cradle, and use Deviations in Combat go take a look at How to Use Deviations guide.
Early Deviations
There are some helpful early Deviations to grab around Nalcott. Grabbing these Deviations decreases the amount of base materials you need gather while exploring. As well as helping with power generation around your base.
Dibgy Boy
You can get a Digby Boy just by mining ores or gravel. There is a higher chance to get one from mining silver ore. Silver ore looks a lot like Tin but with a slight blue tint to it. If you find Digby Boys put them in isolated securements units so they can passively gather you ores. To claim the ore just look inside the isolated securement unit and the ores collected are on the right side.
Logging Beaver
If you are tired of cutting down trees, grab a Logging Beaver. As the name implies this Deviation collects wood for you so you don't have to. You can find a Logging Beaver on the dock to the south of Meyers Market. If you are unable to capture it or want another, you can swap to another world and see if it's there. The teleporter to swap worlds is in the warehouse in the center of Meyers Market.
Festering Gel
After defeating the first boss you get a Festering Gel. This combat Deviation is incredibly strong defensively. When using it in combat you can place it down as a barrier to restore sanity and heal the players around it. You can also throw the Festering Gel to form a barrier where it lands and knocking back enemies in the area. After being thrown it still does the sanity restoring and healing to the players around it. So it's great if you have a teammate who is surrounded or in need of some extra heals. It definitely saves you a lot of meds and sanity restoring consumables.
Electric Eel
You have make a fishing pole and go fishing to catch this Deviation, but it isn't your average fish. The Electric Eel is made up of several D batteries held together by electric currents. No matter its looks, you can place it in your base to increase your overall power output. If you have multiple solar panels or generators then you can catch some more Electric Eels to buff them all. You can have one eel per power facility. Electric Eels can be fished from any water source.
Vehicles
The main way to get around in Once Human is by using vehicles. There is a street motorcycle, retro coupe, and mountain off-road (jeep). The retro coupe is the faster of the three basic vehicles and is a two seater that has a trunk with 8 slots. The motorcycle is the second fastest, can only seat one person, and has no trunk. You do get a motorcycle for free early on in the main story quest. The mountain off-road (jeep) is the slowest but can hold up to four players and has a truck with twelve slots. You can summon your vehicle by pressing "G". When driving you can change the radio station or turn it off by holding "X".
Repairing Vehicles
To repair your vehicle you have to unlock the garage memetic from the memetic tree. Then build the garage in your territory and inside the garage click the vehicle you want to repair and press "G". In the repair screen it shows you how much it cost and you can hold "F" to repair. The vehicle physically in your garage is just a display of your active vehicle. To summon your vehicle to drive around press "G". For a step by step guide on how to repair, head over to "How to Repair Vehicles in Once Human".
Upgrading Vehicles
If you want your vehicles to go faster and have more durability then you should upgrade the parts in them. To upgrade a cars parts you have to go to the memetics tree. Under the garage memetic you can unlock vehicle modding I and vehicle modding II. You need higher level materials to make these upgrades and you find them as you progress through the story. Once you have unlocked vehicle modding memetics go into the garage and pick the vehicle you want to upgrade. Then click the part you want to swap out on the vehicle and make the upgraded version.
Vehicle Parts
Each part of a vehicle upgrades a specific stat for the vehicle. The vehicles frame gives it durability so it doesn't break as fast. Tires improve the handling of the vehicle to make it easier to control. Engine decides the vehicles speed because you can never go to fast. The fuel tank decides how much fuel it can hold so you don't have to stop as much to refuel. If you can only afford one upgrade, the engine is the clear winner since speed helps most when exploring and traveling.
Special Vehicles
Later in the season you can unlock a pickup truck and a hive truck that you can build on top of and drive around. So you could have a farming truck with extra chests to fill with loot, or put together a truck covered in automated turrets to kill everything you pass.
Exploring
In Once Human you are constantly exploring new regions and towns. Here are a few tips to help your exploring go smoothly and efficiently.
Map
The map gives you a lot of information and tooltips/filters. You can also track the main quest, side quest, a town, and a marker at the same time and see them all as different colors on your mini-map. If you middle click on the map you can also place a marker and choose between a few symbols as well as giving it a name. If you see any world events on the map you can teleport straight to them for free.
Teleporters
All over Nalcott there are teleporters for you to activate. You can teleport to your base from anywhere with a 10 minute cooldown but before you do be sure to check the map for nearby teleporters. You should always try to grab nearby teleporters before leaving an area so if you want or need to return in the future you can. There are also season journey quests related to the amount of teleporters you activated so grab any you see on your travels.
Spacetime
Press "Q" to snap your fingers revealing nearby loot and showing red indicators for crates through walls. This helps a lot when searching for hidden crates in towns and highlighted loot is picked up all at once. You can spam spacetime as much as you want and should to be sure not to miss anything. Also, if the small circle on the top right of your Cradle (backpack) is flashing white be sure to look around for a spot where it is flashing the fastest and snap your fingers to reveal a Morphic crate. Kill the Morphic crate for additional loot and a chance for a Deviation.
Gliding
If you are ever falling or want to glide off a high point you can press "Space" to call your guide bird V. You hold onto his legs as he fly's through the air. You can also press "Space" again to let go and/or start gliding again. Once human does have fall damage so be sure to glide from high heights. If you don't you could break your legs or even get downed.
Campsite
The campsite is used as a respawn point and can be placed outside of towns or areas where you are exploring. To place the campsite press "T" and find a spot where it is able to be placed. This could save you a lot of time by not having to run all the way back to the town or area you died in. You can also craft more ammo or cook food and water on the go with the campsite.
6 Week Cycle
As the season progresses more regions unlock and new world events begin appearing. Each season has a theme and at the end of the season you keep everything except your level, energy, map exploration progress, and season challenge progress. However, you can save some things in Eternaland forever.
Once Human Beginners Guide Recap
Well it's safe to say that you aren't a beginner anymore after reading all of that. The scary part is, that this isn't even everything the game has to offer. You can also run a trading center, hunt Morphic crates, solve riddles and puzzles for weapon attachments, collect all the deviations, farm monoliths and silos, farm LEA Research Lab, take on the Forsaken Monolith, and more. The possibilities are endless but the Once Human beginners guide ends here, use what you've learned to help cleanse Nalcott from the stardust infected deviants that plague the cities and towns.
If you haven't already, head over to our Discord to stay up to date with our content development.
Written by: Soap_GOD
Reviewed by: mkaytea, Tenkiei