Cradle Override Guide
Last Updated:July 12, 2024|Changelog
The Cradle is your backpack, which you use to hold combat Deviations and socket passive buffs through the Cradle Override menu. Once you progress the main quest to the second settlement, Meyers Market, Maxie unlocks your Cradle for you. Upon gaining access to the Cradle press O and click Cradle on the right side. The Cradle Override slots, you place buffs in, are unlocked by defeating monoliths and silos. Unlock these passive buffs by leveling up and then activate them with the override slots in your cradle. This guide explains everything you need to know about the Cradle Override system.
Cradle Override Slots
Clear monoliths and silos to unlock your Cradle Override slots where you socket powerful passive buffs. There are eight slots in total, locked behind the completion of four different monoliths and four different silos. In the first week you can only access to five of the eight slots due to higher level regions, Chalk Peak and Red Sands, being locked. By the time you get to Meyers Market in the main quest line you already have killed Ravenous Hunter to unlock a slot. All the monoliths and silos you need to complete are:
Monoliths
- Ravenous Hunter in the Monolith of Greed
- in north-west of the Dayton Wetlands region.
- Treant in the Gaia Cliff Monolith
- in the center of the Broken Delta region.
- Arachsiam in the Mirage Monolith
- in the north-east of the Iron River region.
- Shadow Hound in the Monolith of Thirst
- in the center of the Chalk Peak region.
Silos
- Securement Silo Sigma
- in the north of the Broken Delta region.
- Securement Silo Phi
- in the north-west of the Iron River region.
- Securement Silo Alpha
- in the north-west of the Chalk Peak region.
- Securement Silo Theta
- in the north-east of the Red Sands region.
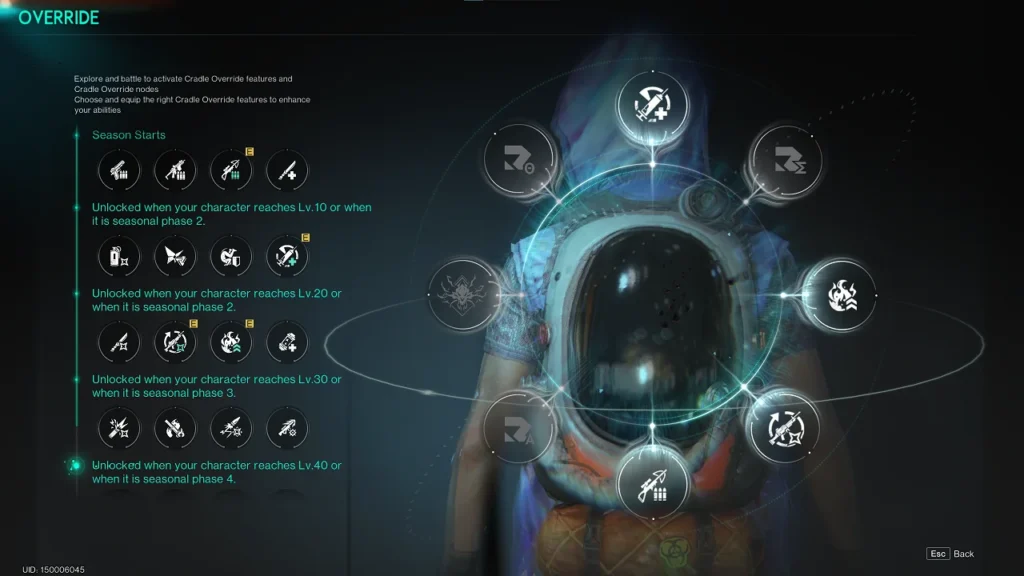
Passive Buffs
The passive buffs socketed in the Cradle Override are powerful and apply to all kinds of builds. There are five different rows of buffs that modify your weapon types, character stats, and weapon effects. More details about the buffs in each row can be found below.
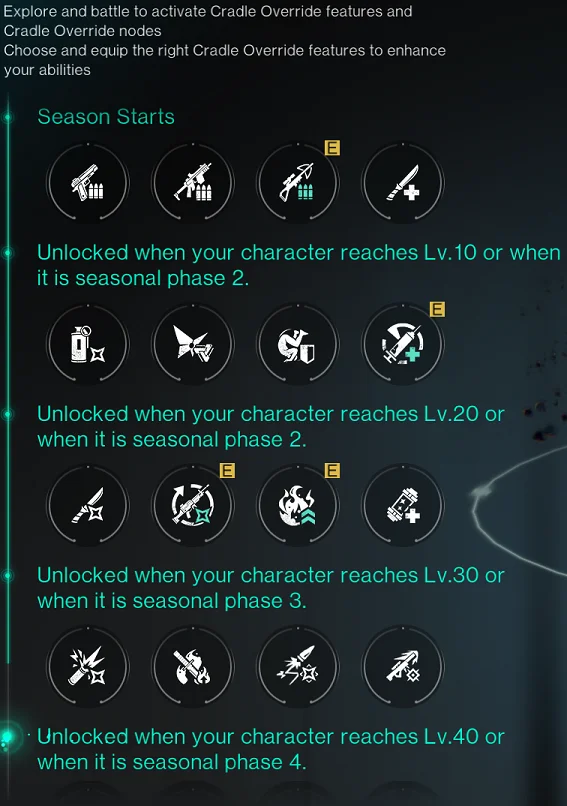
How to Unlock
You unlock the passive buffs by leveling your character up. As you level you unlock more rows of passive buffs to choose from.
Socketing Buffs
Once you decide on what buff you want there are a few ways to socket it. You can hold F to socket it in an open slot if available. Alternatively you can click and drag it to the available slot. If you want to swap out which passive buff you have active you can hover the socketed passive buff and hold U to unequip it. As well as clicking and dragging the new passive buff you want over the one you want to replace.
Passive Buffs for Weapon Types
The first row of Passive Buffs are for the different weapon types. They are:
- Handgun Enhancement
- DMG +20% when holding pistols or shotguns. Reload 1 ammo from reserve upon defeating an enemy.
- Automatic Weapon Enhancement
- DMG +20% when holding SMGs, rifles, or LMGs. Reload 10% of magazine capacity from reserve upon defeating an enemy.
- Long-Range Enhancement
- DMG +20% when holding sniper rifles or crossbows. 30% chance to automatically reload one bullet from the backpack upon defeating a target.
- Melee Enhancement
- DMG +20% when holding melee weapons. Recover 20% of expended Stamina upon defeating a target with a melee weapon. Can trigger once every 3s.
Situational Passive Buffs
The second row of Passive Buffs are more situational with a focus on tactical damage, Deviations, defense, and healing. They are:
- Master Tactician
- After using a tactical item, DMG against the Great Ones (bosses) +25% for 15s.
- Deviation Master
- Having it fight alongside grants DMG + 50% against Deviants
- Agility
- After rolling, DMG Reduction +15% for 4s.
- Rapid Aid
- Reduces the cooldown of healing items by -30% and increases the healing effect by +15%.
Passive Buffs for Character Stats
The third row of passive buffs effect your damage reduction, damage, status damage, or movement speed. They are:
- Brawl Boost
- Damage from humans -20%, effect halved after defeating a human player.
- Tactical Combo
- Weapon DMG +25% for 4s after switching weapon or reloading.
- Status Enhancement
- After hitting a weakspot, Status DMG + 25% for 3s.
- Sprint
- Movement Speed +5%, Running Stamina Cost -15%.
Passive Buffs for Weapon Effects
Some weapons have special weapon effects applied to them. To see if your weapon has a special effect you can hover it in your gear menu. To open the gear menu press K and when you hover a weapon you can read the description of it at the bottom of its tooltip. Lower rarity weapons don't always have descriptions and therefor don't a weapon effect, where most higher rarity weapons have a weapon effect. The different weapon effects are:
Elemental Weapon Effects
- Burn
- Deal Status DMG of 10% Psi Intensity every 0.5s for 6s.
- DMG increases with more stacks, up to 5 stacks.
- The additional damage is Blaze Element, cannot Crit, cannot strike Weakspots, and will not decay with distance.
- Actual Factor = 10% x Stacks x (1+Burn DMG Factor Bonus) x (1+Burn Final DMG Bonus).
- Frost Vortex
- Trap enemies within a 4.5m radius and inflict 30% Psi Intensity Status DMG per second for 4s. Up to 2 Frost Vortex may exist at any time.
- The additional damage is Frost Element, cannot Crit, cannot strike Weakspots, and will not decay with distance.
- Actual Factor = 30% x (1+Frost Vortex DMG Factor Bonus) x (1+Frost Vortex Final DMG Bonus).
- Power Surge
- Deal Status DMG of 50% Psi Intensity once and inflict Power Surge status for 6s (Accuracy -40).
- Shock Element type. The additional damage cannot Crit, cannot strike Weakspots, and will not decay with distance.
- Actual Factor = 50% x (1+Power Surge DMG Factor Bonus) x (1+Power Surge Final DMG Bonus).
- Unstable Bomber
- Trigger 1 Status DMG blast of 100% Psi Intensity after 0.1s with a blast radius of 1.5m. The damage decays over the explosion distance, down to a minimum of 50%.
- The additional damage is Blast element, cannon Crit, cannot strike Weakspots, and will not decay with distance.
- Actual Factor = 100% x (1+Explosive DMG Factor Bonus) x (1+Explosive Final DMG Bonus).
General Weapon Effects
- Shrapnel
- Upon hitting an enemy with a bullet, deal Weapon DMG of 50% Attack to a Random unhit part.
- The element type is the same as the weapon's element. The additional damage can Crit, strike Weakspots, and will decay with distance.
- Actual Factor = 50% x (1+ Shrapnel DMG Factor Bonus) x (1+ Shrapnel Final DMG Bonus).
- Bounce
- Upon hitting an enemy with a bullet, bounce to hit a random enemy within 10m radius to deal Weapon DMG of 60% Attack.
- The Element type is the same as the Weapon's Element. The additional damage can Crit, strike Weakspots, and will decay with distance.
- Actual Factor = 60% x (1+ Bounce DMG Factor Bonus) x (1+ Bounce Final DMG Bonus).
- Fast Gunner
- While skill is in effect, each stack grants Fire Rate +1% and Attack +1% for 2s. Effect can stack up to 5 times.
Melee Weapon Effects
- Blunt DMG
- Deal additional Melee DMG equal to 25% of target's current HP, up to 400% of Psi Intensity.
- This damage has no Element, cannot Crit, cannot strike Weakspots, and will not decay with distance.
Support Weapon Effects
- The Bull's Eye
- Highlight marked target will be outlined and suffer from Vulnerability +8% for 12s.
- Fortress Warfare
- Create an area of effect within a 2m radius that grants allies Heavy Armor for 5s.
- Heavy armor: Super Armor with Weapon DMG +20%.
The fourth and fifth row of passive buffs boost some of the weapon effects.
Forth row:
- First Round Blast
- After reloading, Instant DMG (Power Surge and Unstable Bomber) +25% for 4s.
- Sustained Suppression
- Killing an enemy with Continuous DMG (such as Burn or Frost Vortex) increases Continuous DMG by +20% for 10s, stackable up to 3 times.
- Deadly Combo
- After hitting a weakspot with bullet effects (Bounce and Shrapnel), bullet effect DMG +25% for 3s.
- Steady Hand
- While in Fortress Warfare or Fast Gunner status, Weakspot DMG +40%, Weakspot DMG to the Bull's Eye +20%.
Fifth row:
- Transient Impact
- After triggering a Power Surge, Power Surge DMG +25% for 3s.
- Prairie Fire Inferno
- Based on the number of nearby units affected by Burn, increases Blaze DMG by +15% per unit, up to a maximum of +60%.
- Bullet Hunt
- After killing a target with ranged weapons, Shrapnel DMG +35% for 15s.
- Bounty Hunter
- After defeating a unit you marked, Weapon DMG +25%, Weakspot DMG +35%, lasting for 15s.
Cradle Override Guide Recap
You unlock the Cradle follow the main story quest to the second town and talk to Maxie. Once unlocked you can start socketing passive buffs into the Cradle Override slots. The Cradle Override slots are unlocked by defeating monoliths and silos, and the passive buffs to socket in them are unlocked by leveling up your character. The passive buffs apply to your weapon types, character stats, and weapon effects. The passive buffs socketed into the Cradle Override are incredibly strong so be sure to check them every once in a while to make sure you have as many socketed as you can. Also, don't forget to swap them if you change the gun types you are using.
If you haven't already, head over to our Discord to stay up to date with our content development.
Written by: Soap_GOD
Reviewed by: mkaytea, Tenkiei