Campaign Walkthrough
Last Updated:July 8, 2024|Changelog
Last Epoch Campaign currently spans across 9 chapters through 5 different timelines, serving as an introduction to the game and its mechanics. This walkthrough guides you through each area, making sure you don't miss anything important for your progression. Please note that doing every chapter is not mandatory as you gain access to the main end game system, the Monolith of Fate, after finishing chapter 3.
This walkthrough works for any class or build and covers quests, pathing, npc and bosses that you can encounter during Last Epoch Campaign. Last Epoch Campaign provide Passive points ![]() and Idol slots
and Idol slots  through its quests, but you are limited to 15 Passive points
 ![]() and 8 Idol slots . In total you have access to more than that, so this walkthrough focuses on the most optimal pathing while getting everything that you can out of the Campaign.
and 8 Idol slots . In total you have access to more than that, so this walkthrough focuses on the most optimal pathing while getting everything that you can out of the Campaign.
Chapter 1 - Divine Era
Waypoint: No
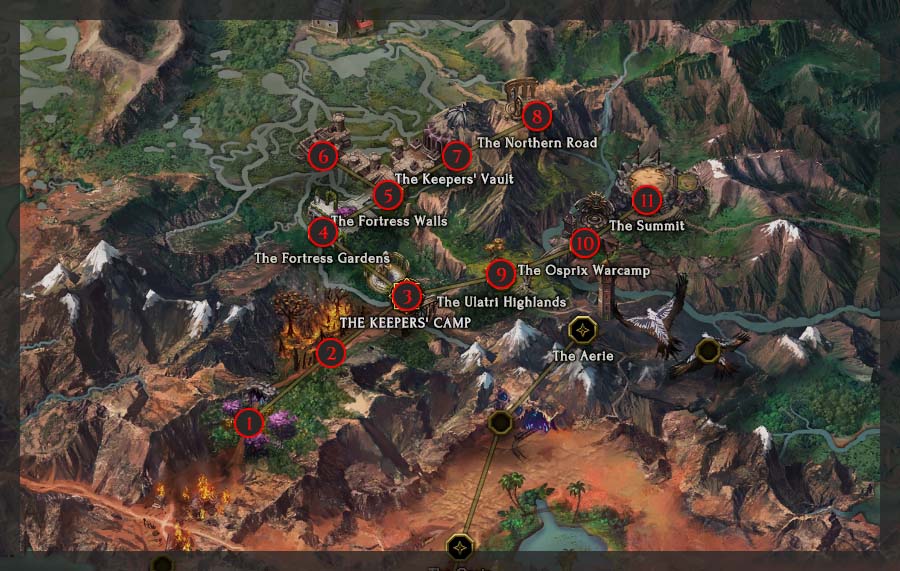
Quests: The Keepers' Camp
Welcome to the world of Eterra! You are a traveler and are about to uncover the mysteries of what appears to be time rifts. You start with the quest The Keepers' Camp  that will follow you until you reach The Keepers' Camp.
Move forward, kill every monster on your way and loot every item you find.
Waypoint: No
Quests: A Long Detour
Continue moving east and kill most monsters on your way. Defeat the Forged Soldier to gain access to The Keepers' Camp.
Waypoint: Yes
Quests: The Keepers
The Keepers' Camp is the first town you have access to. Towns usually have a waypoint, a chest to access your stashes and NPCs. In this case you only have a Shop NPC  and a chest to access your stashes.
Go East and check the Shop NPC .
Look for these items, sell those you don't need and then continue north to The Fortress Gardens:
- If you play a Rogue, Primalist or Sentinel, any two handed weapon with Melee Attack Speed, Melee Damage, any type of flat damage or bleed/ignite/poison chance on hit.
- If you play Acolyte or Mage, any staff with Spell Damage or Cast Speed.
- Boots with implicit higher than 5% or with Movement Speed.
- Any Jade Ring or Silver Ring.
Waypoint: No
Quests: The Keepers
Continue northwest to The Fortress Walls while killing monsters on your way.
You should level up at least to level 4, which is enough to specialize your first skill! Press "S" to open the panel in order to specialize your first skill. You also have access to Passive Points, press "P" to open the Passive Tree Panel.
To know more about the Passive and Skills of Last Epoch, check out the Passives and Skills Guide.
Waypoint: Yes
Quests: The Keepers and Storeroom Sabotuers
This area is a small corridor with a boss arena at the end. The Ulatri Cliffs boss, Haruspex Orian, spawns after you kill 2 waves of monsters. Defeat him to free Keeper Leena and finish the quest A Long Detour . This makes a time rift appear, interact with it to move to chapter 2!
Waypoint: No
Quests: Storeroom Sabotuers (Passive point ![]() )
)
Go east until you reach a dead end. Kill the monsters, click on the armor to advance Void Assault and teleport back to The Fortress Walls. Go east and talk to the Heoborean Soldier to finish the quest, then move to The Keepers' Vault.
Waypoint: No
Quests: The Keeper Vault
Advance forward until you are met with a Forged Soldier and a bunch of monsters. Defeat them to open the door behind them and talk with Keeper Balthas to continue the main quest. Defeat the waves of monsters and continue west until you reach The Northern Road.
Waypoint: Yes
Quests: The Keeper Vault
After walking a bit, Keeper Balthas will get kidnapped. Cross the bridge and talk with the Keeper Guard. Teleport back to The Keepers' Camp and move east to The Ulatri Highlands.
Waypoint: Yes
Quests: The Shard
Move northeast until you reach The Osprix Warcamp.
Waypoint: Yes
Quests: The Shard
Continue north until you reach The Summit.
Waypoint: Yes
Quests: The Shard
This area is a small corridor with a boss arena at the end. Defeat The Summit's boss, Haruspex Orian, to free Keeper Balthas, then teleport back to The Keepers' Camp. Talk with Keeper Leena and Keeper Balthas to finish the quest The Shard and move to chapter 2!
Chapter 2 - Ruined Era
Waypoint: No
Quests: The Last Refuge
Welcome to chapter 2! You just arrived in The Ulatri Cliffs, located in the Ruined Era and are investigating what is happening to you. Move to the Last Refuge Outskirts and talk with Guardsman Willem and Elder Burron on your way. This progresses the newly found quest The Last Refuge .
Waypoint: No
Quests: The Last Refuge, The Void Assault (Passive point ![]() ), Evacuation (Passive point
), Evacuation (Passive point ![]() )
)
After a short distance, talk to Guard Captain Bravon to complete The Last Refuge and begin the quest The Void Assault . Further ahead you will find Guardsman Dolus, take his quest called Evacuation , which ask you to talk to a bunch of npcs and rewards you with a Passive point ![]() .
.
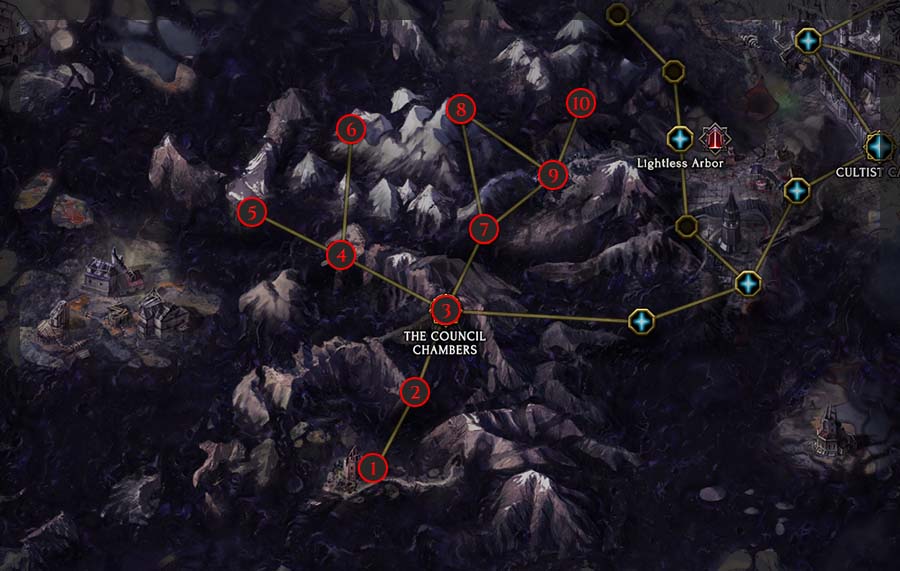
Continue east by taking the northest path until you reach Elder Erza. Defeat the waves of monsters tto unlock the path to The Council Chambers.
Waypoint: Yes
Quests: The Void Assault (Passive point ![]() ), Finding Pannion, Erza's Ledger (Avarice), Artem's Offer (Gambler's Fallacy)
), Finding Pannion, Erza's Ledger (Avarice), Artem's Offer (Gambler's Fallacy)
The Council Chambers is the town of chapter 2 and has various NPCs.
- Elder Gaspar, the main quest NPC.
- Elder Erza who gives a quest that rewards Avarice.
- A Gambler NPC
 that gives you another choice for Elder Erza's quest, rewarding Gambler's Fallacy instead.
 - A Shop NPC .
- A Respec NPC
 to respec your passive tree if needed.
When you enter the town, talk to Elder Gaspar to complete The Void Assault and begin the quest Finding Pannion , then take the quest from Elder Erza called Erza's Ledger and the quest from the Gambler NPC called Artem's Offer .
Then continue west to The Last Archive.
Waypoint: No
Quests: Finding Pannion, Erza's Ledger (Avarice), Artem's Offer (Gambler's Fallacy)
Move until you reach Erza's Library to do either of Erza's Ledger or Artem's Offer quest. Once it's done, go back to The Last Archive and move north east to Pannion's Study.
Waypoint: No
Quests: Finding Pannion, Erza's Ledger (Avarice), Artem's Offer (Gambler's Fallacy)
Erza's Library is a small area where you need to interact with a chest at the north. Once it is done, go back to The Council Chambers by using your portal (press "T") and talk to the Gambler NPC if you want Gambler's Fallacy or Elder Erza if you want Avarice.
As you cannot take both, I recommend Avarice as it is the best one for most build. Then go back to The Last Archive to reach Pannion's Study.
Waypoint: Yes
Quests: Finding Pannion, Saving Last Refuge (Idol slot ), Armoury Aid (Passive point ![]() )
)
This area is an arena for the 3 bosses called Pannion's Void corrupted students. Defeat them and use your portal to get back to The Council Chambers. Talk to Elder Gaspar to complete Finding Pannion and begin Saving Last Refuge . Then talk to Captain Ansel to begin the quest Armoury Aid and go north to The Precipice.
Waypoint: Yes
Quests: Saving Last Refuge (Idol slot ), Armoury Aid (Passive point ![]() )
)
Continue east and defeat the Idol of Loathing. Take the time rift to go to The Ancient Cavern as we want to get across the bridge that was destroyed by the boss.
Waypoint: Yes
Quests: Saving Last Refuge (Idol slot ), Armoury Aid (Passive point ![]() )
)
Move until you reach another time rift to get back to The Precipice. There you have 2 path, the one on the right leads you directly to The Armoury, while the one on the left makes a detour by The Upper District. Go left.
Waypoint: Yes
Quests: The Upper District (Passive point ![]() )
)
Go north until you reach the waypoint. Continue, cross the bridge and defeat monsters near the statue. Once you are done, The Upper District quest gets completed by itself. Move east to The Armoury.
Waypoint: Yes
Quests: Saving Last Refuge (Idol slot ), Armoury Aid (Passive point ![]() )
)
Upon your arrival, you are met with a boss that needs to be summoned. Defeat every wave of monsters to summon the Voidfused Forge, then kill him.
- Be on the lookout for the lava pools that spawn below the boss. They will melt your health!
After defeating the Voidfused Forge, continue east to reach The Lower District. On your way talk to Surviving Guard and Quartermaster Manus to advance the Armoury Aid quest.
Waypoint: No
Quests: Saving Last Refuge (Idol slot ), Armoury Aid (Passive point ![]() ), The Ruined World, The Lesser Refuge (2 Passive points
), The Ruined World, The Lesser Refuge (2 Passive points ![]() )
)
The Lower District is the arena for The Husk of Elder Pannion. Talk to Elder Pannion to begin the fight.
- Don't stand in his lightning bubble or his fire beam, which always rotates clockwise.
After defeating him, take the shard and portal back to The Council Chambers. There, talk to Elder Pannion to complete Saving Last Refuge and take The Ruined World . Talk also to Captain Ansel to complete Armoury Aid and to Geova The Archivist to begin The Lesser Refuge , then go east to The Sheltered Wood.
Important: Idols now drop and they are a large part of your character's power!
If you want to know more about Idols check out the Gear Walkthrough.
Chapter 3 - Ruined Era
Waypoint: No
Quests: The Ruined World, The Lesser Refuge (2 Passive points ![]() )
)
Welcome to chapter 3! The Sheltered Wood is mostly composed of corridor, choose the northest path to reach The Surface.
Waypoint: Yes
Quests: The Ruined World, The Lesser Refuge (2 Passive points ![]() )
)
Go north first to reach The Shrouded Ridge, then when you unlock the Lightless Arbor waypoint, go back to The Surface. After this, go east to The Forsaken Trail.
To know more about the Lightless Arbor dungeon, check out the Lightless Arbor Dungeon Guide.
Waypoint: Yes
Quests: The Ruined World, The Lesser Refuge (2 Passive points ![]() )
)
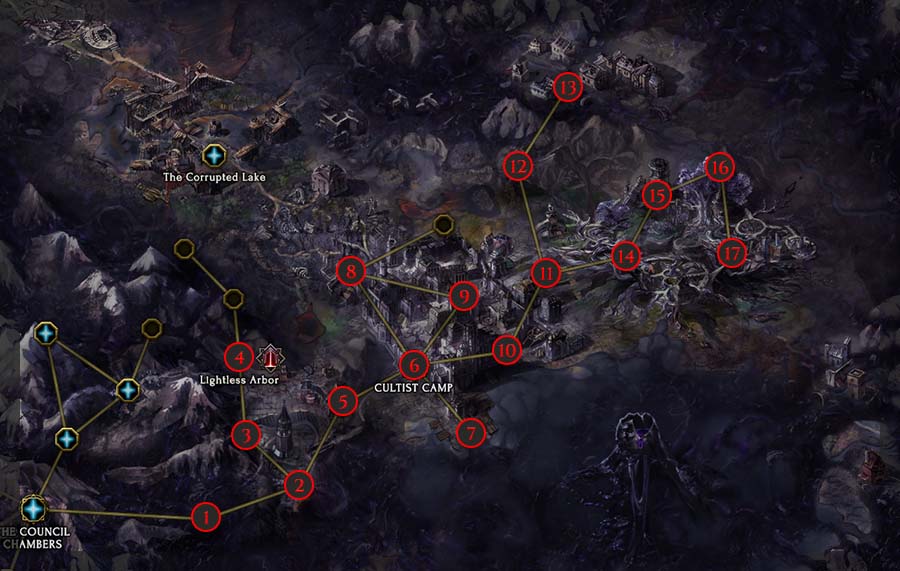
Continue north east until you reach the Cultist Camp.
Waypoint: Yes
Quests: The Ruined World, The Lesser Refuge (2 Passive points ![]() ), Sanity in the Darkness, The Symbol of Hope
), Sanity in the Darkness, The Symbol of Hope
Cultist Camp is the town of chapter 3 and has various NPCs.
- Maceth and Leyda who are the main quest NPCs.
- Halindor who gives a side quest requiring you to defeat 3 Void Horrors in Ruins of Welryn. The rewards aren’t worth it, so skip this quest.
- A Shop NPC that disappears after defeating the Void Amalgamation.
Talk to Maceth and Leyda to complete The Ruined World and start Sanity in the Darkness and The Symbol of Hope . Then go south to the Welryn Docks.
Waypoint: Yes
Quests: The Ruined World ,The Lesser Refuge (2 Passive points ![]() ), Sanity in the Darkness, The Symbol of Hope
), Sanity in the Darkness, The Symbol of Hope
Get close to the chest in the bottom right of the area to summon a Void Centipede and defeat him. Interact with the chest, then portal back to Cultist Camp and go north to The Ruins of Welryn.
Waypoint: Yes
Quests: The Ruined World, The Lesser Refuge (2 Passive points ![]() ), Sanity in the Darkness
), Sanity in the Darkness
Get the waypoint in the middle of the area then go south west to Welryn Undercity. This is going to save you time later.
Waypoint: Yes
Quests: The Ruined World, The Lesser Refuge (2 Passive points ![]() ), Sanity in the Darkness, The Last Imperial
), Sanity in the Darkness, The Last Imperial
Go left and talk with The Last Imperial to take the quest The Last Imperial . Now destroy the 3 Soul Repositories and talk to him again to complete the quest. Then portal back to Cultist Camp, talk to Remaining Cultist and go east to The Ritual Site.
Waypoint: No
Quests: The Ruined World, The Lesser Refuge (2 Passive points ![]() ), Sanity in the Darkness
), Sanity in the Darkness
Move to the boss arena and talk to Maceth and Leyda to summon the Void Amalgamation. Defeat Him to unlock the path forward and complete Sanity in the Darkness .
- Important: Focus the summoned monsters as they deal a lot of damage.
Waypoint: Yes
Quests: The Ruined World, The Lesser Refuge (2 Passive points ![]() )
)
The Shattered Valley has multiple path that leads to different side quest areas. Go north first to The Abandoned Tunnel to complete The Lesser Refuge , then take the time rift The Ancient Forest to do An Ancient Hunt and finally go east to continue to The Courtyard.
The Abandoned Tunnel is shaped like an S and is pretty long. You want to go north east to reach The Lost Refuge. Reach the bottom right of the area and interact with the chests and complete The Lesser Refuge .
Open your map with "M" and teleport to The Shattered Valley and take the time rift to The Ancient Forest…
Waypoint: Yes
Quests: The Ruined World, An Ancient Hunt (Idol slot )
Open your map with "M" and teleport to The Shattered Valley and take the time rift to The Ancient Fores. Reach the top right of the area and defeat Primeval Dragon, then teleport to The Council Chambers. Talk to the Respec NPC to complete An Ancient Hunt. Teleport back to The Shattered Valley and go east to continue to The Courtyard.
Waypoint: Yes
Quests: The Ruined World
Go north east until you reach the Temple Guardian. Defeat him and reach The Temple of Eterra.
Waypoint: Yes
Quests: The Ruined World
Go north until you reach a purple wall, defeat the 4 voidwing nests to remove it and progress to The Lotus Halls.
Waypoint: Yes
Quests: The Ruined Temple
In this area you need to collect 2 orbs at the opposite sides of the map in order to unlock the path to The Sanctum Bastille. Go to the left until you cannot, then go up, interact with the quest objective and take the time rift. Pick up the orb on the pedestal, press ‘T’ and take the portal back to Council Chambers.
Open your map and teleport to the Lotus Hall. Go on the right side this time and do the same thing.
Once you have both orbs, go back to the start of the area and go north to unlock the path to The Sanctum Bastille.
Waypoint: No
Quests: The Ruined Temple
Go north east and take the time rift to get to the Emperor's Remains. Defeat him and take the time rift to The End of Time.
- Kill the Omen eyes when they are summoned to avoid being overwhelmed. Pay attention to the boss' health, it evolves and gains new abilities. One of these is a purple mist you should avoid that summons monsters from its center and deals massive damage.
Chapter 4 - Imperial Era
Waypoint: Yes
Quests: The Immortal Empire (Passive point ![]() )
)
Welcome to chapter 4! The End of Time is the main town of Last Epoch and has various NPCs.
- A Gambler NPC .
- A Shop NPC .
- A Respec NPC to respec your passive tree if needed.
- Elder Gaspar who is the main quest NPC.
Go to the second floor by taking the stairs on the left side. Once there continue the main quest by talking with Elder Gaspar, choose your desired mastery and take the time rift.
Very Important You cannot change your mastery afterward, so select the right one!
Waypoint: Yes
Quests: The Immortal Empire (Passive point ![]() )
)
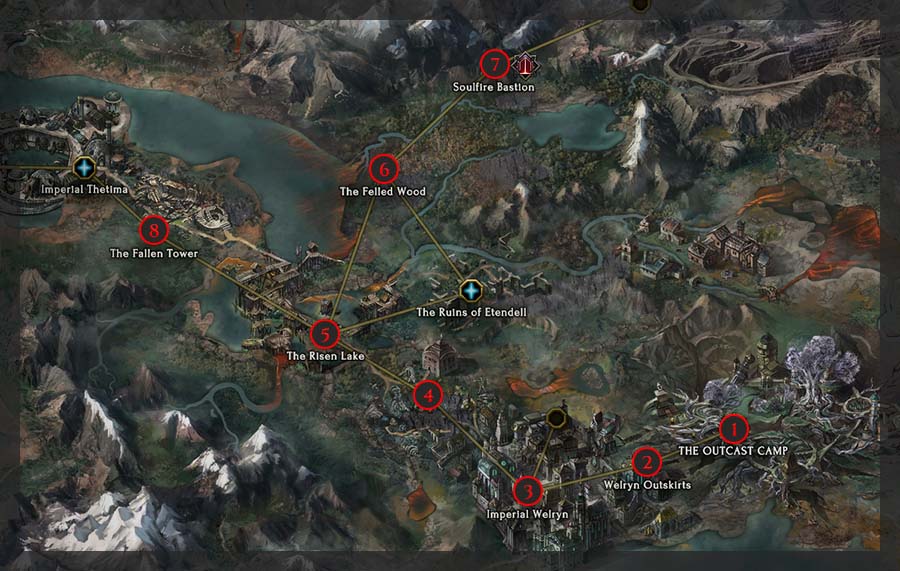
The Outcast Camp is the town of chapter 4 and has various NPCs.
- Outcast Queen who is the main quest NPCs.
- Cailyn gives a side quest, introducing crafting to the player.
- Ansella gives a side quest called A Study In Time that rewards a Passive point
 . It’s confusing and not necessary so skip it.
 - Halindor who gives a side quest requiring you to defeat 3 Void Horrors in Ruins of Welryn. I don't recommend doing this quest as its rewards are not interesting.
- A Shop NPC .
Talk with Outcast Queen to progress The Immortal Empire quest, then go west to Welryn Outskirts.
Waypoint: Yes
Quests: The Immortal Empire (Passive point ![]() )
)
Continue west to reach Imperial Welryn. Don't bother killing Flamme Guard Sulla at the end of the area, it doesn't reward much and could take considerable amount of time depending on your build.
Waypoint: Yes
Quests: The Immortal Empire (Passive point ![]() )
)
Continue north west to reach The Soul Wardens' Road. Don't bother killing Siege Captain Caliga at the end of the area, it doesn't reward much and could take considerable amount of time depending on your build.
Waypoint: No
Quests: The Immortal Empire (Passive point ![]() ), Soul Warden Ambush
), Soul Warden Ambush
Go west until you reach fences, it will proc the Soul Warden Ambush quest requiring you to kill waves of zombies in order to unlock the fences. Continue west to reach The Risen Lake.
Waypoint: Yes
Quests: The Immortal Empire (Passive point ![]() ), The Admiral's Dreadnought (Passive point
), The Admiral's Dreadnought (Passive point ![]() and Idol slot ), The Corrupted Lake (Passive point
and Idol slot ), The Corrupted Lake (Passive point ![]() and Idol slot )
and Idol slot )
Go north until you reach the time rift and take it to reach The Corrupted Lake. There you need to kill the Prophet of Ruin and Idol of Ruin. The easiest way to reach them is to start by going left and then hugging the right wall. Once they are killed go back to The Risen Lake.
- During the Prophet of Ruin and Idol of Ruin fights, don't stand in the big purple circle on the ground.
Now go west until you reach Outcast Seer. Talk with him to progress The Immortal Empire , it will summon monster that you have to kill, then talk with him again. He gives you The Admiral's Dreadnought quest.
Continue north east to reach The Felled Woods, then get the waypoint of the Soulfire Bastion, then teleport back to The Risen Lake. Go north west to reach The Fallen Tower.
To know more about this dungeon, check out the Soulfire Bastion Dungeon Guide.
Waypoint: Yes
Quests: The Admiral's Dreadnought (Passive point ![]() and Idol slot )
and Idol slot )
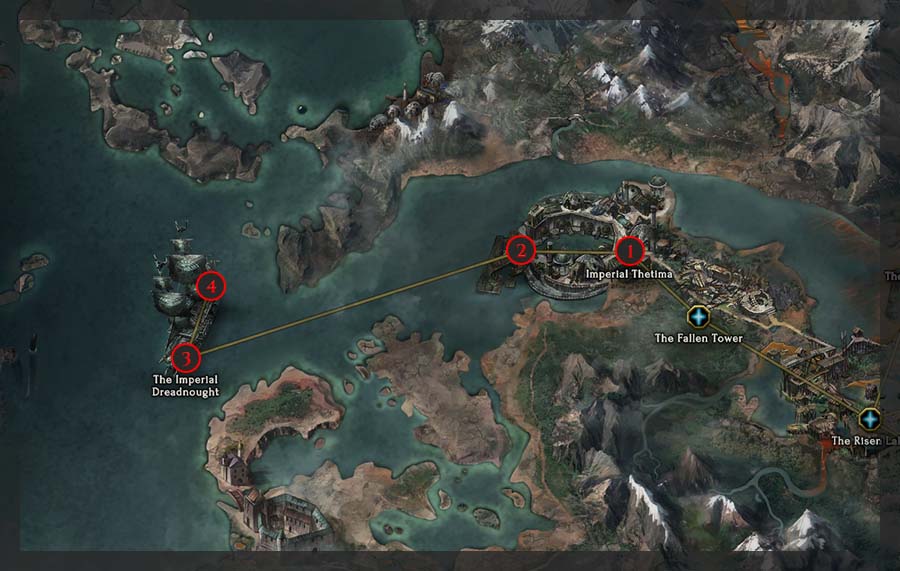
Go north to reach Imperial Thetima.
Waypoint: Yes
Quests: The Admiral's Dreadnought (Passive point ![]() and Idol slot )
and Idol slot )
Go south west to reach The Darkling Pier.
Waypoint: No
Quests: The Admiral's Dreadnought (Passive point ![]() and Idol slot )
and Idol slot )
The Darkling Pier is just a small area to transition to The Imperial Dreadnought.
Waypoint: Yes
Quests: The Admiral's Dreadnought (Passive point ![]() and Idol slot )
and Idol slot )
Go east until you reach The Dreadnought's Deck.
Waypoint: No
Quests: The Admiral's Dreadnought (Passive point ![]() and Idol slot )
and Idol slot )
Go north until you reach the edge of the boat, then move east until to reach Admiral Harton. Defeat him and talk to Alric, then jump out of the boat.
- The easiest way to kill Admiral Harton is to stay very close to him. If you go too far away he starts casting a lightning ability repeatedly until you close the distance.
Chapter 5 - Imperial Era
Waypoint: Yes
Quests: The Oracle's Aid (Passive point ![]() )
)
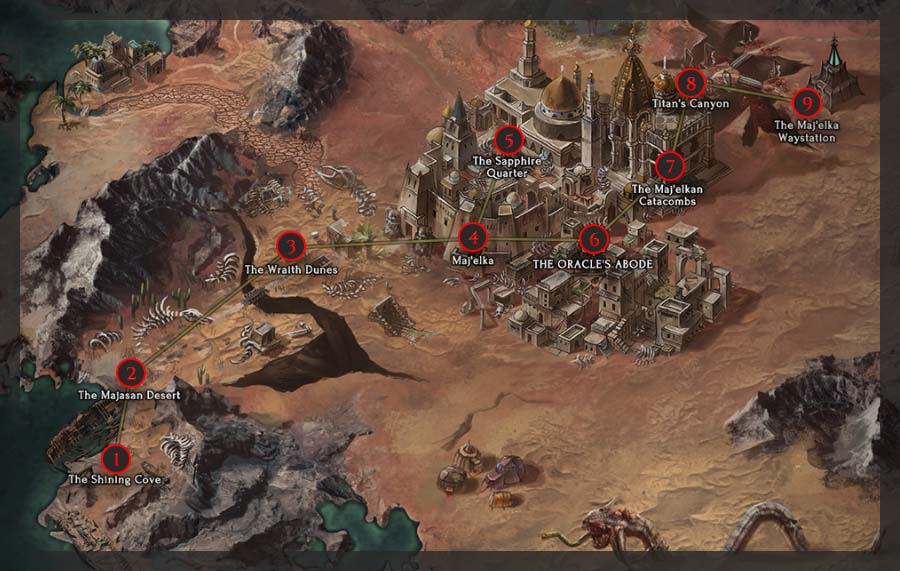
Welcome to chapter 5! Talk to Alric to get The Oracle's Aid quest, then move north east to reach The Majasan Desert.
Waypoint: No
Quests: The Oracle's Aid (Passive point ![]() ), The Hidden Gems (Passive point
), The Hidden Gems (Passive point ![]() )
)
Go north east to reach The Wraith Dunes. Before going to the next area, talk to Rouj Zabat to get The Hidden Gems quest.
Waypoint: Yes
Quests: The Oracle's Aid (Passive point ![]() ), The Hidden Gems (Passive point
), The Hidden Gems (Passive point ![]() )
)
Hug the north border until you get to Argolos the Blessed, a scorpio miniboss that alternates between elemental types. Kill him and continue west to Maj'Elka. This progresses the Hidden Gems side quest.
- Don't stand close to him and avoid his attacks as much as possible. Kill all the other monsters before attacking him as it frees up some space to dodge his abilities.
Waypoint: Yes
Quests: The Oracle's Aid (Passive point ![]() ), The Hidden Gems (Passive point
), The Hidden Gems (Passive point ![]() )
)
Talk to Alric to progress The Oracle's Aid before taking the ladder. Take the south path and defeat the imperial forces then to talk Alric. Continue east to complete The Hidden Gems quest by defeating the Imperial Assassins, then go north to defeat the imperial forces again and talk to Alric.
Now that you completed The Hidden Gems and that The Oracle's Aid only has 2 objective left, go north east to reach The Sapphire Quarter.
Waypoint: No
Quests: The Oracle's Aid (Passive point ![]() )
)
Go north and defeat the Imperial forces again and talk to Alric. Continue north until you meet a rare Immortal Eye, kill him, talk to Alric and take his portal. It leads you back to Maj'Elka, go east to remove the rune blocking the path to The Oracle's Abode.
Waypoint: Yes
Quests: The Oracle's Aid (Passive point ![]() ), The Sapphire Tablet (Passive point
), The Sapphire Tablet (Passive point ![]() and Idol slot ), The Desert Waystation (Passive point
and Idol slot ), The Desert Waystation (Passive point ![]() )
)
The Oracle's Abode is the town of chapter 5 and has various NPCs.
- The Oracle who is the main quest NPCs.
- Shrine Maiden gives a quest called The Sapphire Tablet rewarding both Passive point and Idol slot .
- A Shop NPC .
Talk first with Shrine Maiden to take the quest The Sapphire Tablet , then with The Oracle to complete The Immortal Empire and take The Desert Waystation .
Don't go to the next area yet, instead teleport to The Shining Cove and go east to open a door and take the time rift.
Waypoint: Yes
Quests: The Sapphire Tablet (Passive point ![]() and Idol slot ), The Desert Waystation (Passive point
and Idol slot ), The Desert Waystation (Passive point ![]() )
)
The area is shaped like an inverted U, go north west then go south until your reach the waypoint. Interact with the bridge on the right to fight with Ortra'ek the Survivor.
Once killed, take the tablet on the ground close to the next area and move east to The Temporal Sanctum dungeon entrance. There, register its waypoint and teleport back to The Oracle's Abode. After talking to the Shrine Maiden to complete The Sapphire Tablet , move forward to The Maj'Elkan Catacombs.
To know more about The Temporal Sanctum dungeon, check out the Temporal Sanctum Dungeon Guide.
Waypoint: No
Quests: The Desert Waystation (Passive point ![]() )
)
The optimal path to get to Titan's Canyon is shaped like a V, so go southeast, then northeast.
Waypoint: Yes
Quests: The Desert Waystation (Passive point ![]() )
)
Go east until you reach Spymaster Zerrick. Defeat him and continue to The Maj'elkan Waystation.
- Important Spymaster Zerrick receives hit damage only when his head is outside his body. To make that happen, Spymaster Zerrick needs to have a target he can attack in melee range. Stay out of every poison pool while fighting him in close range. Watch out for the poison pools under his body as you get close to him. There is a small window where you can attack him in melee range without stepping in the pools.
Waypoint: Yes
Quests: The Desert Waystation (Passive point ![]() )
)
Talk to Alric and move on the waystation to finish chapter 5.
Chapter 6 - Imperial Era
Waypoint: Yes
Quests: Journey to the Necropolis
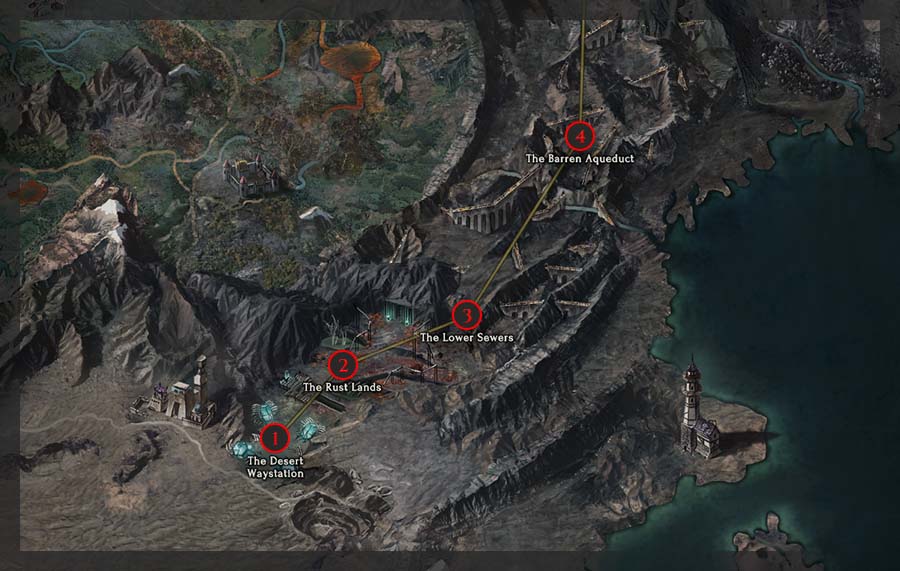
Welcome to chapter 6! Talk with Yulia and move north to reach The Rust Lands.
Waypoint: Yes
Quests: Journey to the Necropolis
Move east to reach The Lower Sewers. Don’t take the time rift unless you want Orchirian's Petals which drops off of a boss here.
Waypoint: Yes
Quests: Journey to the Necropolis
Talk with Alric and move north to reach The Barren Aqueduct.
Waypoint: Yes
Quests: Journey to the Necropolis
Move north to talk with Alric and reach the Necropolis of the Deep.
Waypoint: Yes
Quests: Journey to the Necropolis
Go south east to reach the Necropolis of the Deep.
Waypoint: Yes
Quests: Journey to the Necropolis, The Immortal Citadel (Passive point ![]() )
)
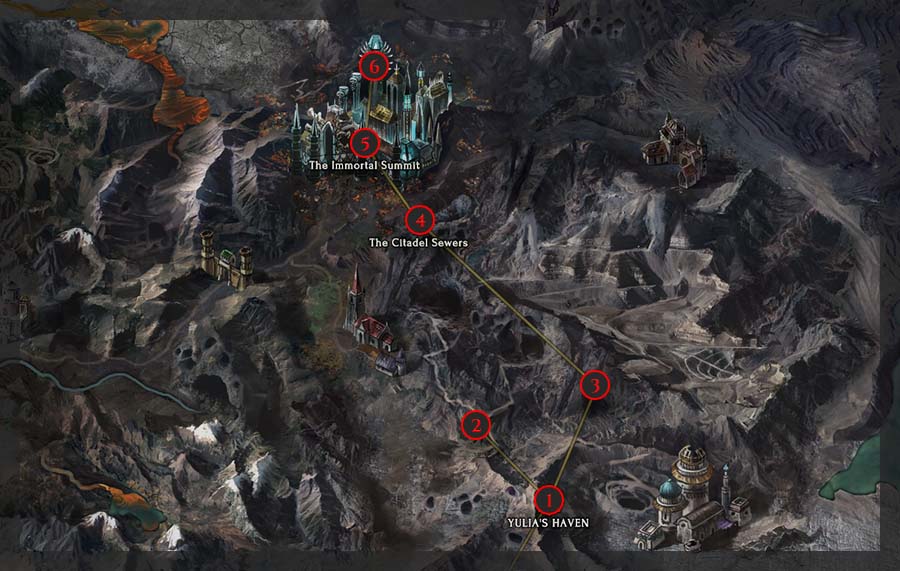
Yulia's Haven is the town of chapter 6 and has various NPCs.
- Yulia who is the main quest NPCs.
- Alric gives a quest called Alric's Revenge rewarding a Passive point . The rewards aren’t worth it, so skip this quest.
- A Shop NPC .
Talk with Yulia to complete Journey to the Necropolis and take The Immortal Citadel . Go east to The Upper Necropolis.
Waypoint: No
Quests: The Immortal Citadel (Passive point ![]() )
)
Go north to reach The Citadel Sewers.
Waypoint: Yes
Quests: The Immortal Citadel (Passive point ![]() )
)
In The Citadel Sewers, you need to defeat the Imperial Watchers in order to remove the rune and access The Immortal Summit. They will be indicated on your map and they patrol counter-clockwise, so move clockwise to catch them more easily.
Waypoint: Yes
Quests: The Immortal Citadel (Passive point ![]() )
)
Go east until you reach a bridge. You need to press a lever and wait for the bridge to come up, then move north to The Immortal Citadel.
Waypoint: No
Quests: The Immortal Citadel (Passive point ![]() )
)
Talk with Yulia to start the boss fight where you face Admiral Harton, Spymaster Zerrick and Pontifex Yulia at the same time. Talk to Yulia again once it's done to finish chapter 6.
- Kill Pontifex Yulia first, then Admiral Harton and finally Spymaster Zerrick. The arena shrinks as you kill bosses.
Chapter 7 - Divine Era
Waypoint: Yes
Quests: Rahyeh's Warpath
Welcome to chapter 7! Go south to reach The Burning Forest.

Waypoint: No
Quests: Rahyeh's Warpath
Go west to reach The Scorched Grove.
Waypoint: No
Quests: Rahyeh's Warpath
Wait for the cinematic and talk to Heorot and Yulia.
Waypoint: Yes
Quests: Rahyeh's Warpath, The Temple of Heorot, A Heoborean Cure (Idol slot )
Heoborea is the town of chapter 7 and has various NPCs.
- Yulia who is the main quest NPCs.
- Medecine Man gives a quest called A Heoborean Cure rewarding an Idol slot .
- A Shop NPC .
Talk with Yulia to complete Rahyeh's Warpath and take The Temple of Heorot , then talk with Medecine Man to take A Heoborean Cure quest. Go south west to The Heoborean Forest.
Waypoint: Yes
Quests: The Temple of Heorot, A Heoborean Cure (Idol slot )
Go west to reach The Nomad Camp. Make sure you get the waypoint because you need to come back here later.
Waypoint: No
Quests: The Temple of Heorot, A Heoborean Cure (Idol slot ), Wrath of the Wengari
Talk with the Nomad Survivor and go west to reach The Wengari Fortress.
Waypoint: Yes
Quests: The Temple of Heorot, A Heoborean Cure (Idol slot ), Wrath of the Wengari, Liberating the Nomads (Idol slot )
Talk with the Nomad Leader to take the quest Liberating the Nomads and go west to reach Kolheim Pass. Move west then north to get to Champions' Gate and unlock its waypoint. This town is special as you get access to dummies, the Arena of Champions and the Arena. Now teleport back to The Wengari Fortress.
In The Wengari Fortress you have 3 quest objectives to complete, first kill the Wengari Brute in the north-west, then the miniboss called Wengari Beastmaster in the north-east (don't forget to talk to the Captured Nomads after) and finally the Wengari Patriarch and Wengari Matriarch at the northernmost point.
- Remember that you can see the quest objectives on your minimap.
- Start with killing the Wengari Patriarch who wears a staff and casts cold boulder avalanches.
Once done with the quests, portal back to Heoborea and talk to Nomad Leader to complete Liberating the Nomads . Now teleport to The Heoborean Forest and go north to The Ice Caverns.
To know more about the Arena of Champions, check out the Arena of Champions Guide.
Waypoint: Yes
Quests: The Temple of Heorot, A Heoborean Cure (Idol slot )
Once you enter the area go to the room on the left and kill the big ice golem, Rime Giant, in the middle of the room. Then go north east to The Tundra.
Waypoint: Yes
Quests: The Temple of Heorot, A Heoborean Cure (Idol slot )
As soon as you enter the area, kill the mammoth-looking monster called Eber, then portal to Heoborea and talk to Medicine Man to complete A Heoborean Cure .
Teleport back to The Tundra and go north and interact with the Cliff Edge to open the ice bridge. Cross the bridge to get to The Temple of Heorot.
Waypoint: Yes
Quests: The Temple of Heorot
Go north until you reach Spreading Frost. Defeat him and take the portal to the Farwood.
- A reliable strategy for this boss is to put him in the middle of the arena and strafe in a circle around him. Avoid his cold beam.
Waypoint: Yes
Quests: The Lance of Heorot (Idol slot )
Go north east to reach The Frozen Roots.
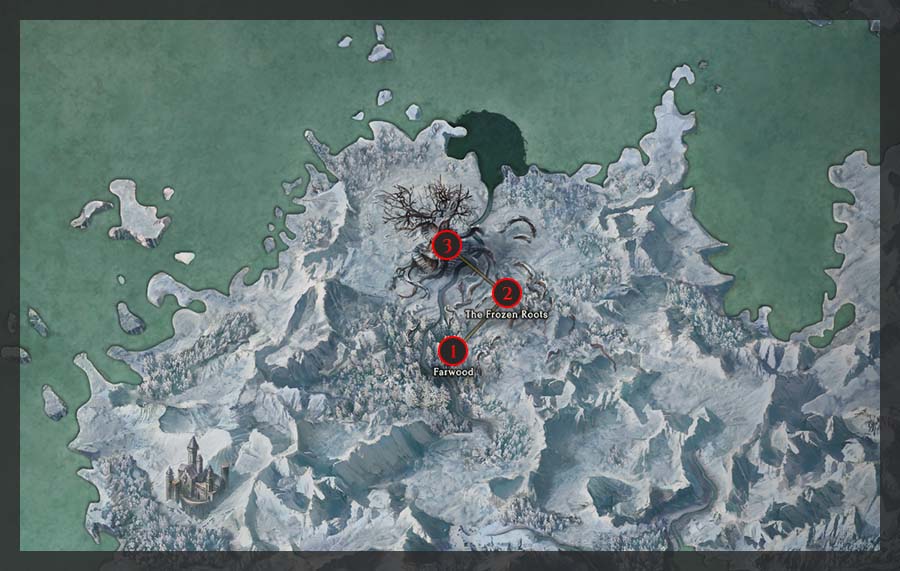
Waypoint: Yes
Quests: The Lance of Heorot (Idol slot )
Talk to Grael and go north to reach The Tomb of Morditas.
Waypoint: No
Quests: The Lance of Heorot (Idol slot ), Heorot's Last Blessing
Defeat The Frostroot Warden, then interact with the frozen NPC and talk to Grael.
- When playing close to the boss he throws his 2 front roots in the air and channels a massive ability in front of him. Take a few steps back for its duration and you’ll be fine.
You should be teleported back to Heorobea, talk with Yulia to complete The Lance of Heorot and start Heorot's Last Blessing . Now go east to The Solemn Path.
Waypoint: No
Quests: Heorot's Last Blessing
Continue east to reach The Scorched Grove.
Waypoint: No
Quests: Heorot's Last Blessing
Talk with Heorot and Grael, then teleport back to Heoborea and move south to The Northern Stream.
Chapter 8 - Divine Era
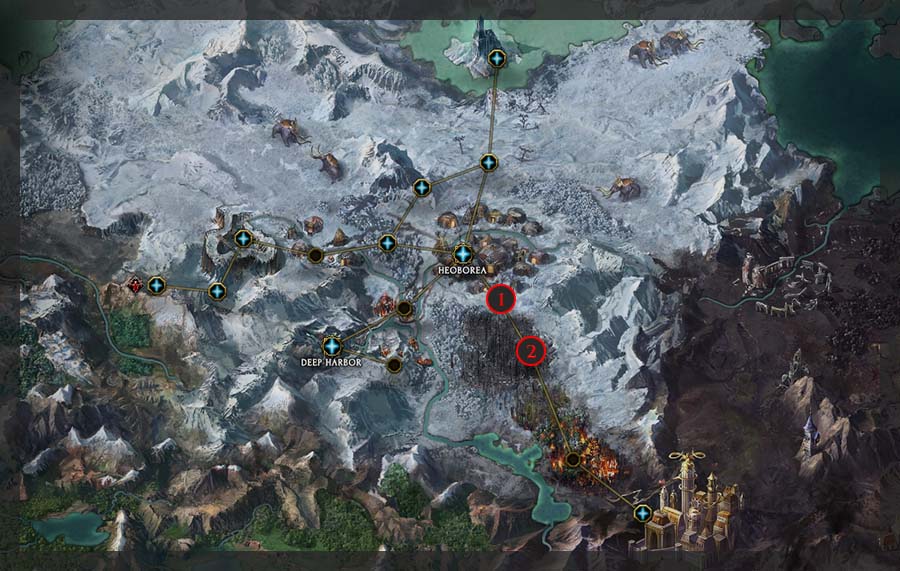
Waypoint: No
Quests: Passage through Deep Harbor
Welcome to chapter 8! Move south to reach Deep Harbor.
Waypoint: Yes
Quests: Passage through Deep Harbor
Deep Harbor is one of the 2 towns of chapter 8 and has various NPCs.
- Yulia who is the main quest NPCs.
- Harbard The Ferryman that moves you to Lake Liath once Passage through Deep Harbor is completed.
- A Shop NPC .
Talk with Yulia and go east to The Burning Pier.
Waypoint: No
Quests: Passage through Deep Harbor
If you talk to Deep Harbor Chieftan at the entrance, he offers you the side quest Deep Harbor Rescue , don't do this quest it's not worth it. Instead go north east to kill Commander cinderous and south west for Vatran the saboteur, then portal back to Deep Harbor.
At Deep Harbor talk with Harbard The Ferryman to complete Passage through Deep Harbor and go to Lake Liath.
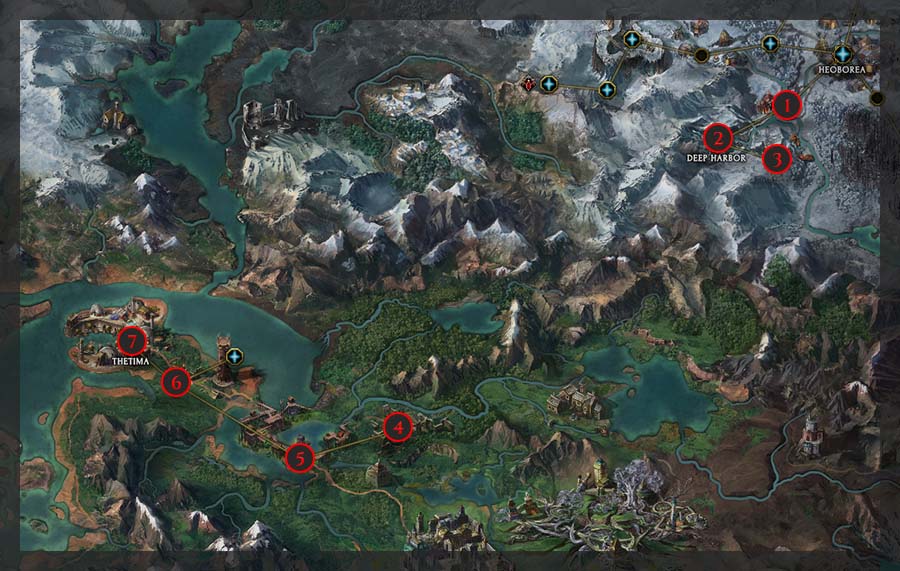
Waypoint: Yes
Quests: Liath and Thetima
Go northwest to reach Liath's Road.
Waypoint: Yes
Quests: Liath and Thetima
Go west until you reach a blocked path. Defeat the invasion forces and speak with Architect Liath. You will get the Liath's Tower side quest, which requires you to turn back to Liath's Tower and defeat Pontifex Aurelus at its top. Don't do this quest, it's not worth it.
Go north to reach Thetima.
Waypoint: Yes
Quests: Liath and Thetima
Deep Harbor is one of the 2 towns of chapter 8 and has various NPCs.
- Yulia and Captain Harton who are the main quest NPCs.
- Trade Prince Melvern gives you the side quest To Shell With It . Don't do this quest it's not worth it.
- A Shop NPC .
Talk with Yulia and Captain Harton, then go northwest to Lagon's Isle.
Waypoint: Yes
Quests: Isle of Storms
Lagon's Isle is connected to 3 areas, be sure to go northwest to reach the Moonlight Shrine.
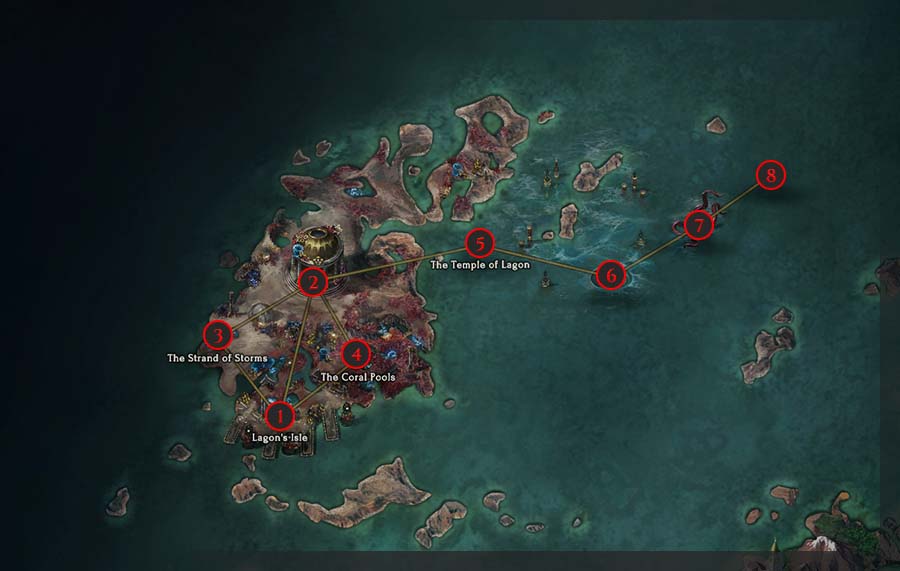
Waypoint: No
Quests: Isle of Storms
Talk with Architect Liath and click on of the altars. You need to find 2 moon fragments, each located in one of the area on the side. Go west first to The Strand of Storms.
Waypoint: Yes
Quests: Isle of Storms
Go west to find the first moon fragment, then go back to the Moonlit Shrine and move east to The Coral Pools.
Waypoint: Yes
Quests: Isle of Storms
Go southeast to find the second moon fragment, then go back to the Moonlit Shrine. Now place the moon fragments on both altars and interact with the 3rd one. You can now move to The Temple of Lagon.
Waypoint: Yes
Quests: Lagon (Passive point ![]() )
)
The Temple of Lagon is a bit of a maze. The best way to reach the next area is to go south until you can't, then northeast.
Waypoint: No
Quests: Lagon (Passive point ![]() )
)
The Temple Depths is also a maze. The entrance to the Sanctum of the Architect is located in the northeast of the area.
Waypoint: No
Quests: Lagon (Passive point ![]() )
)
Go east until you reach Architect Liath and talk with her to engage the fight. Defeat Architect Liath and move east to the Seafloor Colosseum.
- Avoid the lightning abilities on the ground and focus the summoned monster first.
Waypoint: No
Quests: Lagon (Passive point ![]() )
)
Defeat Lagon and talk to him. Then take the portal on the right to Thetima. Now go north, talk to Yulia and take the path on her right.
If you want to learn more about the Lagon Chapter 8 Boss Fight, check out the Lagon Chapter 8 Boss Guide.
Chapter 9 - Divine Era
Waypoint: Yes
Quests: Journey to Maj'elka
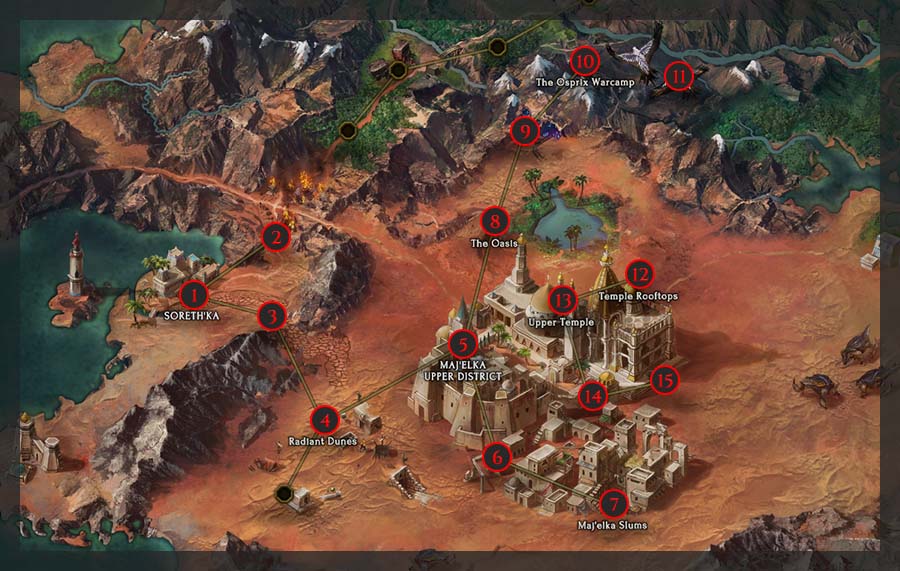
Welcome to chapter 9! Soreth'Ka is one of the 2 towns of chapter 9 and has various NPCs.
- Yulia and Saazhar who are the main quest NPCs.
- Captain Harton gives you the side quest Harton's Idol that rewards an Idol slot . Don't do this quest, it's not worth it.
- Teledji The Merchant gives you the side quest The Missing Merchant . I don't recommend doing this quest either as its rewards are not interesting.
- A Shop NPC .
Talk with Yulia and Saazhar, then go north to The Crossroads.
Waypoint: No
Quests: Journey to Maj'elka
Go north and fight off Osprix, then portal back to Soreth'Ka. Talk to Yulia and go east to The Dry River.
Waypoint: No
Quests: Journey to Maj'elka
Move east to The Radiant Dunes.
Waypoint: Yes
Quests: Journey to Maj'elka
Move southeast and kill Scalebane Swarmkeeper. Then talk to Zerrick and continue east to Maj'Elka Upper District.
Waypoint: Yes
Quests: The Scalebane
Soreth'Ka is one of the 2 towns of chapter 9 and has various NPCs.
- Zerrick, Nagasa Guard and Yulia who are the main quest NPCs. Zerrick also give the side quest Arjani, the Ruby Commander that rewards an Idol slot . I don't recommend doing this quest as its you already have unlocked all your Idol slot .
- Missing merchant gives you the side quest Oasis Hunt that rewards a Passive point . Don't do this quest, it's not worth it.
- A Shop NPC .
Go northeast and talk with Nagasa Guard, then Yulia and finally Zerrick. Go to the right entrance to Maj'Elka Lower District.
Waypoint: No
Quests: The Scalebane
Move southeast until you encounter a Scalebane Bodyguard. He asks you for 100,000 gold  . Refuse his demand and fight him, otherwise you lose up to 100,000 gold ! Continue to the Maj'Elka Slums.
Waypoint: Yes
Quests: The Scalebane
You have 3 hideout in the Maj'Elka Slums and you need to find the right one, which is the farthest on the east. You are faced with the Scalebane Guild Leader, defeat him and portal back to the Maj'Elka Upper District.
Talk to Zerrick and go to The Oasis.
Waypoint: Yes
Quests: Grand Theft Eagle
Move north to reach The Crystal Mines. On your way, you meet Mahraan Zabat. He gives the side quest Too Greedily, Too Deep that rewards an Idol slot . Don't do this quest, it's not worth it.
Waypoint: No
Quests: Grand Theft Eagle
Move north east to reach The Osprix Warcamp.
Waypoint: Yes
Quests: Grand Theft Eagle
Talk to Zerrick and move north until you meet a rare Siege Golem. Defeat him and talk to Zerrick again to reach Majasan Heights.
Waypoint: No
Quests: Grand Theft Eagle
Defend yourself from the Osprixes to reach The Temple Rooftops.
Waypoint: Yes
Quests: Apophis and Majasa (Passive point ![]() and +1 to all attributes)
and +1 to all attributes)
Move east to reach The Upper Temple.
Waypoint: Yes
Quests: Apophis and Majasa (Passive point ![]() and +1 to all attributes)
and +1 to all attributes)
Move north east until you reach the rare Diamond Matron. Defeat her to unlock the path to The Lower Temple.
Waypoint: No
Quests: Apophis and Majasa (Passive point ![]() and +1 to all attributes)
and +1 to all attributes)
Defeat the wave of monsters and continue to the The Chamber of Vessels.
Waypoint: No
Quests: Apophis and Majasa (Passive point ![]() and +1 to all attributes)
and +1 to all attributes)
Defeat Majasa to be done with chapter 9 and engage with Last Epoch end game!
If you want to learn more about the Majasa Boss Fight, check out the Majasa Act 9 Boss Guide.
End of the campaign
Congratulations, you are done with the campaign, getting every avilable Passive point ![]() and Idol slot , unlocking every dungeon and getting +1 to all attributes. You are now ready to conquer the main endgame system of Last Epoch, the Monolith of Fate!
and Idol slot , unlocking every dungeon and getting +1 to all attributes. You are now ready to conquer the main endgame system of Last Epoch, the Monolith of Fate!
Credits
Written by Terek.
Reviewed by McFluffin, Facefoot