Powered By

Contracts Guide

Last Updated: August 22, 2024

Share on Social

Contracts are one of the most important ways to progress through the game slowly but surely. There are three types: Resistance Contracts, Weekly Contracts, and Taedal's Tower Contracts. Most of the time, they involve you killing a certain number of monsters. Sometimes, they might have you gather or mine something or interact with an object. So basically, they're your typical MMO quest, given a special name just for Throne and Liberty! Regardless, all three types are worth making sure to do every day and week!

To learn the recommended Resistance Contracts and Weekly Contracts to take, click section 4 and 5 on the Table of Contents.

Resistance Contracts

Every daily reset, you gain ten extra Contract Rights, which are capped at 60. You can overflow if you have 59 before reset, reaching 69 right after. Nice, right?

To accept contracts, speak to any Contract Manager in any town. You can only have five active Resistance Contracts at any given time. The most popular zones to accept them once you hit level 49 are either Watcher's Post or Purelight Tower. At Watcher's Post, objectives take place in Fonos Basin or Ruins of Turayne. Purelight Tower objectives take place in Purelight Hill or Shattered Temple.

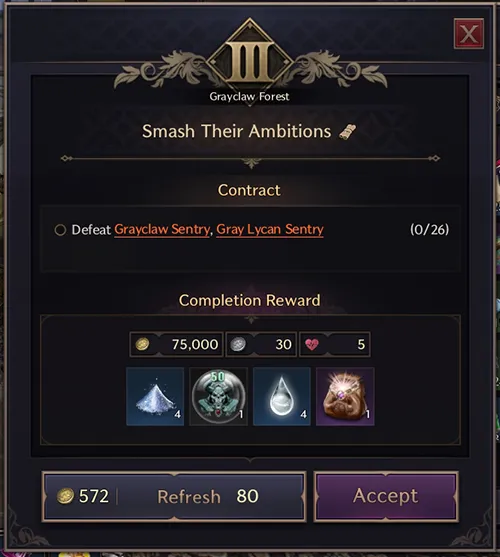
Resistance Contracts have 3 Tiers. The 3rd Tier gives you the most rewards but is the rarest to roll. You can refresh the list after accepting a Contract.

Refreshing the list is highly recommended because there is a low chance of a Contract that rewards Precious Blessing Pouch appearing. Opening these pouches gives you 2 extra Weekly Contracts.

Contract Manager

Contract Rewards

The best possible rewards from Resistance Contracts are given from Watcher's Post, Purelight Hill, or Canina Village. You can accept these contracts there starting at Level 49. Depending on the tier, the possible rewards are:

  1. Precious Blessing Pouch
  2. Training Dew: 10,000 Points
  3. Rare Polished Crystal
  4. Rare Parchment
  5. Rare Rubrix, Stalon, Emeret, Marind Ores
  6. Rare Base Material Selection Chest
  7. 50 Abyssal Contract Tokens

Contract Coin Merchant

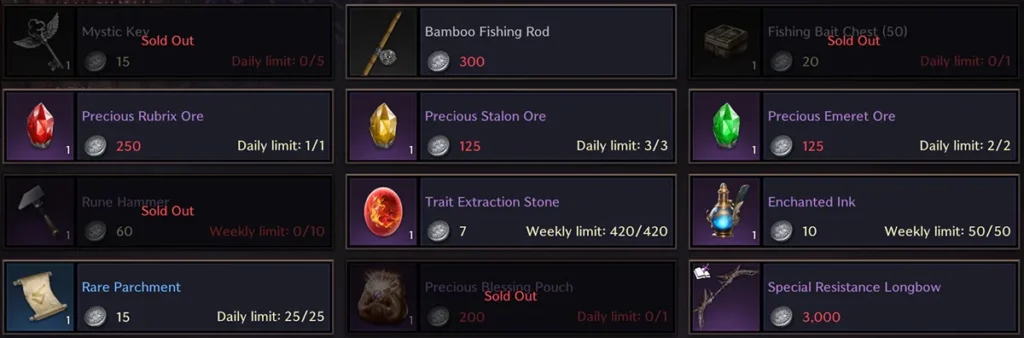
Every Resistance Contract at level 49 or higher rewards you 30 Contract Coins and 75000 Sollant. You can use these coins to purchase limited daily rewards at any Contract Coin Merchant located at Kastleton, Watcher's Post, Vienna Village, Stonegard Castle, Sanctuary Oasis, and Canina Village. The limit refreshes every daily reset.

  1. Mystic Key
  2. Fishing Bait Chest (50)
  3. Weapon, Armor, Accessory Ores
  4. Precious Blessing Pouch
  5. Special Resistance Weapons

Open World Contract Drops

As you farm mobs in the Open World, they drop Allied Resistance Forces Contract Scrolls. With these, you can accept another Contract relevant to the zone. You can reroll this contract 99 times, so do so as many times as possible to roll for one with Precious Blessing Pouch.

Here you see an example where I rerolled 19 times before getting the Precious Blessing Pouch.

Weekly Contracts

Each week, you are allowed to buy up to:

  • 6 Contract Scroll II: Syleus's Abyss
  • 6 Contract Scroll II: Shadowed Crypt
  • 6 Contract Scroll II: Sanctum of Desire
  • 6 Contract Scroll II: Saurodoma Island

2 are from the Sundries Merchants in the Laslan Region and the other 2 from Sundries Merchants in the Stonegard Region on each character. Completing these contracts rewards you with their respective Precious Blessing Pouch and Abyss Currency.

These Precious Blessing Pouches allow you to acquire any Tier 1 Purple Gear that can drop from the monsters in that dungeon.
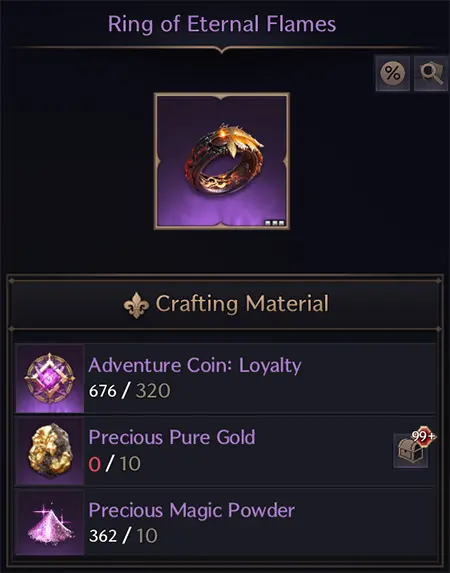
Abyss Currency, on the other hand, allows you to craft either the

  • Precious Equipment Chest: Abyss
  • Precious Equipment Chest: Shadow
  • Precious Equipment Chest: Desire
  • Precious Equipment Chest: Tyrant

These chests allow you to pick which gear you want specifically. You need 40 Abyss Currency to craft one with the Weapon Crafter, Armor Crafter, or Accessory Craft in Stonegard Castle.

Once the weekly reset occurs, you can buy 6x of each Contract again for all your characters. Make sure to stock up on each character every week, as they have no expiration date!

Taedal's Tower Contracts

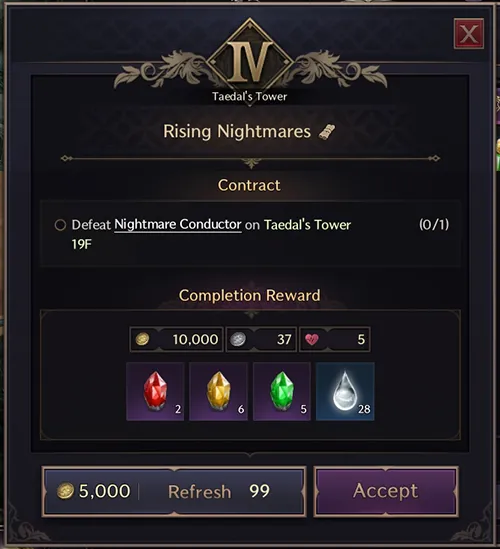
Taedal's Tower Contracts allow you to rechallenge a floor again, ranging from 10F to 20F. You may purchase up to 3 from Sundries Merchant every week. The rewards are shown in the image to the right.

  • 2 Precious Rubrix Ore
  • 6 Precious Stalon Ore
  • 5 Precious Emeret Ore
  • 28 Training Dew: 10,000 Points

Below are the recommended Resistance Contracts regarding efficiency. If I can, I like looking for five that all take place in one zone, are convenient, and complement each other. Once you do enough, you start seeing the patterns and be able to figure out what the most efficient route is for yourself. But until then, read below!

Purelight Hill
Shattered Temple
Fonos Basin
Ruins of Turayne

I picture the entire Purelight Hill zone and separate it by the enemies and the objects in each part. I take the Contract depending on how convenient it is to complete my other ones along the way.

Northeastern Route

  1. Mitran
  2. Kotori
  3. Black Boar
  4. Collect gatherable items
  5. Retrieve Smithing Tools
  6. Purify Contaminated Herbs
  7. Investigate the Mana Recording Device of Shattered Temple
  • In this region, you find Smithing Tools and Contaminated Herbs on your path. Along one of the escort routes, you encounter plenty of Mitran, Kotori, and Black Boars.
  • There are plenty of gatherables in all parts of Purelight Hill as well.
  • #7 is also not an error. After finishing your objectives in this part, you can fly down from the most northeastern part to the Mana Recording Device of Shattered Temple. You can even chain this into some Shattered Temple Contracts.

Southwestern Route

  1. A Token for Helping a Herbalist
  2. Activate the Old Purification Stone and acquire a Purified Branch
  3. Investigate the Mana Recording Device of Purelight Hill
  4. Black Boar
  5. Contaminated Mitran
  6. Collect gatherable items
  7. Contaminated Purification Stone
  8. Smithing Tools
  • I usually try to base this route around the Contract to activate the Old Purification Stone. It's an interactable that drops the Purified Branch you need after a specific charging time. During this charging time, the Contaminated Mitran and Black Boar nearby attack the Old Purification Stone. You have to kill them anyway, so you might as well have Contracts to do just that!
  • Contaminated Purification Stone is right across the pond from the Old Purification Stone.
  • You see Smithing Tools along the road out from Purelight Hill. "Investigate the Mana Recording Device" in Purelight Hill is a relatively simple quest that requires you to interact with something further southwest of the Old Purification Stone.
  • To complete the Goblin Herbalist objective, you need to pick up the Bag with Tokens. You usually find this escort quest in progress or the bag lying on the ground already, allowing you to efficiently complete the quest.

Southern Route

  1. Mitran
  2. Kotori
  3. Black Boar
  4. Collect gatherable items
  5. Purified Manastone
  • Sometimes, I like to combine contracts involving the above objectives with those of the Southwestern Route. I can walk east a bit to complete these objectives, but I don't base my contracts on the objectives that can be achieved here.
Shattered Temple Contracts Map

Shattered Temple is a much more straightforward region to take Contracts for. I still base my Contracts around two parts of the zone, Temple 2, Temple 4, and Azhreil Riftstone. To be more specific for Azhreil Riftstone, the part between the stairs and the entrance to the large square.

Temple 2

  1. Activate the Old Censor and acquire Blessed Material
  2. Gallu Soldier (A lot)
  3. Gallu Knight
  4. Gallu Archer
  5. Suspicious Coffin
  6. Silver Smelting Tools
  7. Collect gatherable items
  8. Cursed Aura Tombstone (Detour)
  • The Old Censor can be found in each Temple, but Temple 2 is the closest to the Shattered Temple Waypoint, where you usually teleport. You might as well take kill quests since you must protect it for some time until it spawns Blessed Material.
  • Temple 2 has a high concentration of Gallu Soldiers, which are easy to AoE down if you're strong enough. Gallu Knights and Gallu Archers are less concentrated than Gallu Soldiers, but a decent amount is around. Suspicious Coffin is located near the Temple area as well.
  • You can find Silver Smelting Tools a bit further south of the Temple and more Gallu Knights and Archers. There are plenty of gatherables along the way.

Temple 4

You're using the Purelight Hill Waypoint for Temple 4. It is basically identical to Temple 2, except that the Silver Smelting Tools are further away.

Azhreil Riftstone

  1. Investigate the Mana Recording Device
  2. Gallu Knights (A lot)
  3. Gallu Soldiers
  4. Gallu Archers
  5. Cursed Aura Tombstone
  • I like going to this area when I have a high number of Gallu Knight contracts. There's a large concentration of Gallu Knights in this area that you can easily aggro. If I have the Mana Recording Device contract, I complete it before flying back down. You can find a Cursed Aura Tombstone southeast of the Riftstone as well.

To be updated!

To be updated!

Below are the recommended Weekly Contracts you should take regarding efficiency.

If you're grinding to spend Abyssal Contract Token Points, group with a party and farm any dense mob area. The following spots shown below are just for Weekly Contracts.

Syleus Abyss 5F - 6F
Sanctum of Desire
Shadowed Crypt
Saurodoma Island
5F
6F

The red skull indicates the Demonhoof Head Shaman spawn locations. The boss respawns 10 minutes after being killed. Use Plague Zombie Morph or Gallu Knight Morph to avoid enemies as you walk around. Alternatively, you can use Geode Dracoryft Turtle Morph and swim across the lava to the grapple points.

Ideal Group

  • When doing Allied Resistance Forces Contract Scroll II: Syleus's Abyss, most players gravitate around one of four areas.
  • The most popular place is on the 5th Floor in the rightmost square area where the mini-boss is located. This is because all your Contracts involve either killing the Demonhoof Head Shaman or interacting with the Sealed Magic Tome or Soul Brazier. There's only one other place with all 3 and it's also on the square area on the 6th Floor.
  • The Soul Brazier in this square area is on the bottom floor, but you can easily grapple up again, which is indicated by the yellow arrow on the locations above.
  • The northern part of 5F and the southern part of 6F have both the Sealed Magic Tome and Soul Brazier, but not the mini-boss. If your group decides to farm here, just don't take the contract involving killing Demonhoof Head Shaman.

Collect Sealed Magic Tomes

  • Defeat Demonhoof Butcher
  • Defeat Demonhoof Tracker
  • Collect Sealed Magic Tome

Sealed Magic Tomes and Proof of Exploration

  • Collect Demonhoof Butcher, Demonhoof Berserker, and Demonhoof Tracker's Horns
  • Collect Sealed Magic Tome

Uncover the Secrets of the Abyss

  • Defeat Demonhoof Berserker
  • Defeat Demonhoof Tracker
  • Collect Sealed Magic Tome

Stop the Archmage's Ritual

  • Defeat Demonhoof Butcher, Demonhoof Berserker, and Demonhoof Tracker
  • Examine the Soul Brazier
  • Defeat Demonhoof Head Shaman

Researching Suspicious Mana Wavelengths

  • Defeat Demonhoof Butcher, Demonhoof Berserker
  • Examine the Soul Brazier

Dark Magic Analysis

  • Collect Demonhoof Butcher, Demonhoof Berserker, and Demonhoof Tracker's Horns
  • Examine the Soul Brazier

Revenge of the Black Scar Guild

  • Collect Demonhoof Butcher, Demonhoof Berserker, and Demonhoof Tracker's Horns
  • Defeat Demonhoof Head Shaman

Ritual to Open a Rift in Diabolica

  • Defeat Demonhoof Butcher, Demonhoof Berserker, and Demonhoof Tracker
  • Collect Sealed Magic Tome
  • Defeat Demonhoof Head Shaman

Abominations

The other contracts involve killed Lethal Venom Abomination and Steelclaw Abomination. They're just not efficient contracts. You can find them at the bottom of the square areas with the Soul Brazier.

1F
Basement

Once you enter the dungeon, you can probably see a zerg running around the circular path on the 1st Floor. Conveniently, the Avolos Umbramancer boss also spawns on the first floor near this path, as indicated by the red skull. If you don't have a group, being part of this zerg is an efficient way to complete Allied Resistance Forces Contract Scroll II: Sanctum of Desire.

Lazy Group

If you're super lazy and don't want to join a group to farm somewhere else, you can flow with the Zerg and slowly complete the following Contracts. Most involve killing the Avolos Umbramancer.

For Safe Sanctum Investigations

  • Defeat Avolos Tracker
  • Defeat Avolos Guardian

Umbramancer's Conspiracy

  • Defeat Avolos Tracker
  • Defeat Avolos Geomancer, Avolos Aeromancer
  • Defeat Avolos Umbramancer

Energy of Diabolica in the Armor

  • Collect armor from Avolos Tracker and Avolos Guardian
  • Defeat Avolos Pyromancer, Avolos Aeromancer
  • Defeat Avolos Umbramancer

Stop the Umbramancer's Ritual

  • Defeat Avolos Guardian
  • Defeat Avolos Hydromancer, Avolos Pyromancer
  • Defeat Avolos Umbramancer

Avolos Armor Collector

  • Collect armor from Avolos Tracker and Avolos Guardian
  • Defeat Avolos Geomancer, Avolos Hydromancer
  • Defeat Avolos Umbramancer

Samad's Revenge

  • Defeat Avolos Geomancer, Avolos Hydromancer
  • Defeat Avolos Pyromancer, Avolos Aeromancer
  • Defeat Avolos Umbramancer

Altar of Darkness

If you want to be a bit more proactive, consider the options below. At the Altar of Darkness area, you're more likely to find Avolos Geomancer and Avolos Hydromancer. You can take some quests above that involve the aforementioned.

Watch the video to see how to get to the Altar of Darkness without passing through any gates.

Further Investigate the Alter of Darkness

  • Defeat Avolos Tracker
  • Defeat Avolos Guardian
  • Investigate the Altar of Darkness

Sanctum of Desire Investigation Support

  • Defeat Avolos Guardian
  • Collect Essence of Earth from Avolos Geomancer
  • Investigate the Altar of Darkness

Altar Deep in the Sanctum

  • Defeat Avolos Tracker, Avolos Guardian
  • Investigate the Altar of Darkness
  • Defeat Avolos Umbramancer

Investigate the Alter of Darkness

  • Defeat Avolos Guardian
  • Collect Water Essence from Avolos Hydromancer
  • Investigate the Altar of Darkness

Junobote's Book

In the Junobote's Book area, you find more Avolos Aeromancers and Avolos Pyromancers. I only like spending time in this room if I am trying to grind.

Watch the video to see how to get to Junobote's Book without passing through any gates.

Junobote's Book

  • Defeat Avolos Guardian
  • Collect Essence of Wind from Avolos Aeromancer
  • Acquire Junobote's Book

Treasure in the Sanctum

  • Defeat Avolos Guardian
  • Collect Essence of Fire from Avolos Pyromancer
  • Acquire Junobote's Book

Mono Element

Four contracts involve killing primarily Avolos Elementalists from one of the four schools: Pyro, Geo, Hydro, and Aero. The zerg rarely passes through the more concentrated areas where they are located on the 1st Floor, other than maybe the Aeromancer one. Thus, none of them are worth mentioning.

The basement (right part of the image) is one of the areas where most people complete their Allied Resistance Forces Contract Scroll II: Shadowed Crypt. This is because you find the Berserk Dark Enforcer and the Mana Flame Brazier in the same place.

Ideal Group

I usually begin my rotation with this initial five if I do not know the respawn timer of Berserk Dark Enforcer. The Mana Flame Braziers are close by, so they're never an issue. Once I finish the Berserk Dark Enforcer contracts, I rotate in a round of the Watcher Statue contracts because it'll take 10 minutes for the boss to respawn anyway.

Wicked Spell

  • Collect Dark Magic Books from Dark Wizard and Dark Shaman
  • Interact with Mana Flame Brazier

Weaken the Sylavean Order

  • Collect Dark Enforcer, Dark Assassin's Weapon Part
  • Interact with Mana Flame Brazier

Stopping Dark Magic Rituals

  • Defeat Dark Enforcer, Dark Shaman
  • Interact with Mana Flame Brazier
  • Defeat Berserk Dark Enforcer

Arkeum and Shadowmancers

  • Defeat Dark Wizard, Dark Shaman
  • Defeat Berserk Dark Enforcer

Shadowmancers' Holy Ground

  • Defeat Dark Enforcer, Dark Assassin
  • Defeat Berserk Dark Enforcer

Switch Out

Both Watcher Statues do not take long to get to. You do have to go up a floor, breaking away from the zerg momentarily. While there are monsters near the statue, you can morph into a Plague Zombie or Gallu Knight to avoid any mobs. Go directly behind the statue before interacting with it to prevent any monster aggro.

I don't usually take the Abyssal Specter contracts because I get anxious. Abyssal Specters spawn when you kill the monsters with the purple aura around it. It takes 10 minutes for the purple aura to respawn, so it feels like a dead contract is taking up space when I could have just taken a Berserk Dark Enforcer contract.

Venelux's Plan

  • Defeat Dark Enforcer
  • Defeat Dark Shaman
  • Interact with Watcher Statue

Sylavean Order's Cruelty

  • Defeat Dark Wizard
  • Defeat Dark Assassin
  • Interact with Watcher Statue

Dangerous Specters

  • Defeat Abyssal Specter
1F
Basement

When you first enter, you encounter most players killing mobs near the Brazier area to complete Allied Resistance Forces Contract Scroll II: Saurodoma Island.

Ideal Group

None of these contracts involve you killing a mini-boss or elite. It's just a good old-fashioned monster-slaying fiesta.

For Safe Trading

  • Defeat Reptilian Soldier, Reptilian Sentry
  • Defeat Reptilian Lancer, Reptilian Fighter

Reptilian Crossbows

  • Defeat Reptilian Soldier
  • Collect Rusty Crossbows from Reptilian Sentry

Their Special Crossbow-Making Secrets

  • Defeat Reptilian Fighter
  • Collect Rusty Crossbows from Reptilian Sentry

Treasure-Hunting Brothers

  • Defeat Reptilian Fighter
  • Defeat Reptilian Lancer

Reptilian Regeneration

  • Defeat Reptilian Sentry
  • Collect Reptilian Solder, Reptilian Lancer, Reptilian Fighter's Tails

Angry Fisherman's Request

  • Defeat Reptilian Soldier
  • Defeat Reptilian Lancer

Reptilian Butcher

To spawn the Reptilian Butcher, you need 20 last hits. Each last hit on a mob gives you a buff. You need 20 buffs to receive another buff, lasting only 5 minutes. With this 5-minute buff, you then need to interact with the Brazier in the area to spawn the Reptilian Butcher. But wait, it's not a 100% chance to spawn! I really don't recommend this group.

Reptilian Conspiracy

  • Defeat Reptilian Soldier, Reptilian Sentry
  • Defeat Reptilian Butcher

Saurodoma Island Preemption

  • Defeat Reptilian Solder, Reptilian Lancer
  • Defeat Reptilian Butcher

For Safe Docking

  • Defeat Reptilian Lancer, Reptilian Sentry
  • Defeat Reptilian Butcher

Revenge of the Family

  • Defeat Reptilian Solder, Reptilian Lancer
  • Defeat Reptilian Fighter, Reptilian Sentry
  • Defeat Reptilian Butcher

Collect Magic Crystal Flower

Four kill quests involve you collecting a Magic Crystal Flower. To collect it, you need to venture away from your zerg. It's efficient if your group is just farming the area near the pickup.

Summary

  • The three types of contracts are Resistance Contracts, Weekly Contracts, and Taedal's Tower Contracts.
  • Contracts further your progression in the game, offering you key upgrade materials like Rare Rubrix Ore.
  • Weekly Contracts are a fantastic way to acquire BiS gear.
  • For efficiency, you should take ideal Weekly Contracts for each Open World Dungeon.
  • Taedal's Tower Contracts help you progress through the game.

Credits

Written by Yaen
Reviewed by Nymphellas

© 2024 Maxroll Media Group, All Rights Reserved