Archboss Guide
Last Updated:April 17, 2025|Changelog
Guild Bosses, Field Bosses, and Archbosses are the three types of bosses in Throne and Liberty. This guide focuses on sharing all you need to know about Archbosses that drop some of the most potent weapons in the game.

There are two weekly Archbosses in Throne and Liberty: Desert Overlord Queen Bellandir and Courte's Wraith Tevent. Both Archbosses require a large amount of coordination to defeat.
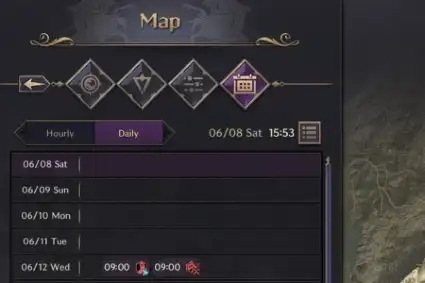
How to Use the Timetable
Open the Map (M), head to your Timetable at the top left, and select 'Hourly' or 'Daily' to see exactly when an Archboss is spawning and any concurrent events.
The icon with three dots and three lines at the top right of the Timetable enlarges and shrinks icons to improve readability.
An alternative option to check current or upcoming bosses is the Schedule icon located at the top right of your screen, just to the left of your Minimap. This function only shows bosses that are active or coming in the next hour.
Instanced and Open World PvP Events
Archbosses alternate between instanced portals and Open-World PvP every week.
During an Open World PvP event, a large area surrounding the boss spawn becomes PvP active, and players can immediately begin attacking each other. No Instanced Portals spawn.
For the Instanced Portals, Peace, Dominion, and Guild portals are available. Choosing Peace will teleport you into a PvE-only instance. Choosing Dominion will teleport you into a PvPvE event where you are put into one of three factions. Choosing Guild will sign you up for a GvG or GvGvG event.
Roaming Level 50 Archbosses

Besides their weekly spawn times, Archbosses roam in their respective zones, dropping items that can be collected and used to craft Archboss weapons. You can't target or damage roaming Archbosses.
Queen Bellandir can be found roaming the Moonlight Desert. It has an extremely low chance of randomly dropping Queen Bellandir's Carapace. Players can collect this and use it to craft Bellandir weapons. During the Desert Caravan event, roaming Bellandir drops a significant amount of Moonlight Scales that you can turn in for additional event contribution points.
Tevent can be found roaming the Ruins of Turayne. It has an extremely low chance of dropping Tevent's Soul Fragment randomly. Similar to Bellandir's Carapace, you can collect fragments and use them to craft Tevent weapons.
Level 50 Archbosses
Below is information on the location, rewards, and mechanics for both Archbosses in Throne and Liberty. Remember, participate in both boss battles regardless of your level to qualify for loot and Codex completion. However, these bosses deal incredibly high damage to all players, regardless of their gear.
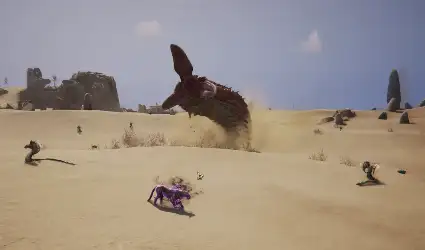
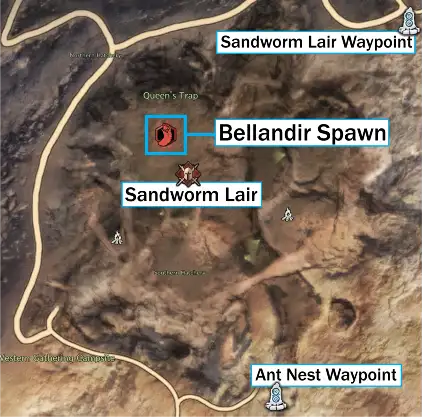
Queen Bellandir is the first Archboss unlocked through the Milestone system and is a level 50 gigantic worm that spawns in the Queen's Trap in the northwestern portion of the Sandworm Lair.
There are two ways of reaching Bellandir's spawn. You can run southwest from the Ant Nest Waypoint or travel northwest from the Sandworm Lair Waypoint.
Guaranteed Loot
- Conquest Participation Award: Queen Bellandir
Random Loot
- Queen Bellandir's Blade
- Queen Bellandir's Annihilation Crossbow
- Queen Bellandir's Domination Wand
- General's Charge Boots
- Ghost Wolf Stealth Boots
- Transcendental Wing Shoes
- Transcendent Magic Ring
- Queen Bellandir's Carapace
- Queen Bellandir's Abyss (only when raining)
- Queen Bellandir's Core
- Morrigan Raven
Queen Bellandir's Mechanics and Tips
Bellandir's mechanics are not so complex once you understand them. The key thing to remember is that you must have at least 20 to 40 Queen's Venom Neutralizer to be prepared for Bellandir. Purchase them from a Guild Merchant using your Guild Coins. Knowing the mechanics described below provides you with a huge advantage in eliminating your enemies using the boss's mechanics.
- When Queen Bellandir spawns, it stuns all nearby players for a few seconds.
- Pay attention to Bellandir's two Fury Attacks, which are frequently cast during the fight. The Purple Fury Attack Indicators are easy to time to get a Perfect Block most of the time. If you fail to block one of Bellandir's Fury Attacks, it grabs you and launches you into the air, dealing massive damage. The second Fury Attack is more dangerous as it one shots most players and deals massive damage to tankier players.
- Both of Bellandir's Fury Attacks are melee to mid range, so long range players hardly have to worry about them.
- Bellandir poisons everyone in the arena throughout the fight with a strong Poison DoT. When you are hit with the DoT, use the Queen's Venom Neutralizer to cleanse it quickly. This mechanic happens quickly and also includes a brown shockwave or blast from Bellandir to help notify you of the mechanic.
- During the fight, Bellandir shouts inaudible words and then digs its head underground, spawning a massive Sandstorm that covers the majority of the arena and sucks players into the center. Do your best to keep away from the middle of the Sandstorm or try to run out of it, or else you get one shot once the mechanic ends.
- Throughout the fight, Bellandir also launches larvae, similar to the ones during the last boss fight of the Cave of Destruction, which latch onto randomly selected players. These players must run quickly away from their teammates because the Worms explode and one shot most players caught in the AoE.
- Pay attention to when Bellandir is about to hit 10% health as it leaps into the air and land, dealing massive damage to everyone within melee range.
PvP Tips
- When Bellandir spawns, and AoE stuns all nearby players, take advantage of this opportunity to quickly kill enemies and reduce their damage output on the boss.
- During the Sandstorm, players who didn't get out in time are forced to morph and try to keep as far away from the center. Use ranged abilities to secure easy kills on these players.
- If a Worm latches on to you, use them to blow up enemy raids and thin their numbers.
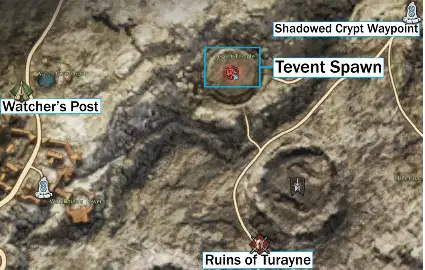
Courte's Wraith Tevent is a level 50 Archboss that spawns on the northwest edge of the Ruins of Turayne in the center of Tevent Temple.
There are two ways to reach the boss. You can either travel northeast of Watcher's Post and fly down into the temple or run southwest from the Shadowed Crypt Waypoint.
Guaranteed Loot
- Conquest Participation Award: Tevent
Random Loot
- Tevent's Despair Blade
- Tevent's Massacre Blade
- Tevent's Screaming Bow
- Tevent's Cuneiform Bone
- Grand General's Strike Gloves
- Reaper's Hand of Death
- Touch of Mother Nature Gloves
- Tevent's Frame
- Tevent's Abyss (night time only)
- Tevent's Soul
- Frost Lutrang
Tevent's Mechanics and Tips
Tevent is a difficult boss to fight, especially during a Conflict spawn. Once you understand all the mechanics, incorporate them into your strategies during PvP to wipe enemy raids. Pay attention to Tevent's animations and any debuffs you are affected by to avoid getting one-shot or dying to DoT damage.
- Tevent casts Purple Lines on the ground that spawn Bones after 3 seconds. Pay attention to the ground and run out of this telegraphed mechanic to avoid damage.
- Similar to Queen Bellandir, Tevent's Fury Attack has a slow Purple Fury Attack Indicators that is easy to Block. Sometimes, Tevent casts the same Fury Attack twice in a row, so make sure you have enough stamina to Block twice or else take massive damage.
- When Tevent says, "Plummet to the depths of hell!" it Dashes two to three times toward the edge of the arena in random directions, dealing enough damage to one shot players who aren't tanky. After the final Dash, Tevent jumps back to the center of the arena, dealing massive AoE damage that covers the entire inner platform. Move away from where Tevent is facing after it shouts to avoid getting hit by the dashes. Also, it's easier to face tank the AoE damage when Tevent Jumps back to the middle of the arena. You can time your jump to avoid damage if you're too squishy or run off the inner platform and into the water to avoid the AoE damage.
- Tevent throws multiple Daggers from its body in a 360-degree AoE that covers the majority of the arena. Face tank this damage if you're ranged; however, melee struggle more as getting hit by multiple daggers deals additional damage. Reduce the damage you take by running away from Tevent when it gathers Spirits into its body, making it glow purple for a moment before exploding with Dagger Projectiles.
- Throughout the fight, Tevent's left hand glows purple as it prepares to cast Lightning that falls from the sky on multiple randomly selected players, applying a massive DoT Debuff. With correct timing, you can block the lightning. Cleanse this Debuff by jumping into the waterway and standing under the waterfalls. If it's raining, you just have to jump into the river formed in the waterway.
PvP Tips
- Taking control of the outer ring gives you a massive advantage during the fight, as you can DPS players from range in the inner ring, depending on where the boss moves. You can kill or freely DPS players running into the water to cleanse themselves or trying to escape a mechanic.
Credits
Written by EliEli
Reviewed by Tenkiei, Yaen