Twink Ice Strike Invoker Leveling Guide
This Twink Ice Strike Invoker Leveling Guide teaches you how to speedrun through the campaign, from Level 2 to Level 60, with all Skill Points & Permanent Stat Bonuses, in under 5 hours.
- Do you want to Level an Invoker?
- Do you want to reach maps in under 5 Hours?
- Do you have Exalted Orbs to spare?
If you answered yes to all of the above then you're in the right place!
Note: This guide is for players leveling a second character or later. If this is your very first character, and you're looking to level an Invoker, check out this Fresh Start Leveling Guide here!
Dawn of the Hunt brought sweeping changes to Path of Exile 2, and information on the passive tree or skill balance was not released before the patch went live. We're hard at work testing the build and will update the guide as soon as possible. Use this build as a framework for your leveling journey and pin the post to be notified of updates.
Path of Exile 2 is currently in early access, this means rapid development including frequent changes to builds as there are balance fixes and we learn more. Pin this page to be notified of any updates.
If you've beat the campaign and want to check out an endgame version of the build check out our Ice Strike Invoker Build Guide!
Twink Leveling Basics
The basics of Twink Leveling are to:
- Buy & Prepare Items
- Setup Items & Skill Gems
- Have a Plan & Go!
The guide provides the following for a seamless leveling experience:
- Trade Links
- Step-by-Step Skill Gem Progression
- Passive Tree Routing
- A Leveling Plan that has been tested multiple times
- & a Full Video of the run
Buying & Preparing Items
The first step is to buy and prepare items, organized into the following categories:
- Equipped Items
- Inventory Items
- Stash Items
Unique items are bought, and Rare items are either crafted during the run or prepared on your main character in advance. No expensive Unique items are required, and no hard-to-craft Rare items are selected. If an item is optional it is noted. Furthermore, if you've been actively mapping, you may already have acceptable Rare Items or some of the consumables listed below.
The prices of items listed below may change over time!
Equipped Items
Equipped Items are equipped from the beginning of the run. Take care when purchasing or crafting items that the level requirement is 2 or lower.
- Pillar of the Caged God = 1ex
- Sockets: 2 Glacial Runes
- Optional: Purchase with a Corrupted Implicit = 3ex+
- Wings of Caelyn = 1ex
- Foxshade = 1ex
- Luminous Pace = 1ex
- Meginord's Girdle = 1ex
- Rare Rings x2
- Acquisition: Purchase Iron Rings from Una or Finn in Act 1 Normal
- Crafting Method: Alchemy, Essence or Alt Transmute Regal Exalt
- Desirable Mods: Flat Damage to Attacks, Strength, Dexterity, Intelligence, Attributes
- Rare Gloves
- Acquisition: Purchase a Stocky Mitts or Suede Bracers from Una or Finn in Act 1 Normal
- Crafting Method: Alchemy, Essence or Alt Transmute Regal Exalt
- Desirable Mods: Flat Damage to Attacks, Strength, Dexterity, Intelligence
- Rare Amulet (Optional)
- Acquisition: Purchase a Crimson Amulet from Una or Finn in Act 1 Normal
- Crafting Method: Alchemy, Essence or Alt Transmute Regal Exalt
- Desirable Mods: Strength, Dexterity, Intelligence, Attributes
- Instill: Sharpened Claw
- Magic Lesser Life Flask
- Magic Lesser Mana Flask
Inventory Items
Inventory Items include gear that is equipped soon, or are small items that are carried in advance, to save time later. In this run Inventory Items have a level requirement of 16 or lower.
- Wanderlust = 1ex
- Greymake (Optional) = 5ex+
- Surefooted Sigil = 5ex+
- Instill: Sharpened Claw or Blur
- Surefooted Sigil is useful for going faster, but can be replaced with a rare Attribute Amulet instead
- Alternative: Rare Attribute Amulet
- Desirable Mods: Spirit, Strength, Dexterity, Intelligence, Attributes, Resistances
- Any Rage on Hit Jewels x2+ (Optional) = 1ex
- Polcirkeln (Optional) = 3ex+
- Any Rare Rings with Flat Damage to Attacks and Attributes (Level 3 to 16) = 1ex+
- Note: If you purchase a Polcirkeln, prepare only 1 Rare Ring.
- Sapphire Charm
- Ruby Charm
- Topaz Charm
- Uncut Support Gem 3 x22 = 1ex x22
- Note: Most players have extra Uncut Support Gems from mapping. If not, it may be faster to farm them in maps instead of individually trading for them.
- Lesser Jeweller's Orb x7
- Note: Lesser Jeweller's Orbs are best bought in bulk via the in-game Currency Exchange.
- Gemcutter's Prism x4 (Optional)
- Note: Gemcutter's Prism are best bought in bulk via the in-game Currency Exchange.
Stash Items
Stash Items are equipped in later acts. In this run Stash Items have a level requirement of 16 or higher. All Rare Items have the same crafting methods listed above.
- Thrillsteel = 5ex+
- Alternative: Rare Helmet with Stats = 1ex
- Alternative: Use Wings of Caelyn for the whole run
- 25% MS Bushwhack = 1ex+
- Alternative: Rare Boots with 25% Movement Speed (Level 40+) = 1ex
- Any Rare Rings with Flat Damage to Attacks and Attributes (Level 16 to 30) = 1ex+
- Any Rare Rings with Flat Damage to Attacks and Attributes (Level 30 to 40) = 1ex+
- Rare Gloves (Level 30 to 40) = 1ex+
- Specific Bases: Any Evasion Gloves
- Acquisition: Purchase from Oswald or Alva in Act 3 Normal
- Crafting Method: Alchemy, Essence or Alt Transmute Regal Exalt
- Desirable Mods: Flat Damage to Attacks, Strength, Dexterity, Intelligence, Resistances
- Higher Level Mana Flasks
- Grand Mana Flask
- Colossal Mana Flask
- Gargantuan Mana Flask
- Transcendent Mana Flask
- Higher Level Life Flasks
- Grand Life Flask
- Colossal Life Flask
- Gargantuan Life Flask
Setup Items & Skill Gems
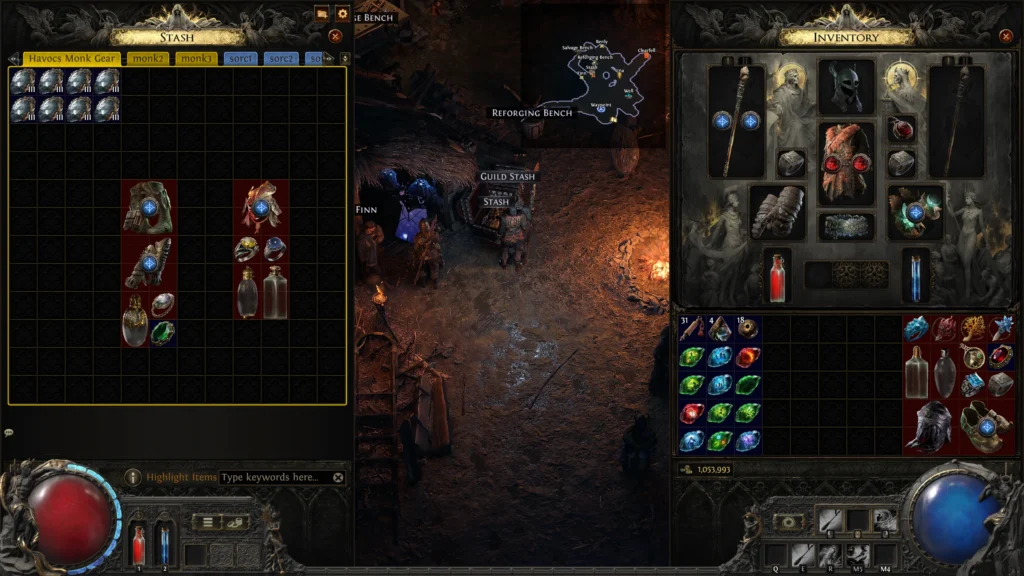
The second step is to organize all of the prepared items and setup your skill gems. Use the reference image below to setup your Equipped Items, Inventory & Stash. Use the Skill Embed on the right for Step-by-Step Skill Gem Progression.
The Level 2 Setup
- Glacial Cascade is created with the first Uncut Skill Gem from Renly
- Killing Palm is optionally acquired by muling a second character or by searching for the Mysterious Campsite in Clearfell
- Recommended: Use 4 Gemcutter's Prisms on Ice Strike at Level 14.
Additional Notes
- Future Skill Gems are created with quest-given or dropped Uncut Skill Gems.
- If a Skill Gem has 3 attached support gems, use a Lesser Jeweller's Orb on it.
- Level 3 Uncut Support Gems have no level requirements; and can support Level 1 Skills.
- Furthermore, you can optionally create every support gem in advance, as pictured below.
Use the <Prev and Next> arrows to navigate.
Go!
It's time to blast! Noted below are any key gear swaps, character breakpoints, or zone routings to assist with your run. There may be some discrepancies, depending on how many extra rare items you've crafted and which unique items you've selected.
Act 1 Normal
- Run Start
- Level 5
- Switch Wings of Caelyn for Greymake
- Level 6
- Equip Tempest Bell + Overabundance + Font of Rage + Concentrated Effect
- Level 8
- Switch your Current Amulet for Surefooted Sigil
- Kill King in the Mists
- Equip Herald of Ice + Magnified Effect + Longshot + Innervate
- Level 11
- Switch Luminous Pace for Wanderlust
- Level 12 (Optional)
- Switch a Rare Ring for Polcirkeln
- Before Geonor
- Equip a Sapphire Charm
- Level 14
- Remove Falling Thunder
- Equip Ice Strike + Primal Armament + Close Combat + Martial Tempo
- Note: Martial Tempo is from Glacial Cascades links.
- Review Glacial Cascade + Upheaval + Mobility + Rage
Act 2 Normal
- Before Rudja, the Dread Engineer
- Equip a Ruby Charm
- Level 16+
- Equip a higher level Life Flask Grand Life Flask
- Equip a higher level Mana Flask Grand Mana Flask
- Equip any Rare Ring upgrades
- Traitor's Passage
- Kill Balbala, the Traitor to receive the quest Djinn Barya for your ascension.
- Level 22-30+
- Equip any Rare Ring upgrades
- With a Level 7 Uncut Skill Gem, create Hypothermia & Freezing Mark to equip later at Level 31
- Note: This requires 52+ Intelligence.
- Level 27
- Switch Greymake for Thrillsteel
- Trial of the Sekhema
- Before entering the Dreadnought, complete the Trial of Sekhemas for your first 2 Ascendancy Points.
Act 3 Normal
- Level 30
- Equip a higher level Life Flask Colossal Life Flask
- Equip a higher level Mana Flask Colossal Mana Flask
- Level 31
- Equip Hand of Chayula + Hypothermia + Hex Bloom + Freezing Mark
- Level 33+
- Equip 25% MS Bushwhack
- Equip any Rare Glove upgrades
- Equip any Rare Ring upgrades
- Defeat Ignagduk
- Equip Charged Staff + Persistence + Conduction + Overcharge
- Equip Combat Frenzy + Profusion
- Note: This requires Resonance on the Passive Tree.
- Level 40
- Equip a higher level Life Flask Gargantuan Life Flask
- Equip a higher level Mana Flask Gargantuan Mana Flask
- Upgrade any items for rare items as you see fit.
- All of Cruel Difficulty can be completed with gear equipped in Normal.
Act 1 Cruel
- Freythorn (King in the Mist) can be skipped.
- Continue Blasting.
Act 2 Cruel
- Level 50
- Equip a higher level Mana Flask Transcendent Mana Flask
- Continue Blasting.
Act 3 Cruel
- Defeat Ignaduk for +40 spirit
- Add Clarity to Combat Frenzy
- Equip Wind Dancer
- Continue Blasting.
Skill Rotation
- During the Early Game the majority of your pack-to-pack clear is done with Glacial Cascade.
- Use Killing Palm to dash to new packs and progress faster.
- For Tankier Monsters, first build combo with Quarterstaff Strike.
- Then use Tempest Bell & Falling Thunder.
- After acquiring Ice Strike with a Level 4 Uncut Skill Gem, use it as your primary pack clearing and single target ability.
- Enemies that are far away and behind or to the side of your character, can still be cleared with Glacial Cascade.
- At Level 14 versus Tankier Monsters, first build combo with Ice Strike.
- Then use Tempest Bell.
- Then build another combo with Ice Strike.
- Then use Tempest Bell once more.
- Before concluding with successive Ice Strikes until the enemy is defeated.
- At Level 31 the Single Target combo is the same as above, except before attacking, use Hand of Chayula to apply Hypothermia & Freezing Mark.
- After acquiring Charged Staff + Combat Frenzy + Resonance on the Passive Tree:
- Use Charged Staff to consume Power Charges, significantly increasing both your clear speed & single target damage.
- At the start of a zone:
- Consider using Charged Staff at 2 Power Charges.
- Before using Charged Staff again at your Maximum Power Charge amount.
- Before Bosses:
- Attempt to enter Boss Arenas with your Maximum Power Charge Amount.
- Power Charge Duration from the minor nodes before The Power Within helps versus bosses with long cutscenes.
Passives
Click the Arrows to open in a new tab for step-by-step progression.
- Begin the Run by rushing towards Step Like Mist through the Attribute nodes on the right.
- Then, allocate Essence of the Mountain, Essence of the Storm & Flow Like Water.
- Progress to Echoing Frost, Echoing Thunder & Echoing Flames.
- Allocate Killer Instinct & Tenfold Attacks.
- Path to the Jewel Socket by Resonance, & equip a Gain 1 Rage on Melee Hit Jewel.
- Afterwards, allocate The Power Within, Lust for Power & Resonance. Ensure you allocate Resonance as you equip Charged Staff & Combat Frenzy.
- Then, add another Jewel Socket & Overflowing Power.
- Next, boost your damage with Thin Ice and Heavy Frost; and reduce your mana costs with Conservative Casting.
- Begin to slowly allocate increased Critical Hit Chance & increased Critical Damage Bonus nodes to conclude the run.
- Lastly & optionally, consider rerouting your starting points to the left side, pathing through Skill Speed & Critical Damage.
- Note: Consider allocating Siphon and/or Life on Kill to improve Mana or Life sustain while clearing.
- Note: Depending on your rare items, you may need to allocate Strength, Dexterity, or Intelligence. That said, most of your attribute points should be Strength to scale your damage with Pillar of the Caged God & secondarily Intelligence to equip your Skill Gems.
Video
The video below goes over all the leveling steps while also showing gameplay and playstyle tips.
FAQ
Yes
The purpose of a Twink Run is to level a new character as quickly as possible through the campaign. Players using Twink Runs often view the campaign as the tutorial and maps as the true endgame.
- Relic: 15% increased Mana Recovery from Flasks
- Venom Drought: 25% increased Mana Regeneration Rate
- Cruel Relic: 15% increased Life Recovery from Flasks
- Cruel Venom Drought: +5 to All Attributes
Ice Strike Invoker is played with a kill or be killed playstyle. Aggressive play is required to freeze enemies before they can attack. However, if aggressive play is difficult to execute, use Glacial Cascade to freeze or defeat enemies before progressing forward.
Summary
- Complete the PoE2 Campaign in under 5 Hours
- Acquires all Skill Points and Permanent Stat Bonuses
- No Expensive Unique Items & No Hard-to-Craft Rare Items
Credits
Written by: havoc616
Reviewed by: Crouching_Tuna
Language Reviewed by: Tenkiei