The Spear Huntress Leveling Guide
In this Spear Huntress leveling guide you learn powerful leveling builds for both the Amazon and the Ritualist Ascendancy Classes. The recommended leveling strategy is a Bleed Spear Huntress build, which deals incredible physical damage while easily dancing around dangers with high mobility. This beginner-friendly guide covers both a fresh start (or Solo Self Found run), and leveling with Uniques to crush the Path of Exile 2 Campaign.
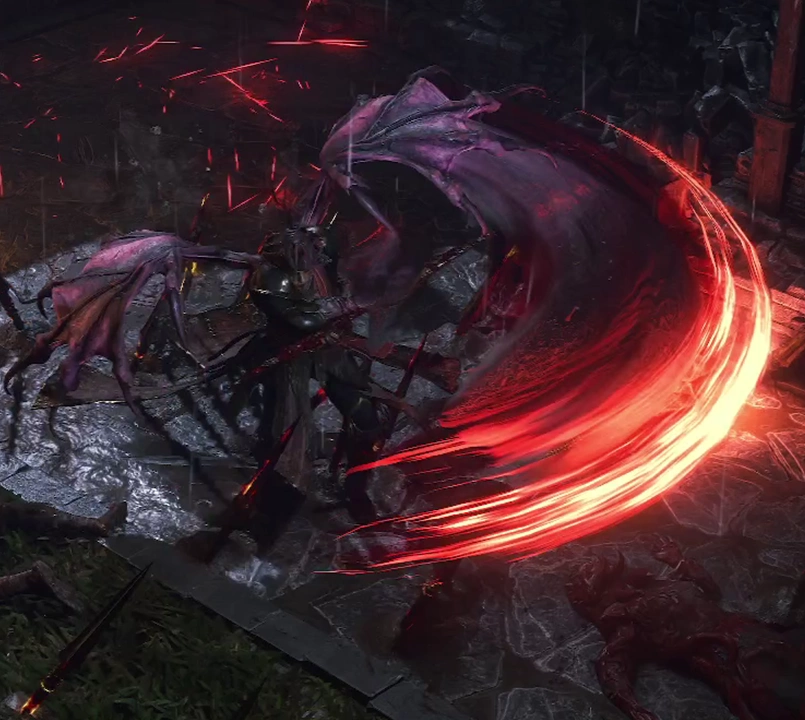
The Rake skill with the incredible Stomping Ground Support Gem deals devastating physical damage to tanky enemies like Rares and Bosses, while also giving excellent clear speed of packs thanks to its high mobility. Strength-stacking during the campaign gives huge damage and a large Life pool with almost no gearing requirements to succeed — making it a perfect budget league-starter or Solo Self Found build.
Spearfield provides a safe way to deal damage at range and can deal huge damage to any larger bosses or any targets that attempt to charge you. High mobility and hit-and-run tactics are enabled by the combination of Rake, Disengage and Thunderous Leap.
This build doesn't require any Unique items to function. But the build does benefit from several common Uniques including Horns of Bynden, Meginord's Girdle, and Jarngreipr. Your first few Exalted Orb drops can be spent to trade for these items in Trade Leagues, giving you an immense power boost.
You do not need specific resistances on any item, just aim to cap your Elemental Resistances at 75% as soon as possible! Chaos Resistance becomes important in the endgame but is not as important (or available) during the Campaign.
Path of Exile 2 is currently in early access, this means rapid development including frequent changes to builds as there are balance fixes and we learn more. Pin this page to be notified of any updates.
Skills
- In early Act 1 you use a combination of basic Spear Stabs, Explosive Spear, and Whirling Slash.
- Throw your Explosive Spear as you close into engage, ideally you should try to anticipate where the monsters are going to be when it explodes.
- Engage larger groups with Whirling Slash to deal area damage and blind enemies. Disengage can be used with Whirling Slash to trigger it's explosion easily while dealing additional damage.
- Use Spear Stab to deal single target damage while waiting for Explosive to detonate.
- You can optionally include Parry and disengage on bosses or lone attackers followed by Disengage to defend yourself and create a Frenzy charge to empower Explosive Spear.
- Rake is available early in Act 1 when you get your first Level 3 Uncut Skill Gem — around character level 6.
- It can be used initially for movement and to apply some Bleed damage to enemies.
- When you get your next Uncut Support Gem create the Stomping Ground and use it with Rake.
- The Rake skill now pulses twice, slash, and then pulse again. The pulses from Stomping Ground deals the majority of your damage for a long while.
- Stomping Ground's damage is based on your total Strength. Allocate as many Strength nodes as possible and prioritize Strength on gear.
- Only get enough Dexterity and Intelligence to equip gear and gems. Use the passive point respec in town with Gold to reallocate Attribute nodes as needed.
- Keep an eye out for Runes that grant Attributes! Even Dexterity on gear can be useful as it allows you to allocate more Strength with Passives.
- Spearfield is a powerful Utility and Damage dealing attack. It summons a field of spears that damage and Maim (slows) enemies that walk into them. You can also use it to attack enemies directly.
- You use Spearfield early in the campaign to generate Rage stacks with the Rage Support Gem. This gives a substantial damage boost.
- You can also support it with Blood in the Eyes to Hobble enemies, lowering their Evasion to scale your Critical Strike with the Amazon Ascendancy.
- The Bludgeon Support is also effective as it causes enemies to be knocked back by spears, sometimes causing them to be hit by other spears in the area.
- Pre-place 1 to 3 Spearfields before you engage a boss or dangerous enemy and occasionally place additional to maintain the Maim, Hobble, and Rage effects.
Use the <Prev and Next> arrows to navigate.
- The Thunderous Leap is used almost exclusively for mobility.
- You can use it to leap up and down ledges and across gaps throughout the campaign to give yourself some major shortcuts to save time while leveling.
- The Blood Hunt skill allows you to deal a large burst of damage nearly instantly to finish off a powerful enemy.
- The damage it deals is primarily based on the amount of Blood Loss the enemy has suffered, making this skill far more useful later in the Campaign when you Bleed damage starts to become a larger portion of your overall DPS.
- In early Campaign, typically Acts 1 to 3, you will likely find Rake and Stomping Ground outperforms Blood Hunt. If this is the case simply continue focusing on using Rake.
- Use it when an enemy has less than 1/3rd of their life remaining, provided they have suffered some blood loss. The Execute support further incentivizes this approach.
- The Tame Beast skill allows you to capture a Rare Beast-type monster to use its skills and and modifiers for your own benefit.
- There are many good choices of modifiers on Rare beasts you can try to capture. Some examples effective in this build are:
- Physical Damage Aura
- Haste Aura
- Resistance Aura
- Shock on Hit or Shocked Ground effects.
- Temporal Bubble or Hinder Aura to slow enemies.
- Beasts can be captured anywhere but Act 3's Jungle Ruins and Infested Barrens zones are the easiest.
- Learn more about how you can Tame Beasts in this guide.
- Herald of Blood causes enemies who have suffered Blood Loss to explode on death, dealing physical damage in an area based on the Blood Loss.
- It's primary purpose is to help kill large packs of enemies faster, and it does a good job of that.
- As the explosions hit enemies they can be supported in a variety of ways to provide utility or improve clear speed.
- Magnified Effect simply boosts explosion size, making it a solid choice!
- Blind causes the explosions to Blind enemies, lowering their Evasion and Accuracy. On an Amazon, lowering Evasion of enemies also means boosting your effective Critical Strike Chance against them!
- At endgame you can use Blood in the Eyes and Splinter as extra utility options for Map clearing.
- Wind Dancer can be added to your Spirit skills in Act 3 when you kill Ignagduk, the Bog Witch and gain an extra +40 Spirit.
- It provides excellent survivability thanks to Evasion scaling and the knockback counter attack when you are hit.
- As the triggered ability, Gale Force, is an attack it uses your weapon and can deal a large amount of damage, often killing any nearby enemies.
- Arms Length increases it's knocback distance, often sending enemies into additional Spears from Spearfield.
- Maim slows any surviving enemies making it harder for them to attack you again.
- Against larger bosses Spearfield can do extremely high damage, thanks to causing many spears to hit the same enemy. This also works for enemies that are prone to moving around a lot.
- Towards the end of the campaign, consider using Spearfield more as a primary skill, especially against any large bosses.
- Gem swaps to more oriented damage gems are an option but Rage and Hobble are reasonably effective damage-boosting effects anyway, so it's not necessary.
- The ideal single target setup for Spearfield is Concentrated Effect, Bloodlust, Martial Tempo, and Bullseye.
- With this setup you use Rake to apply a bleed and spam Spearfield for damage. This is particularly effective for bossing in late Cruel difficulty.
- Rake with Stomping Ground still deals more damage than Spearfield in many cases if you are using Strength-boosting leveling Unique items.
- Spearfield can also be used as a versatile endgame mapping primary skill.
- For this to be as effective as possible you want Spearfield to be able to consistently apply Bleeds and knockback targets.
- Instilling the Staggering Wounds Notable on your Amulet provides knockback, while allocating Thousand Cuts and Inevitable Rupture give rapid Incision stacks to enemies to scale damage and bleed chance.
- The Incision is also effective as it scales the Bleeds from Spearfield due to the rapid application and consumption of Incision stacks. This helps make the Bleeds from each spear damaging enough for potent Herald of Blood explosions.
- Martial Tempo helps with comfort and clear speed, while Bullseye provides an effective damage boost when attacking with the full range of Spearfields large area.
Gem Engraving Priority
It does not require an Uncut Spirit Gem.
Skill Rotation
- Pre-place your Spearfields (3 total is the limit initially, shrinking to 2 as your AoE increases because of the 70 Spear limit). You can place them between you and enemies, or right on top of a monologuing boss.
- Mark the enemy with Bloodhound's Mark as soon as possible.
- Re cast the Mark after an enemy has been Heavy Stunned.
- Repeatedly use Rake.
- Use Disengage to retreat or evade as necessary and continue Raking, optionally placing more Spearfields every so often or during down time.
- Optionally, finish the enemy off with Blood Hunt when their Life is low (between 10-30% Life, depending on how much Blood Loss they have suffered.)
- Repeatedly use Rake.
- It can dash forwards to about half a screen away, use the range by targeting monsters that are spread out.
- Disengage as needed to dodge enemy attacks or reposition.
- Disengage can leap you over or between monsters easily, and you can easily use it to travel forwards by targeting behind you.
- (Optional) Use Spearfield before engaging dangerous packs of enemies, or to prevent charging enemies from reaching you.
Skill Leveling, Socket and Quality Priority
Utility gems like Thunderous Leap can be left low level to save on Mana costs.
Any Gemcutter's Prism drops should be spent to max Quality each skill in order.
Progression Guide
In this section you learn Act-by-Act tips and important milestones for leveling your Spear Huntress in the Path of Exile 2 Campaign. If you need more detailed advice on leveling (for any build) check out our Comprehensive PoE Campaign Leveling Guide.
Act 1
The brief period before you get Rake can be the most challenging if you rush it. Take your time and use the following tips to make the first part of Act 1 much easier.
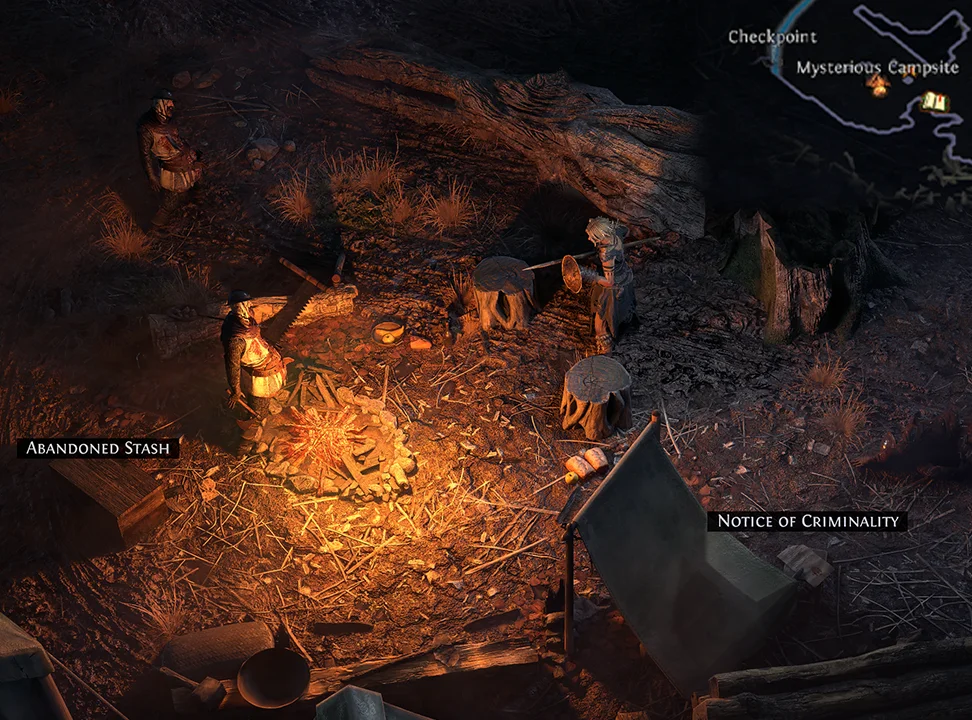
- In Clearfell there is a Mysterious Campsite that contains an Abandoned Stash. There is an Uncut Skill Gem inside. Having access to an extra Skill before engaging with The Devourer or Beira of the Rotten Pack makes those fights much easier.
- If you already cut Explosive Spear, use this gem to cut Disengage.
- Bind Parry from your Buckler and Disengage to two comfortable and adjacent hotkeys. Any slow enemy like Zombies can easily be used to generate Frenzy Charges by holding the Parry hotkey and following up with Disengage.
- You can use a Zombie or other enemy before entering a boss fight to generate up to 3 Frenzy Charges to throw three quick Empowered Explosive Spears. The burning ground also empowers Whirling Slash.
- Beira of the Rotten Pack is very easy to Parry. All of her icicle attacks (barrage and spread versions) can be parried if you stand next to her. Combined with Disengage you can kill her very quickly and easily with Explosive Spears.
- The Devourer's basic attacks can be Parried but it's easier to simply use Explosive Spear normally and hit and run tactics with Spear Stabs to work them down patiently.
- Use your first Uncut Support gem on Overabundance for Explosive Spear. This lets you place two Explosive Spears in the ground at the same time.
- Do not try to Parry in large packs of enemies, especially in zones like The Grelwood. Individual Werewolves are, however, very easy to parry and you can use them to pre-stack Frenzy Charges to Explosive Spear the next pack.
- Make sure you find and defeat Areagne in the Witch Hut special encounter in The Grelwood. The Cauldron contains upgraded Flasks and the Rare monster drops an Uncut Support Gem, which is an essential damage boost at this level.
- This second Uncut Support Gem can be used on Martial Tempo for Spear Stab to boost single target damage or on Expedite for Explosive Spear, if you find yourself preferring not to use Parry / Disengage too often.
- The Rust King in The Red Vale uses mostly slam attacks, which cannot be parried or evaded. Use dodge rolls and Spear Stabs to chip away at him and use Whirling Slash whenever he summons monsters. Build stages on the Whirlwind and explode with Disengage when the enemies converge on you. Keep throwing your pairs of Explosive Spears whenever possible (Overabundance allows you to stick two in the ground at a time).
- In the Grim Tangle hunt down and slay The Rotten Druid for another Uncut Support to get Pursuit for Spear Stab, giving you more single target damage.
- Make sure to check out the Act 1 Secrets guide for more specific locations on extra gear and Uncut Gems if you are struggling and need a power up!
- Once you get Rake things become much simpler! Cut a Stomping Ground Support as soon as possible to link to it. You can also move your Martial Tempo gem over from Spear Stab to immediately improve it further.
- Ensure you start prioritizing Strength on gear and passives as much as possible from now on to scale Stomping Ground's damage!
- The Embattled Trove encounter in The Tomb of the Consort (side area in The Cemetery) grants an Uncut Support Gem, which you can use to get Stomping Ground, if you haven't already.
- Once you have Rake and Stomping Ground you don't need to use basic Spear Stab again. You can keep using Explosive Spear if needed to damage dangerous enemies before you engage them in melee, but it wont often be necessary.
- You can get an extra Uncut Support from the Dryadic Ritual in The Hunting Grounds, easily found by exploring around the edge of the map. This can be used to fill any missing slots or pre-mptively cut a Magnified Effect for Herald of Blood.
- Head into Freythorn as soon as possible to complete the quest and get Herald of Blood. Don't forget to activate it in your skill menu!
- For the quest reward for Freythorn, take a Sapphire Charm to prepare for the end of Act 1 boss.
- The Crop Circle in Ogham Farmlands, or the later Gallows encounter in The Manor Ramparts also both provide Uncut Supports. You can use these to grab the Blood in the Eyes and Rage Supports.
- Rage is incredible on Spearfield, which you can get towards the end of the Act. Blood in the Eyes can be used on Spearfield or Herald of Blood (note: this is primarily for boosting Accuracy vs Enemy evasion for Amazon builds).
The rest of Act 1 is easy mode with Rake and Stomping Ground. Use Spearfield to weaken enemies and generate Rage stacks for extra damage. Grab some Cold Resistance where possible to make Count Ogham easier.
Act 2
While Act 2 is fairly straightforward with this leveling build there are some challenges presented at a few specific bosses. Keep stacking Strength, Life and Resistances as much as possible. Don't forget to upgrade your Spear whenever possible with high physical damage and attack speed — it doesn't affect Stomping Ground very much (which is mostly based on Strength), but it does make your Spearfield and Bleeds much stronger.
- Rathbreaker, in the first area can be challenging for many players.
- Try to stand right at the point of the arena cliffs with Rathbreaker, as the ranged attackers cannot hit you there.
- You can spam Rake through the basic attacks and dodge roll to the other side of the boss before the slam attacks hit.
- If Hyenas try to swarm, quickly place 2-3 Spearfields between you and them, which slows and kill most of them.
- The next hurdle for many players is often Rudja, Dread Engineer in the Mawdun Mines.
- Improve your Fire Resistance as much as possible to be able to effectively ignore her Flamethrower attacks. Or dodge roll through them to avoid the majority of damage.
- When she enrages and begins melee attacking keep your distance with a combination of Disengage and dodge rolls until she stops. Thanks to Disengage, this build has an easier time in this fight than many other builds.
- You get access to two new skills in this Act: Thunderous Leap and Blood Hunt.
- Thunderous Leap is used to cross gaps and jump over ledges. It doesn't need any Supports and can be kept at a low level to reduce Mana costs.
- Blood Hunt is later used to finish off enemies but at this level can be kept aside as it's not too useful until your Bleed damage becomes an overall larger part of your DPS.
- You have several opportunities to get new Support Gems in this Act. You can add Execute and Bloodlust to Blood Hunt or hold them aside for later Skill gem acquisitions.
- In The Buried Shrines (below Keth) is an encounter called Elemental Offering. It gives you a chance to choose an element. You should pick lightning for a Topaz Ring to help prepare for the upcoming Jamanra boss fight, which can be quite difficult.
- Craft the Ring with a Orb of Transmutation and Orb of Augmentation. If it rolls Life, Strength, Resistances, then consider also using a Regal Orb.

- The Trial of the Sekhamas can be somewhat challenging with Rake because of the Honour system the trial has.
- Use Spearfield to kill enemies carefully at range. It's especially effective against the final boss, Rattlecage. Place your Spearfields and kite the boss around the pile of stones in the middle of the arena for a very safe kill.
- Disengage and Thunderous Leap can be used to jump over Flamethrower traps.
- If you still struggle, consider coming back at a higher level or with some gear upgrades. Check out our guide on Ascending here.
- When moving through The Dreadnought zones, use a combination of Spearfield and Thunderous Leap to navigate the zone and keep the difficult enemies at bay.
- For the Jamanra boss fight, ensure your Lightning Resistance is as high as possible and your gear upgraded from vendors in town and crafting.
- If you have found any Exalted Orbs, now is a good time to spend them via Trading with other players to get some upgrades such as a Meginord's Girdle or even just a nice pair of Movement Speed boots (remember to limit the search to your level requirement).
- Ensure your flasks are upgraded, Colossal Life Flasks and Colossal Mana Flasks are available and a big boost.
- Use Spearfield when you cannot engage in melee, Jamanra is large, making the skill effective for damage.
- Use Disengage to leap past the lightning beams safely and use Rake opportunistically when safe to do so.
Act 3
Act 3 gives you the opportunity to add two key pieces to your build: the incredibly powerful Bloodhound's Mark, and a second Spirit Skill.
- Bloodhound's Mark can be linked to Single Out to provide a powerful debuff for Rare enemies and Bosses.
- Use this skill! It causes enemies to lose their Armour and become Heavy Stunned. This greatly enhances your damage and gives safe times to engage otherwise deadly enemies.
- You get access to Tame Beast after you defeat Igagduk in The Azak Bog.
- Cut the Tame Beast gem using a regular Uncut Skill Gem (not a Spirit gem).
- With your Uncut Spirit Gem you can create the Wind Dancer skill.
- Use Wind Dancer until you can find a good beast to tame.
- From now on, keep an eye out for Rare Beast type enemies with good Auras or other random Rare modifiers.
- The type of Beast doesn't matter very much, focus on the Auras and other bonuses they have.
- Ideally, you want a Physical Damage Aura, and "All Damage Shocks". But many good choices exist.
- Feel free to Tame Beasts to try them out and cut new Tame Beast gems to experiment with a variety of modifiers. You can swap in and resummon any beasts you've previously captured in a gem!
- Learn more about how to capture a good Beast here.

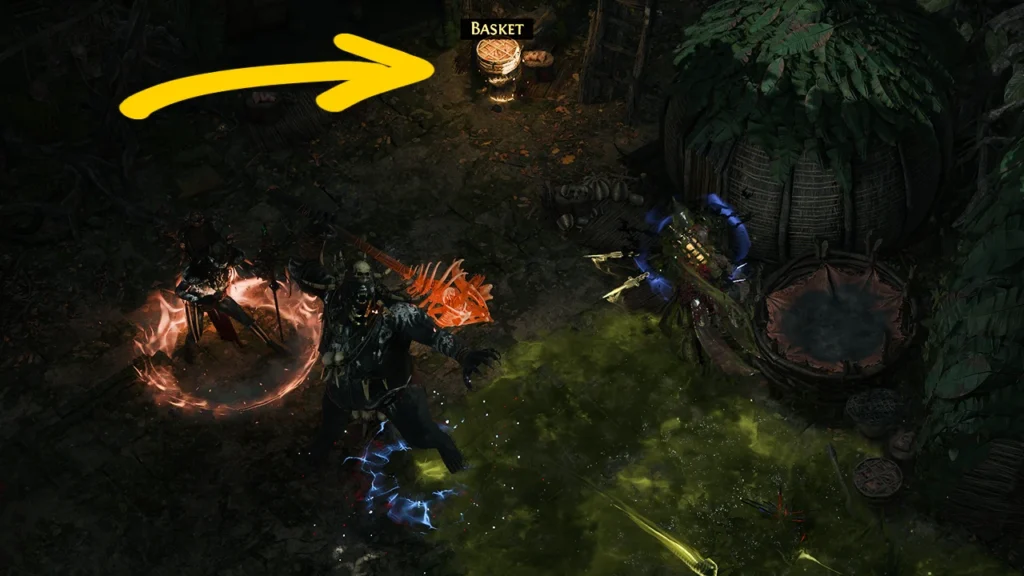
- Don't forget to get your free Lesser Jeweller's Orb from the Basket in the Orok Campsite, located in the Sandswept Marsh. Use this to add a socket to Rake so you can add the Lacerate or Brutality gem to further enhance your Stomping Ground + Martial Tempo combo.
- If you find another Lesser Jeweller's Orb at some point, use it on Spearfield to add Bloodlust support to enhance boss killing!
- The Trial of Chaos can be challenging for any build, especially if the randomized modifiers in each room happen to be particularly bad for your build.
- You can take multiple attempts by simply leaving and using the entrance key to start again.
- Spearfield is effective against each of the bosses due to their size.
- Spearfield and Disengage can keep you out of harm's way while killing the approaching enemies.
- Use your Bloodhounds Mark to stun enemies with bleed damage from Rake. Consider using the Lacerate support if your Strength is very high (as Stomping Ground damage may be higher than your regular Spear damage). The higher damage Bleeds help to trigger Bloodhound's Heavy Stun faster.
- For the Doryani fight at the end of the Act:
- Use Rake to destroy him in the first phase.
- For the second phase use the occasional Rake combined with spamming Spearfield for large single-target damage against his oversized body.
- Use Disengage to flip out of the large area slams easily.
Cruel
- During Cruel, you gain access to the full set of level 1 to Level 3 support gems.
- Adding Incision to Spearfield can allow you to clear packs with Spearfield and consistently trigger Herald of Blood explosions. It also enhances single target damage thanks to the Thousand Cuts notable passive.
- Herald of Blood can be linked to the Blind support to lower enemy Accuracy and Evasion — improving both your safety and also your DPS with Amazon's Critical Strike Ascendancy.
- Make sure you link your beast Companion to Loyalty and Last Gasp to improve your defenses and make them far more effective.
- Disengage can be linked to Shocking Leap and Holy Descent to provide some excellent utility.
- In Cruel Act 3 you gain another Lesser Jeweller's Orb from the Orok Campsite, use it on Spearfield if you haven't already upgraded it. Otherwise Herald of Blood or Bloodhound's Mark are reasonable choices.
- You also gain more Spirit after killing Ignagduk again, allowing you to equip Wind Dancer alongside your Tamed Beast and Herald of Blood.
- Wind Dancer linked to Maim and Arms Length keeps enemies away from you if you get swarmed.
The biggest change you may notice is that your Bleed damage starts to play a larger role in your overall DPS as you progress through Cruel. You can lean into a more Bleed-focused playstyle as this happens (using gems like Deep Cuts on Rake) or maintain a Stomping Ground focus by continuing to stack Strength into the endgame.
Ascendancy
Learn how to complete the Trial of the Sekhemas and Trial of Chaos to earn your Ascensions with our Ascension Guide!
Amazon is the recommended Huntress leveling Ascendancy and the Class of choice for most endgame builds at the moment. The powerful Critical Strike and Penetrate nodes provide excellent gearing opportunities to enhance your damage on any build. It also has multiple powerful options for Elemental builds such as Mystic Harvest for leech-based survivability.
- Predatory Instinct is the first Ascendancy Passive for a Bleed Huntress when leveling because it provides a solid damage boost for defeating Campaign bosses. It doesn't require any special gear or consideration, you can let it do it's thing in the background without much thought.
- Later on, when you Bleed damage becomes more significant, you can attempt to apply your biggest Bleed while an enemy has an Open Weakness (when their health is in the highlighted sections)
- Critical Strike is your second Ascendancy Notable because it further enhances your damage scaling and increases your gearing options. This node converts Accuracy against enemies into extra Critical Hit Chance.
- From now on, consider Accuracy on gear as extra damage. Accuracy can be obtained on Gloves, Helmets, Rings, Amulets, and Weapons.
- Don't prioritize Accuracy over raw physical damage (or Strength), but you can use it to further enhance your damage.
- Penetrate can be taken when you Ascend after level 60 at the end of the Campaign or in early endgame. It turns Accuracy on a weapon into extra flat Physical damage (including the Accuracy from a Greater Vision Rune!
- Prioritize getting spears with high Physical Damage and Accuracy. Here's an example: Ideal Early Endgame Spear
- If you cannot get such a spear and have no Accuracy on your weapon you can take the alternate Ascendancy node and respec the Passives when you upgrade your weapon.
Ritualist is not recommended over Amazon for leveling a Bleed Huntress build, but if you have a specific Ritualist build in mind — or if you have some great leveling Rings — then it can be leveled effectively by using this same strategy.
- Corrupted Lifeforce is the first choice in Act 2. It's minor node gives a solid 20% increased Physical Damage and the Blood Boils mechanic combines with Herald of Blood to give you some excellent pack-clearing power.
- In Act 3, take Unfurled Finger by traveling through the Reduced Mana node. The drawback is minor here as Mana costs are pretty easily dealt with by having some Mana Leech on a Ring.
- This node allows you to equip three Rings. How powerful that is depends entirely on how good your Rings are. If you are fresh start or Solo Self Found then prioritize Gambling and Crafting Rings to look for Physical Damage, Life, Resists and Life and Mana Leech.
- If you are in a Trade League, or are leveling with pre-existing items then you can use powerful Uniques like Venopuncture for a big damage boost.
- After Act 3, consider respeccing Corrupted Lifeforce to Mystic Attunement to further boost the impact of your Jewelry including that third Ring.
If you choose the Ritualist route, ignore gearing advice to stack Accuracy, which is only used for Amazon's Ascendancy scaling. Focus instead on maximizing the power of your Jewelry to benefit from the Ritualist.
Amazon Passives
Click the arrows to open the full tree in a new tab.
- For the attribute nodes take enough Intelligence and Dexterity to meet gear, skill gem and support gem requirements, then use the rest on Strength for more damage and life.
- You can use your Gold at the Hooded one or Doryani to respec and change your Attributes if a new skill or gear upgrade leaves you unable to use your skills/items — or just to further increase your Strength!
- The progression order is designed for you to start getting Accuracy and Critical Strike Passives after you have your second Ascendancy. Focus on raw damage and Strength until then.
- Take Deft Recovery early if you find yourself getting stunned too often and cannot improve the Life on your gear (and you don't have, or are already using a Stone Charm).
- The Staggering Wounds Notable provides knockback for Stomping Grounds and Spearfield for both damage and survivability. Instill it onto an Amulet as soon as possible using a set of: Distilled Paranoia, Distilled Greed, and Distilled Guilt. These are common and can be cheaply acquire on the Currency Exchange as early as Cruel Act 1.
Ritualist Passives
Click the arrows to open the full tree in a new tab.
- For the attribute nodes take enough Intelligence and Dexterity to meet gear, skill gem and support gem requirements, then use the rest on Strength for more damage and life.
- You can use your Gold at the Hooded one or Doryani to respec and change your Attributes if a new skill or gear upgrade leaves you unable to use your skills/items — or just to further increase your Strength!
- Take Deft Recovery early if you find yourself getting stunned too often and cannot improve the Life on your gear (and you don't have, or are already using a Stone Charm).
- The Staggering Wounds Notable provides knockback for Stomping Grounds and Spearfield for both damage and survivability. Your should be to Instill it onto an Amulet as soon as possible using a set of: Distilled Paranoia, Distilled Greed, and Distilled Guilt. These are common and can be cheaply acquire on the Currency Exchange as early as Cruel Act 1.
- The Blinding Strike and Disorientation give you 100% Blind uptime with Spearfield for a solid increase to survivability and damage.
- Critical Scaling may still be the ideal goal if you plan to keep playing a Bleed playstyle into endgame but without Amazon's Critical Strikes scaling it is not recommended for leveling on a Ritualist.
Stat Priorities
Offensive Scaling
- Strength scales the Stomping Ground Support and is the best damage modifier in the campaign overall.
- High Physical Damage on your Spear and other gear.
- Attack Speed on your Spear and Gloves.
- Mana Leech so that you do not run out of Mana.
- Critical Hit Chance.
- Critical Strike Bonus Damage.
- (Amazon Only) Accuracy Rating for Critical Strike Amazon Ascendancy and Falcon Dive Notable Passive.
- Bleeding Magnitude, Magnitude of Damaging Ailments.
- Melee Skills Levels.
- #% Physical / Melee / Attack / Spear Damage variants all scale Bleed damage. Only "Attack" or "Physical" #% Damage modifiers work for Stomping Ground (it does not scale with weapon specific modifiers).
Defensive Scaling
- Sufficient +#% to Fire, Cold and Lightning Resistance to cap your Resistances.
- Maximum Life.
- Movement Speed on Boots. (This is normally a higher priority, but with this playstyle you move fast via skills).
- Life Leech (and Life Gain on Hit to a lesser extent).
- Evasion Rating.
- A strong Life Flask with increased recovery amount or rate.
- Reduced Freeze Duration on Boots, and Charms to avoid Freeze, Stun and Poison.
- Chaos Resistance as you begin endgame.
If you're struggling to survive, or want to learn more about damage and defenses in Path of Exile 2 check out these additional resources:
Gearing
- During the early campaign, prioritize Strength, Life and Resistances. Strength alone can carry your damage with Stomping Ground.
- Keep checking any pairs of Boots for Movement Speed. Search the NPC vendors and Craft with Orb of Transmutation and Orb of Augmentation where possible.
- Dexterity and Intelligence on gear is still helpful as it allows you to allocate more Strength on Passives.
- As you proceed through Cruel difficulty, begin to prioritize getting a source of Life and Mana leech. These are both very powerful on a pure Physical damage build like this. Rings are typically the easiest place to obtain Leech stats, but Gloves and your Spear are fine too.
- For your first Jewels any two or three applicable modifiers can suffice while leveling. Blind on Hit and Gain Rage on Melee Hit are two of the more useful effects to get early on on at least one of your Jewels.
Use the tabs at the top to examine each gearing snapshot!
- If you are playing a League where you have access to trading with other players then you should not use your first few Exalted Orb drops to craft gear.
- Instead, invest them in the following items:
- Meginord's Girdle: Level 1. This gives you huge amounts of Life and Damage thanks to the Strength.
- Horns of Bynden: Level 1. This item gives you a large amount of Strength and Rage on hit for more damage. With this item you can drop the Rage from Spearfield in favor of Martial Tempo or Incision.
- Jarngreipr: Level 6. These gloves make your strength satisfying and Dexterity or Intelligence requirements for your Spears and Melee skills. This lets you invest more into Strength on the Passive Skill Tree.
- All of these items are very common and very cheap!
- There are other options shown as optional extras that range in price and effectiveness that are mostly aimed at improving speed or damage. Keep in mind if you use too many uniques your Resistances may suffer.
- Aim to have 75% in each Elemental Resistances as you begin endgame maps. Chaos Resistance becomes increasingly important as you progress as well, but an Amethyst Charm can supplement you early on.
- If you plan to keep using Stomping Grounds long term then continue stacking as much Strength as possible. Otherwise, you can begin to prioritize Accuracy, Bleed, Critical and Physical damage modifiers more to transition into a more Bleed or Spearfield-focused playstyle.
- Ensure you have a source of both Life and Mana Leech.
- Rage on Hit can be gained from a Boar Talisman socketed into Gloves. Alternatively, a Ruby Jewel can provide Rage on Hit.
- (Ritualist Only) ignore any Accuracy or Critical modifiers on gear as unimpactful. Focus on raw Physical Damage, and Attack Speed.
FAQ
Using Rake, Disengage, and Thunderous Leap correctly can vastly improve your clear speed, movement and even survivability.
- Practice using Rakes maximum range against targets, especially if they are spaced out well.
- Use Disengage liberally, it is faster than running in most cases until you have about 30-40% movement speed bonus. You can use Disengage to travel forwards through enemies by targeting behind you.
- Thunderous Leap can jump you over ledges and obstacles.
- Dodge Roll can be used to cancel the animation of Rake at any point, use it to rapidly reposition. Dodge Roll can also effectively extend your Disengage to change direction and avoid damage.
There are many effective routes you can take to refine a Bleed Huntress in mid to late endgame. Each has some playstyle differences and strengths and weaknesses, experiment with each strategy and find which resonates with you.
- You can focus on favoring Spearfield for safe, effective map clear and extremely good boss killing on a budget as in this example of a Budget-friendly Bleed Knockback Spearfield Amazon by ZiggyD.
- A style like this drops Stomping Ground and uses Rake's natural bleed potency to enhance Spearfield's single target.
- You could also opt to keep Stomping Ground and use it as a powerful Bleed applicator at endgame such as in Goratha's Rake Amazon Build Guide.
- Goratha also shows how you can build a late-game defensive setup utilizing Energy Shield and Evasion.
- There may even be some potential with Rapid Assault or you could transition into a more traditional physical damage hit build.
Each Beast costs a varying amount of Spirit as a % of your total. You can try to tame another beast with a lower reservation or apply Quality to your current beast if it is otherwise ideal. More expensive Beasts generally have more life and deal more damage but this isn't necessary with Last Gasp support.
If you manage to get additional Spirit on your Body Armour or Amulet you can run a Precision for extra damage.
A Captured Beast Companion can be leveled with a regular Uncut Skill Gem. Simply select the "All Gems" option in the bottom-left of the menu.
NOTE: These bonuses are minor, if you picked something different for the Venom Draught, don't worry too much!
Video: Bleed Stomp Gameplay
Summary
- Spear Huntress planning on leveling as a Bleed build can be extremely powerful in the campaign by using Rake with the Stomping Ground. Stacking Strength provides both damage and Life for a balanced and highly effective leveling build.
- You can use Spearfield for excellent extra damage against bosses, to keep enemies away from you with Maim and Knockback, and to debuff foes with Blood in the Eyes whilst also improving your own damage with the Rage support.
- By using Disengage, Rake, Thunderous Leap, and Dodge Roll in tandem you can achieve fast clear speed, high mobility and great survivability.
- Herald of Blood provides satisfying gameplay whilst boosting clear speed and providing some great utility with the Blind support.
- At endgame you can keep using Stomping Ground on Rake, or you can focus more on the versatile power granted by Spearfield. Either way, both skills can continue being used alongside each other for a powerful endgame Bleed Amazon build!
Credits
Written by: ZIGGYD
Content Reviewed by: Goratha
Language Reviewed by: Tenkiei