Galvanic Shards Amazon Build Guide
The Galvanic Shards Amazon Build for the Huntress class fires lightning pulse-based projectiles with huge single target damage while forking Galvanic Shards bring the thunder when clearing Maps!
Shockburst Rounds' powerful pulse requires a shocked enemy, but rewards you with a huge single target payoff. This creates a very simple, but engaging rotational playstyle during Boss encounters. Shocking an enemy is absolutely mandatory for Shockburst Rounds' powerful pulse, which is being taken care of by your screen clearing ability, Galvanic Shards.
Galvanic Shards fires a charged bolt that fragments in flight knocking back enemies and releasing chaining Lightning beams between them. The Lightning damage portion of Galvanic Shards is responsible for shocking your enemies to enable Shockburst Rounds' tremendous single target.
You rely on Evasion Rating and your Health Pool to mitigate damage while moving around the battlefield, dodging incoming Hits while wielding Lightning itself as your weapon.
The early stages of the build do not require any Unique items to function. But the build does benefit from several Uniques including:
- The Black Insignia
- Death Rush
- Beacon of Azis
- Maligaro's Virtuosity
In the Endgame variants you increase the build's efficiency by including the following Uniques:
- Essentia Sanguis
- Leopold's Applause
You do not need specific resistances on any item, just get the required total resistances amongst all gear combined. You need to cap your Resistances at 75% unless otherwise specified in the guide!
Path of Exile 2 is currently in early access, this means rapid development including frequent changes to builds as there are balance fixes and we learn more. Pin this page to be notified of any updates.
Skills
- From Level 1 to Level 14 you use the following Grenades for strong clear and single target damage:
- Explosive Grenade
- You can shorten the Fuse Duration of Explosive Grenade with Expedite in place of Concentrated Effect but this costs you a lot of damage.
- Flash Grenade
- Explosive Grenade
- After Level 14 you add Gas Grenade for even more explosions, triggered by your Explosive Grenade. Make sure to unlock your other important Level 14 skills first, for this check out the Gem Engraving Priority below!
- Shoot these Grenades in front of you while progressing through the zone to kite enemies into the cooking Grenades!
- Alternatively you can buy a Bow from the vendor and use the following setup until Level 14, this is worse damage and clear but easier to play:
- Lightning Arrow - Martial Tempo - Lightning Infusion
- Lightning Rod - Scattershot - Concentrated Effect
- Wind Dancer is an incredible defense tool since your main defense is Evasion Rating.
- At Level 14 the first Level 5 Uncut Skill Gemskill you acquire has to be Galvanic Shards. Galvanic Shards is your main ability in this build and feels extremely satisfying to wield. You use Galvanic Shards for clearing high density encounters and applying Shock for Shockburst Rounds later on.
- Rapid Shot provides insanely high single target damage for Rare or Boss encounters until you unlock Shockburst Rounds at Level 41. Rapid Shot even increases the damage of Explosive Grenade through the Heat mechanic and therefore pairs great with Grenades until you replace them all together.
- Every second you acquire 4 Heat while channeling Rapid Shot.
- Your Grenades gain 6% of Damage as Extra Fire Damage per Heat.
- Herald of Thunder is the second Spirit Gem you cut. This provides empowered attacks after you kill a shocked enemy.
- Artillery Ballista provides additional damage and a constant source of Culling Strike.
- Shockburst Rounds delivers huge single target damage through its pulse. This pulse requires a shocked target to occur. Therefore use Galvanic Shards until you shock the enemy and then swap to Shockburst Rounds and fire away until the Shock falls off. Shockburst Rounds is only necessary on tanky Rares or Bosses.
- Voltaic Mark helps with shocking Rare and Unique enemies.
- Emergency Reload instantly reloads your ammunition and provides additional damage for the loaded bolts.
- As third Spirit Gem, you do add Overwhelming Presence to increase your chance to Shock by decreasing the enemies' Elemental Ailmant Threshold.
Use the <Prev and Next> arrows to navigate.
Gem Engraving Priority
Gem Leveling Priority
Skill Rotation
- Empty your Explosive Grenade and Flash Grenade charges.
- Fire Crossbow Shots until your Grenades are usable again.
Single Target
- Use Gas Grenade to spread gas and prepare the explosion.
- Empty your Explosive Grenade and Flash Grenade charges. Explosive Grenade detonates Gas Grenade's gas cloud.
- Fire Rapid Shot until your Grenades are usable again.
Clear
- Hold down Galvanic Shards and almost feel as if you are playing Path of Exile 1.
- Optionally cast Explosive Grenade when off cooldown.
Single Target
- Put down 2 Artillery Ballista and stay close as long as possible to generate maintain Rage.
- Use Voltaic Mark to increase your Shock chance and magnitude on the enemy.
- Shock your enemy with Galvanic Shards.
- Unleash your Shockburst Rounds on the shocked enemy for huge damage.
- Start at Step 1 as soon as your Shock falls off and repeat the process.
Clear
- Hold down Galvanic Shards and almost feel as if you are playing Path of Exile 1.
How does Shock work?
- The probability of shocking a target takes the enemy's Ailment Threshold as well as your hit's damage into consideration.
- Overwhelming Presence greatly helps you shock your enemies by reducing their Elemental Ailment Threshold.
- On top of that, Shock also increases the amount of damage your target takes. This can also be increased by increasing "Shock Magnitude".
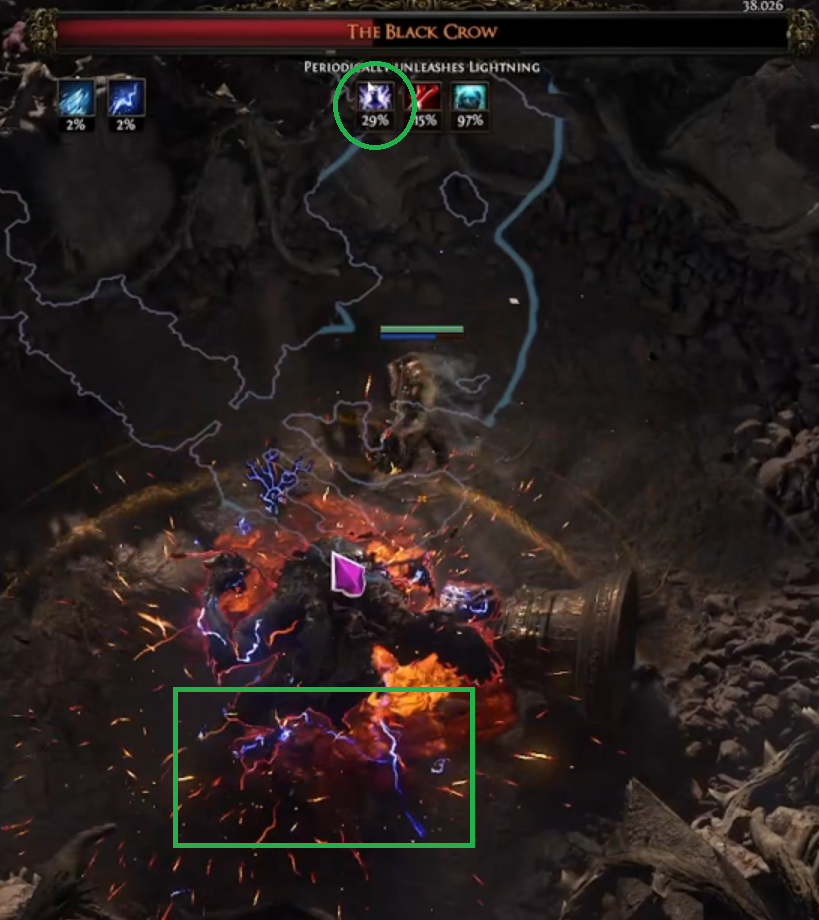
- You can check if your Galvanic Shards has shocked a target by paying attention to its health bar at the top of the screen (see green circled icon).
- Shocked targets also have fine blue sparks around them (see green squared sparks).
Ascendancy
Learn how to complete the Trial of the Sekhemas and Trial of Chaos to earn your first 2 Ascensions with our Ascension Guide!
- Critical Strike provides tons of Critical Hit Chance turning Accuracy into a damage scaler. This also mean that the closer you are to a target, the more Critical Hit Chance you have and therefore deal more damage to the target.
- Predatory Instinct reveals weaknesses against Rare and Unique enemies. Revealed Weaknesses are highlighted on Rare and Unique enemies' Life bars, and occupy a total of 45% of their maximum Life in random segments. While the enemy's current Life is within a highlighted segment, they are considered to have an Open Weakness and take 50% more damage.
- Your third and fourth choice comes down to your current gear:
- If you need more damage, you take Penetrate. This requires your weapon to have Accuracy on it to boost your damage. Either as a normal mod on the item itself, through Greater Vision Rune or both.
- And if you want more sustain instead, you take Mystic Harvest. Make sure to acquire "Leech x% of Physical Attack Damage as Life" on your gear, for example on your Leech Ring.
Passives
Click the arrows to open the full tree in a new tab.
- For the attribute nodes take enough Dexterity to meet gear, skill gem and support gem requirements, then use the rest on Strength for more life. After acquiring the Critical Strike Dexterity becomes an offensive stat due to granting Accuracy.
- You can use your Gold at the Hooded one or Doryani to respec and change your Attributes if a new skill or gear upgrade leaves you unable to use your skills/items.
- "Start of Campaign" - Early on the priority is to get as many damage increase nodes as you can such as Maiming Strike and Precision Salvo. Make sure to follow the correct order by navigating the Passive Tree with the < and > at the top of the screen. After acquiring Critical Strike you do a very small respec at the start of the Passive Tree. If you are having issues dying, consider taking more Evasion Nodes such as Freedom of Movement or Catlike Agility, but first make sure you are wearing Evasion or Evasion + Energy Shield bases.
- "with Crit on XBow" - Only use this Passive Tree when in Maps and only when your Crossbow has "+% Critical Hit Chance" on it. Else the "Maps" passive tree is just better due to providing more raw power instead of Critical Damage Bonus. This tree excels when you acquire a Crossbow with additional Critical Hit Chance and should not be played before.
- "Endgame ES Swap" - With this passive tree you swap to your Endgame Energy Shield version.
Stat Priorities
Offensive Scaling
- Increased Physical Damage / Attack Damage / Lightning Damage / Elemental Damage with Attacks.
- Accuracy Rating (therefore also Dexterity).
- Increased Attack Speed.
- Increased Critical Hit Chance & Increased Critical Damage Bonus.
- +x to Level of all Projectile Skills
Defensive Scaling
- Sufficient +#% to Fire, Cold and Lightning Resistance to cap your Resistances.
- Evasion Rating.
- Maximum Life.
- Physical Damage Life Leech.
If you're struggling to survive, or want to learn more about damage and defenses in Path of Exile 2 check out these additional resources:
Gearing
- During the campaign, try to get maximum life and Resistances everywhere possible. It is extremely important to get Evasion Rating or atleast Evasion Rating + Energy Shield / Armour bases so that your Evasion on the tree helps you survive.
- Upgrade your Crossbow consistently and keep the one with the highest DPS. Double check if your new Crossbow is really an upgrade by checking the DPS tooltip in your Skill menu. If you are starting late in a league you can check the trading website for amazing Crossbows for very cheap prices.
- Use Runes to fix Elemental Resistance or Attribute problems.
- As you enter the Atlas of Worlds and begin mapping, your first goal is to cap your resistances and meet Attribute requirements.
- The Black Insignia helps you out tremendously in Early Maps by providing Tailwind, increasing your Evasion Rating, Skill and Movement Speed as long as you do not get hit.
- Keep scaling your total Evasion Rating and maximum Life through better gear as you progress through the map tiers.
- When you obtain Essentia Sanguis you swap to an Evasion Rating + Energy Shield Hybrid, leeching Energy Shield with all of your damage.
- Make sure to change your chest to Evasion Rating + Energy Shield as soon as possible to acquire tons of Energy Shield through your Passive Tree nodes such as Mindful Awareness.
- Then go for a full Energy Shield Helmet with high Energy Shield and optional "Reduced Attribute Requirements" to make the most out of Subterfuge Mask.
- Next, you should look at acquiring an Amulet that provides "x% increased Maximum Energy Shield" and/or "+x to maximum Energy Shield" to further boost your Energy Shield pool.
- When you obtain Leopold's Applause, you swap to the next variant in your character's progression.
- You also add a Cavalry Bow to your setup to be able to shock by using Stormcaller Arrow.
- Conduction, Lasting Shock provide much more convenient Shock windows.
- Lightning Exposure and Strip Away play into Leopold's Applause.
- Make sure you prioritize Critical Hit Chance on your Bow to make the most use out of Harmonic Generator.
- Make sure to change your Passive Tree to make the most use out of Leopold's Applause and Weapon Set Passive Points. Unspec 24 points from your normal Passive Tree and redistribute those accordingly into the Weapon Set Passive Trees.
- As your expensive lategame variant you swap to Hand of Wisdom and Action and go Attribute stacking on all item slots possible.
- Astramentis is an auto include in this variant but is not mandatory to transition.
- Breach Ring or similar non-breach rings are a great entry point when swapping to this version.
- Ingenuity increases your ring's efficiency and is a cornerstone of the build.
FAQ
Shockburst Rounds main damage comes from its pulse, not the projectiles. This pulse requires a shocked enemy to trigger. Make sure your target is shocked before you swap to Shockburst Rounds.
Make sure you have the necessary points on the passive tree above and your Overwhelming Presence is active when you are early in your character's progression. Either get more "Chance to Shock" on the tree around General Electric or a better Crossbow. This becomes a non-issue when you swap to the later variants.
Crossbow builds can be pretty heavy on the attributes if you level everything. So just follow the skill leveling priority section of this guide, but if you can't get the attribute requirements just leave them lower level until you can(you definitely want to work towards getting the attributes to level up all high-priority skills though.
NOTE: These bonuses are minor, if you picked something different for the Venom Draught, don't worry too much!
- This build does all content quite well, so make sure to run all the league mechanics you like!
Video
Summary
- Use Galvanic Shards to explode every monster pack you encounter, while Shockburst Rounds takes care of tanky Rares or Bosses.
- Shockburst Rounds requires a shocked target to pulse, which provides the main portion of its damage.
- Scale Evasion Rating and maximum Life throughout the Campaign and in Early Maps.
- In the Endgame Evasion allows you to utilize Ghost Dance to quickly regain Energy Shield in dangerous situations.
Credits
Written by: Chronikz
Content Reviewed by: Palsteron
Language Reviewed by: Tenkiei