Defenses and Defensive Layering
Last Updated:August 15, 2023|Changelog
Introduction
Defenses are a key part of building your character in Path of Exile, and much like Ogres they don't really have all that much in common with onions! Properly combining defensive layers so that the strengths of one covers for the weaknesses of another leads to your build feeling invincible. This guide takes you through each of the defensive layers in Path of Exile, and how to combine them to become truly tanky.
When you see "Defenses" referenced in game, this refers exclusively to Armor, Evasion, Energy Shield, and Ward. But players use the term more broadly and include many other things like Leech, Spell Suppression, Block, and more. Having well balanced defenses begins with protection from Attacks, Spells, and DoTs. You also need defenses against each type of damage; Physical, Fire, Cold, Lightning, and Chaos. A good build combines multiple defensive layers. The easiest way to understand how you build defenses in Path of Exile is through avoidance, mitigation, and recovery. It's important to select synergistic defensive layers, Evasion is great for protecting you against frequent Attacks, but does not stop Spells, or DoTs. So this defense pairs nicely with Spell Suppression, which halves the Spell Hit damage you take.
How Defensive Layers Work
The best way to build a well rounded tanky character is to combine multiple types of defenses. To do this you need to understand how each defensive layer works and what other defenses synergize with it.
Avoidance is all about preventing you from being hit, or preventing damage when you're hit. Most forms of avoidance are capped below 100% so that you can't use them to become immune to damage. There's usually an element of randomness when using avoidance.
Because you can't avoid every hit, you need something to deal with the damage you take which is where the next layer, mitigation comes in. Avoidance is extremely effective in situations where you take a lot of small hits. Some examples of avoidance include Evasion, Block, and Chance to Avoid Ailments.

Mitigation reduces the damage you take. Many forms of mitigation only apply to hits so mitigating damage over time is especially difficult. Most forms of mitigation are specific to one damage type, Armor for example only applies to Physical hits. The most powerful forms of mitigation like Molten Shell protect you from multiple types of damage.
But Path of Exile has a plethora of effects which apply one type of mitigation to a different damage type, such as how the Juggernaut Ascendancy node Unbreakable applies your Armor to Elemental Damage taken from Hits.
Having high mitigation is great when fighting bosses, because it prevents your character from being 1-shot. Most forms of mitigation combine multiplicatively, to prevent players from becoming immune to damage.
Recovery helps bring your health back to full after taking damage. The first form of recovery all players are introduced to is the humble Small Life Flask. Most sources of recovery either apply to Life, or Energy Shield and not both at once so if you want to recover both you'll need multiple sources of recovery.
Different forms of recovery interact with enemies differently. Some are passive like Regeneration which makes it very reliable. Others react to your damage taken such as Recoup, requiring you to take damage from a hit before they activate. Others require you to hit an enemy including Leech. These are unreliable against bosses with immunity phases.
This is a crucial part of your build because you are often at your most vulnerable right after taking damage. More examples of recovery include Life Gain on Hit, Energy Shield Recharge, and Recover/Replenish.
Taking Damage
Damage in Path of Exile follows a strict order of operations (as detailed on the PoE Community Wiki). Here is a simplified flowchart about taking damage in Path of Exile. Because there's an order of operations, some defensive layers are able to interact with each other. For example, the absorption from Elemental Aegis (Magna Eclipsis), or Guard Skills like Steelskin don't deplete when you Block a hit!
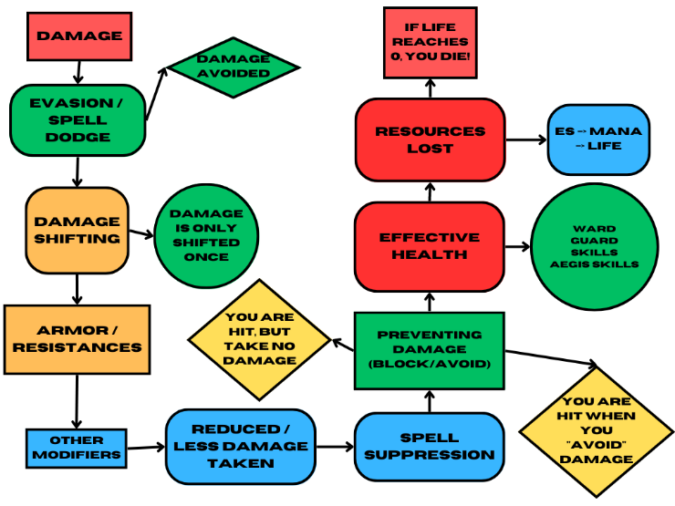
WARNING: Damage over Time is extremely deadly because it bypasses Evasion, Dodge, Armor, Suppression, Avoid Damage when Hit, and most Guard Skills.
First - Avoidance
Avoidance is your first defensive layer. It prevents you from being hit, taking damage when hit, or being affected by ailments. Most forms of Avoidance are capped between 75% and 95%. Thus, you need other defenses to deal with the damage that gets past your avoidance.
Evasion
Evasion is one of the core defense affixes in Path of Exile, it grants you up to a 95% chance to Evade an Attack, and also protects from Critical Strikes by downgrading them to normal hits. Evasion is different from other forms of avoidance because it uses an entropy system which means you are unlikely to take multiple consecutive hits from the same enemy but eventually you always get hit.
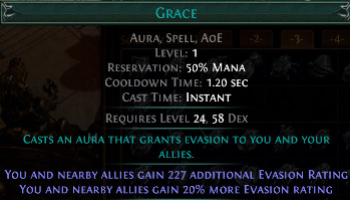
Evasion only applies to Attack hits, therefore it's quite limited and is notoriously unreliable! You feel invincible one minute and like you have no defenses the next. Evasion is scaled with gear, Passives in the Ranger, Shadow or Duelist areas and the Grace Aura.
Block
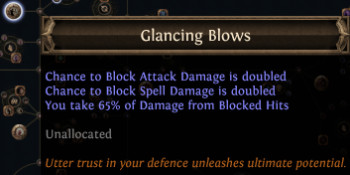
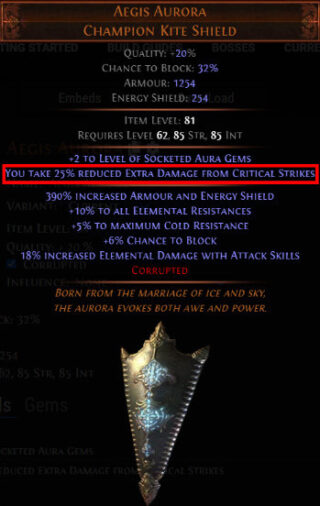
Block remains one of the most powerful forms of avoidance in Path of Exile. When combined with Glancing Blows it acts more like mitigation, and through synergy with Aegis Aurora or Influenced shields (Ebony Tower Shield) you can also use Block to Recover resources after being hit. Attack block is easiest to find in the Duelist and Marauder areas of the tree, whereas Spell Block is prevalent in the Templar and Witch areas. Block is an incredible defensive layer that should be used whenever possible.
Chance to Avoid Damage from Hits
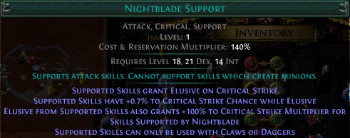
Chance to Avoid Damage from Hits is an effect of Elusive granted by Withering Step, Nightblade Support or Mistwalker. It does exactly what you'd expect, giving you a chance to take no damage from a given hit. There are a few suffixes that also grant the stat. Chance to Avoid Damage from Hits is unreliable on its own, especially when granted by Elusive (because the value varies with Elusive effect). Add it to an already sound setup rather than used as the foundation of your build.
Spell Dodge
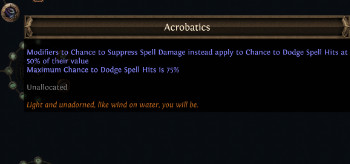
Spell Dodge comes exclusive from the Acrobatics Keystone. Your Spell Suppression (a form of mitigation) is converted into up to 75% chance to Dodge Spell Hits, much like Chance to Avoid Damage from Hits this defense is highly unreliable on its own, therefore it should only be used in addition to other defensive layers. Use extreme caution when giving up your Spell Suppression.
Ailment Avoidance
A core feature of most builds, Chance to Avoid Elemental Ailments has only gained importance over time. Shock or Scorch can ruin your day, cost you 10% exp and leave you one portal short! Since 3.16 GGG has added multiple new ways to deal with Elemental Ailments including Purity of Elements, and Stormshroud. Some ascendancies also have built in ways to deal with Ailments such as direct avoidance from Raider's Avatar of the Veil or immunity to specific Ailments from Saboteur's Pyromaniac.
There are also ways to deal with Bleeding like Slayer's Endless Hunger. Immune prevents the ailment from affecting you, whereas unaffected simply prevents it from harming you. You can turn a debuff into a buff by combining Unique items. Maw of Conquest makes you unaffected by Poison and The Golden Rule to caps your Chaos Resistance by reflecting Poisons you inflict. Some Ascendancies like the Chieftain (Tasalio, Cleansing Water) offer ways to become unaffected by Ailments.
Ailment Effect
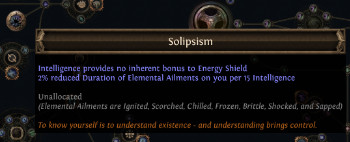
You can lower the time you're affected by a given Ailment through Reduced Ailment Duration. If you lower the duration enough, it fully protects you from the Ailment, but beware some enemy skills increase the duration of Ailments they inflict. Many sources of Ailment Duration reduction are found on the passive tree including, Solipsism and Anointed Flesh.
Reducing the duration of Ailments is unreliable, it's better to get 100% Chance to Avoid or become Unaffected. The exception to this is Soul of Abberath which gives 60% reduced Duration of Ignite on You. This reduces the damage Ignites deal so that your recovery can keep you alive. Another way to deal with Ailments is by reducing their effect, you can do this is via Jewel Modifiers or Influence Suffixes. At 100% Reduced effect of Chill, Freeze, and Shock you become immune to these Ailments.
Second - Mitigation
Mitigation comes into the equation after you take a damaging hit. Everyone is introduced to Resistances early in their Path of Exile journey, but by the time you reach endgame you need to familiarize yourself with the many other ways to deal with damage. Some of the strongest forms of mitigation work by applying one defensive effect to a new damage type.
Armor and Additional Physical Damage Reduction
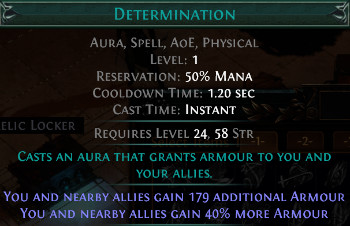
Armor is one of the core defense affixes in Path of Exile that prevents a portion of Physical hit damage. Armor's efficacy is inversely proportional to the size of the hit relative to the amount of armor you have. This is why a Granite Flask is so effective when leveling through the campaign. Armor affixes are found on gear with a Strength requirement, and the Aura Determination is a great way to get more Armor to defend against larger hits.
You can make your Armor more effective with Additional Physical Damage Reduction (Endurance Charges) and Chance to Defend with Double Armor. Physical damage is extremely dangerous, so Armor is a core part of the defensive layers of most builds. Armor has strong synergies with Guard Skills, and layers of Avoidance like Evasion or Block that prevent you from taking consecutive hits. Damage Shifting (discussed later) is another way to make your armor more effective. Physical mitigation from Armor caps at 90% by default, or 50% with Imbalanced Guard. If you want even more Armor, run Defiance Banner. You can also Evasion using Iron Reflexes to convert it to Armor.

Spell Suppression
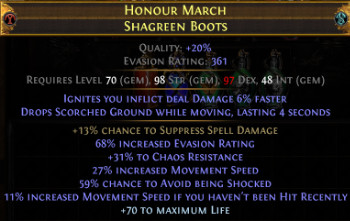
If you have 100% Chance to Suppress Spell Damage, you take half damage from all Spell hits, making this defensive layer particularly useful when fighting bosses! You can find Spell Suppression on nodes near the Ranger and Shadow areas of the tree, or Suffixes on gear with a Dexterity requirement.
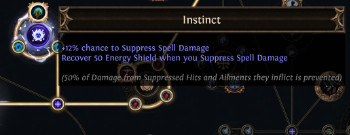
It's difficult to incorporate Spell Suppression into your build through gear alone and without a shield. Elevore is a particularly effective defensive option. It adds 20-25% Suppression and turns Suppression into recovery in addition to mitigation. This is highly effective while mapping, especially when enemies spawned by Eldritch altars rapidly fire projectiles at you.
Resistances
Resistances are a core part of your Path of Exile experience from early on. Path of Exile's endgame is balanced around having 75% Elemental Resistances so when you are under 75% you take massive amounts of damage! This is where raising your Maximum resistance comes in to further reduce enemy Elemental damage, plenty of Passives help with this including Prismatic Skin and Crystal Skin. You can also use Eldritch Implicits, or Auras like Purity of Fire, Purity of Ice, and Purity of Lightning.
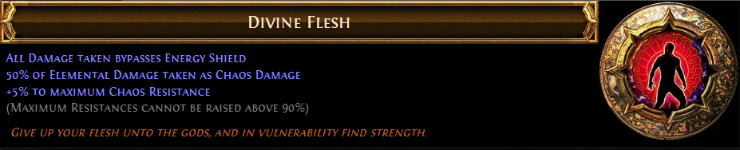
Positive Chaos Resistance is important for dealing with Chaosweaver enemies, or running Searing Exarch altars. If you want to further improve your defense against Chaos damage after getting 75%, consider the Glorious Vanity Keystone Divine Flesh. The +5% Maximum Chaos Resistance, reduces your Chaos damage taken by 20%. Divine Flesh also applies this Resistance to 50% of your Elemental Damage taken. Warning, Divine Flesh causes all damage to pierce your Energy Shield. You can become completely immune to Chaos Damage using Chaos Inoculation and investing in Energy Shield.
Reduced/Less Damage Taken
Reduced Damage Taken is an incredibly rare stat, because it combines additively with other modifiers. So if you got to 100% you would become immune to damage. For example the Slayer's Brutal Fervour includes 10% reduced damage taken while Leeching. The more common form of direct damage reduction is reducing the damage enemies deal through effects like Occultist's Frigid Wake or the Sap ailment. Damage reductions are incredibly powerful, but rare, so it's difficult to stack several together in the same build.
More commonly you'll find "Less" damage taken modifiers. The difference here is that Reduced combines additively, and Less combines multiplicatively. The guard skill Immortal Call is a good example as it gives up to 35% Less Physical Damage Taken and 34% less Elemental Damage taken for a short duration (and can consume Endurance Charges to increase the duration and Physical mitigation). The Elemental Flasks, Sapphire Flask, Ruby Flask, and Topaz Flask are an easy to use and highly effective way to mitigate Elemental damage without the need for Max Resistances. Damage reductions are great to have on a build with high avoidance which doesn't have to worry about taking frequent hits. Like with many other forms of defense if "Hits" is not specified, the reduction applies to DoTs as well.
Damage Shifting
Damage Shifting refers to taking one type of damage as another. This is a great way to apply your Elemental Resistances to Physical damage, or stack a single Resistance and ensure it is always relevant. Shifting is NOT conversion, so there's no double dipping as the original properties are not preserved. Taste of Hate is a good example of this, 20% less Cold damage taken makes Cold damage less threatening, and taking 15% of Physical Damage from Hits as Cold effectively mitigates 12% of your Physical damage taken while it's active.
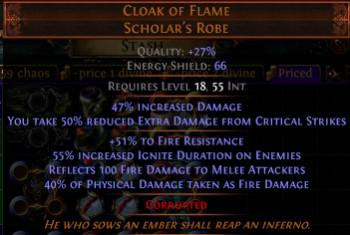
Damage can't be shifted multiple times! There are diminishing returns when combining multiple sources of shifting, so don't try to re-shift damage. Cloak of Flame doesn't specify "from hits" so it also shifts damage over time, making this item a powerful defense especially for builds without easy access to Armor!
Ward and -Damage Taken
Ward is a core defense that acts as a temporary shield protecting the user from a flat amount of damage for a single hit. So if you have 1,000 Ward and are hit, the Ward breaks absorbing up to 1,000 damage. As a result, Ward is ineffective when mapping because you take multiple hits frequently, but can be quite good against bosses. There's also an entire build archetype which relies on Ward, Cast when Damage Taken Support and self-damage effects to constantly trigger spells. Some items also grant a flat damage reduction, (-damage taken). But the values are low it's calculated before reductions/less damage taken, rendering this defense ineffective.
Guard Skills
Almost every Path of Exile build wants to use a Guard Skill, Arcane Cloak provides both defense and damage when you have a lot of Mana to spare. Immortal Call gives a potent but temporary damage reduction and scales with Endurance Charges. Molten Shell grants an absorb that scales with your Armor, this is by far the most popular Guard Skill because it mitigates most types of damage and has a generous duration.

If your build lacks Armor and Mana instead consider Steelskin which gives immunity to Bleeding, and grants an absorb to increase your effective health pool. Necromancers have access to the exclusive Bone Armour Guard Skill via Bone Barrier, which is a better version of Steelskin.
Critical Strike Mitigation
When a monster crits you, it's gonna be a bad time. Reduced Extra Damage from Critical Strikes fixes this by reducing or completely negating enemy crits, letting you run crit maps (and Expedition modifiers) with impunity. There's several ways to influence enemy Critical Strikes, Evasion for example can downgrade a crit to a normal hit, though this won't be effective 100% of the time.
You can also Mark or Poison enemies and use a Mastery to remove their ability to Crit. Assassin gets Mistwalker, and several passives such as Sanctum of Thought or Corrupted Implicits lower the extra damage you take from Critical Strikes.
If you don't mind dying from time to time, this defensive layer isn't required in softcore, just avoid maps and invitations with bonuses to monster Critical Strike. But in hardcore you definitely want to make the investment.
Aegis Effects
Aegis Skills from Magna Eclipsis or Bastion of Elements can be a great way to add more effective health against a specific damage type. Because Aegis effects take time to recharge, you want a good layer of avoidance before investing into them.

Aegis skills also benefit from other forms of mitigation, but a good Aegis means you won't need as much recovery on your build. You can only have 1 Aegis skill active at a given time. Despite the naming similarity, Aegis Aurora does not grant an Aegis skill.
Damage Taken Before Life

There are many effects which cause Damage Taken from something else before your Life. Mind Over Matter causes a % of damage to be taken from Mana before Life, this can be a great way to mitigate damage so long as you quickly recover the Mana.
Non-Chaos damage is applied to Energy Shield before Life, and any damage to your Energy Shield can't interact with Mind Over Matter while protecting your life! On the other hand, if you use Mind Over Matter with Eldritch Battery, your Energy Shield now protects your Mana further splitting damage. Be warned, this is extremely anti-synergistic with Aegis Aurora which wants as much damage as possible to go to your Energy Shield. Another way to protect your health is Frost Shield, which takes damage before your Life or Energy Shield making it a great defense to add to most builds. The Mana cost of Frost Shield is quite high if you trigger it with Cast when Damage Taken Support so plan accordingly.
Life Loss Prevention
Life Loss Prevention is exceptionally rare and powerful defensive layer. Petrified Blood prevents some Life lost, but comes with several downsides and shouldn't be used on most builds. On the other hand, Progenesis provides much needed Chaos Resistance, and prevents 25% of Life Loss from Hits during the effect, instead staggering it over 4 seconds. So as long as you have reliable recovery from something like Recoup or Regeneration you can effectively ignore 25% of the damage you take.

Progenesis is one of the most powerful items in the game as it offers generic mitigation that's easy to scale and usable on most builds.
For more information on how to get Progenesis check out our Maven Guide.
Third - Recovery
Recovery happens after taking damage, you need to recover so that the next hit won't reduce your health to 0. A great example of this early on is Life Flasks, but recovery takes many different forms. The most powerful forms of recovery tend to be instant and easily scaled, such as Life Gained on Hit or Aegis Aurora's Replenishment effect. Non-instant recovery (Flasks, Regeneration, Leech, Recharge and Recoup) is affected by Recovery Speed. Instant recovery (Replenish, Recover, and Gain on Hit) is not modified by Recovery Speed.
Flasks
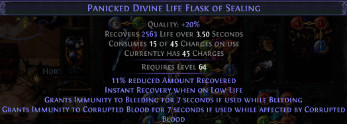
Everyone starts with a Life Flask, so you should be familiar with the basics already. Life Flasks have a variety of prefixes, and suffixes which can be rolled to provide additional healing, or utility. Eternal Life Flask has the highest base recovery at 1040 Life/second, but Divine Life Flask recovers more in total, making it a better base for a Panicked or Bubbling Flask.
It can be annoying to have to manually use your Life Flask all the time, so you should have another type of recovery that deals with damage passively, but being able to hit your Flask in an emergency when your Life suddenly drops is often invaluable. If you find yourself running out of Life Flask charges, there are several nodes for charge gain (Replenishing Remedies or Flask Mastery) in the Ranger and Shadow areas. You can also use the Ryslatha Pantheon or run multiple Life Flasks if you find yourself running out of charges, but don't spam them together because only the strongest effect applies, and Life Flasks effects are removed upon reaching full Life. You can also use a Mana Flask on a Mind Over Matter build for similar benefits. The Burden of Truth grants Supreme Decadence, which applies Life Flask recovery to your Energy Shield. The Pathfinder ascendancy gives many flask related bonuses.
Regeneration
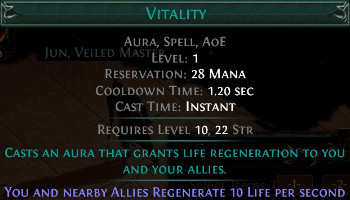
Regeneration is a persistent source of healing that always ticks your Life, Mana or Energy Shield up. The Vitality Aura provides flat Regeneration and is extremely powerful while leveling. The more Life or Energy Shield you have, the more beneficial it is to have percentile regeneration, from sources like Consecrated Ground, or passives like Warrior's Blood. You can apply Life Regeneration to Energy Shield with the Zealot's Oath Keystone.
Because Regeneration never stops working it's a great form of recovery to round out your defenses, it keeps working regardless of your ability to hit enemies. Life Regeneration Speed, or Increased Recovery Rate modifiers magnify the effects of Regeneration. Mana Regeneration is commonly used as an offensive stat, to ensure you're able to deal damage consistently. But when you're using Mana for defense it's an important part of your recovery strategy and is increased through Increased Mana Regeneration, the Clarity Aura, or Regenerating a % of your Mana per second. Regeneration excels on builds with significant mitigation and avoidance, and powerful % Life Regen paired with damage reduction on items like Doppelgänger Guise are among some of the most underrated defenses in Path of Exile! If you're playing a Hybrid build consider the Inquisitor Ascendancy, Pious Path lets your Life Regeneration also restore Energy Shield.
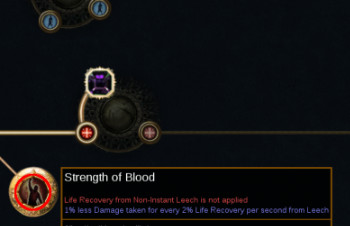
Leech
Leech is the most frustratingly complicated mechanic in Path of Exile, with stats like increased Maximum Recovery Per Life Leech, Increased Total Recovery per Second from Life Leech, and Increased Maximum Total Recovery Per Second From Leech, all of which sound similar and do very different things! But to simplify how it works, by default you can recover 20% of your Maximum Life every second by Leeching. If you're leeching Mana you can also recover 20% of your maximum every second, but Energy Shield recovers 10% of the Maximum every second by default (to compensate for ES builds normally having a larger health pool than Life/Mana builds). Because players hit very hard relative to their health pool, even a relatively small number like leeching 0.4% of all damage done is fine.
If you have 5,000 Life and hit for 60,000 damage, your damage is double the amount required to cap your Leech instances. Leech is great when you're able to hit enemies, and persists for several seconds which helps at mitigating damage over time. Leech is normally removed upon reaching full life, so you need to hit enemies again to Leech after being damaged. This is why Slayer's Brutal Fervour (often called overleech) is great for builds that Leech! Your Leech continues healing you until the instance expires regardless of whether or not you reach full Life.
Modifying Leech
A similar effect exists for Energy Shield Leech on Essentia Sanguis which also grants Ghost Reaver. Another way to scale Leech is the Vaal Pact Keystone. This doubles your Maximum Leech (from 20% to 40% of Maximum Life per second) but removes the effects of Life Regeneration. Mapping builds with Overleech that can always hit enemies, greatly benefit from Vaal Pact. But using it can be a fatal mistake on bosses with immunity phases. Many builds grab a single Mana leech node like Mana Leech, Life and Mana Leech or Clever Thief to ensure they can recover Mana to keep dealing damage.
Recoup
Recoup turns damage taken from hits into healing over 4 seconds. It's an incredibly powerful form of recovery that synergizes well with almost all forms of mitigation and avoidance. Recoup happens over a duration, so it is affected by Life, Mana, or Energy Shield Recovery rate modifiers. Life Recoup in particular is quite easy to obtain as it can be found on Rings and Jewels.
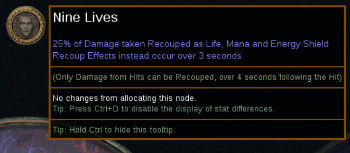
Because it scales off of the damage you take, Recoup is excellent for builds with a low Life pool and hybrid builds. You can find Recoup on nodes like Infused Flesh and Vampirism near the Witch or Shadow areas. Powerful items like Stasis Prison also grant Recoup. If you want Mana Recoup instead there's several passives that grant it including Mana Mastery. Witch has a strong synergy with Recoup through the Nine Lives Keystone. Nine Lives gives Life, Mana and Energy Shield Recoup and applies Recoup effects over 3 seconds instead of 4, greatly increasing the healing. Graven's Secret replaces Power Charges with Absorption charges that grant Energy Shield Recoup. If you have mitigation from Ward, (or similar effects) you can Recoup more than the damage you took.
Grants per Enemy Hit
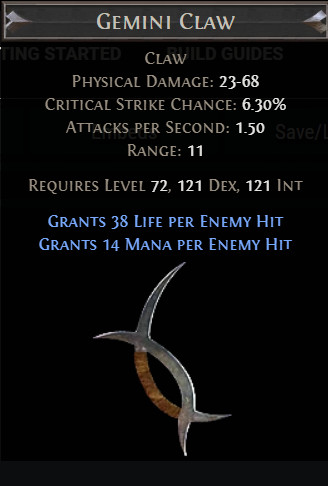
If you want instant recovery, consider Life Gain on Hit. This is available as an implicit on all Claws, and can be found on some Influenced Rings or Synthesized Weapons. On a build that utilizes Attacks you can also use Life Gain on Hit Support. If you use spells, consider the Watcher's Eye for Vitality or Discipline to get Life or Energy Shield on hit respectively.
Life Gain on Hit Synergies
Most of the time you want to use Life Gain on Hit in combination with a backup form of recovery which is more persistent or activates without you needing to hit enemies (Life Flasks, Regeneration and Recoup are all good options here). Mana Gained on Hit makes it quite easy to sustain even costly skills, which is why many Poisonous Concoction builds use the Life and Mana on Hit to sustain Life and Mana. Bloodseeker, Leech or Claw Masteries and certain Legacy items like convert your Leech into Life Gained on Hit making it easy to scale massive amounts of instant recovery.
Recharge
Energy Shield Recharges if you haven't taken damage for 2 seconds, you can speed this up using Faster Start of Energy Shield Recharge. Recharge is interrupted by damage, unless you have Wicked Ward and your Recharge started recently. Because Recharge's recovery happens over time it's scaled by Energy Shield Recovery Rate. It helps to have layers of avoidance to prevent something from interrupting your Recharge, for example combining Evasion and Energy Shield, or adding Block. Recharge applies to Life via the Eternal Youth Keystone, in exchange for making other forms of recovery less effective.
Remember, you need to avoid taking damage for a couple seconds before it kicks in. Be careful, degenerative buffs like Blood Rage prevent you from Recharging Life or Energy Shield.
Recover/Replenish
Aegis Aurora Replenishes Energy Shield on Block based on your Armor, Shaper and Warlord shields such as Ebony Tower Shield Recover 3-5% of your Maximum Life, Mana or Energy Shield on Block. Strength-based Shields also have flat Recovery on Block, and Elevore recovers up to 200 Life when you Suppress Spell Damage. Some Ascendancies also offer Recovery, such as Pathfinder's Master Surgeon. Ghost Dance is a powerful form of Recovery available to builds that scale Evasion and Energy Shield, because you don't take frequent attacks, you easily maintain Ghost Shrouds. Another common source of Recovery triggers on kill and can be found on Influenced chests, or passives such as Blood Drinker or Mind Drinker.
Recovery is instant and unaffected by harmful map modifiers such as 60% reduced Life, Mana, or Energy Shield recovery rate. Recovery is important after taking damage you need to be to full health as soon as possible.
Dissolution of the Flesh
Dissolution of the Flesh is a unique defensive layer that replaces all other forms of Recovery. When you take damage your Life that would be lost is instead reserved, this cannot be combined with Energy Shield but goes give 20-30% More Maximum Life. If you don't take damage for 2 seconds, the reservation ends effectively restoring you to full Life. The advantage of using Dissolution of the Flesh is that you don't need recovery, but because the delay to end the reservation cannot be modified you need to be careful, otherwise your entire Life can be reserved killing you instantly.
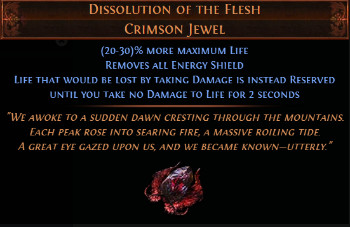
Use Evasion, Block or other layers of avoidance to protect yourself from damage until the reservation to ends. This is a great example of one defense negating the downside of another. Because your Life is reserved instead of being lost you can use Petrified Blood without the recovery penalty. The Life lost from Petrified Blood is not damage, thus doesn't interrupt Dissolution.
Combining Defenses
Now that you know how the individual defensive layers work, how do combine them into a complete build? Look for synergies! Start by grabbing defenses near to your class's starting location, then use defenses from gear to fill in the gaps.
Mapping Defenses
If you're playing a Ranger build it's easy to get a lot of Evasion, which is a powerful layer of avoidance. Having high Evasion means it's unlikely you take two consecutive Attack hits, but does nothing to defend you from spells. This is where Spell Suppression comes in, once you get 100% chance to Suppress Spells you'll take 50% less damage from all Spell Hits. To deal with the Attack Hits you fail to evade, adding in some Armor helps to round out your mitigation. Chance to Avoid Elemental Ailments is also easy to access from the Ranger area and completely protects you from the dangerous effects of Shock, Sap, Chill, Freeze, Brittle, Ignite and Scorch.
This also frees up your flasks' suffixes to bolster Evasion, Armor, or other defenses. When using a compatible skill that hits rapidly, always equip a claw to add Life Gain per enemy Hit. This build combines Evasion, Spell Suppression, Armor, and Life Gain on Hit to come up with well rounded defenses that excel when mapping. Your biggest weakness is large elemental hits from spells or boss attacks plus damage over time effects (which bypass most of your defenses). This is especially true if you're unable to hit an enemy to recover while taking the damage. Uber bosses often pose a particular challenge for this type of defensive setup. Most uber bosses require more persistent recovery and many of their Elemental Spells have penetration.
For more information on this build check out our Venom Gyre Deadeye.
Energy Shield Defenses
Many Witch builds opt into building around Energy Shield instead of Life. This gives more damage through the Pain Attunement Keystone, combined with Shavronne's Wrappings or Coruscating Elixir to prevent Chaos damage from bypassing Energy Shield. If you want to to ignore Chaos damage entirely use Chaos Inoculation instead! But having a large health pool doesn't automatically make you tanky, so many Energy Shield builds begin by layering on Block and Spell Block (this is especially easy with the Glancing Blows Keystone, or Mistress of Sacrifice from the Necromancer Ascendancy).
From there adding some Armor to mitigate Physical damage works well, and you can use Aegis Aurora to prevent small hits from ever killing you. Because Aegis Aurora gives +5% Maximum Cold Resistance, adding Purity of Ice, eldritch implicit modifiers, and Melding of the Flesh gives 90% all Elemental Resistances. This combination is already great due to the high level of synergy between the defensive layers. If you want to fight Uber Bosses it helps to add Elemental Flasks, a Granite Flask, or a Basalt Flask depending on the enemy damage type to better deal with specific encounters. Energy Shield has innate recovery from Recharge, and Aegis Aurora provides Recovery on Block. Adding the Divine Shield Keystone significantly increases your recovery. Finally, Elemental Ailment Immunity via the Stormshroud Jewel, and 100% Reduced Extra Damage taken from Critical Strikes round out your defenses.
Tanky Builds
So the end result is a build that excels in almost all areas of the game. Its sole weakness is physical damage over time, something that's extremely difficult to mitigate due to bypassing almost all defenses. This level of defensive investment requires a high budget like Cast On Critical StrikeForbidden Rite, or a skill that scales extremely well without much gear like Deathwish Ignite from the Maw of Mischief. Uber Bosses are challenging, you need impressive defenses to attempt them and this is a great way to do it.
Video Guide
Summary
- Layering defenses is a critical part of character building in Path of Exile.
- Most defensive layers defend against ability types (Attacks, Spells, DoTs, Ailments). Or types of damage such as Physical, Fire, Cold, Lightning, or Chaos.
- The first layer is avoidance, which focuses on preventing hits, damage, or negative effects.
- Avoidance includes Evasion, Block, and Chance to Avoid Elemental Ailments.
- The second layer is mitigation, ways to reduce the damage you take from DoTs or when hit by an enemy.
- If you want to mitigate damage, use Armor, Guard Skills, Spell Suppression, and Progenesis.
- The third layer is recovery, ways to get your Life, Mana or Energy Shield back after taking damage.
- Some examples of recovery include Life Flasks, Recoup, Recharge, or Leech.
- A well rounded build combines multiple synergistic defenses together. This way the strength of one layer covers for the weaknesses of another.
- There are tons of powerful defensive combinations on PoE Ninja.
- Or use Path of Building to try stuff out!
Credits
Written by Tenkiei
Reviewed by Crouching_Tuna, Facefoot