Loot Filter Guide
Last Updated:July 18, 2024|Changelog
Saying there's a lot of loot in Last Epoch is an understatement. Dealing with drops in the early game is manageable, but eventually there will be far too many items on the ground to deal with and players can quickly become overwhelmed. Fortunately, this is where Loot Filters come in! In this guide we teach you everything you need to know in order to use Loot Filters successfully, including importing filters from others and even how to create your own.
Before you make a Loot Filter make sure you understand what drops are worth filtering for by checking out our Gear Walkthrough.
What is a Loot Filter?
A Loot Filter allows us to remove items from our display that we no longer want to see. Items that are filtered out will still drop, but their nameplates will no longer show. This makes it much easier to see the items we want while avoiding unnecessarily sifting through gear that isn't relevant to our build or isn't valuable enough to pick up. They also allow us to display items differently by recoloring them or even emphasizing them, which can make it easier to identify the most important items.
A well crafted filter can literally save hours of time, allowing us to spend that time doing the fun stuff instead of worrying about the tedious task of comparing items and deciding whether to keep something or leave it on the ground. Whether we choose to import a premade filter (all of our build guides include one) or make one from scratch, a good filter is a huge boost to both efficiency and quality of life for any player.
Navigating The Interface
Before we dive into making our own filter let's get more acquainted with the filter interface.
Opening The Interface
There are two ways to bring up the filter interface. The fastest is to use the command 'shift+F'. Alternatively, pressing 'Escape' and going to settings, then scrolling to the 'Interface' section and pressing 'Shift + F | Manage Loot Filters' also works.

Selecting a Filter
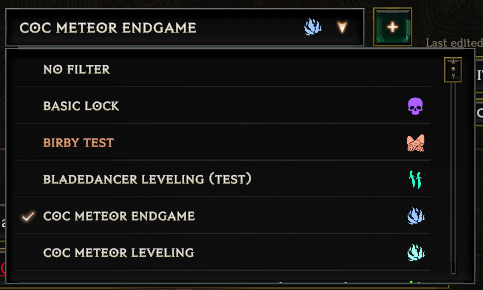
Once we have the filter interface open, the most basic task we need to be able to accomplish is selecting a filter. By clicking on the drop down box at the top of the interface we can select from a list of all of our filters.
The Plus Sign (+)
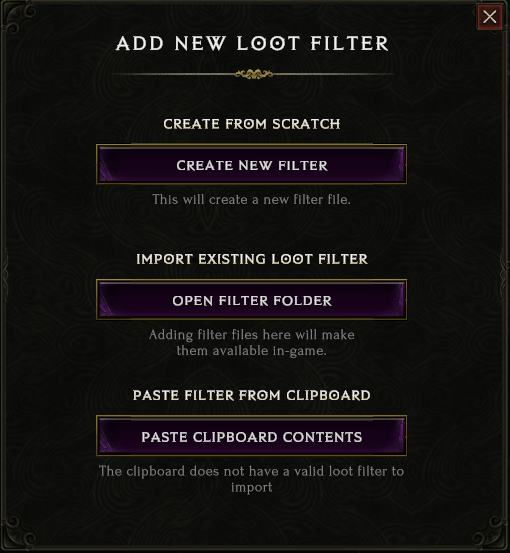
To the right of filter selection is a button with a '+'. Clicking on it opens a window with three options. We can create a new filter from scratch, import an existing filter by dropping a file into the folder, or import a filter by pasting it from our clipboard. We'll talk more about the two options for importing a filter in the next section.
Edit/Duplicate
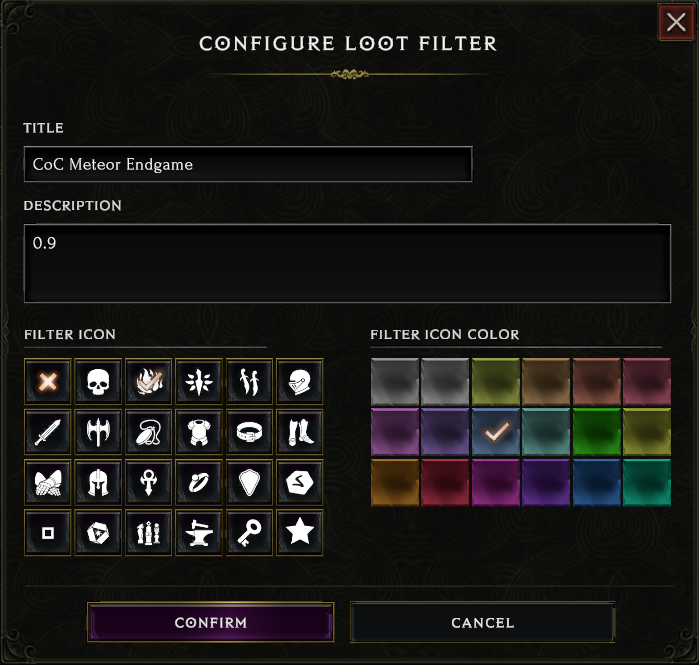
Just below and to the right of filter selection are the edit and duplicate buttons. Edit allows us to change the title, description, filter icon, and filter icon color of the selected filter. Duplicate makes an exact copy of the filter, which comes in handy when making a filter for a similar type of build or using a template filter to generate a new one.
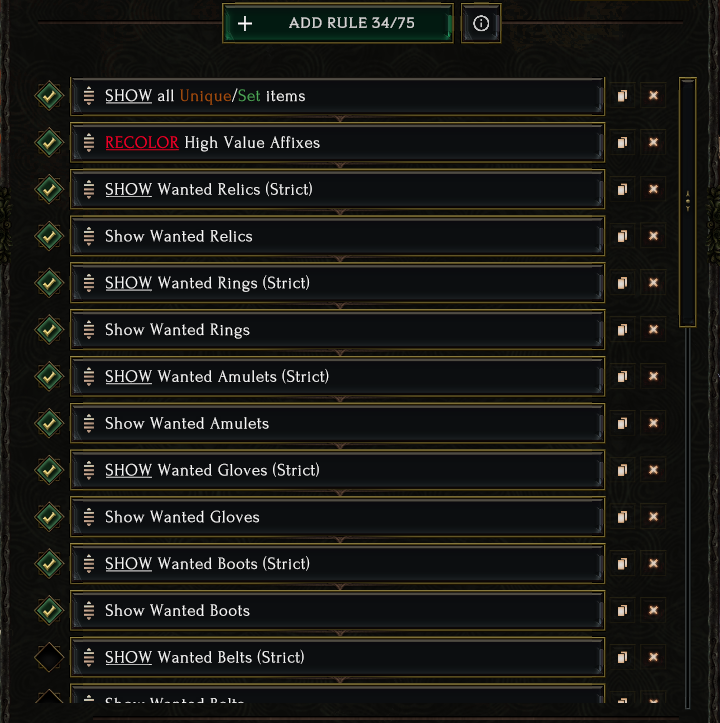
Add Rule and the Rule Window
Directly below Loot Filter selection is the 'Add Rule' button. Clicking this opens a window that allows us to create a new rule for the selected filter. Directly below that button is a window that displays all of the existing rules for the selected filter and allows us to manage and modify those rules. We'll discuss both of these areas in more detail in the section 'Creating a Filter'.
Delete/Export Filter
The bottom of the interface gives us two buttons. Delete Filter removes the filter file completely. Note: This is permanent and cannot be undone. Only do this if you're sure the filter will never be used again. Export filter allows us to export the filter to an outside location for sharing. We discuss exporting in more detail in the next section.
Importing/Exporting a Filter
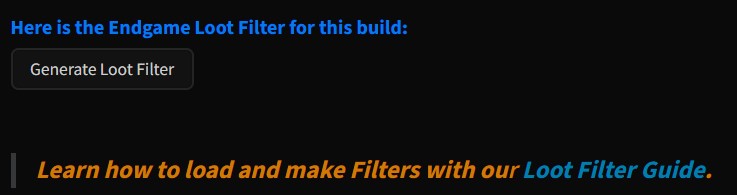
For players who prefer to have a premade filter, the process of importing one is relatively straightforward. First, we need to download the filter which comes in an xml format or copy it to our clipboard. For a Maxroll build, head to the 'Loot Filter' section and find the link. Left click on the link, which automatically copies it to your clipboard.
Now that we have the filter it's time to add it to the Loot Filter folder.
- In your game and under the Loot Filter interface (shift+f opens the interface) select the '+' sign at the top.
- Click 'Paste Clipboard Contents'
- This should automatically load the filter. Rename it to something you'll remember.
- We're done! The filter should now be fully accessible.
Exporting a filter follows a similar process. First, select 'Export Filter' from the bottom of the Loot Filter interface. Now select 'Open Custom Filter Location', which brings us to the filter folder. Find the file that has the same name as your filter and copy it or upload it to your medium of choice.
Creating a Filter
The process of creating a filter is easy. First, click on the '+' in the upper right. A new window will open with three options. Choose 'Create new filter'. A third window will now appear with options to name our filter, add a description, choose an icon, and choose the color of the icon. Once you're happy with everything select 'Confirm' and your new filter is created and ready for us to start adding rules!
Adding Rules
Rules are effectively what make the filter work by telling the game what to show and what to hide. We add a rule by selecting the big green button that says 'Add Rule' in the Loot Filter main interface. There are a lot of ways to customize rules which can get confusing, but knowing how all of the options work can be the difference between creating an OK filter that generally works but shows too much or too little and requires constant tweaking vs a filter that shows exactly what we want to see and can even update rules automatically for us. With that in mind, let's go through each rule option.
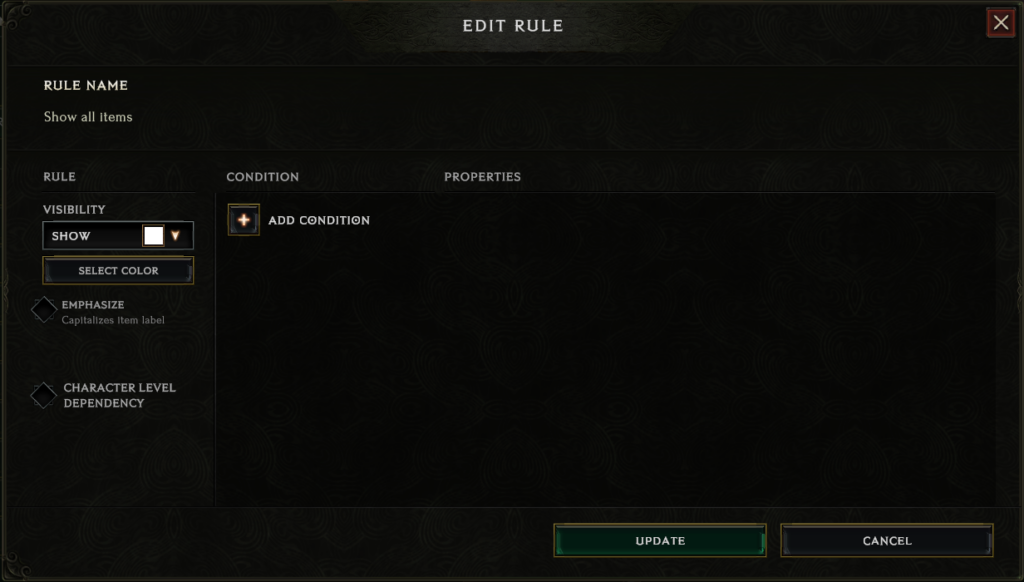
Visibility
Visibility is where we choose whether a rule will show an item or hide it. 'Show' means if the conditions we chose are met then the item will show on the ground, while hide means if those same conditions are met we will not see the item.
For example, if we want to make a rule that ensures we see all Exalted items, we need to choose the condition for Exalted rarity (more on conditions later) and then choose 'Show' as our visibility. If we want to hide all Normal items, we instead choose the Normal rarity as our condition and choose 'Hide' as our visibility.
There is one more Visibility option called Recolor. This acts as 'Show' but also changes the color of the loot nameplate on the ground to a color of our choosing. Upon choosing Recolor we make our color choice, but if we want to change it later there is a button right below visibility that displays when Recolor is the selected visibility.
Emphasize
Emphasize increases the size of the nameplate, making it easier to identify.
Character Level Dependency
By selecting Character Level Dependency we can specify a level range for our character that this rule will apply. For example: If we choose 15 in the first box and 30 in the second, that rule will only apply from levels 15-30. The rule will be deactivated for any levels below 15 and above 30.
Add Condition(s)
Conditions are the heart of the rule. This is where we tell the rule exactly what we're looking to either hide or show. We can have multiple conditions for a single rule, but be aware that all conditions must be met in order for a rule to apply, so be careful not to overcomplicate a single rule with too many conditions! In the next section we cover all of the different types of conditions and how they apply.

Conditions
Conditions are broken up into six options: Affix, Class Requirement, Level, Rarity and Item Type.
Affix
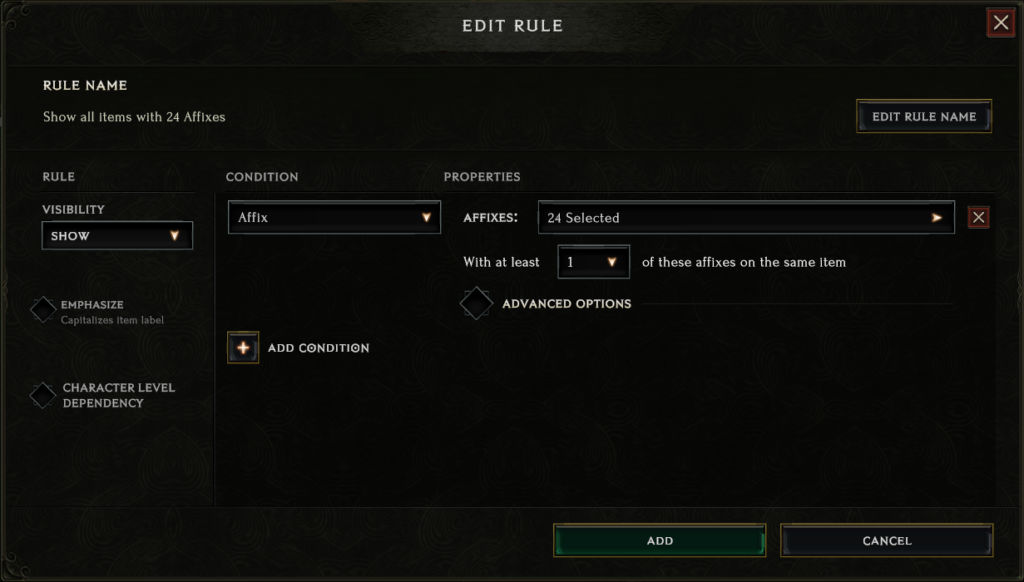
This is used to filter specific affixes (i.e. Melee Critical Strike Chance). We can choose to filter for any number of affixes from a single one to every affix in the game. We can also choose to filter for more than one affix on an item. Example: If we have 4 affixes selected and also choose 'With at least 2 of these affixes on the same item" then the rule will only filter for items that have at least 2 of the 4 affixes we've selected.
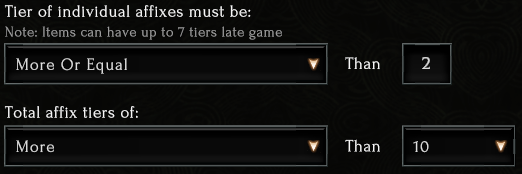
By selecting 'Advanced Options' we can also filter for tiers. There are options for tiers of an individual affix (example: If we want to only filter for items that have 2+ tiers of Melee Critical Strike Chance select 'More or equal to' and then type '2' in the box on the right.) and total affix tiers (example: If we want to filter for items that have more than 10 tiers of the selected affixes select 'More' and type '10' in the box on the right. Note that this only considers tiers of affixes that are part of the condition. It does not factor in tiers of affixes that are not listed). These options come in handy later on when our gear is getting better and upgrades are harder to come by.
Class Requirement
This is a simple condition that allows us to filter class specific items. It only has one drop down with all of the classes listed. We can choose multiple classes if we want to show or hide more than one.
Level
This condition gives us several options to tailor our filter based on level requirements. 'Below Level' means that we filter for any items below a level of our choosing, while 'Above Level' does the opposite, filtering only for items above a chosen level.
The next two conditions work a little differently:
- 'Max lvl below character level' allows us to set a range of levels below our own where items will be filtered for. This will adjust dynamically as we level up. Example: If we set this to '10' we will only filter for items that are no more than 10 levels below our character level. At level 20 we only filter for items 10-20 while at level 60 we filter for 50-60.
- 'Highest usable level' filters only items that are at or below the current character level, meaning this rule changes dynamically as we level up. Example: At level 20 this will filter for items level 20 and below, while at level 60 this will filter for 60 and below.
Rarity
This is a simple condition that allows us to filter for specific rarity types like Unique or Exalted.
For more info on rarity types check our Gear Walkthrough.
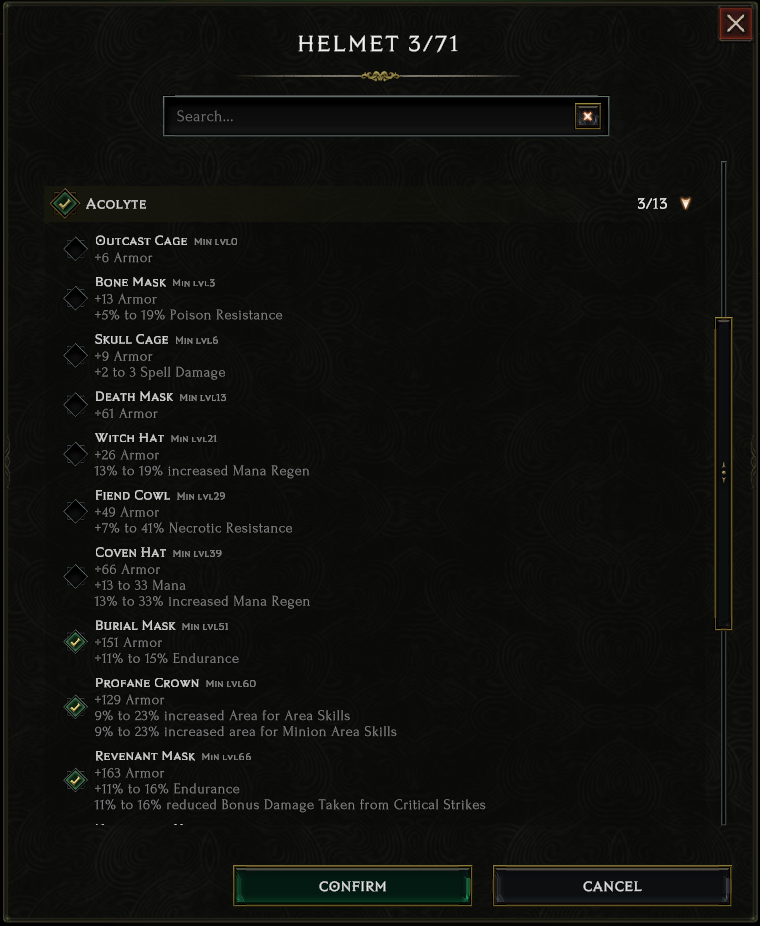
Item Type
This condition is a powerful one that allows us to filter for both types of items (i.e. Helmets) as well as specific items of that type (i.e. Profane Mask). We use 'Type' to select the type of item and 'Subtypes' to select the more specific items. (Example: We want to to filter for the above mentioned Profane Mask as well as Burial Mask and Revenant Cowl. We first need to select 'Helmet' under 'Type' and then select 'Subtypes'. This will bring up a new window. From here, select the drop down under 'Acolyte' and then select the three helmets. Now click 'Confirm to lock it in'.
Note that we cannot select multiple Types and also select Subtypes. We also cannot have multiple Item Type conditions in a single rule. This means if we want to filter for multiple Item Types with Subtypes we need to make multiple rules, one for each Item Type we want to filter for (i.e. a rule for Wands and a separate rule for Staves, each with their own subtypes.)
Using Multiple Conditions
Because we can have multiple conditions for a rule we can mix and match these conditions to our liking. For example, if we want to see only Two Handed Axes that are Rare or better we would use both the 'Rarity' and 'Item Type' conditions. We can use up to one of each condition in a rule but never multiples of the same condition. Bear in mind that an item will need to pass every condition within a rule in order to be filtered by that rule, so be careful not to make your rules overly strict with too many conditions!
Working With Multiple Rules
One of the most powerful features of the Loot Filter in Last Epoch is the ability to combine up to 75 rules together into a single filter. In order for so many rules to work together there needs to be a way for the game to deal with so many rules at once. There also needs to be ways for us to manage the rules that are in place.
Rule Priority
Rule Priority is how the game deals with rule conflicts to determine what rules should override other rules. Rules that are higher on the filter take priority over rules below them. For example, if we have a rule that tells the filter to hide all Uniques, but another rule above it that says to show Unique Longbows, then if Reign of Winter drops our filter will show it because the show rule takes precedence over the hide rule. If the hide rule is placed on top of the show rule, then when Reign of Winter drops we won't be able to see it. As you can see, it's very important that we properly order our rules!


This also creates an important layer of functionality for us, because it allows us to synergize rules together so that lower filters can 'catch' items that higher filters ignore. Example: We can put a 'catch all' filter at the bottom of our rule list that hides everything that isn't shown by one of our higher rules. To find out how to make a catch all rule see the basic Loot Filter example below.
Reordering Rules
When building and adjusting our filter there will be times when we want to reorder rules to change their priorities. Fortunately, this is very easy to do! To reorder a rule, we simply click and drag that rule to a different spot in the rule section. As we drag the rule, other rules will shift to show us how the rule order will change. When we're happy with the position of the rule we simply drop the rule in by depressing our mouse button.
Enabling/Disabling, Copying and Deleting Rules
There are three other useful functions for rules in the rule window. All of these functions can be found on the right side of each rule:
- We can enable/disable a rule by clicking on the diamond. If a rule is enabled the diamond will be colored green with a checkmark in the center. If the rule is disabled the diamond will be hollow.
- We can copy a rule by clicking on the icon that looks like two pieces of paper. This is especially useful for making multiple rules that are similar and only need minor adjustments instead of making an entirely new rule for each.
- The white 'x' allows us to delete a rule from our filter.
A Basic Loot Filter Example
In this section we go step-by-step through the process of making a simple Loot Filter that can perform some basic filtering tasks and be used as a stepping stone to a more comprehensive filter. Note: This should in no way be considered a complete filter and is used for educational purposes only. For a more complete example, download a filter from one of our Build Guides and use our Understanding Maxroll Loot Filters Guide to learn how it works.
Rule 1
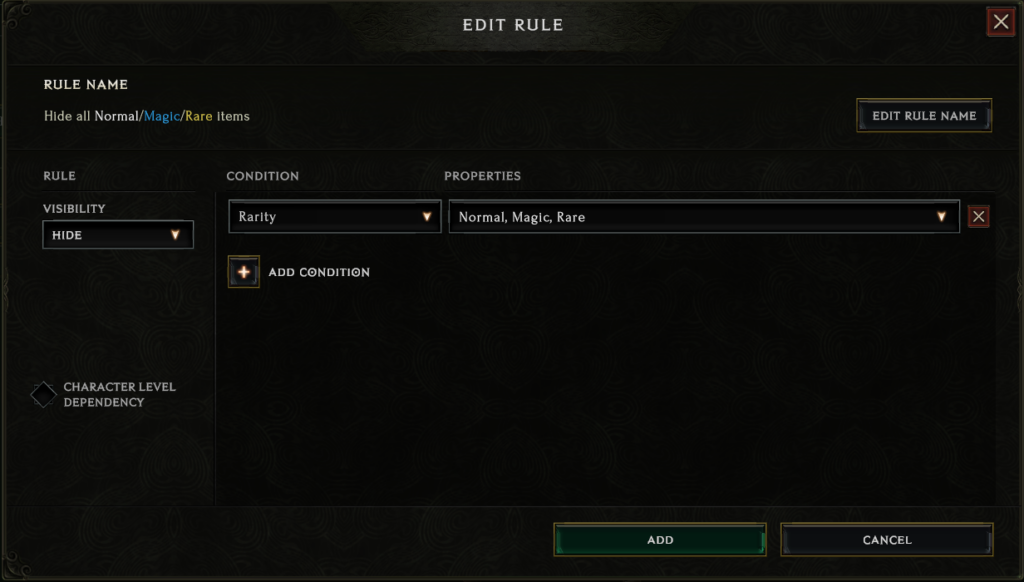
The first thing we need to do is create a 'catch all' that hides any items we don't specifically ask the filter to show. To do this we need to:
- Make a new rule by selecting 'Add Rule' in the Loot Filter interface
- Under 'Visibility' choose 'Hide'
- Under 'Condition' choose 'Rarity'
- Now under 'Properties' choose 'Normal', 'Magic' and 'Rare'
- Keep this rule at the bottom of your list.
We're only choosing these three properties because we still want to see all Exalted, Unique, and Set items.
Rule 2
Now we need to have a rule that shows any items that have the affixes we're looking for (except Idols, we'll handle those next).
- Make a new rule by selecting 'Add Rule' in the Loot Filter interface
- Under 'Visibility' choose 'Show'
- Under 'Condition' choose 'Affix'
- Now under 'Properties' select any affixes that you want to look for that aren't Idol related (anything that isn't the bottom section). Some good options in here are Health related affixes (Health, Health, Hybrid Health), Resistances, and Attributes that fit your build (Example: Sorcerers will likely want Intelligence. Check your skill tags to see which attributes apply to the skills you're using)
- Make sure this rule is always placed above Rule 1 or else items will be hidden before they ever reach this rule!
Rule 3
Next we want to handle Idols. We're going to keep them all visible because they're generally useful and don't drop too often, but we also want to be able to differentiate ones with affixes that we know we want from the rest.
- Make a new rule by selecting 'Add Rule' in the Loot Filter interface
- Under 'Visibility' choose 'Recolor'
- Choose a color that works for you. We recommend the greenish/teal color (third from the bottom) because it stands out from the normal Idol color but also looks similar.
- Under 'Condition' choose 'Affix'
- Now under 'Properties' select any Idol related affix you want to look for (these are at the very bottom of the filter). Some good universal affixes are Increased Health, Added Health, and any of the Resistances. Do not put any affixes in here that aren't related to Idols or they will be colored incorrectly!
- Place this rule just above Rule 2 (the order of these two doesn't actually matter but keeping your generic hide rule at the very bottom is good practice)

With these three rules we already have a working filter! Our first rule filters out any items that don't have what we want. Our second rule shows us items that we do want by preventing the first rule from hiding them, and our third rule helps us see important Idols while not hiding others that might still be useful. Let's add two more just to improve the filter a bit and set us up for success later should we want to add rules.
Rule 4
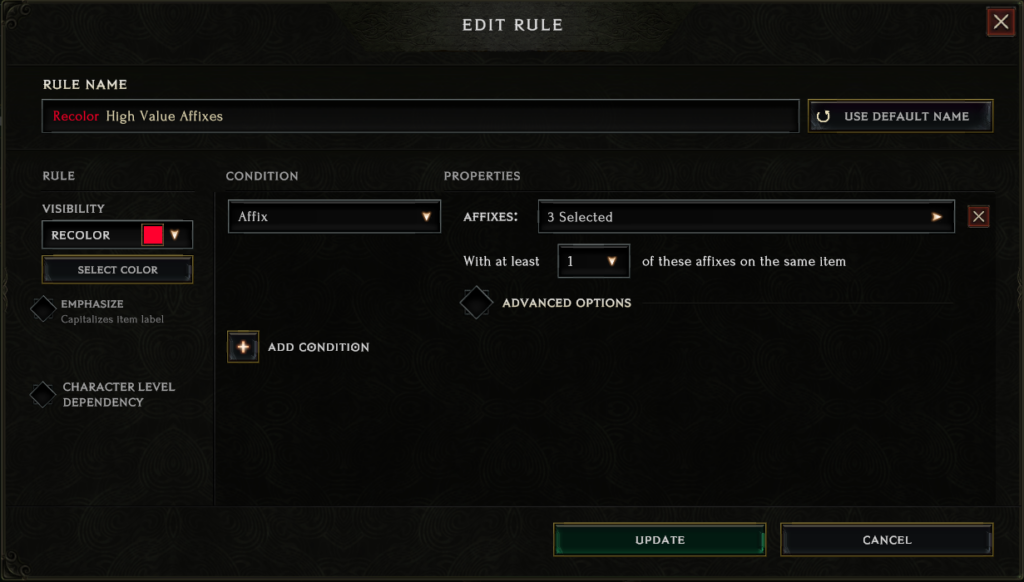
It's great that we're seeing only affixes that we want but what if there are affixes that we really want? It's important that we don't miss those when they drop, so let's make a recolor rule that really makes those items pop.
- Make a new rule by selecting 'Add Rule' in the Loot Filter interface
- Under 'Visibility' choose 'Recolor'
- Choose a color that works for you but also really stands out. We recommend red.
- Under 'Condition' choose 'Affix'
- Now under properties choose any affix that you really want to stand out from the rest. It's OK if you put the same affix(es) in rule 2, the recolor will still work. An example of affixes that might go here are class specific affixes that are important for your build (example: Level of Shield Throw for a Shield Throw build).
- Let's put this above rule 3. The order doesn't really matter as long as it stays above rule 1, but having it at least above rule 2 makes logical sense and will make it easier to keep track of what each rule is doing (this can be a problem with filters that have many rules).
Rule 5
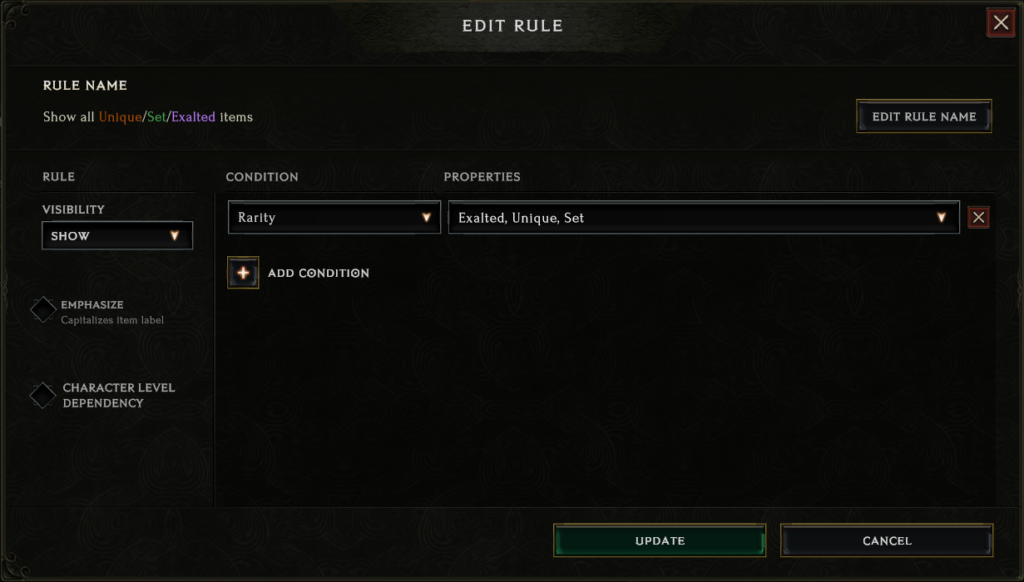
Now let's make sure the most valuable items in the game are always shown.
- Make a new rule by selecting 'Add Rule' in the Loot Filter interface
- Under 'Visibility' choose 'Show'
- Under 'Condition' choose 'Rarity'
- Under 'Properties' choose 'Exalted', 'Unique' and 'Set'
- Place this rule at the top of your filter
This rule acts as a 'catch all' for these three rarities, making sure no matter what else we do with our other rules these items will always filter through. There aren't any rules right now that would hide them, but by placing it now you can rest assured that you won't have any problems if you decide to customize your filter further. Make sure this rule is always at the very top. It cannot protect these items from any rules above it!
You now have a basic working Loot Filter! From here, you can use everything you've learned from this article to make your own rules, or if you aren't comfortable with that you can always use one of our own builds that come with pre-made and ready to go filters. Either way, we recommend checking out our guide on Maxroll Loot Filters to better understand how our filters work or even get some ideas on rules you might want to add to your own!
Summary
- A Loot Filter allows us to remove items from our display that we no longer want to see.
- They also allow us to display items differently by recoloring them or emphasizing them
- The Loot Filter interface (shift+F) is where we can add, select, modify, duplicate and delete our filters.
- Filters can be imported from various sources (like the ones you find here at Maxroll) or you can create your own.
- There are many rules with many different options that allow for endless customizability.
Video
Credits
Written by McFluffin.
Reviewed by Terek, Aristotelian.