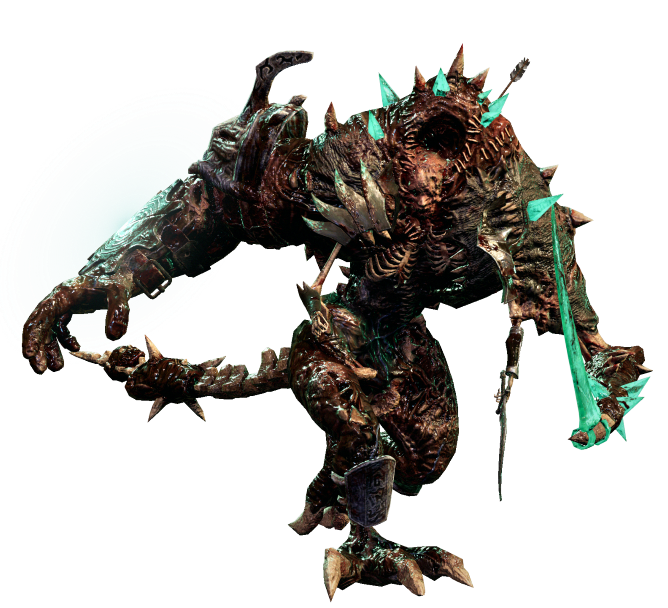
Abomination – Fall of the Outcasts Boss Guide
Last Updated:February 15, 2024|Changelog
Abomination is the first timeline boss you'll encounter in the Monolith of Fate. He is one of the easier bosses in the game, with several campaign bosses providing a greater challenge than him. That being said, he can still punish players who aren't paying attention to mechanics.
In this guide, we cover the rewards, boss mechanics, and provide a strategy for defeating this boss.
For more information on the Timeline this boss is found in check out our Fall of the Outcasts Timeline Guide.
Rewards
All timeline bosses have a pool of exclusive Uniques that can drop. They also provide the player with a Blessing, which is a permanent buff to either power or farming/leveling efficiency. Just like Uniques, each boss has their own exclusive Blessing pool.
Uniques
Abomination can drop 4 different Uniques:
- Woven Flesh is a common drop with a 50% chance to drop. It is mutually exclusive to Ribbons of Blood, meaning you always get one or the other, but not both. It can drop from both normal and empowered versions. The drop rate is not affected by corruption.
- Ribbons of Blood is a common drop with a 50% chance to drop. It is mutually exclusive to Woven Flesh, meaning you always get one or the other, but not both. It can drop from both regular and Empowered versions. The drop rate is not affected by corruption.
- Flayer's Pride is a rare drop. The drop rate is increased by higher Corruption. It can technically drop off of normal Abomination; however the area level must be increased to at least 65 for it to drop. We recommend farming this on Empowered.
- Strands of Souls is a rare drop that can only be found in Empowered. Increases in Corruption improves the drop rate of this item.
See the Monolith Beginner Guide for more info on Corruption.
Blessings
The Blessings of this Timeline are focused around increasing drop rates of certain items, gold, and experience. Some generally useful choices are: Strength of Mind, Winds of Fortune, and Scales of Greed.
Normal
- Curse of Flesh
- Favor of Souls
- Mark of Agony
- Memory of the Living
- Pride of Rebellion
- Scales of Greed
- Sight of the Outcasts
- Sign of Torment
- Strength of Mind
- Winds of Fortune
Empowered
- Grand Curse of Flesh
- Grand Favor of Souls
- Grand Mark of Agony
- Grand Memory of the Living
- Grand Pride of Rebellion
- Grand Scales of Greed
- Grand Sight of the Outcasts
- Grand Sign of Torment
- Grand Strength of Mind
- Grand Winds of Fortune
Boss Mechanics
Modifiers
When you go into a timeline boss fight, you carry any modifiers that are active from running echoes. Some of these modifiers can be especially dangerous, while some can actually bring value with little or no downside.
- Critical Strike Avoidance - If you're a Crit based build and have sufficient Crit to be noticeable.
- Enemies have +X Critical Strike Chance - avoid these if you don't have capped Critical Strike Avoidance.
- Enemies have a chance to Dodge - any builds that rely on Hitting the enemy (including DoT builds that apply Ailments on Hit) should avoid this modifier (except for Rogues with Focus Fire).
- Enemies heal if they have not been damaged recently - Only take this if you're confident you'll never go 4 or more seconds without damaging the boss (after phase 1).
- Frenzy and Haste + Berserk - Individually these are manageable (although you may still want to avoid them if you can). Together they can make a boss very difficult to deal with as they significantly speed up the mechanics of the fight. Don't take these unless you're comfortable with the mechanics and confident that the additional speed of the fight won't be a problem.
- Anything that affects Rare enemies - Bosses are not considered Rare enemies, so those modifiers do not apply to the encounter. However, the rewards do. This is an easy way to boost the value of a fight for any build without increasing difficulty.
- Enemies have +X Critical Strike Chance when Crit capped - If you're Crit capped, then this modifier provides no extra difficulty.
- Critical Strike Avoidance on a DoT build - DoTs can't Crit, so this won't matter.
- Enemies have a X% chance to receive a Glancing Blow when hit on a DoT build - Similar to Crits, Glancing Blows only apply to Hits.
- Enemies have a chance to Dodge on a build that uses a DoT skill - Ailments generally need to Hit to be applied, so don't take this if you're relying on Hits to stack your DoTs. However, some skills have the DoT tag, meaning they don't Hit. DoTs can't be Dodged, so your damage is unaffected.
Boss Strategy
Abomination is a two phase fight. In phase 1, he is invulnerable until you destroy four Vessels. Once the vessels are destroyed, he becomes vulnerable and phase 2 begins.
Phase 1
Run to the center area to activate the boss and start the fight, then immediately run to one of the Vessels. Try to take it out in one shot if possible. The Abomination will catch you and start using its own mechanics while the Vessel is also attacking. If you find it too dangerous just quickly move onto the next one. The boss should be slower than you, giving you some time to attack the next Vessel. As you destroy vessels, Necrotic pools form in each quarter of the arena that the vessel was positioned in. Go in a clockwise or counter clockwise pattern until all four Vessels are killed, which helps you avoid the Necrotic pools when switching between vessels. Once all four Vessels are destroyed, immediately head to the center ring.
Phase 2
Once you've destroyed all four Vessels and reached the center ring, you can start damaging the boss.
- Try to position the boss close to the center to give yourself more room to maneuver. Keep moving to make it easier to avoid Earthquake.
- When he uses Necrotic Wave, either stand in between two of the waves at range from the boss, or reposition to his back before the waves return.
- When you see the red circle from Tail Flair, move away and to one of the sides of the boss. This ensures that you also avoid the line attack as well as the circle AoE.
- Once the boss reaches 90%, be on the lookout for the Necrotic AoE circles from Spirit Decay. These slowly chase you and ramp up their damage, so they need to be avoided. They continue to spawn throughout the fight every time he uses Earthquake.
Rinse and repeat until The Abomination is killed. Speak to the NPC to choose your timeline and your Blessing.
Video
Summary
- The blessings for this timeline are all focused around increasing drop rates of certain items, gold and experience.
- Abomination is a relatively easy fight in comparison to many other bosses in the game.
- The fight consists of two stages, with the first phase requiring the player to destroy four Soul Vessels before Abomination can be damaged.
- The second phase occurs in the center of the ring and solely consists of fighting Abomination.
- The most dangerous mechanic of the fight is Spirit Decay, which spawns every time Abomination uses Earthquake under 90% health.
Credits
Written by McFluffin.
Reviewed by Facefoot, Lizard_IRL, Raxxanterax.