Exotic Class Items
Last Updated:February 15, 2025|Changelog
Exotic Class Items were once thought to be a thing of the past. With The Final Shape, a new Hunter Cloak, Titan Mark, and Warlock Bond give Guardians more power than they've ever seen before. Alongside these Class Items, a new activity has been uncovered: Dual Destiny. In this guide, learn about the features of Exotic Class Items, how to unlock this hidden activity, and how to complete it.
DISCLAIMER: Dual Destiny requires access to The Final Shape DLC to unlock. This activity must be played in a duo fireteam!
DISCLAIMER: This article doesn't cover farming for Exotic Class Items after unlocking them from Dual Destiny, though know that they can be farmed outside of it.
New Exotic Pairings
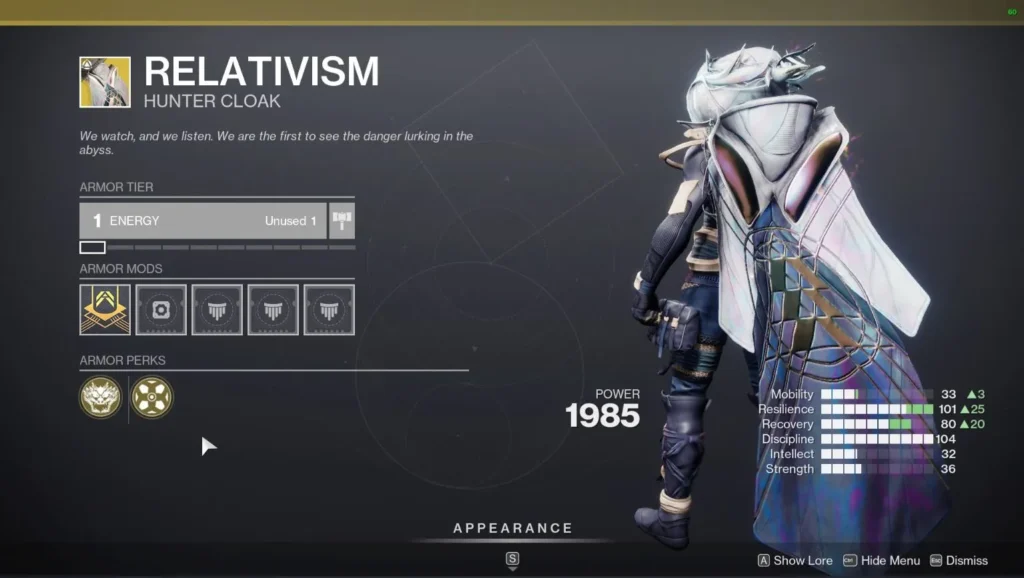
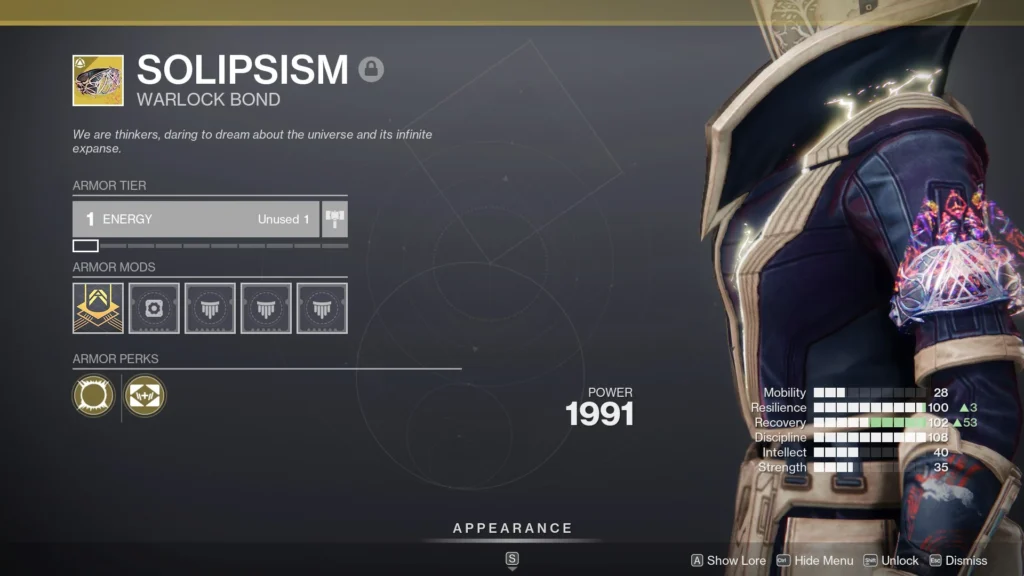
Alongside Prismatic, Bungie promised that Guardians would be more powerful than ever imagined, and they absolutely delivered! Breaking the barriers of only being able to equip one Exotic armor piece at a time, Relativism, Stoicism, and Solipsism all randomly roll with two Exotic traits. It's worth noting that these traits are a watered down version of their original states. But combining two of them puts these Exotic Class Items in a league of their own. You can only utilize Exotic Class Items while on the Prismatic Subclass.
Hunter
| First Slot Exotic Traits | |
|---|---|
| Name | Description |
| Spirit of the Assassin | Become invisible with powered melee kills or finishers |
| Spirit of Inmost Light | Use an ability to increase the regeneration for the other two |
| Spirit of the Ophidian | Improves ready speed on all weapons |
| Spirit of the Dragon | Dodging reloads all weapons and increases weapon handling speed |
| Spirit of Galanor | Hits and final blows with your Super returns Super energy after it ends |
| Spirit of the Foetracer | Damaging a powerful combatant or Guardian with an ability grants you a temporary damage bonus for weapons matching that ability’s element |
| Spirit of Caliban | Damaging a powerful combatant or Guardian with an ability grants you a temporary damage bonus for weapons matching that ability’s element |
| Spirit of Renewal | Allies inside the Duskfield take reduced damage and targets inside the area deal reduced damage |
| Second Slot Exotic Traits | |
|---|---|
| Name | Description |
| Spirit of the Star-Eater | Picking up Orbs of Power after your Super is full increases its damage |
| Spirit of Synthoceps | Improved melee damage when you’re surrounded |
| Spirit of Verity | Weapon final blows with a damage type matching your grenade grant a stacking grenade damage bonus |
| Spirit of the Cyrtarachne | Gain Woven Mail when you use your grenade |
| Spirit of the Gyrfalcon | Grants Volatile Rounds to your Void weapons after coming out of invisibility |
| Spirit of the Liar | Dealing damage with a powered melee or receiving a melee attack allow for a counterattack |
| Spirit of the Wormhusk | Dodging heals you slightly |
| Spirit of the Coyote | Gain an additional class ability charge |
Titan

| First Slot Exotic Traits | |
|---|---|
| Name | Description |
| Spirit of the Assassin | Become invisible with powered melee kills or finishers |
| Spirit of Inmost Light | Use an ability to increase the regeneration for the other two |
| Spirit of the Ophidian | Improves ready speed on all weapons |
| Spirit of Severance | Powered melee or finisher final blows create a damaging explosion |
| Spirit of Hoarfrost | Your Barricade becomes a wall of Stasis crystals that slows nearby targets when created |
| Spirit of the Eternal Warrior | When your Super ends get bonus damage for weapons matching its element |
| Spirit of the Abeyant | Drengr’s Lash projectiles have better tracking and more range |
| Spirit of the Bear | Converts damage blocked with Unbreakable to Super energy and you move faster while using this aspect |
| Second Slot Exotic Traits | |
|---|---|
| Name | Description |
| Spirit of the Star-Eater | Picking up Orbs of Power after your Super is full increases its damage |
| Spirit of Synthoceps | Improved melee damage when you’re surrounded |
| Spirit of Verity | Weapon final blows with a damage type matching your grenade grant a stacking grenade damage bonus |
| Spirit of Contact | Hitting a target with a powered melee creates a bolt of lightning in the area and jolts enemies |
| Spirit of Scars | Final blows with weapons that match your Super’s element create a burst of healing around you |
| Spirit of the Horn | Your class ability creates a shockwave that scorches targets |
| Spirit of Alpha Lupi | Generates a healing pulse when activating your class ability |
| Spirit of the Armamentarium | Gain an additional grenade charge |
Warlock
| First Slot Exotic Traits | |
|---|---|
| Name | Description |
| Spirit of the Assassin | Become invisible with powered melee kills or finishers |
| Spirit of Inmost Light | Use an ability to increase the regeneration for the other two |
| Spirit of the Ophidian | Improves ready speed on all weapons |
| Spirit of the Stag | Rift grants damage reduction to allies standing on it |
| Spirit of the Filaments | Casting an empowering rift grants you Devour |
| Spirit of the Necrotic | Damaging combatants with melee poisons enemies that spread poison when defeated |
| Spirit of Osmiomancy | Recharges your grenade more quickly on hits and improves Coldsnap tracking |
| Spirit of Apotheosis | Greatly increases grenade and melee energy after using your Super |
| Second Slot Exotic Traits | |
|---|---|
| Name | Description |
| Spirit of the Star-Eater | Picking up Orbs of Power after your Super is full increases its damage |
| Spirit of Synthoceps | Improved melee damage when you’re surrounded |
| Spirit of Verity | Weapon final blows with a damage type matching your grenade grant a stacking grenade damage bonus |
| Spirit of Vesper | Rifts release Arc shockwaves |
| Spirit of Harmony | Get Super energy with weapon final blows matching your Super element |
| Spirit of Starfire | Dealing empowered weapon damage grants grenade energy |
| Spirit of the Swarm | Destroying a Tangle spawns Threadlings |
| Spirit of the Claw | Gain an additional melee charge |
Want to see builds using these new Exotic Class Items? Check out our Build Guides!
How to Unlock Dual Destiny
There's no quest to pick up this time. To unlock this new Exotic mission, you have to complete a puzzle for Savathun in The Pale Heart. First, head to each landing zone and complete the Overthrow event. After killing the boss, a message appears in your activity feed: "A Secret Keeper of the Witch Queen has spawned". This text does not appear until after the dialogue you're listening to ends. You must locate this Hive Guardian Wizard and kill it before the five minute timer expires and a new Overthrow begins. Below are the locations of all three Wizards.
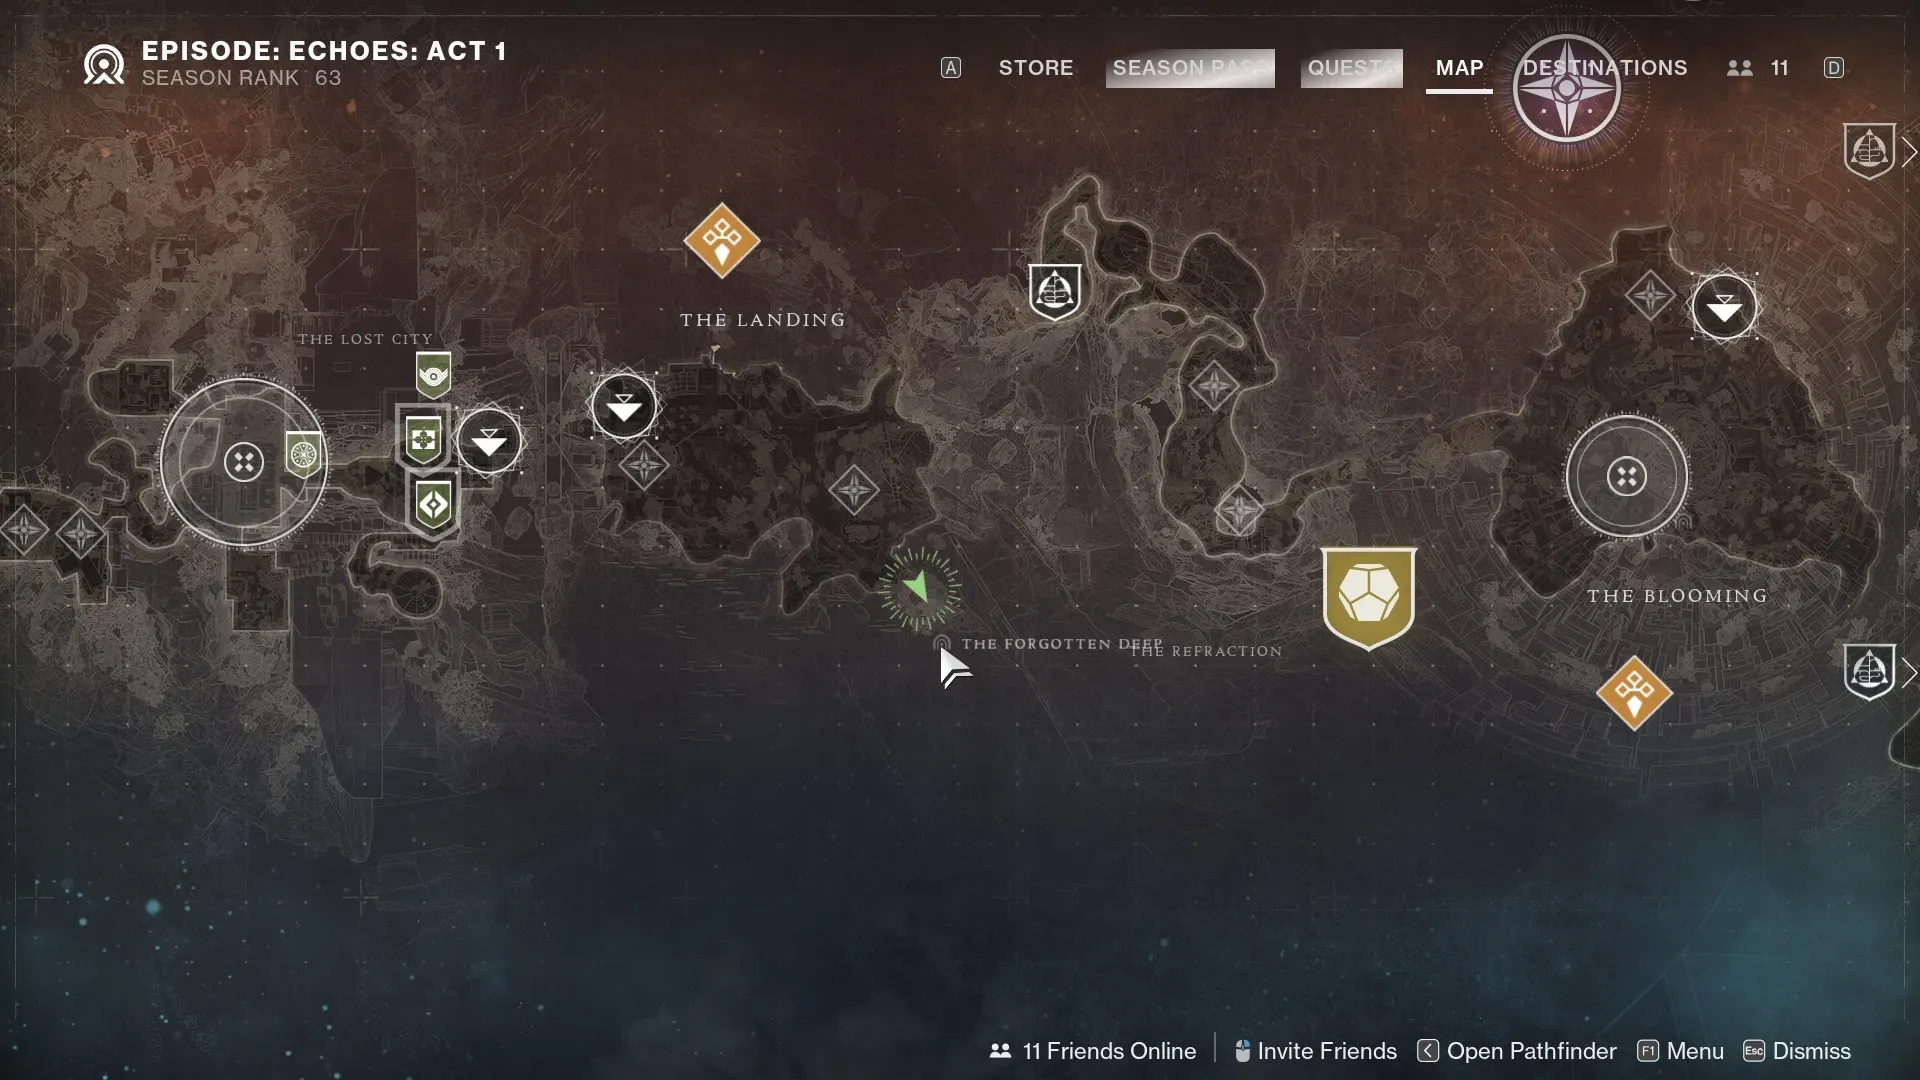
After you've killed all three Wizards, head back to The Blooming and look towards The Refraction. There is a pillar of green light stemming from the ground and you need to investigate it. Once you reach The Refraction, you're going to gain a new buff called Savathun's Envoy. This buff only lasts 7 minutes so you want to move fast. Upon exiting the blue cave, two objective markers appear on your HUD. Head towards one and a group of enemies spawns. Kill enough of these enemies and a Subjugator spawns named Expector Selin. You won't be able to kill the boss, but getting to the first damage threshold on its health bar causes it to despawn leaving behind an Orb of Refracted Light.
Take this Orb back into the blue cave you used to enter the area. Near a crystalline statue of Savathun, there is a new marker on top of a pad glowing with Light. Deposit the Orb of Refracted Light here. Head back out of the cave to the second objective, kill some enemies, and another Subjugator spawns Named Expector Yemiq. Damage them enough to send them away and receive an Orb of Sublimated Darkness. In the same room but opposite where you dunked the first Orb is a pad emitting Darkness. Deposit the second Orb here.
After completing all of these steps, a flag appears next to the crystalline statue of Savathun. From here you can launch the new Dual Destiny Exotic mission. You can also launch the mission from the Director map on The Pale Heart. This activity can only be completed in a fireteam of two.
Dual Destiny
You've completed Savathun's puzzle and are now ready to launch the mission. Grab your duo and make sure that one of you is on a Light Subclass and the other is on either a Darkness Subclass. Equipping Prismatic fulfills either requirement. Your Subclasses are locked during the mission, but you are free to change your weapons as desired. This mission requires a significant amount of teamwork so be ready to communicate, but the reward of an Exotic Class Item is worth the effort.
Both Guardians are given a unique buff when you load in, one Light Aligned and the other Darkness Aligned. These buffs are based on your equipped Subclass and remain the same throughout the entire encounter. You can see your alignment on the left hand side of your screen. To unlock the first barrier, simply have the Light Aligned Guardian step on the Light plate and the Darkness Aligned Guardian step on the Dark plate. These plates are a common occurrence throughout the mission.
Continue through the open area killing enemies until you reach a cave with more ads and two more plates. The Light plate is just to the right of the entrance while the Dark plate is further back near where an Ogre spawned. Head passed through the newly open section of the cave until you find a place for a Rally Banner for your first encounter.
Keep your eyes open during the activity Hive crystals, destroying them gives you more time to complete sections of the mission!
Initial Encounters
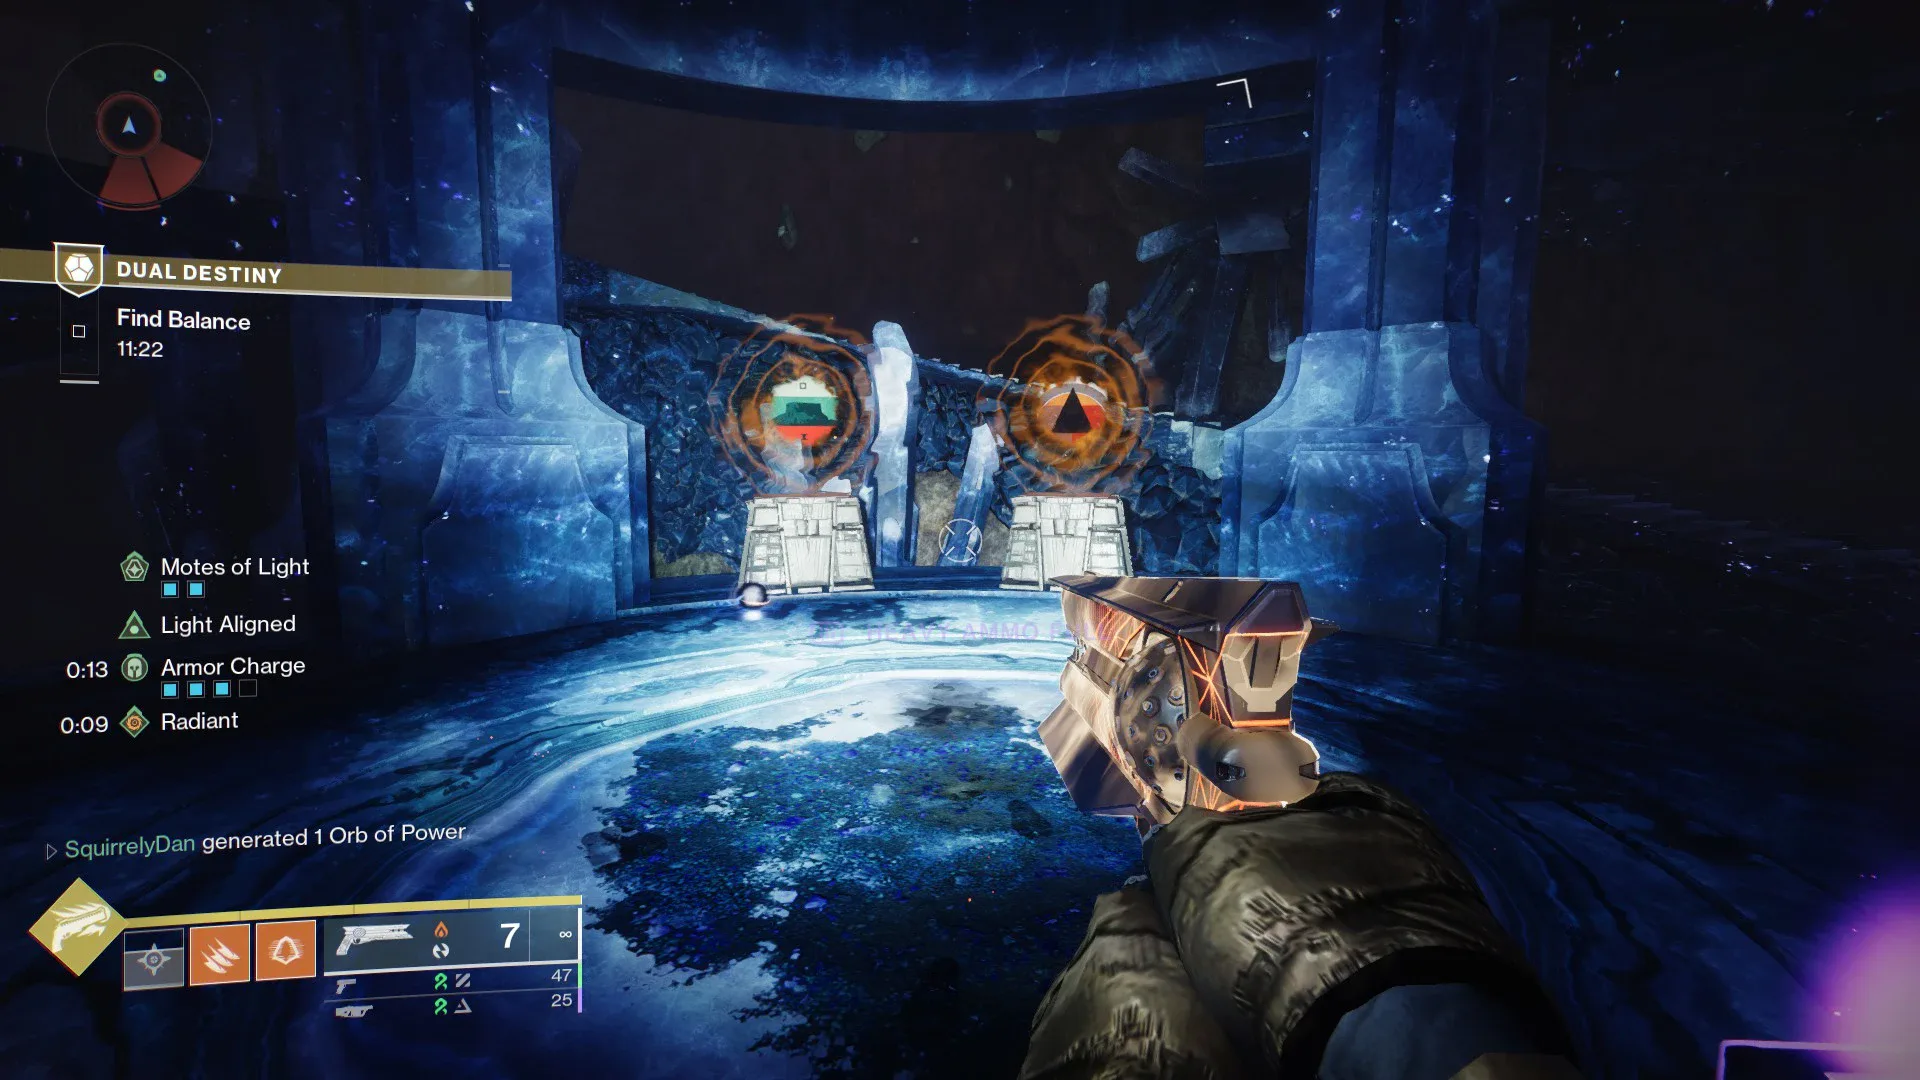
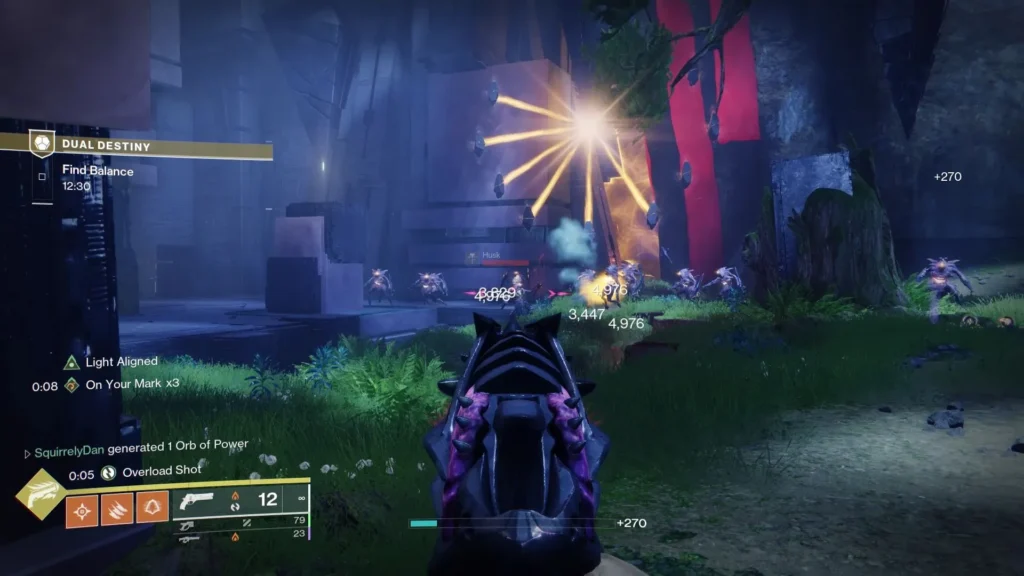
In this section, you face off against Taken and Dread enemies. Both players need to kill enough enemies to spawn either a Taken Centurion (Light) or a Taken Knight (Dark). Upon defeat, each of these majors drops a mote for their respective player.
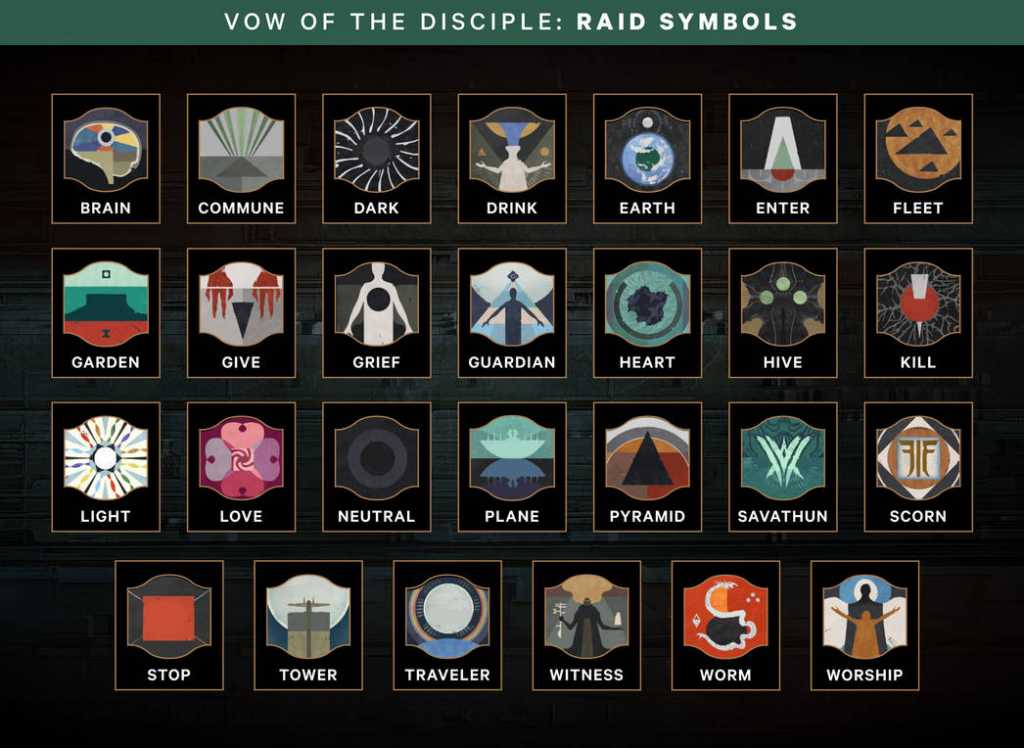
The first encounter requires you to pick up two motes. For the Light player, above two pedestals you can find symbols identical to those from the Vow of the Disciple raid. For the Dark player, spread around the room are floating pyramid spikes with the same symbols. More symbols appear for each player after picking up each mote. The Light Guardian reads their symbols from left to right and the Dark Guardian shoots them. If done correctly, you are teleported to another room.
In the second room, your roles are swapped. The Dark Aligned sees the symbols that need to be shot and the Light Aligned does the shooting. However, now there are three symbols. Kill three majors, call out the correct symbols left to right and destroy the respective pyramid spikes.
You're teleported to one last room after completing the last, roles switched once again. Four symbols to call out this time for the Light player. Complete this section and move on, you're getting closer to your Exotic Class Items. During this platforming section, you are separated and each Guardian needs to stand on their respective plates to open new sections to jump to.
Second Section
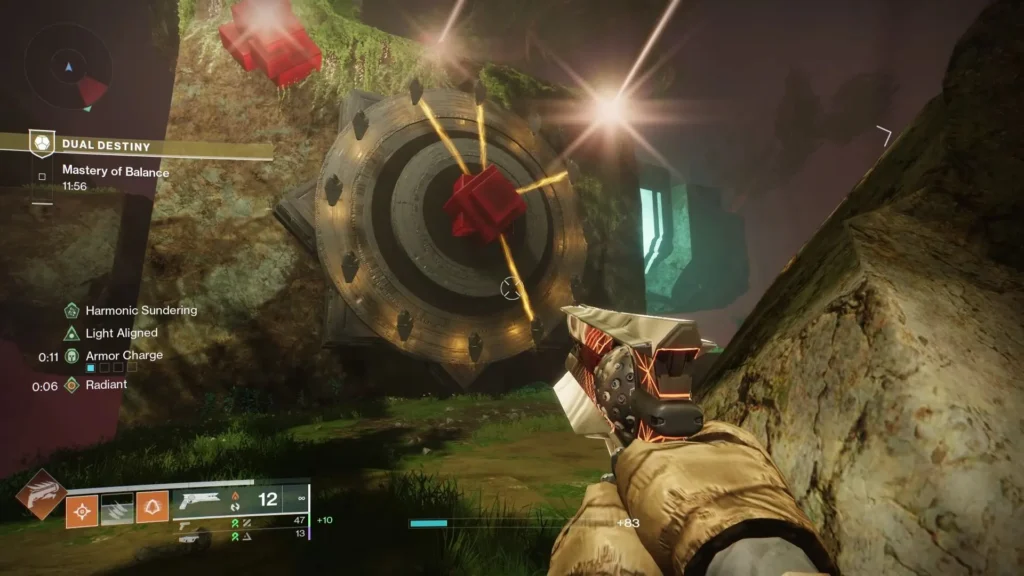
After a bit of platforming, you and your friend arrive at an open room with three large pyramids at the back. Near these are nine small cruxes in a partial circular pattern. Six rays of light point towards the small cruxes. What you're looking for here are the three smaller cruxes that do NOT have a ray of orange light going to them. Both of you have three inactive cruxes to call out per phase.
You can either number them left to right 1-9, or like a broken clock where 11, 12, and 1 are missing. Just make sure you and your duo are on the same page. If you have 1, 2, and 3 while your partner has 4, 5, and 6, the cruxes that need to be shot are 7, 8, and 9.
Killing enemies during the encounter gradually spawns a Tormentor. The Guardian that lands the killing blow on it receives the Harmonic Sundering buff, allowing you to open the cruxes. Once open, the Guardian without the buff shoots the same cruxes to remove them. If you fail to shoot all three before the buff runs out, you can kill another Tormentor and the destroyed cruxes do not return. Shoot all three to finish one phase. Each time you complete a stage, one of the large pyramids across the back wall disappears. There are a total of three phases and completing all off them opens up a new pathway to take.
You are once again split from one another. Kill combatants and stand on your plates simultaneously to activate man cannons to send you to higher platforms.
Final Encounter
Reach the final room after another small jumping section, ever closer to acquiring your Exotic Class Items. This new arena is split into two separate mini encounters. What they have in common is that there's a lot of enemies throughout and a need for big boss damage, so equip yourselves accordingly. Time to be reintroduced to the Subjugators Selin and Yemiq!
Part One
Face off against Selin first. Damage this boss until you hit the first threshold on its health bar. Once the boss teleports away, two Taken Wizards spawn on either side of the room. Each player can only damage one, find and eliminate both Wizards. After they are defeated, symbols similar to the first encounter spawn. The Light Aligned Guardian reads the ones near the boss from top to bottom. The Dark Aligned Guardian must shoot the pyramid spikes with the matching symbols in the order they were read.

Selin jumps back down and becomes vulnerable to damage again. Reach the next threshold on its health bar to spawn in Yemiq. Damage the boss enough to send it away and get another symbols phase. This time, the roles are switched. The dark player reads the symbols near the boss and the Light player shoots the pyramid spikes in the order they are read. Yemiq meets you in the arena so you can continue the fight.
Upon reaching the final third of its health bar, the boss teleports away and you need to kill two more Taken Wizards. Defeat these Wizards to reach part two of the encounter.
Part Two
Here, each player is assigned to a "clock", each on opposite sides of the room. This puzzle has four cruxes active for each Guardian and the goal is to find the matching crux. One player reads their four cruxes, the second player calls out the match, and you both shoot it.
While the nodes do rotate every few seconds, they do not randomize - if the rotation speed is too fast, work on memorizing which nodes are active during each individual rotation. Take care of the Grim that spawns during this so you can focus on the puzzle. Shoot three matching cruxes to finish.
When the puzzle is complete, you face off against both of the Subjugators. If you're having a hard time, try to focus on one boss at a time to cut down on the threat. Note that this is not a Darkness Zone so the only thing you lose by dying is time. When both Subjugators are dead, head towards the marker on your HUD across the bridge through the lit up doorway.
Hop on your respective plates to teleport back into the boss arena. Here, you have a decision: Choose peace or prepare for battle. Should you both choose battle, it's a fight to the death against your former partner! Whatever your decision, head to the middle of the arena for your Exotic Class Items! Dual Destiny is infinitely farmable and you get an Exotic Class Item for each completion - with a once-per-week bonus copy, allowing you to drop 2 at once!
Summary
- Exotic Class items pair two traits from already existing Exotic armor pieces, even taking some perks from other Class's pools.
- Head to The Pale Heart and complete an Overthrow in The Landing, The Blooming, and The Impasse.
- Defeat hidden Lucent Hive Wizards after each Overthrow event, before the next one begins.
- Meet Expectors Selin and Yemiq and take the Orbs of Refracted Light/Subliminal Darkness back to the crystalline statue of Savathun in The Refraction.
- Communicate with your teammate to ensure your success in the hidden Dual Destiny activity.
Credits
Written by: SquirrelyDan
Reviewed by: ShieldMaiden, Dredscythe