The Final Shape Walkthrough
Last Updated:February 9, 2025|Changelog
Welcome to The Final Shape Walkthrough! Everything you need to know about Destiny 2's latest DLC is right here. In this walkthrough there's campaign help, information on every exotic quest, weapon and Pale Heart gear quests, the Pale Heart Pathfinder, and even a full rundown of all the activities in the Pale Heart.
The Campaign
The Final Shape Campaign is straightforward and has 7 full length missions. Completing them completes the Campaign:
- Transmigration
- Temptation
- Exegesis
- Requiem
- Ascent
- Dissent
- Iconoclasm
These missions do not conclude The Final Shape, there's tons of post-Campaign content to do! Complete smaller missions focused on allies Mithrax and Caiatl, reclaim the Pale Heart with Overthrows, fully unlock your Prismatic subclass, earn new gear and weapons, and uncover the secrets of the Traveler and the Witness. See the sections below for specific information regarding new activities and secrets.
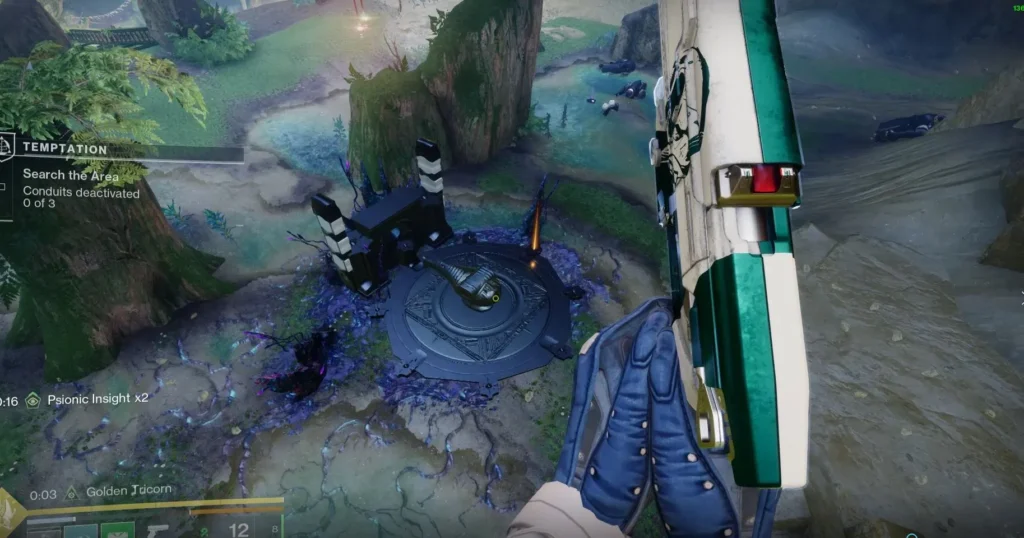
Psionic Conduit Puzzle
There is one new puzzle in this campaign: the Psionic Conduit Puzzle. The conduit looks like a clock with one hand. One of the nodes have an orange glow above it. Players need to move the hand to the orange glow. Do this by counting how many nodes are between the hand and the node, because that is how many Psions you need to kill. The hand can spin clockwise or counter-clockwise, so pick the spin that has the least amount of nodes needed. Kill the Psions, then dunk the collected "Psionic Insight" on the left for counter-clockwise or on the right for clockwise. Some Psionic Conduits take more than one charge to complete.
Be sure to check out our Prismatic Fragment Locations for an in-depth guide on ALL Prismatic Fragment locations and how to unlock them!
Exotic Weapon Quests
The Final Shape brings five Exotic Weapons to the table. Some are re-imagined fan favorites, and some are completely new, but they are all easily attainable with this Final Shape Walkthrough!
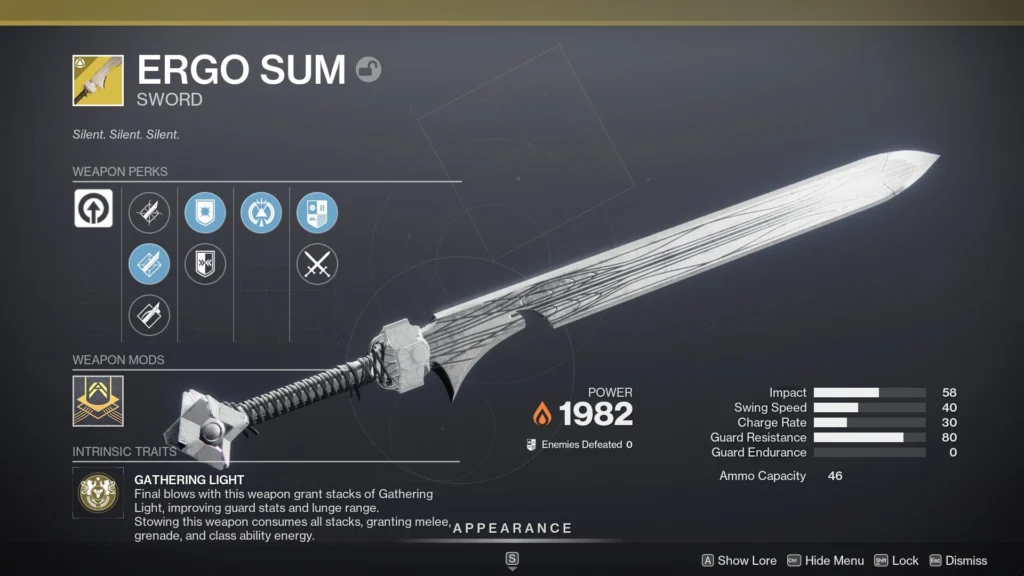
"Destined Heroes" rewards the player with Ergo Sum, the first ever Energy Weapon Sword. The quest steps are as follows:
- Listen to the radio in the Tower area of the Lost City in the Pale Heart.
- Complete "Queens, Part 1".
- In this mission, use the Hive sword to deflect elemental damage to the rune with the same elemental color. For example, deflect the Shrieker's Void attack to the purple rune.
- Speak to Micah-10 in the Arbor of Light in the Lost City.
- Talk with Cayde-6 in the Tower area of the Lost City.
- Speak with Ghost in the Tower area of the Lost City.
- Complete "Found in the Dark and Lost in the Light".
- Pick up the quest from Ghost.
- Track the quest from your map to follow the route. This leads you to a chest that rewards a Prismatic grenade.
- The next part of the quest can be launched from the Tower in the Lost City - it's called "The Hollow, Part 1.".
- Activate the panel on the left cave wall. If you have trouble locating it, pull out your Ghost to see the objective marker.
- Defeat Taken Captains and collect the motes. Dunk the motes in the opposite plate (take Dark motes to the Light plate, etc).
- Korha the Hollow spawns. Defeat them, then destroy the two generators by dunking the opposite energy again.
- This rewards you with a Prismatic chest.
- Behind that chest is a banner where you can launch "The Hollow, Part 2".
- Activate the panels to escort explosive Shanks to closed doors. Once it reaches the door, shoot it so that it explodes, blowing the door open.
- Reach the boss fight against Korha.
- Kill servitors on both sides of the arena and deposit charges they drop into the center console.
- This spawns more exploder Shanks that swarm Korha. Shoot them when they close to bring down Korha's shield. Repeat until they are defeated.
- Complete "Found in the Dark".
- As done previously, track the quest on your map and follow the marker to The Seclusion.
- Follow the marker to reach the Prismatic chest. Launch the next mission from the banner beyond the chest. It's called "Home, Part 1".
- Complete "Home, Part 1".
- Kill enemies until a Major Psion spawns - defeat it and plant the antenna in a generator. This antenna shows the fleet where to send down missiles. Do this for both generators.
- In the next area, there are two Psions that are floating in a protective bubble. Kill them with one melee attack each.
- Kill the mini-bosses that spawn.
- Set the antennas on the generators.
- Kill the boss that spawns, then collect your reward from the Prismatic Chest. Launch the next mission from the banner just beyond the chest.
- Complete "Home, Part 2".
- Melee the 2 Psions in the protective bubbles.
- Kill Major Cabal enemies to drop charges.
- Throw the charges at the generators to destroy them.
- This spawns a Goliath Tank that is protected by a trio of protective bubble Psions.
- Melee 3 Psions to bring down the tank's shield, then deal damage.
- Repeat until defeated. Claim your reward from the Prismatic chest.
- Complete "Queens, Part 2".
- Launch the mission from the Tower area of the Lost City in the Pale Heart.
- Defeat Taken enemies to become Taken Empowered. This shows up as a buff on the left side of your screen.
- Once charged, cross the chasm to the other side.
- Kill enemies in the blue crystal cave.
- Climb upward through a hole in the ceiling.
- Kill enemies and interact with Fissures of Light to free them.
- Defeat the Tormentors that spawn.
- Return to Ghost. Be sure to have at least 1 slot open in your Energy weapons, as the Dyadic Prism you receive holds the spot for Ergo Sum.
- Launch the next part from the quest to visit The Sacrarium. Approach the statue to claim the sword.
Random Perks that Ergo Sum can roll:
- Wolfpack Rounds
- Gathering Light
- Sacred Flame
- The Perfect Fifth
- Arc Conductor
- Stormbringer
- Unplanned Reprieve
- Insectoid Robot Grenades
- All Ergo Sums have the Transcendent Duelist Intrinsic Trait.
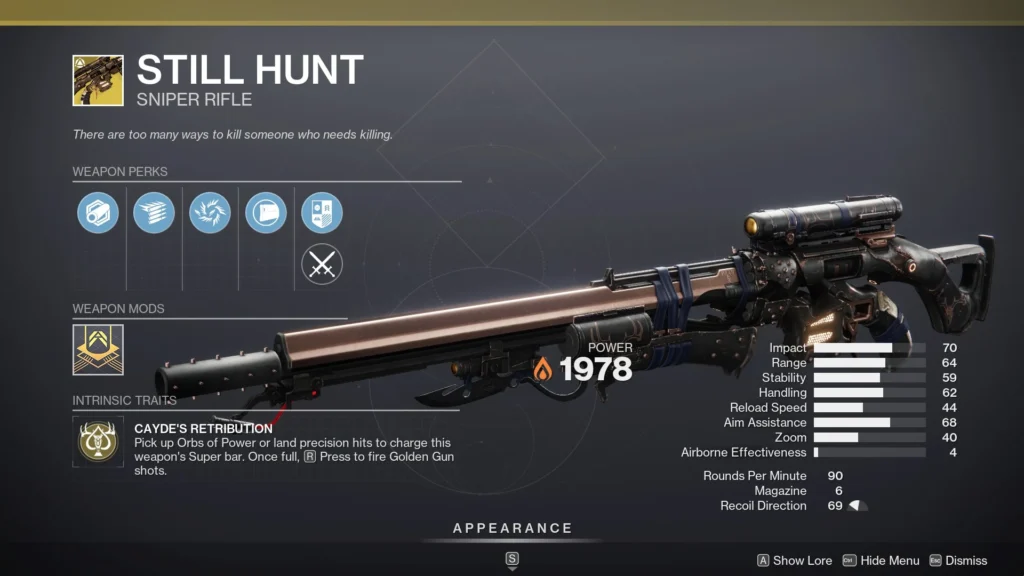
"Wild Card" rewards Still Hunt, a sniper rifle that can mimic the Hunter's Golden Gun. Players need to complete The Final Shape campaign and "Queens, Part 1" from the "Destined Heroes" quest to unlock the "Wild Card" mission. The quest steps are as follows:
- Complete The Final Shape campaign.
- Start the "Destined Heroes" Quest to unlock "Queens, Part 1".
- Complete "Queens. Part 1" to unlock the "Wild Card" mission.
- In this mission, use the Hive sword to deflect elemental damage to the rune with the same elemental color. For example, deflect the Shrieker's Void attack to the purple rune.
- Pick up "Wild Card" mission from Cayde-6 in the Tower area of the Lost City in the Pale Heart.
- Complete "Wild Card".
- Jump off of the ledge at the Tower in the Lost City down to the banner to launch the mission.
- Make camp, then begin hunting Screebs and War Beasts with a white smoke aura that indicates Dark Ether.
- Follow the marker to the energy signature.
- Defeat the War Beast, Devourer of Tainted Light. Follow the boss into the shielded area to continue fighting it. Return to camp to chat with Cayde-6 and Crow, then Meditate.
- Defeat all of the Taken in the area to remove the Blight. Repeat this three more times.
- Two more Blights appear, bolstered by more Taken enemies and their Dread friends. Defeat all enemies surrounding the Blights to remove them.
- Return to camp and Meditate.
- Follow the marker to a cave reached by dropping off the cliff. Follow the passage until you reach another small cave.
- Use the small cracks in the rocks to defeat Shanks until the Shank named "Hoarder of Tainted Light" appears. Defeat this boss Shank.
- Return to camp.
- Follow the marker to a cave filled with Screebs. Continue until you are able to place a Rally Banner.
- Defeat Lii'liks, Harvester of the Witness by defeating Screebs and placing their dropped Dark Ether into a barrel; every time the barrel reaches 10 motes, the boss's shield goes down. Do this three times to defeat the boss.
- Return to camp.
- Return to the Tower area of the Lost City.
- Speak to Cayde-6 and receive Still Hunt.
Cayde's Retribution is the intrinsic perk for this weapon. Fill the meter by hitting precision shots with the rifle and collecting orbs of power, then hold reload once it is full to activate Golden Gun. For the Hunters out there, you can pair this with Celestial Nighthawk, turning your three shots into one powerful burst of damage.
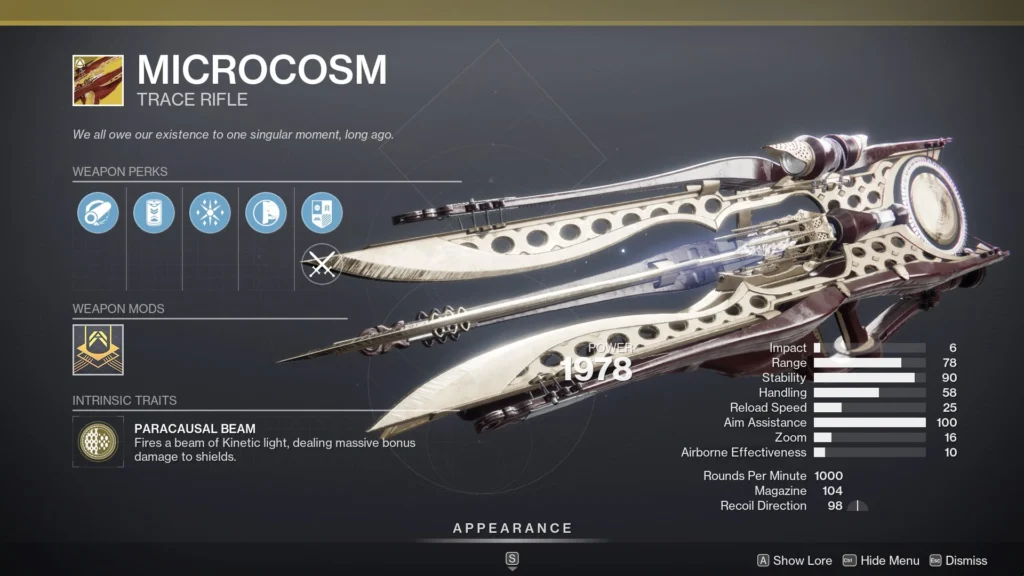
"Convalescence: Rootbound" rewards players with Microcosm, the first Heavy Weapon Trace Rifle. This weapon can easily break through enemies with shields, and final blows give you Super energy. When your Super expires, Microcosm deals increased damage. The quest steps are as follows:
- Complete The Final Shape campaign.
- Start the "Destined Heroes" Quest to unlock "Queens, Part 1".
- Complete "Queens. Part 1" to unlock the "Convalescence: Rootbound" mission.
- Talk to Micah-10 to acquire the Convalescence mission.
- Complete "Convalesence: Rootbound".
- Complete the Forgotten Deep Lost Sector in the The Landing region of the Pale Heart.
- This lost sector utilizes 3 green hive wells that you must walk through to break the crystal to continue.
- At the end of the Lost Sector, after all enemies are defeated, find the Ghost at the base of the tree on the platform.
- Return to the Arbor in The Lost City and interact with the Ghost you saved.
- Complete the Forgotten Deep Lost Sector in the The Landing region of the Pale Heart.
- Complete "Convalescence: Underbrush".
- Complete activities in the Pale Heart to acquire a Flickering Blessing mod.
- Highlight the Pathfinder objectives on your map - the reward is always a chest.
- Equip the Wombo/Combo mod on your Ghost shell and explore the Pale Heart to find chests. Keep opening chests until a mod is acquired.
- Equip the Flickering Blessing mod by navigating to the Pale Heart map from Destinations. Right above the Blooming you can find the Traveler's Blessings node. Select it, then equip one of the blessings.
- Return to the Arbor in The Lost City and interact with the Ghost at the tree as well as Micah-10.
- Complete activities in the Pale Heart to acquire a Flickering Blessing mod.
- Complete "Convalescence: Greenery".
- Complete public activities in The Landing to progress an Overthrow event, which reward chests.
- Look slightly north of The Refraction on your map, and highlight the Convalescence: Greenery icon. Once in the area, follow the eagle made of Light to a cave locked with Hive magic. Shoot the corresponding crystals to open the cave.
- Interact with the Hive altar to summon a hive sword. Kill enemies and destroy any crystals and Hive rocks in your path. Kill all three Lucent Hive Lieutenants, and do not forget to crush their ghosts.
- Return to the Arbor in The Lost City and interact with the Ghost at the tree as well as Micah-10.
- Complete "Convalsecence: Budding".
- Complete the Cooperative Focus Mode of Ascent, launched from the southeast side of the Pale Heart.
- Complete the Cooperative Focus Mode of Dissent, launched from the southeast side of the Pale Heart.
- Complete the Cooperative Focus Mode of Iconoclasm, launched from the southeast side of the Pale Heart.
- These missions are as hard as Legendary campaign missions.
- In these missions, there are 3 types of mechanics the player should know:
- Fractured by the Witness - a debuff from the Witness that slows your movement and kills you at a x10 stacks. Have a fireteam member interact with you to remove the debuff, and juggle between the fireteam.
- Glyphtouched - One player can interact with but cannot see the symbols. Communicate with your fireteam as to where the player with the debuff must go.
- Beserkers - Carefully get close enough to the enemy to see the Surpressed debuff. Have one player shoot the enemy in the chest and the other in the back at the same time. Once complete, you can kill the Berserker. Shoot the orange, glowing Darkness cruxes at the same time to ensure the Berserker does not respawn and to progress the mission.
- Return to Micah-10 and receive your brand new Exotic Trace Rifle!
Tessellation is an Exotic Fusion Rifle that matches damage type with your equipped grenade. Every final blow with this weapon gives you grenade energy. Tessellation was a pre-order special for The Final Shape. Even if you didn't pre-order it, you can still obtain it from the Monument to the Lost Lights in the Tower. The Final Shape DLC is still required to buy it.

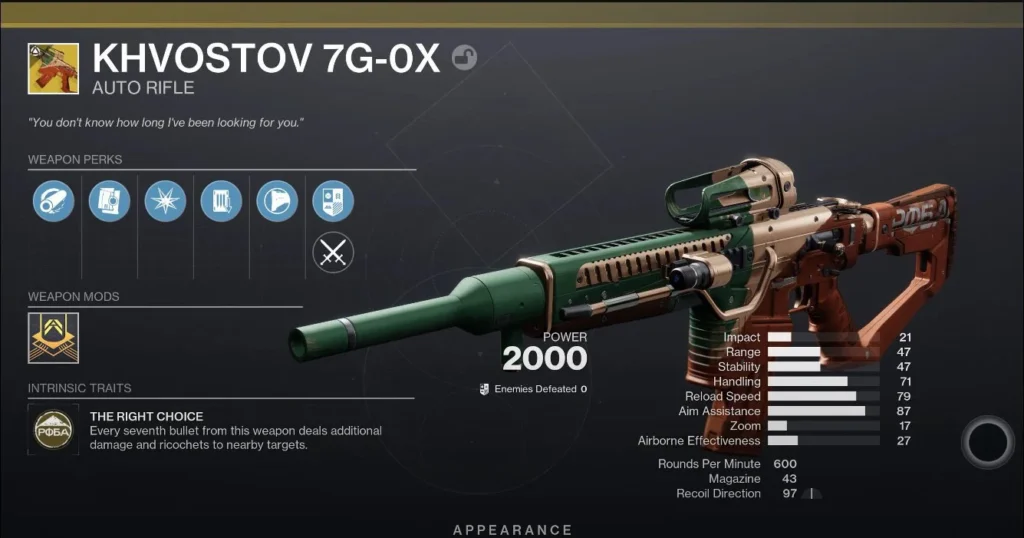
The Khvostov 7G-0X is back and better than ever. The intrinsic perk The Right Choice gives every seventh bullet additional damage and lets it ricochet to nearby targets. The quest steps are as follows:
- Complete The Final Shape campaign.
- Loot all 9 Region Chests in the Pale Heart.
- These are marked on the map by a cross with a dot in the middle of the icon. Section labeled "Region Chests and Feathers" of this Final Shape Walkthrough has specific locations of these chests.
- Obtain and complete the "Alone in the Dark" quest from Micah-10 in the Tower of the Lost City.
- Throughout the "Alone in the Dark", players will need to find all Lost Encryption Bits.
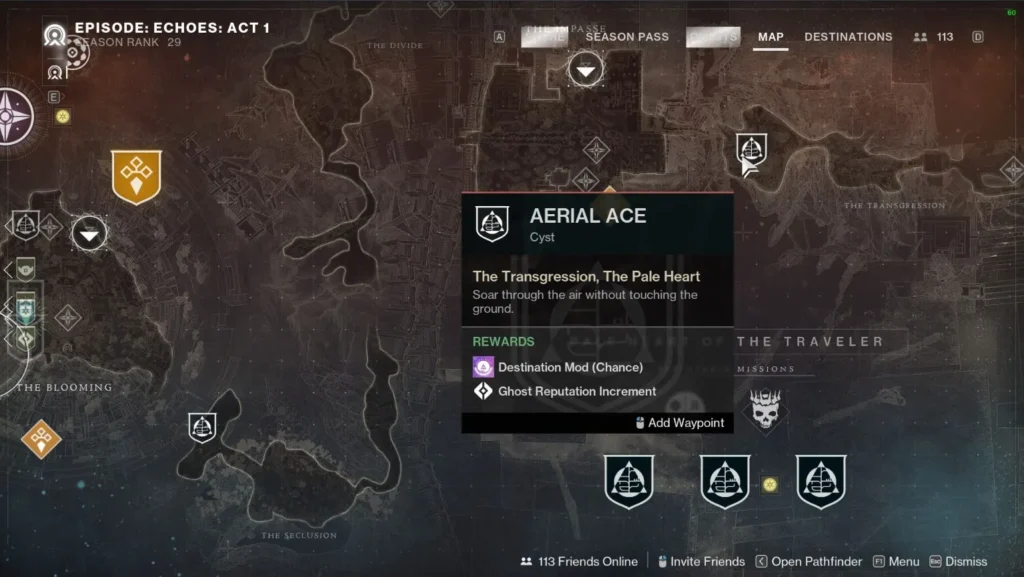
- Aerial Ace Lost Encryption Bit
- When you heal the ghost, look to the back of the room in the lava pool and find the purple rock. Go to that rock and look to the right, you should see another area to continue walking. Walk forward to the roots on the right and then turn further right to see the crevice you can crouch through to collect the bit.
- Moth-Infested Cavern Lost Encryption Bit
- After the fight with Major Ogre in the blue crystal room, jump down beneath where the Ogre was standing and look in the cave.
- Searing Light Encryption Bit
- After you kill the boss, find the cave with the glowing purple aura. The bit is in the left corner.
- Slayer Lost Encryption Bit
- After the ogre at the end of the mission is killed, look for the cave with a tree trunk at the front of it. The bit is in the middle of the cave behind the second tree. There is also a Memory of the Traveler here; jump up on the rocks to the left and the memory is behind the purple crystal.
- Smothering Darkness Lost Encryption Bit
- After defeating the boss, find the purple crystal that has a cave next to it, and the bit is on the right.
- Sword Dance Lost Encryption Bit
- Acquire the sword and destroy crystals in this mission. After you fight the ogre, jump down instead of continuing up and destroy the wall with the sword. The bit is behind the wall.
- Aerial Ace Lost Encryption Bit
- Travel to the Impasse and make your way into the Cosmodrome Wall.
- Continue on the path until you see what looks to be a region chest. Open it to receive the Legendary version of Khvostov 7G-02.
- Find all the visions of the Traveler. There are 17 in total, and 8 need to be found. The rest are dropped from Overthrow Bosses. For the locatable Visions, players will see a "Near Objective" buff on their screen when they are near the Visions.
- Vision 1
- Enter the Slayer Cyst and enter the cave with the tree trunk in front. Jump up on the rocks to the left and and the vision is in the corner.
- Vision 2
- Travel to the Impasse in the Pale Heart. Just before you enter the temple that leads to The Transgression, look to the left. A vision is on top of the monolith.
- Vision 3
- Travel to the Tower inside the Pale Heart. Go through the Arbor and head to the right, the Vision is at the very back within the waterfall.
- Vision 4
- Fast travel to The Landing area. Turn to your left and the Vision is on a rock by the waterfall.
- Vision 5
- Fast travel to The Landing and go through The Refraction. When you reach the Ogre, go down the path to the left and go straight to the ledge. The Vision is below, within a waterfall.
- Vision 6
- Fast travel to The Blooming. Follow the path to the left until you are almost going through the cave to The Divide. The Vision is up in a tree on the right of the cave.
- Vision 7
- Follow the path through The Divide until you are at the top of the mountain and see the path downwards into the facility. The Vision is behind a satellite dish on the roof to the left.
- Vision 8
- Fast travel to The Impasse and go to The Transgression. Continue down the long path until you reach the second room with a slanted tree. The Vision is on the left behind another tree.
- Vision 1
- Kill all Overthrow Bosses. The Visions drop directly where the boss dies, not in the chest.
- Place all Visions into the pedestals. They are found by loading into the Tower in the Pale Heart. immediately turn left and follow the path through the observatory and into the room where the Speaker stood in the original Tower. This will spawn a chest that rewards your upgraded Khvostov 7G-0X.
- Throughout the "Alone in the Dark", players will need to find all Lost Encryption Bits.
Exotic Gear
Along with some new Exotic Weapons, there's exciting Exotic Gear for each of the classes! Each class received two (normal) pieces of Exotic Armor. Players can unlock one Exotic piece at the end of the Legendary Campaign, or unlock both through Master Rahool at the Tower. To unlock them at Rahool, players need to reset their rank with the Cryptarch to focus an Exotic Engram into the Exotic Gear piece of their choice!
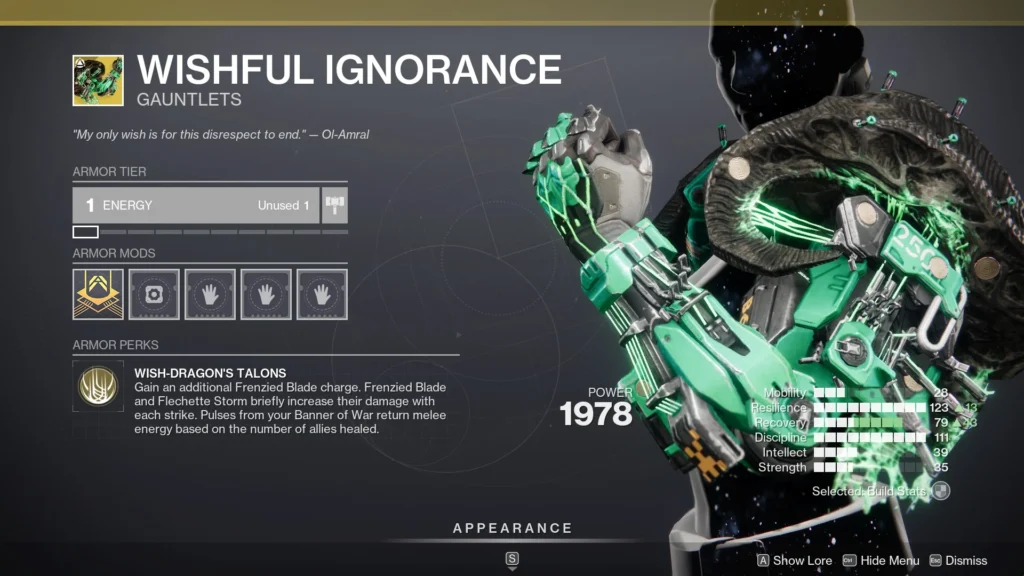
Wishful Ignorance is an Exotic Arm piece for the Titan class. The intrinsic perk Wish-Dragon's Talons gives you an additional Frenzied Blade charge. Frenzied Blade and Flechette Storm deal increased damage with each successive strike for a brief amount of time. Additionally, Banner of War pulses return melee energy based on the number of allies healed.
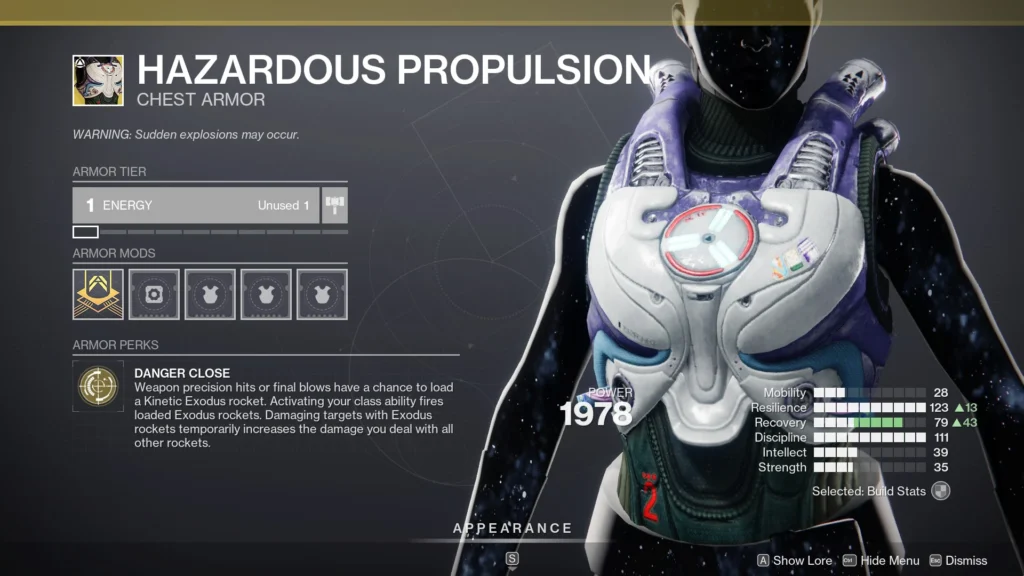
Hazardous Propulsion is an Exotic Chest piece for the Titan class. The intrinsic perk Danger Close works really well with Guardians wielding "Rocket" Weapons (Rocked Assisted Sidearms and Rocket Launchers, notably). Precision hits or final blows from any Weapon grant a chance at loading a Kinetic Exodus rocket. Activating one of your Barricades or Thruster automatically fires your loaded Exodus rockets at enemies in front of you - they're homing. This intrinsic perk also grants increased damage to all "Rocket" Weapons when you damage targets with the Exodus Rockets.
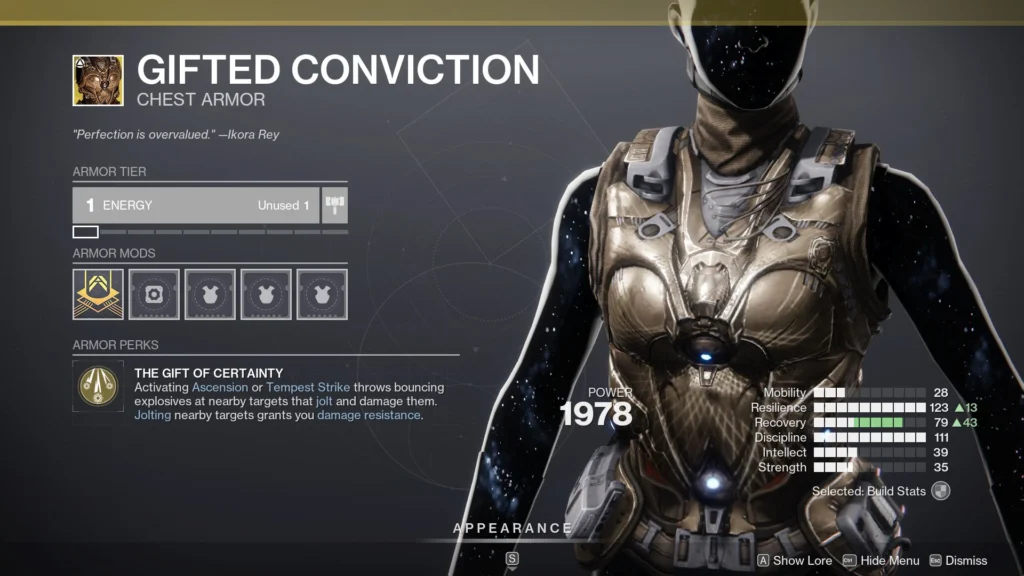
Gifted Conviction is an Exotic Chest piece for the Hunter class. The intrinsic perk The Gift of Certainty throws bouncing explosives that Jolt enemies when you activate Ascension or Tempest Strike. Jolting nearby enemies even grants a stacking damage resistance buff!
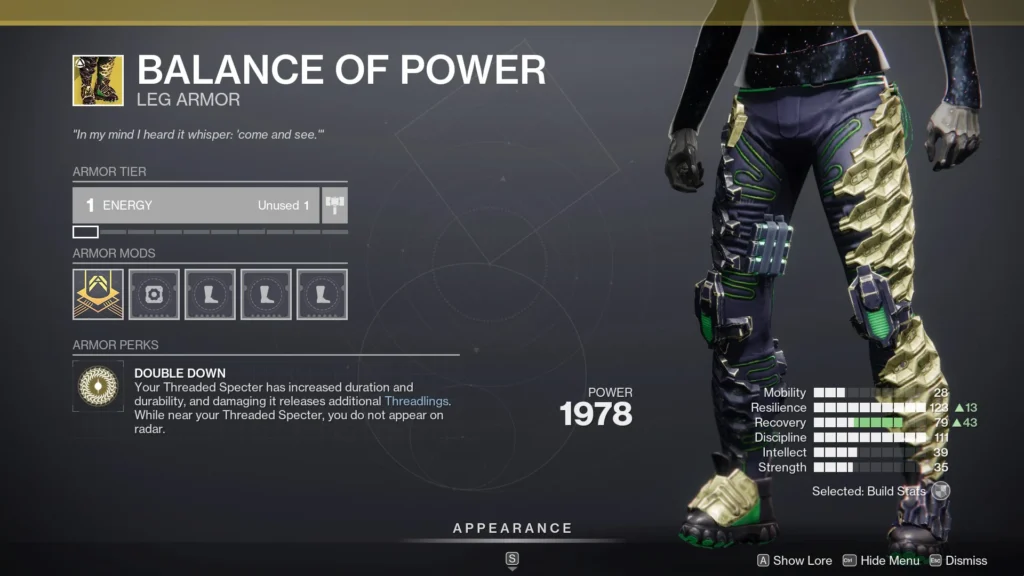
Balance of Power is a piece of Exotic Leg Armor for the Hunter Class. This enhances your Prismatic or Strand Hunter Subclasses, since the intrinsic perk Double Down Enhances your Threaded Specter. The Specter will last longer, is more durable, and it releases more Threadlings after detonating. And for PvP, Players near their Specters do not appear on radar!
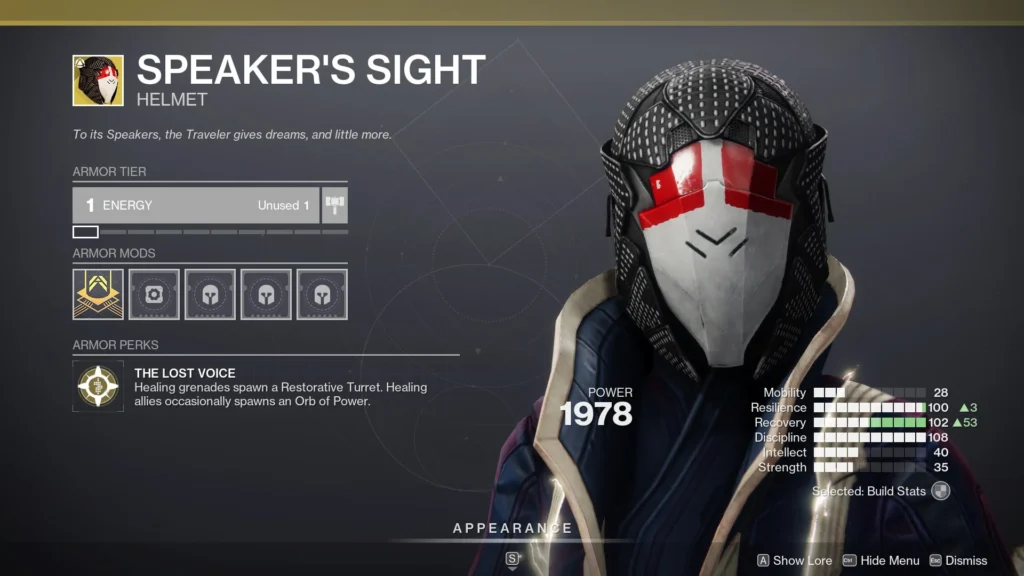
Speaker's Sight is a Helmet for the Warlock class. The intrinsic perk The Lost Voice plays into the support role. Your Healing Grenades spawn a Restorative Turret that sends out a Curing and Restorative projectile to yourself and allies. Healing allies has a chance to spawn an Orb of Power.
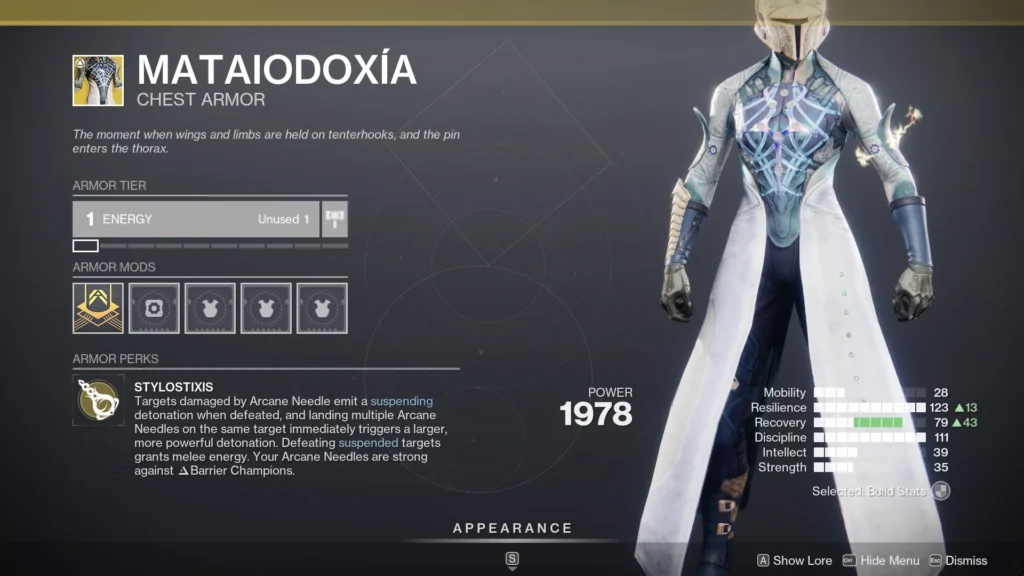
Mataiodoxía is an Exotic Chest Armor for the Warlock class. Any Warlock running Prismatic or Strand should think about incorporating this into their build. The intrinsic perk Stylostixis makes your Arcane Needle strong against Barrier Champions, meaning it can stun the Champion, preventing it from putting up its barrier and regenerating health. Targets damaged by Arcane Needle create a Suspending blast when they are defeated, and landing multiple needles on the same target will emit a larger blast. Also, defeating Suspended targets grants melee energy!
There's also Exotic Class Items with two randomly rolled intrinsic perks from other pieces of Exotic Armor! Learn more about them and how to unlock them with our dedicated guide!
The Pale Heart
This new destination takes players inside the Traveler, the cosmic force that gave us the Light. Each location inside the Traveler takes you closer to where the Witness was finalizing The Final Shape. As with any destination, within the Pale Heart players can Fast Travel to certain locations and find secret region chests. There's more to do here, though, like completing Overthrows, finding feathers from left for you by the Traveler!
Overthrow
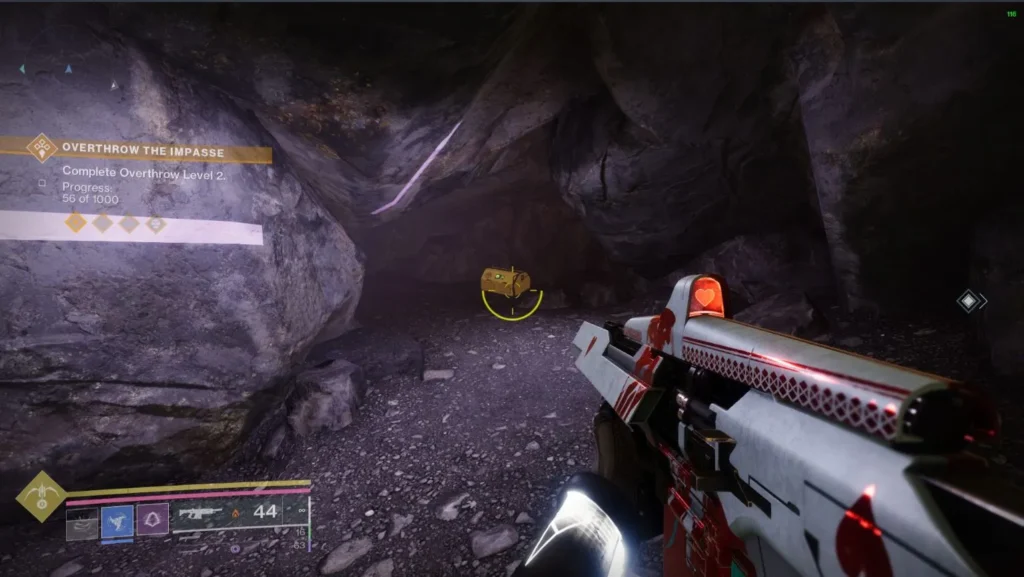
This is a unique type of public event in Destiny 2 and is comprised of miniature public events. When players enter a region, the Overthrow overlay on the left side of your screen indicates the activity's progress. There are 4 stages, and each stage requires 1000 points to move on to the next stage. Earn points for the Overthrow by completing public events, killing combatants in the area, opening chests, and foraging. Reach stage 4 to face a final boss, and defeat it to unlock a higher-value chest.
Region Chests and Feathers
Region Chests - These golden chests only appear once in their marked locations on the map. The chests are marked by a Fallen cross with a dot in the center. These chests reward Glimmer, Armor, reputation with Ghost, and Lost Encryption Bits. There are nine in total, and ones you find never show up again.
Feathers - The Traveler has guided Guardians by manifesting into a hawk to show us the way. Naturally, the bird has left feathers everywhere. Feathers reward Enhancement Cores. Collecting these is required for a triumph, though not one that unlocks usable equipment.
Weapon and Gear Quests
All Weapon and Gear quests can be acquired through Micah-10 and the Ghost at the ruined Tower in the Pale Heart. To complete these missions, players need to collect Memory Vestiges and complete Cysts activities located within the Pale Heart.
Cysts and Memory Vestiges
Cysts - These activities are like miniature Vanguard Ops that are a part of the "Alone in the Dark" quests from Micah-10. These activities usually have one mechanic that is taught to you as you progress in the activity. Kill enemies and perform the mechanic to complete the it.
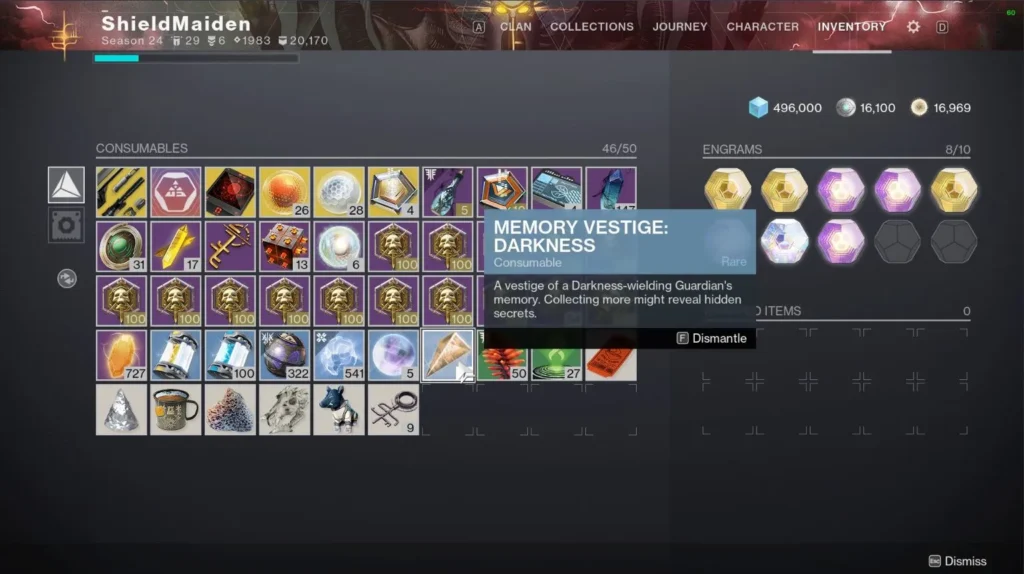
Memory Vestiges - These consumables come in two forms: Light and Darkness. Light Memory Vestiges are found by defeating enemies within Cyst caves in Micah-10's "Alone in the Dark" quests. Darkness Memory Vestiges are found in corrupted chests located within the Pale Heart. Five Light Memory Vestiges are used to create Memories of Light, while Five Darkness Memory Vestiges are used to create Memories of Darkness. Memories show you the location of a Prismatic chest. These processes are automatic.
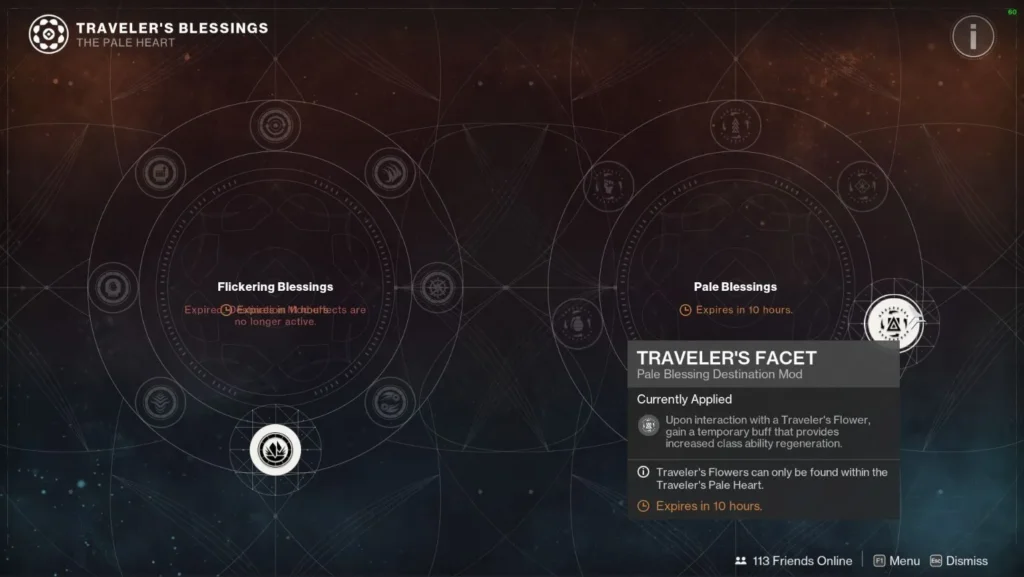
Pale Heart Pathfinder and Traveler's Blessings
Pale Heart Pathfinder - The Pale Heart Pathfinder is specific to the Pale Heart, meaning that objectives can only be completed within this destination. After unlocking Ergo Sum, your first 3 Pathfinder completions per week award a random copy of it.
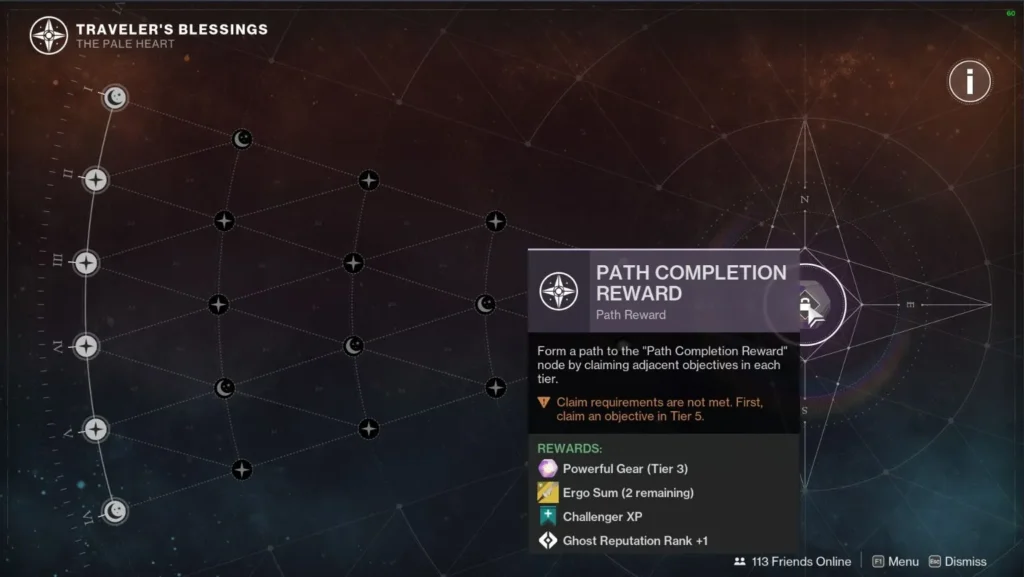
Traveler's Blessings - These mods are randomly found while opening chests in the Pale Heart. They grant players various buffs that only work while you are inside the Traveler. Players can only activate one Blessing from each ring at a time. These eventually deactivate, though, and require recollection.
Summary
The Final Shape Walkthrough is a comprehensive guide on the most sought after information pertaining to the Final Shape DLC. This covered new puzzle mechanics, Exotic Armor and Weapons, the Pale Heart destination, and even some of the secrets buried within! This Expansion gave players many new activities to figure out and enjoy, so get to it, Guardian!
Credits
Written by: Xtra37
Reviewed by: Northwar