Rainbow Goblin Farming Guide
Last Updated:September 14, 2023|Changelog
Introduction to Rainbow Goblins
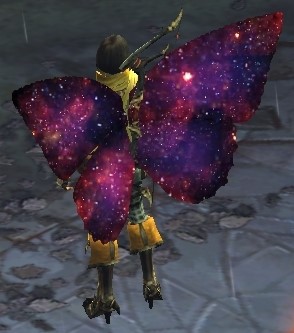
Rainbow Goblins are elusive little rascals that leave behind portals to a special level called Whimsydale (not to be confused with other rainbow level, Whimsyshire, accessible via the Plan: Staff of Herding). This is the only way to access the secret level which contains the rarest item in the game, the Cosmic Wings! Farming for this glorious cosmetic has plagued many Diablo 3 players, causing them to give up before earning the ultimate prize. You, however, have come to the right place, as the guide below will teach you everything you need to finally meet the Princess!
Before you begin, decide if you're going for pure speed or overall value. If your goal is to find the most Rainbow Goblins, then you should farm based on speed. Utilizing this method will not strengthen your character as you'll farm on Normal difficulty and receive minimal items. If you want to make your character stronger while farming, then you should simply do T16 Bounties. This will lower the probability of finding Rainbow Goblins, but you'll be powering up with Bounty Caches and get far more legendaries. Regardless of the option you choose, always farm in Adventure Mode with as many teammates as possible. If you typically play solo or do not have anyone to play with, we recommend joining a Diablo 3 Community dedicated to farming Rainbow Goblins.
Rewards
Wings (Only drops in Whimsydale)
Cosmic Wings drop from the unique monster Princess Lilian. She has roughly a 1% chance to spawn and is guaranteed to drop the wings on death. This is the rarest item in Diablo 3 and the main reason we're hunting Rainbow Goblins.
Transmogs (Drops in both)
Super Awesome Sparkle Cake (and other unique monsters) drop Spectrum, the Rainbow Sword, while Piñatas and Happy Clouds drop The Horadric Hamburger. Both require you to be level 30 or higher.


Portrait (Only drops in Whimsyshire)

Sir William drops the Rainbow Portrait. He has a low chance of spawning, but is guaranteed to drop the portrait on death.
Tips & Tricks: Rainbow Goblins
- Rainbow Goblins cannot spawn in:
- Greater Rifts
- Nephalem Rifts
- The Vault
- Bandit Shrines
- Although they spawn in Campaign, you are much more likely to find them in Adventure Mode.
- If you spawn multiple Rainbow Goblins in the same game, all Rainbow Portals lead to the same instance of Whimsydale. This means you should leave and make a new game after exploring it once (unless you have bounties to finish!)
- Never farm Rainbow Goblins with the intention of obtaining materials, gems or gold. You are much better off doing Nephalem or Greater Rifts for those items.
- Turn on your sound to listen for the unique laugh goblins make when nearby. Turn down all volume sliders, except Effects and Master Volume in the gameplay menu.


Builds for Farming Rainbow Goblins
Below are the best builds for two different farming styles for each class to hunt Rainbow Goblins:
- The bounty option allows you to power up your character while farming, at the cost of finding fewer Rainbow Goblins. They can all crush T16 bounties effortlessly and are the build to use if you want to power up while hunting for the wings. Our recommendation for the best bounty build is the GoD Demon Hunter listed below.
- The speed option is the fastest build available with no regard for power. This farms on normal difficulty (which doesn't affect Rainbow Goblins or Cosmic Wing drop chances) and gives up any chance of improving our character. Our recommendation for the best speed build is the Raiment Monk listed below.
Concept
This is the standard T16 Bounty Build from the Waste Whirlwind Rend Barbarian Guide. It has tremendous speed and power with one of the easiest playstyles ever - holding down right click.
Stat Priorities
- Cooldown Reduction
- Rend Damage
- Damaging Stats (CHC, CHD, Physical Dmg)
Gameplay
- Spam Ignore Pain and Wrath of the Berserker all the time.
- Cast Sprint once every 4 seconds.
- Hold down Whirlwind to kill everything. Never cast Rend as it's automatically applied from Ambo's Pride.
- Cast Furious Charge to cover more ground. This will also help generate Fury so you can keep Whirlwind up.
- If you're having problems keeping your Fury up, drop Sprint for Warcry Charge and spam it all the time.
Concept
This setup is similar to the Bounty one above, except we replace damage-dealing skills and items for every movement speed option possible.
Stat Priorities
- Cooldown Reduction
- Resource Cost Reduction
- Attack Speed
Gameplay
- Spam Ignore Pain, Warcry and Wrath of the Berserker all the time.
- Cast Sprint once every 4 seconds.
- Hold down Whirlwind to kill everything.
- Cast Furious Charge to cover more ground. This also helps generate Fury so you can keep Whirlwind up.
Concept
Bonus! Looking for an even speedier Barb build? Try the Furious Charge setup displayed below. You will have to get up your beloved Spin-to-Win gameplay, but you'll move a bit quicker as a reward.
Stat Priorities
- Cooldown Reduction
- Attack Speed
Gameplay
- Spam Ignore Pain, Warcry and Wrath of the Berserker all the time.
- Cast Sprint once every 4 seconds.
- Cast Battle Rage once in awhile to keep the buff up.
- Hold down Furious Charge to kill everything and cover more ground.
Concept
This is the standard T16 Bounty build from the AoV Fist of the Heavens Crusader Guide.
Stat Priorities
- Cooldown Reduction
- Fist of the Heavens Damage
- Damaging Stats (CHC, CHD, Holy Dmg)
Gameplay
- Spam Iron Skin, Akarat's Champion and Provoke all the time.
- Press Laws of Hope once every 5 seconds.
- Use Steed Charge to cover more ground.
- Kill enemies using Fist of the Heavens.
Concept
This is a variant of the standard T16 Bounty Build from the AoV Fist of the Heavens Crusader Guide that focuses purely on speed.
Stat Priorities
- Cooldown Reduction
- Attack Speed
Gameplay
- Spam Iron Skin, Akarat's Champion and Provoke all the time.
- Press Laws of Hope once every 5 seconds.
- Use Steed Charge to cover more ground.
- Kill enemies using Fist of the Heavens.
Concept
This is the standard T16 Bounty Build from the GoD Hungering Arrow Demon Hunter Guide.
Stat Priorities
- Cooldown Reduction
- Hungering Arrow damage
- Damaging stats (CHC, CHD, Cold Dmg)
Gameplay
- Spam Vengeance, Smoke Screen and Preparation at all times.
- Press Shadow Power once every 5 seconds.
- Hold down Strafe at all times when you want to attack, and press Hungering Arrow every 3 seconds. Don't drain yourself of Hatred when no enemies are around.
- Keep your Momentum stacks high by attacking with your Hungering Arrow at least 5 times at the start of a run, and then refresh it back to 20 (maximum) whenever you reach 17.*
*As of Patch 2.6.9, Momentum stacks are somewhat buggy and don't always give you the stacks even after you attacked. Keep an eye on your buff bar to see when that happens and shoot another Hungering Arrow.
Concept
This is a setup based on Danetta's Hatred, which will allow us to vault infinitely to fly through the maps.
Stat Priorities
- Cooldown Reduction
- Attack Speed
- Resource Cost Reduction
Gameplay
- Spam Smoke Screen, Preparation, and Preparation at all times.
- Press Shadow Power once every 5 seconds.
- Use Vault to fly around the maps
- Use Multishot to kill enemies.
Concept
This is the Nephalem Rift build from the Patterns of Justice Tempest Rush Monk Guide.
Stat Priorities
- Cooldown Reduction
- Tempest Rush damage
- Damaging stats (CHC, CHD, Lightning Dmg)
Gameplay
- Spam Epiphany.
- Activate Sweeping Wind one time. As long as you hit an enemy every 6 seconds, the stacks will refresh. Otherwise, refresh it manually.
- Activate Mantra of Conviction once every 3 seconds.
- Hold down Tempest Rush to kill enemies.
- Use Dashing Strike to cover more ground.
Concept
This is a variant of the standard T16 Bounty Build from the LoD Wave of Light Monk Guide that focuses purely on speed.
Stat Priorities
- Resource Cost Reduction
- Cooldown Reduction
- Attack Speed
Gameplay
- Spam Epiphany, Blinding Flash and Mystic Ally.
- Use Dashing Strike for mobility and to kill enemies.
- You do not need to cast Mantra of Healing. We just want the Spirit Regeneration from the Circular Breathing passive.
Concept
This is the standard T16 Bounty Build from the Masquerade Bone Spear Necromancer Guide.
Stat Priorities
- Cooldown Reduction
- Attack Speed
- Bone Spear damage
- Damaging stats (CHC, CHD, Physical Dmg)
Gameplay
- Cast your Simulacrum, which will last forever unless you die.
- Spam Devour.
- Activiate Bone Armor near enemies.
- Kill enemies using Bone Spear.
- Use Blood Rush for mobility.
Concept
This build is focused purely on speed and uses the two-piece bonus from the Pestilence Master's Shroud set, along with Captain Crimson's Trimmings for more Cooldown Reduction.
Stat Priorities
- Cooldown Reduction
- Attack Speed
- Resource Cost Reduction
Gameplay
- Spam Devour and Land of the Dead.
- Activate Bone Armor near enemies.
- Cover more ground using Blood Rush.
- Corpse Lance will automatically fire at a nearby enemy each time you Devour while Land of the Dead is up.
- If your Land of the Dead is down, kill enemies with Death Nova until its back up.
Concept
This is the standard T16 Bounty Build from the Mundunugu Spirit Barrage Witch Doctor Guide.
Stat Priorities
- Cooldown Reduction
- Spirit Barrage damage
- Damaging stats (CHC, CHD, Cold Dmg)
Gameplay
- Cast Spirit Barrage once every 20 seconds or spam it on Elites.
- Spam Big Bad Voodoo, Horrify, and Soul Harvest.
- Use Spirit Walk for mobility.
Concept
This is the Angry Chicken speed build which uses Manajuma's Way two-piece set to transform you into a chicken, increasing your speed by an additional 100%.
Stat Priorities
- Cooldown Reduction
- You literally need nothing else
Gameplay
- Activate Summon Zombie Dogs at the beginning.
- Cast Spirit Barrage, Horrify, Spirit Walk and Soul Harvest. Then, cast Hex Angry Chicken.
- When Hex Angry Chicken wears off, repeat step 2.
Concept
This is the standard T16 Bounty Build from the LoD Frozen Orb Wizard Guide.
Stat Priorities
- Cooldown Reduction
- Arcane Orb damage
- Damaging stats (CHC, CHD, Cold Dmg)
Gameplay
- Cast Storm Armor, Familiar and Magic Weapon at the start of your run.
- Spam Teleport for mobility.
- Use Arcane Orb to kill enemies.
- Use Shock Pulse 3 times to increase the damage of Frozen Orb from your offhand Triumvirate.
Concept
This is a variant on the standard T16 Bounty Build from the LoD Frozen Orb Wizard Guide that focuses purely on speed.
Stat Priorities
- Resource Cost Reduction
- Cooldown Reduction
- Attack Speed
Gameplay
- Cast Storm Armor, Familiar, Magic Weapon at the start of your run.
- Spam Diamond Skin.
- Teleport to cover more ground.
- Use Disintegrate to kill enemies.
If you're farming solo we recommend this Enchantress setup because she is the only follower that gives Cooldown Reduction, allowing you to spam your abilities more. Since this is at most T16 content, she’ll stay alive with Esoteric Alteration and Mutilation Guard and use Hand of the Prophet to gain all skills. This will give us Cooldown Reduction, Elemental Damage, Reduced Damage from Ranged Attacks, Armor, Attack Speed, and a Cheat Death.
Stat Priorities:
Since she will not have the immortality focus, we need to stack survivability on our Enchantress.
Intelligence > Vitality > Life % > Armor > All Resistance > Life Per Hit > Attack Speed.
Key Items:
The Flavor of Time: For double duration on Pylons.
Nemesis Bracers: For extra Elites, Death’s Breaths and In-geom procs.
Avarice Band: For the insane pickup radius.
Ring of Royal Grandeur: To complete our sets.
Gloves of Worship: For 10 Minute Shrine Buffs.
Sage’s Journey: For double Death’s Breaths.
Cain’s Destiny: For more Attack Speed & Experience.
Strategy and Locations for Farming Rainbow Goblins
Gather 3 friends (and remember there are Rainbow Goblin hunting communities!) and plan your routes. Assign 1 player to Acts I through III, and put the final person searching both IV and V.
- Act I (Assigned to Player 1)
- Cathedral Level 1 ➔ Leoric's Passage
- Leoric’s Hunting Grounds
- Northern Highlands
- Royal Crypts
- Southern Highlands ➔ Cave of the Moon Clan 1-2
- Act II (Assigned to Player 2, who should then help Player 3)
- Ancient Waterways: Eastern and Western channels, 2 levels each
- City of Caldeum
- Stinging Winds
- Act III (Assigned to Player 3)
- Arreat Crater level 1-2
- Caverns of Frost 1-2
- Keep an eye out for the unique monster Chiltara in Level 2. She has a low chance to drop the Gibbering Gemstone which is needed to craft the Plan: Staff of Herding
- Core of Arreat
- Rakkis Crossing
- The Bridge of Korsikk
- Tower of the Cursed 1-2
- Tower of the Damned 1-2
- Act IV (Assigned to Player 4)
- Silver Spire 1-2
- Silver Spire 1-2
- Act V (Assigned to Player 4)
- Pandemonium Fortress 1-2
- Each level has either 0 or 2 goblins, so if you find 1, keep looking for the 2nd
- Pandemonium Fortress 1-2
Whimsyshire: How to Craft the Staff of Herding
Whimsyshire is another Rainbow Level often confused with Whimsydale, but is only accessible via the Plan: Staff of Herding. To get to Whimsyshire, you must first gather several items then craft it at the Blacksmith.
Items Needed
- Black Mushroom - Act 1, Cathedral Level 1. Located on the floor.
- Leoric's Shinbone - Act 1, Leoric’s Manor. Located in the fireplace (not required on Console).
- Wirt's Bell - Act 2, Hidden Camp. Sold by Squirt for 100,000 gold.
- Liquid Rainbow - Act 2, Mysterious Cave Level 1. Reset the game until you get the "Clear the Mysterious Cave" Bounty in Act 2. Located in the Mysterious Chest (not required on Console).
- Gibbering Gemstone - Act 3, Caverns of Frost Level 2. Reset the game until you get the "Clear the Caverns of Frost" bounty in Act 3. Dropped from Chiltara on floor 2 (she has a low chance to drop the gemstone).
- Plan: Staff of Herding - Act 4, Silver Spire 1. Dropped by Izual.
Instructions
After obtaining all of the items above, take the Plan: Staff of Herding to the blacksmith, Haedrig. Once you teach him the plan, he will have the option to craft the Staff of Herding under “Forge Weapons.”
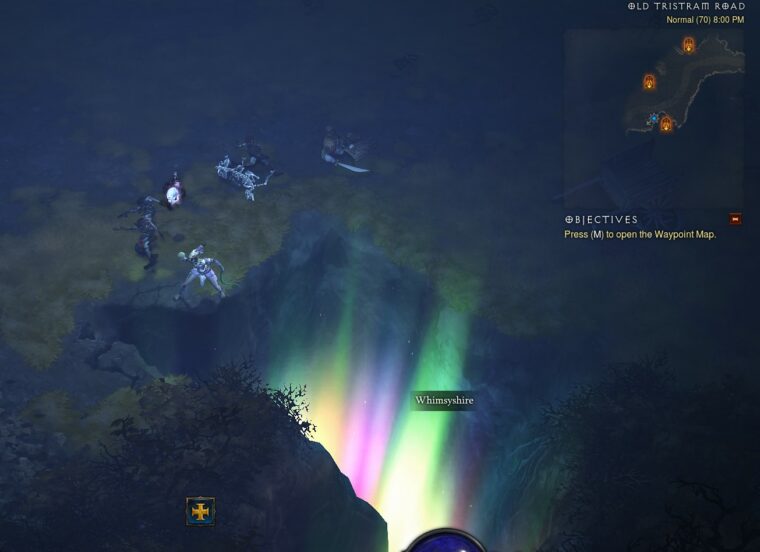
Getting There
With the Staff of Herding in your inventory, port to The Old Ruins waypoint and head northwest. Follow the path until you get to the glowing red chasm (pictured above). When you get close enough to it, The Ghost of the Cow King will appear. Talk to him and the chasm will change to a glowing rainbow that you can click on to enter Whimsyshire.
Video Guide
Summary
Hunting for Rainbow Goblins may seem like a daunting task, but hopefully this guide makes your journey as easy as possible. Decide if you're going for pure speed to net the most amount of goblins, or whether you'll farm bounties to strengthen your character simultaneously. Remember that the Rainbow Portal to Whimsydale is the only way to get the Cosmic Wings, and the Staff is the only way to get to Whimsyshire which drops the Rainbow Portrait. Good luck in your endeavor to find the game's rarest reward!

Credits
Written by Raxxanterax
Contributions by Narcissa
Reviewed by Northwar, wudijo