Twink Skeletal Arsonist Infernalist Leveling Guide
This Twink Skeletal Arsonist Infernalist Leveling Guide teaches you how to speedrun through the campaign, from Level 2 to Level 60, with all Skill Points & Permanent Stat Bonuses, in under 6 hours.
- Do you want to Level an Infernalist?
- Do you want to reach maps in under 6 Hours?
- Do you have Exalted Orbs to spare?
If you answered yes to all of the above then you're in the right place!
Note: This guide is for players leveling a second character or later. If this is your very first character, and you're looking to level an Infernalist, check out this Fresh Start Leveling Guide here!
Dawn of the Hunt brought sweeping changes to Path of Exile 2, and information on the passive tree or skill balance was not released before the patch went live. We're hard at work testing the build and will update the guide as soon as possible. Use this build as a framework for your leveling journey and pin the post to be notified of updates.
Path of Exile 2 is currently in early access, this means rapid development including frequent changes to builds as there are balance fixes and we learn more. Pin this page to be notified of any updates.
If you've beat the campaign and want to check out an endgame version of the build check out our Bombarding Minions Infernalist Build Guide!
Twink Leveling Basics
The basics of Twink Leveling are to:
- Buy & Prepare Items
- Setup Items & Skill Gems
- Have a Plan & Go!
The guide provides the following for a seamless leveling experience:
- Trade Links
- Step-by-Step Skill Gem Progression
- Passive Tree Routing
- A Leveling Plan that has been tested multiple times
- & a Full Video of the run
Buying & Preparing Items
The first step is to buy and prepare items, organized into the following categories:
- Equipped Items
- Inventory Items
- Stash Items
Unique items are bought, and Rare items are either crafted during the run or prepared on your main character in advance. No expensive Unique items are required, and no hard-to-craft Rare items are selected. If an item is optional it is noted. Furthermore, if you've been actively mapping, you may already have acceptable Rare Items or some of the consumables listed below.
The prices of items listed below may change over time!
Equipped Items
Equipped Items are equipped from the beginning of the run. Take care when purchasing or crafting items that the level requirement is 2 or lower.
- Enfolding Dawn = 1ex
- Luminous Pace = 1ex
- Midnight Braid = 1ex
- Rare Rings x2
- Acquisition: Purchase an Iron Ring or Lazuli Ring from Una or Finn in Act 1 Normal
- Crafting Method: Alchemy, Essence or Alt Transmute Regal Exalt
- Desirable Mods: Cast Speed, Strength, Dexterity, Intelligence
- Note: Rings are replaced quickly as the run progresses.
- Rare Gloves
- Acquisition: Purchase a Stocky Mitts or Suede Bracers from Una or Finn in Act 1 Normal
- Crafting Method: Alchemy, Essence or Alt Transmute Regal Exalt
- Desirable Mods: Life, Strength, Dexterity, Resistances
- Magic Lesser Life Flask
- Magic Lesser Mana Flask
Inventory Items
Inventory Items include gear that is equipped soon, or are small items that are carried in advance, to save time later. In this run Inventory Items have a level requirement of 17 or lower.
- Wanderlust = 1ex
- Oaksworn = 1ex
- +1 Minion Helm (Level 4) = 1ex
- Rattling Sceptre (Level 3-6) = 1ex
- Optional: Purchase with % Increased Spirit = 10ex+
- +1 Minion Amulet (Level 4-14) = 1ex
- Alternative: Surefooted Sigil = 3ex+
- Surefooted Sigil is useful for going faster, and can be hot swapped with a +1 Minion amulet on bosses.
- Sapphire Charm
- Ruby Charm
- Uncut Support Gem 3 x21 = 1ex x21
- Note: Most players have extra Uncut Support Gems from mapping. If not, it may be faster to farm them in maps instead of individually trading for them.
- Lesser Jeweller's Orb x6
- Note: Lesser Jeweller's Orbs are best bought in bulk via the in-game Currency Exchange.
- Any Rare Rings with Cast Speed and Attributes from level 3 to 17 (Optional)
Stash Items
Stash Items are equipped in later acts. In this run Stash Items have a level requirement of 17 or higher. All Rare Items have the same crafting methods listed above.
- +2 Minion Sceptre with Allies Deal Increased Damage = 1ex
- Alternative: +1 Minion Sceptre with % Spirit and 1 damage stat = 2ex+
- Alternative: +1 Minion Sceptre with multiple damage stats = 2ex+
- Alternative: +1 Minion Sceptre with % Spirit and multiple damage stats = 3ex+
- Note: Useful minion mods appear as early as level 18, the above trade links are capped to level 36 as that's when the last Flat Added and % Increased Damage mods appear
- +2 Minion Helmet = 1ex
- Specific Bases: Any Energy Shield Helmet
- Desirable Mods: Energy Shield, Mana, Life, Resistances
- +2 Minion Amulet = 2ex+
- Desirable Mods: Energy Shield, Mana, Life, Resistances, Attributes
- Rare Boots with 25% Movement Speed (Level 40+) = 1ex
- Specific Bases: Any Energy Shield Boots
- Acquisition: Purchase from Oswald or Alva in Act 3 Normal
- Crafting Method: Alchemy, Essence or Alt Transmute Regal Exalt
- Desirable Mods: 25%+ increased Movement Speed, Energy Shield, Mana, Resists
- Rare Gloves
- Specific Bases: Any Energy Shield Gloves
- Acquisition: Purchase from Oswald or Alva in Act 3 Normal
- Crafting Method: Alchemy, Essence or Alt Transmute Regal Exalt
- Desirable Mods: Life, High Energy Shield, Mana, Intelligence, Resists
- Any Rare Rings with Cast Speed and Attributes from 17+ (Optional)
- Higher Level Mana Flasks
- Grand Mana Flask
- Colossal Mana Flask
- Gargantuan Mana Flask
- Higher Level Life Flasks
- Grand Life Flask
- Colossal Life Flask
- Gargantuan Life Flask
- Any Rare Jewel with Minion Damage (Optional) = 1ex
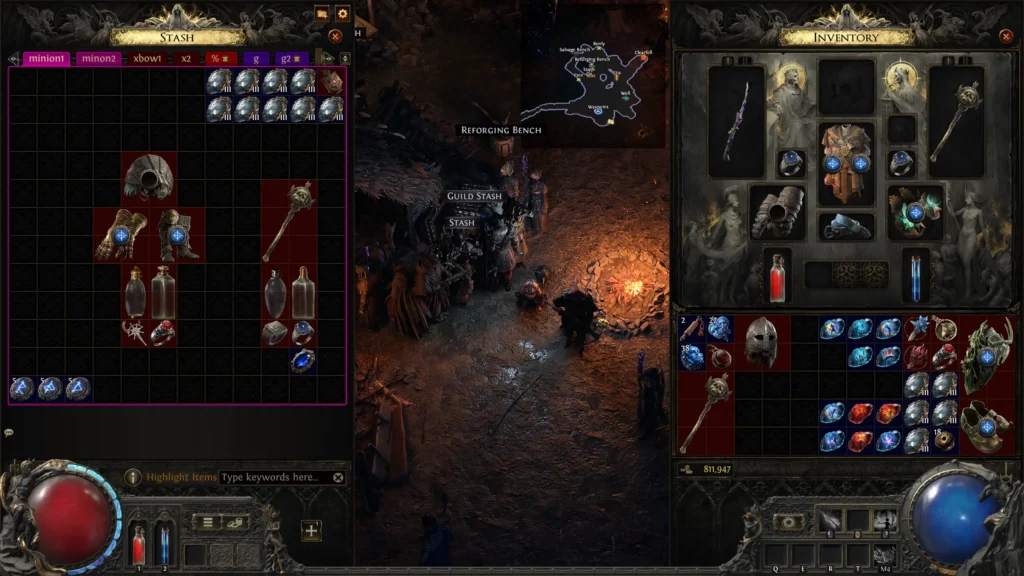
Setup Items & Skill Gems
The second step is to organize all of the prepared items and setup your skill gems. Use the reference image below to setup your Equipped Items, Inventory & Stash. Use the Skill Embed on the right for Step-by-Step Skill Gem Progression.
The Level 2 Setup
- Skeletal Sniper is created with the first Uncut Skill Gem from Renly
- A Level 1 Flame Wall is acquired by muling a second character for an Uncut Skill Gem Level 1.
Additional Notes
- Future Skill Gems are created with quest-given or dropped Uncut Skill Gems.
- If a Skill Gem has 3 attached support gems, use a Lesser Jeweller's Orb on it.
- Level 3 Uncut Support Gems have no level requirements; and can support Level 1 Skills.
- Furthermore, you can optionally create every support gem in advance, as pictured below.
Use the <Prev and Next> arrows to navigate.
Go!
It's time to blast! Noted below are any key gear swaps, character breakpoints, or zone routings to assist with your run. There may be some discrepancies, depending on how many extra rare items you've crafted and which unique items you've selected.
Act 1 Normal
- Run Start
- Level 4
- Equip +1 Minion Helm
- Equip +1 Minion Amulet
- Equip +1 Minion Sceptre
- Note: Be sure to transfer your Skeletal Warrior support gems to the new Sceptre.
- Level 6
- Remove Skeletal Sniper & Equip Skeletal Arsonist + Scattershot + Martial Tempo + Minion Mastery
- Level 7
- Switch Withered Wand for Oaksworn
- Kill King in the Mists
- Equip Raging Spirits + Feeding Frenzy + Elemental Focus + Fire Mastery
- Level 11
- Switch Luminous Pace for Wanderlust
- Before Geonor
- Equip a Sapphire Charm
- Level 14
- Equip Pain Offering + Magnified Effect + Persistence + Ablation. Note: This requires 16+ Strength.
Act 2 Normal
- Before Rudja, the Dread Engineer
- Equip a Ruby Charm
- Level 16+
- Equip a higher level Life Flask Grand Life Flask
- Equip a higher level Mana Flask Grand Mana Flask
- Level 17+
- Equip any Rare Ring upgrades
- Traitor's Passage
- Kill Balbala, the Traitor to receive the quest Djinn Barya for your ascension.
- Level 22
- Equip Flammability + Cursed Ground + Heightened Curse + Inspiration Note: This requires 52+ Intelligence.
- Lost City
- Once you enter The Lost City look for a Rare Tomb, for an Uncut Spirit Gem.
- Level 22-30+
- Equip any Rare Ring upgrades
- Equip any Minion Sceptre upgrades
- Equip a higher level Life Flask Giant Life Flask
- Equip a higher level Mana Flask Giant Mana Flask
- Trial of the Sekhema
- Before entering the Dreadnought, complete the Trial of Sekhemas for your first 2 Ascendancy Points.
Act 3 Normal
- Level 30
- Equip a higher level Life Flask Colossal Life Flask
- Equip a higher level Mana Flask Colossal Mana Flask
- Level 33+
- Swap to a +2 Minion Skill Helmet with high ES, such as Heavy Crown or Feathered Tiara.
- Equip any Minion Sceptre upgrades
- Equip any Rare Jewel with Minion Damage
- Equip any Minion Amulet upgrades
- Defeat Ignagduk, equip Grim Feast & optionally, link it to Clarity
- Level 40
- Equip a higher level Life Flask Gargantuan Life Flask
- Equip a higher level Mana Flask Gargantuan Mana Flask
- Upgrade any items for rare items as you see fit.
- All of Cruel Difficulty can be completed with gear equipped in Normal.
- Note: It's recommended to equip Energy Shield gear. Combining Grim Feast with high ES gear lets you overflow your ES to double its normal limit, granting a massive defensive bonus.
Act 1 Cruel
- Freythorn (King in the Mist) can be skipped.
- Continue Blasting.
Act 2 Cruel
- Continue Blasting.
Act 3 Cruel
- Kill Ignaduk for +40 spirit
- Continue Blasting.
Skill Rotation
- For general pack-to-pack clear, maintain Flame Wall for Skeletal Arsonists while summoning Raging Spirits.
- Note: If you're using the Direct Minions Keybind, you need to direct them to attack after moving, otherwise they stand around for 2-3 seconds before attacking.

- For Tanky Monsters, first drop Flame Wall to buff your Arsonist's attack, and to summon Raging Spirits. Then debuff enemies with Flammability.
- For Single Target, begin with Flame Wall x2 & Flammability.
- Then target a Skeletal Warrior, if available, with Pain Offering.
- Continue to maintain Flammability, Flame Wall and Pain Offering.
- Pro-Tip: To more easily separate your Arsonists and Warriors, direct minions to one side of the boss before commanding them to attack. This groups up your Arsonists slightly away from the boss and keeps them away from your Warriors.
Passives
Click the Arrows to open in a new tab for step-by-step progression.
- Rush through the Minion Damage nodes on the left, through Raw Destruction, Power of the Dead, then head towards Living Death
- Afterwards acquire Gravedigger, Necrotised Flesh and Relentless Fallen
- Then path to the left, allocating Restless Dead & Growing Swarm
- Continue upwards, allocating Lord of Horrors & Bringer of Order, followed by Silent Guardian, Holy Protector, Left Hand of Darkness & Crystalline Flesh to increase your minion's defenses
- From here on, acquire defensive nodes such as Enhanced Barrier, Glazed Flesh, Dampening Shield, Mana Blessing, Open Mind, Pure Energy, Insightfulness and the Keystone Mind Over Matter
- Note: Depending on your rare items, you may need to allocate Strength, Dexterity, or Intelligence. That said, most of your attribute points should be Intelligence to level your Skill Gems.
Video
The video below goes over all the leveling steps while also showing gameplay and playstyle tips.
FAQ
Yes
The purpose of a Twink Run is to level a new character as quickly as possible through the campaign. Players using Twink Runs often view the campaign as the tutorial and maps as the true endgame.
- Relic: 15% increased Mana Recovery from Flasks
- Venom Drought: 25% increased Mana Regeneration Rate
- Cruel Relic: 15% increased Life Recovery from Flasks
- Cruel Venom Drought: 10% to Chaos Resistance
The default Direct Minions hotkey is `, usually found on the same key as ~.
Summary
- Level from 2 to 60 in under 6 Hours
- Acquires all Skill Points and Permanent Stat Bonuses
- No Expensive Unique Items & No Hard-to-Craft Rare Items
Credits
Written by: havoc616
Reviewed by: Helm Breaker, Jerrin
Language Reviewed by: Tenkiei