Templar Leveling Build Guide
This Armageddon Brand Cremation Templar Leveling Build Guide teaches you the most efficient way to complete the Path of Exile Campaign; with All Skill Points and All Labs. Fire Templar is a classic and proven League Start Leveling Build; making it a great choice for leveling a new character, or when completing a fresh start speedrun.
This Leveling Guide has been tested and verified without Ascending. Thus in practice, your in-game power level will exceed that of the showcased video.
Class Leveling Guides
Ascendancy Overview
This leveling guide is Class agnostic, however, Ascendancies offer a crucial early-game power spike. Use the tabs below for more information on which Ascendancy nodes to specialize in for a smoother leveling experience. Note that if you plan on respeccing in endgame you need a bunch of Gold or 5 Orbs of Regret per node.
Passive Tree Progression
Leveling Progression
Gem Swaps
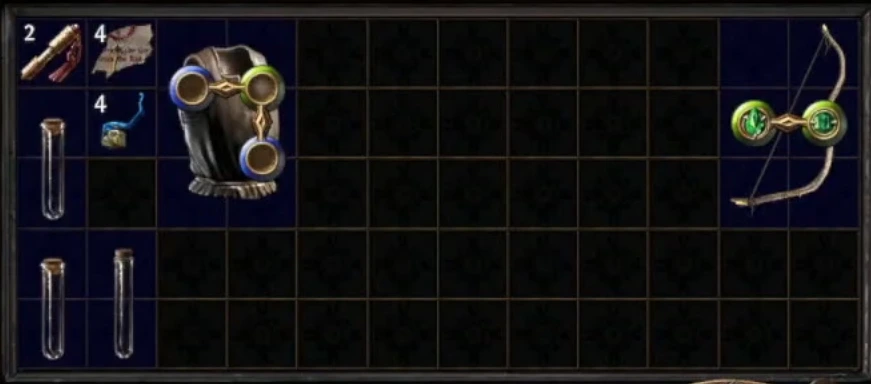
Use the Skill Embed on the right for Step-by-Step Skill Gem Progression.
For a more in-depth Step-by-Step explanation of when each gem is acquired and socketed refer to the leveling progression section below.
Playstyle
Armageddon Brand is your primary clearing ability. Cremation is your primary single target ability.
Haste or Determination is used during zone progression and is swapped to Anger on Bosses. For even more single target damage, enemies are debuffed with Wave of Conviction & Flammability.
A regex is a code that can be copied to a vendor's search bar in Path of Exile to filter the results. It highlights specific bases with links, and colours appropriate to this build: Make sure to use it at the vendors whenever you are in town.
b-b-|-b-b|b-.-b|b-b|nne|r-.-b|b-r-|g-b-r|g-r|r-gTemplar Leveling Build Act Progression
Act 1
- Ranger Mule: Before playing your Templar, Create a Ranger, Defeat Hillock, and enter Lioneye's Watch
- Check Tarkleigh for Links:
- BBB for Rolling Magma / Armageddon Brand
- BBG or BGR for Cremation
- GR or GGR Axe / Sword for Weapon Swap Leap Slam
- Any items with Blue or Red sockets to assist with socketing gems
- Optional: Buy a Coral Ring for 3 Wisdom from Nessa
- Stash the Following Items:
- Momentum
- Small Life Flask x2, Small Mana Flask
- And any newly bought Items and Currency
- Check Tarkleigh for Links:
- Level 2: After Hillock
- Rolling Magma - Elemental Proliferation
- Level 4: After Hailrake
- Rolling Magma - Elemental Proliferation
- Holy Flame Totem
- Flame Wall
- Frostblink - Arcane Surge
- Check the Vendor for 2x Goat's Horn if necessary
- Level 8: After Lower Prison & Completing Dweller
- Rolling Magma - Elemental Proliferation - Combustion (If 3B)
- Holy Flame Totem - (Combustion here if No 3B)
- Flame Wall
- Frostblink - Arcane Surge
- Check the Vendor for 2x Goat's Horn if necessary
- Level 10: After Brutus
- Add Leap Slam - Momentum to the above setup
- Level 12: After Reaching Cavern of Wrath and Completing Fairgraves
- Optional: Add Searing Bond to the above setup
Act 2
- Level 16: After Fidelitas
- Add Herald of Thunder
- Optional: Add Herald of Ice
- Optional: Purchase Arctic Armour to equip for Freeze Immunity in later Acts or to use instead of Determination in High Physical Damage Zones
- Level 18: After Weaver
- Free Cruelty or Elemental Focus
- Purchase the Other One
- Depends on your upcoming Cremation Links
- Purchase Wave of Conviction
- Purchase Desecrate
- Purchase Concentrated Effect
- Optional: You can delay this step until you have enough Alterations, usually after Vaal Oversoul
- Free Cruelty or Elemental Focus
- Bandits: Help Alira
- After The Way Forward - Travel back to Act 1
Act 3
- Level 24: After Tolman
- Purchase Anger
- Free Flammability from Maramoa
- Optional: Purchase Determination -- Run in High Physical Damage Zones
- Optional: Buy a Heavy Belt
- Solaris 2
- Rare Jade Amulet
- Important: Acquire the Fire Damage Craft in the Room beside Lady Dialla
- Important: Craft Flat Fire Damage to Spells onto your Leap Slam Weapons with 8 Transmutes
- Important: The Craft requires Level 24
- Level 28: After Gravicius
- Free Armageddon Brand --> Switch with Rolling Magma
- Purchase Cremation
- Example Setup at this Point (Colours and Link Dependent)
- Armageddon Brand - Elemental Proliferation - Combustion
- Cremation - Concentrated Effect - Cruelty or Elemental Focus -- Depending on Colours
- Wave of Conviction, Flame Wall
- Desecrate
- Frostblink - Arcane Surge - Flammability
- Leap Slam - Momentum
- Anger or Determination
- Optional: Complete Library
- Optional: Purchase Faster Attacks -- Link with Leap Slam - Momentum
- Optional: Purchase Haste -- To use instead of Anger or Determination during Zone Progression
- Optional: Purchase Blood Rage
Act 4
- Level 38: After Malachai
- Free Ignite Proliferation from Lady Dialla --> Switch with Elemental Proliferation
- Optional: Free Summon Stone Golem from Oyun
- Optional: Purchase Immolate (1 Alchemy) --> Add to Armageddon Brand 4Link
- Optional: Purchase Cast when Damage Taken (1 Alchemy) --> To link with Immortal Call
Act 5
- After completing The Key to Freedom
- Free Ruby Flask
Act 6
- After Lily Roth
- Purchase Faster Attacks
- Purchase Immortal Call
- Optional: Purchase Haste -- To use instead of Anger or Determination during Zone Progression
- Optional: Purchase Blood Rage
- Example Setup at this Point (Colours and Link Dependent)
- Armageddon Brand - Ignite Proliferation - Combustion - Immolate
- Cremation - Concentrated Effect - Elemental Focus - Cruelty
- Leap Slam - Momentum - Faster Attacks
- Cast when Damage - Immortal Call | Desecrate
- Frostblink - Arcane Surge - Flammability - Wave of Conviction
- Anger or Determination or Haste | Arctic Armour
- Major Pantheon: Brine King
- Minor Pantheon: Ryslatha
Act 7
- After completing The Silver Locket
- Granite Flask or Jade Flask
Act 8
- Run Arctic Armour for Freeze Immunity in zones with Cold Damage
Act 9
- After completing The Storm Blade
- Free Rare Opal Sceptre
Act 10
- After completing Safe Passage
- Silver Flask
- After completing Death and Rebirth
- Free Rare Widowsilk Robe or Rare Elegant Ringmail
Important Leveling Tips
With experience, the Leveling Progression outlined above is all you need. However, if you're looking for additional guidance, then review the Important Leveling Tips listed below.
General Progression Tips
Weapon Progression
- Level 2 Driftwood Sceptre x2
- This is your starting sceptre!
- In most scenarios, it's not worth crafting whatsoever.
- Level 7 Goat's Horn x2
- Use against Bosses or Rares for increased Single Target Damage.
- Consider using any Alchemy & Essence for more damage
- Level 10 Leap Slam Weapons x2
- Use during Zone Progression to travel quickly
- Use an Axe & Sword to take advantage of the Dark Arts 60% increased damage dual wield mastery
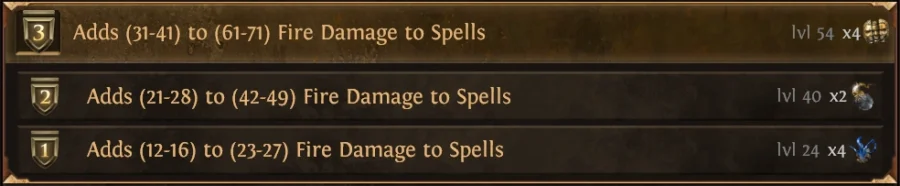
- Act 3 Level 24 Craft Flat Fire Damage to Spells on your Leap Slam Weapons
- Requires 8 Transmutes
- From this point onward, use your Leap Slam Weapons for both Clear and Single Target Damage
- Act 7 Craft T2 Flat Fire Damage to Spells on your Leap Slam Weapons (Optional)
- Requires 2 Scouring & 4 Alchemy
- Act 6 to Act 10+ Rare 1.5 APS Sceptre (Optional)
- Any Magic or Rare Grinning Fetish or Karui Sceptre
Listed above is the ideal Fire Caster weapon progression. Fire Casters are strong enough to finish the run with Level 24 Crafts, especially so if you farm extra levels. That said, you can improve your damage in Part 2 of the Campaign by either: upgrading your T1 Flat Fire Damage to Spells craft to T2, or upgrading your Leap Slam Weapons to any Magic or Rare Grinning Fetish or Karui Sceptre that improves your DPS.
What is Muling?
In Path of Exile, "Muling" or creating a "Mule", simply means creating a second character or more, to acquire resources that improve the main characters progression.
Typical Resources of interest are:
- Skill Gems or Support Gems
- Life or Mana Flasks
- Specific Items
- Linked Items
- & Currency
Why Mule?
There are two main benefits to muling:
- Gaining access to resources before they are normally available
- & Consistency
In this run the Ranger Mule provides the following benefits:
- Immediately acquiring Momentum Support to use at Level 10, instead of waiting until Act 3 or Act 6.
- Acquiring 3 Extra Scrolls of Wisdom or more, to help purchase and identify items.
- Acquiring 2 Extra Small Life Flasks to guarantee a Medium Life Flask, significantly improving survivability.
- Acquiring an Extra Small Mana Flask, improving Mana Sustain in Act 1.
- Providing a 2nd set of Loot from Hillock, potentially providing Linked Items, Movement Speed Boots, or Unidentified Magic or Rare Items to sell for Transmutation Shards.
- Providing a 2nd Vendor Check, potentially providing Linked Items or Movement Speed Boots.
- A Burning Arrow Gem to vendor with an Iron Ring, to create a Topaz Ring; improving survivability in High Lightning Damage zones such as Act 2 Chamber of Sins Level 2 or versus unique enemies such as Vaal Oversoul or Piety.
For a 1m10s to 1m30s investment, the benefit is clearly worth it.
Early Links, Leap Slam Weapons & Socket Colour Planning
To review, you are searching for the follow links during the early game:
- BBB for Rolling Magma / Armageddon Brand
- BBG or BGR for Cremation
- GR or GGR Axe / Sword for Weapon Swap Leap Slam
- Any items with Blue or Red sockets to assist with socketing gems
The ideal scenario is to acquire all necessary Linked Items during Act 1; in preparation of the Act 3 Armageddon Brand Cremation Setup, whilst also achieving the Level 10 Setup:
- Rolling Magma - Elemental Proliferation - Combustion (If 3B)
- Holy Flame Totem - (Combustion here if No 3B)
- Flame Wall
- Frostblink - Arcane Surge
- Leap Slam - Momentum
However, Vendor Checks and Item Drop RNG isn't always so forgiving. In below average scenarios: killing extra monsters, Chroming 3 Links and checking the Vendor in Act 2 and beyond may be required. To assist with link prioritisation, you can remove the 1 Link items & organise the remaining Links into the table below:
| What | Minimum Links | Minimum When | Ideal Links | Ideal When |
| Rolling Magma | BB | Level 2 | BBB | ASAP |
| Leap Slam | GR | Level 10 | GGR | Act 6 |
| Cremation | GR or GB | Level 28 | BBG or BGR | Level 28 |
The table should impart the following conclusions:
- Acquiring a BBB for your main clear is of utmost importance
- Acquiring a GR Weapon to Leap Slam with at Level 10 is necessary to travel quickly
- Cremation links can be delayed until Level 28
Note: It's advantageous to acquire your GGR weapon as soon as possible, as lower level weapons have lower attribute requirements, and may be easier to chrome.
Goat Horns, Weapon Swapping & Playstyle
To maximise progression speed, this build uses Leap Slam to traverse through zones quickly. However, until the Level 24 Crafts, Axes & Swords offer no damage benefits.
Thus, from Level 7 until Level 24, equip 2 Goat's Horns in your second weapon set. The Flat Fire damage to Spells in combination with Rolling Magma's high Damage Effectiveness, significantly boosts your single target damage.
Versus Magic, Rare & Unique Monsters:
- Use your Goat's Horns.
- Use Flame Wall if necessary.
- Use Holy Flame Totem only versus Unique or high damage enemies.
Versus Everything Else:
- Use your Leap Slam Weapons.
- Consider casting Flame Wall if it avoids weapon swapping or an extra cast.
- Avoid using Holy Flame Totem.
Note: Since Holy Flame Totem is ideally only used for single target damage; if you are lacking a Red Socket on your gear and have a Red Socket on a Goat's Horn, it can be socketed there to alleviate socket pressure.
Rolling Magma Double Bounce
Before progressing further Rolling Magma's Bounce mechanic needs to be understood.
Simply stated:
- Rolling Magma Bounces multiple times per cast.
- Rolling Magma only deals damage when the projectile hits the ground (AKA the Bounce).
In practice, this means aiming slightly in front of the target, to potentially hit an enemy twice with a single Rolling Magma.
The Level 24 Fire Crafts Breakpoint
Continuing onward, at Level 24 it's imperative to craft Flat Fire Damage to Spells on your Leap Slam Weapons. Doing so significantly boosts your damage and forgoes the need to Weapon Swap. Consider vendoring your Goat's Horns for extra currency if necessary.
| Zone | Modifier Tier | Cost | Notes |
| Act 3: Solaris Temple Level 2 | Fire T1 | 4 Transmutes | Found in the Room beside Lady Dialla |
| Act 7: Dread Thicket | Fire T2 | 2 Alchemy | Found near Dreadstone |
Important: Note the 4 Transmute cost for the T1 Flat Fire craft. This means during campaign progression, you should loot and vendor as many Magic & Rare items as necessary.
Act-by-Act Progression Tips
Act 1
- In the Submerged Passageway, place a Portal at the Bridge, to more quickly enter Flooded Depths Later.
Act 2
- In the Broken Bridge, search for and defeat the 3 Exiles beside the waypoint. Keep an eye out for item upgrades, jewellery, and gear to vendor.
- There are many Breaches in Act 2. The Breach in Riverways is often found on the way and can be a great source of extra experience and items while progressing.
Act 3
- Solaris 2
- Important: Acquire the Fire Damage Craft in the Room beside Lady Dialla
- In Docks you can find a Unique enemy that drops a guaranteed Essence. They only drop Essences the first time you click them; so consider resetting the zone until you spawn an Essence you desire.
Act 4
- Get Level 32 before entering Kaom's Stronghold to avoid severe XP Penalties.
Act 5
- The Chamber of Innocence has many guaranteed Magic Monster packs. It's strongly recommended to go out of your way to farm them.
- Before entering the Reliquary to complete the Passive Skill Point quest, place a portal outside of the Cathedral Rooftop entrance, to progress faster.
Act 6
- In the Beacon, while progressing the fuel pylons, consider placing a Safety Portal as the enemies that spawn can occasionally be very dangerous.
Act 7
- After defeating Gruest, and progressing forward to the Causeway; consider placing a portal near the Dread Thicket entrance if you see it, to progress faster.
- Dread Thicket
- Acquire the T2 Fire Damage Craft near Dreadstone.
Act 8
- Upon returning to the Harbour Bridge to complete the act, reset the zone by Ctrl + Clicking the entrance for more experience along the way.
Act 9
- Consider farming Blood Aqueduct for more experience and gear before progressing to maps.
- Consider rolling a Bleed Removal Flask and using Grace in the Belly of the Beast.
Act 10
- Upon entering the Ravaged Square, place a portal near the entrance, before travelling to the Ravaged Square waypoint. Then take the waypoint back to town, and go through your portal and head south, in search of The Control Blocks to defeat Vilenta.
Video
The video below goes over all the leveling steps while also showing gameplay and playstyle tips.
FAQ
Yes
Yes, consider using the follow links: Wave of Conviction - Concentrated Effect - Immolate - Cruelty
You can consider using the following options until Armageddon Brand at Level 28:
- Fireball from Level 1 to 28
- Fireball to Level 12 & Fire Trap to Level 28
- Fireball to Level 16 & Wave of Conviction until Level 28
It's worth noting, that using Rolling Magma incorrectly, still deals significantly more damage than Fireball.
- Base Game: Hierophant
- Legacy of Phrecia: TBD
Summary
- Complete the PoE Campaign with an Armageddon Brand Cremation Templar Leveling Build in under 3 Hours
- Step-by-Step Leveling Progression through the Acts including Gem Swaps
- Tips and Tricks to help gear up as you level
- SSF Fresh Start League Start Viable
Check out more related Build Guides to continue your character progression here!
Credits
Written by: havoc616
Reviewed by: Crouching_Tuna
Language Reviewed by: Tenkiei