Damage Explained
Last Updated:February 19, 2024|Changelog
The most fundamental concept of any ARPG is dealing damage to enemies. Without damage enemies don't die, experience isn't gained, loot doesn't drop and players don't progress. Similarly, doing more damage means killing faster, getting experience quicker and dropping more loot. It's not surprising that so many players want to know how to maximize their damage.
In this guide, we'll cover the basics of dealing damage in Last Epoch, including the fundamental equations behind the big numbers you see on your screen. Understanding the concepts presented here will better prepare you to make the most of the damage options at your disposal.
Base, Added, Increased, & More Damage
While there are many ways to improve your damage in Last Epoch, the foundation is built upon Base, Added, Increased, and More Damage. These stat types work together to form the main damage of a skill. Neglecting any of these results in suboptimal performance, so a good balance is a must for anyone who wants to get the most out of their build.
Added, Increased, and More Damage can all be found on Items, Skills and Passives, while Base Damage is only found on Skills. Added Damage is most commonly found in Skill Trees, Passives, and on Weapons (with the exception of Throwing Damage, which is found on Rings, Amulets, Gloves and Relics). Increased Damage is the most plentiful stat, commonly found on the Passive Tree and all types of items. More Damage is most commonly found in Skill Trees, but is also found on some Passive Nodes and Uniques.
Base Damage
All skills have some amount of Base Damage (although for some it's very small). This is the starting point for the damage calculation that everything else scales from.
Added Damage
This is damage that is added to your Base Damage. It is always a flat amount (never a percentage), and can be a particular Damage Type, or Adaptive Damage which adapts to the Damage Type of the skill you're using (shown by tags on the skill). For example, '+4 Spell Damage' adds 4 Base Spell Damage to any skill with a Spell tag. If an Added Damage source doesn't list a Damage Type, it's Adaptive.
Increased Damage
This Damage Type multiplies off of Added Damage. Additional sources of Increased Damage add together to give an even higher increase.
Example: If you have 4 Adaptive Spell Damage, and 150% Increased Spell Damage the Increased Damage would more than double the 4 Base Damage for a total of 10 Spell Damage (4*(1+1.5)). If you had two sources of Increased Damage (150% Spell, 150% Fire, and you're using a Fire Spell), these would add together (300% total increased), and then multiply the Added Damage (4*(1+3)), so your 4 Spell Damage is now increased to 16.
More Damage
More Damage, similar to Increased Damage, multiplies your damage from the previous two sources. However, unlike increased, different sources of More Damage also multiply off of each other. For instance, in our previous example we had two sources of 150% Increased Damage which added together and then multiplied the base Added Damage, significantly increasing its output. However if those were actually sources of More Damage, instead of quadrupling the damage from 4 to 16, we would actually have 25. Here's how it works mathematically:
- Increased: 4*(1+3) = 16
- More: 4*(1+1.5)*(1+1.5) = 25
Combining All Three
To get an accurate reflection of the kind of damage you deal, you need to be able to combine all of your damage sources together with some basic math. However if you're just looking for a solid estimate for comparison purposes you can follow these general rules:
- Added Damage is always good.
- More Damage is usually better than Increased Damage and it is necessary to have sources of More Damage in basically every build.
- Increased Damage is good when it doesn't conflict with the other two sources, or any other stats that are important to your build (i.e. Critical Strike Chance, Attack Speed).
If this is good enough for you, then skip ahead to the next section on Added Damage Effectiveness. Otherwise, continue on to learn how to combine them.
Calculations
In order to determine the total damage output when combining all three sources, follow this equation:
(Base + Added 1 + Added 2... )*(Increased 1 + Increased 2...)*(More 1)*(More 2)*...The three dots (...) represent that we can scale this up to however many sources we have of that Damage Type. Example: We might have 4 sources of Increased Damage, so we would just keep adding that damage together until they are all accounted for. In this instance, let's say we have 3 of each Damage Type. The equation would look like:
(Base + Added 1 + Added 2 + Added 3)*(Increased 1 + Increased 2 + Increased 3)*(More 1)*(More 2)*(More 3)Now let's go through an example with real numbers. We have:
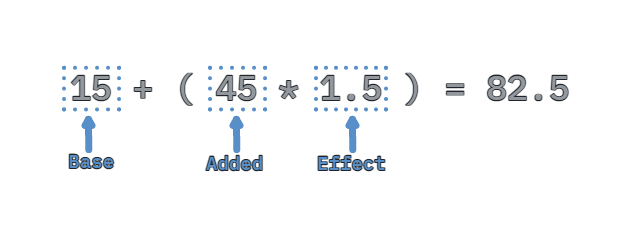
- A Skill with 20 Base Damage
- 3 sources of Added Damage: 5, 10, and 15
- 2 sources of Increased Damage: 100% and 50%
- 2 multipliers: 20% and 50%

You may have noticed how powerful More Damage is. There's no doubt that More Damage is a highly desirable stat that can make or break builds, depending on whether or not they can find enough More Damage. However, this doesn't mean that you should neglect Added Damage and Increased Damage. Added Damage provides a baseline to multiply your damage off of, so it is always a very powerful scaler. Increased Damage is also itself a multiplier, even though it only multiplies once. Neglecting it is a costly mistake. Increased damage as a source is usually exclusive to More Damage (i.e. they don't share the same affix slots), so there is little reason to not take it when available.
- In the above calculations, notice that a '1' is always added in with the Increased Damage. This is necessary to account for a state where there is no Increased Damage (X*(1+0)). Without the '1', having no Increased Damage would produce a result of 0, which would obviously be incorrect since we still have our Base Damage. This extra '1' is needed any time we're multiplying damage to prevent such a scenario.
- Thanks to order of operations and the fact that we're multiplying, the actual order of added/base, increased, and More Damage in the equation doesn't actually matter. We're ordering them this way for simplicity and comprehensibility.
Added Damage Effectiveness On Skills
While the equations used in the above section hold up under typical circumstances, there are some major factors we need to consider. The first one is Added Damage Effectiveness on skills. It would be reasonable to assume that all skills apply Added Damage the same way, but this is not the case. Some actually give a larger amount than expected, while others give a smaller amount. Here's how it works: Let's say I have 50 Added Damage being applied to three different skills. Those skills have Added Damage Effectiveness of 50%, 100%, and 200%. Here's how these 3 skills play out:
50%: 25 Added Damage
100%: 50 Added Damage
200%: 100 Added Damage
As you can see, we have a new multiplier, but this time it is specifically for Added Damage. The equation is very simple, and looks like this:
(added)*(Effectiveness)In this case, 100% Added Damage Effectiveness is the baseline, unlike increased and More Damage, where it was 0%, so we don't need the extra '1' in this equation. If we plug in the above example at 50% Effectiveness, it looks like this:
(50)*(0.5) = 25Now, let's put Added Damage Effectiveness into the larger damage equation from the previous section:
(((Base + ((Added 1 + Added 2...)*(Effectiveness)))*(Increased 1 + Increased 2 ...)*(More 1)*(More 2)*...If this looks confusing to you, it can be summed up like this: Add together all of your sources of Added Damage, then multiply those by Effectiveness. Now add that number to your Base Damage. From here, follow the original equation.
Note: Added Damage Effectiveness applies to all sources of Added Damage. This includes Skill Tree Nodes and Passives. Skill Tree Nodes can be especially misleading since they only apply to the skill, and many players assume that Added Damage Effectiveness is already factored into the node. This is not the case.
Damage Types and Ability Types
Just like in many other games in the genre, Last Epoch has a variety of Damage Types and Ability Types to choose from that allow for a large number of tastes and play styles. Anything from Physical Throwing Attacks, to Fire Spells or Poison Melee Attacks are possible. Having so many options to combine can be fun, but also confusing for players that are trying to figure out how they all fit together. Let's start by looking at all of the different Damage Types and Ability Types that exist.
Hits
The first layer is whether something is a Hit or Damage over Time (DoT). Hits do all of their damage at once, can be a Critical Strike and can apply Ailments.
Damage Over Time
DoTs do their damage over a period of time instead of all at once, cannot be Critical Strikes, and typically cannot apply Ailments or 'On Hit' (Health on Hit, Ward on Kill, etc.) effects. However some skills with the DoT tag are able to apply ailments at fixed intervals (i.e. Hail of Arrows with the node Tear Flesh). Ailments themselves can be DoTs (Bleed, Ignite, Poison, etc.), but not all ailments are DoTs (Chill, Shock, Slow, etc.).
All of the damage you do is either a Hit or a DoT, never both. However some skills have both a Hit and DoT component to them. In this case each component scales separately.
Once you know whether your damage is a Hit or a DoT, it's now time to determine what Damage Types and Ability Types you are using. Here is a full list of each:
Damage Types
- Fire
- Cold
- Lightning
- Physical
- Necrotic
- Poison
- Void
Ability Types
- Melee Attack
- Throwing Attack
- Bow Attack
- Spell
All of these types can be combined in different ways, but most skills have only one Ability Type (although there are a number of notable exceptions) and several Damage Types to choose from. A Damage Type can also be added through gear and passives, but if it's not supported by a skill you might find difficulty in properly scaling the damage. Let's look at some examples of combining Damage Types and Ability Types to see how it plays out.
Example 1
Let's start with an easy one. You're a Hit based Throwing Attack build, which means you're only using Throwing Skills without any DoTs, and you have Increased Throwing Damage, as well as Increased Physical Damage. All of your Base Damage is Physical, so how do you determine how the Increased Damage is applied? Since all of your Base Damage is both Throwing and Physical, and all of your Increased Damage also falls under these two categories, you can simply add the Increased Damage together and then multiply it against your total Base Damage, like in the original examples.
Example 2
For our second example, let's assume you're now a Hit based Melee Fire build. You only use a Melee Skill. You use added Fire Damage whenever you can, but the weapon you're using has some Added Physical Damage. You also have Increased Melee Damage and Increased Fire Damage. In this case, you're going to apply all of your Increased Melee Damage to all of your Added Damage, but are only able to apply the Increased Fire Damage to the Fire portion of your Added Damage. Note: Using a Fire Skill does not alter the Physical Damage in any way, so it applies that portion of your damage as Physical to the target unless the skill has Damage Conversion (more on that later). If you have Adaptive Damage (Example: The base damage on most weapons where a damage type is not explicitly listed) it always converts to the Damage Type of the Skill you're using.
Example 3
For the last example we're using Fireball; this is a Hit based Fire Spell, but we're also applying Ignite on Hit. Ignite is an Ailment that does Fire Damage over Time (is a DoT). We have Increased Fire Damage, Increased Spell Damage, and Increased Damage over Time. Here's how it plays out:
- Increased Fire Damage increases both the Hit damage of Fireball as well as our Ignites, since they both have the Fire tag.
- Increased Spell damage only increases the damage of the Hits from Fireball. Ignite is an Ailment, not a Spell.
- Increased Damage over Time only applies to Ignites, since Fireball is a Hit based Spell and does not have the DoT tag.
There's a multitude of ways that a player can combine different kinds of damage, but this can also create problems for players who aren't considering how each kind scales. A key to maximizing your damage is understanding how to synergize everything so that you don't miss out on scaling benefits.
Critical Strikes
Critical Strikes are another way to improve Hit damage, and can be very powerful when scaled properly. DoTs cannot be Critical Strikes, so any build that relies on Damage over Time should avoid scaling Critical Strike Damage. At baseline, skills (with a few exceptions) have a 5% chance to be Critical Strikes and deal double damage. Note: The character sheet is currently very misleading by showing base Critical Strike multiplier at 200%, making it seem like Critical Strikes start at triple damage, which is not correct and not how the other stats on the character sheet function. We have to account for this discrepancy in the way character stats are handled whenever we do calculations that include Critical Strikes.
There are generally three ways to scale your Critical Strike damage. Two of them (Added Critical Strike Chance and Increased Critical Strike Chance) increase your chance to successfully land a Critical Strike and work in tandem, while the third (Critical Strike Multiplier) increases the amount of damage you do when a Hit succeeds in being a Critical Strike.
Added Critical Strike Chance
This is a straight numerical increase on your chances to score a Critical Strike. It always has a '+' in front of the stat, and it never says 'Increased'.
Example: If you have a weapon with '+5% Melee Critical Strike Chance', then you increase your chance to get a Critical Strike by 5%. If you have no other sources of Critical Strike Chance, then you would just add this to your base crit (5%) for a total of 10% chance to Critically Strike on Melee attacks.
Increased Critical Strike Chance
This is a multiplier of the sum of your Base and Added Critical Strike Chance.
Example: We still have the +5% Melee Critical Strike Chance on our weapon, but we also have 50% Increased Critical Strike Chance. We would calculate our chances to get a Critical Strike as follows:
(5+5)*(1+.5) = 15%Critical Strike Chance caps at 100%, where you are guaranteed a Critical Strike against any enemy that does not have Critical Strike Avoidance. Overcapping Critical Strike Chance beyond 100% does not provide any benefit, even against Critical Strike Avoidance. However, the Rogue does have access to Critical Strike Vulnerability, which increases the chance that an enemy receives a Critical Strike and does help negate Critical Strike Avoidance.
Note: There is one other way to increase your Critical Strike Chance, through skill tree Nodes that offer More Critical Strike Chance. These work similar to More Damage, as they are multiplicative with Added and Increased (and other sources of More Critical Strike Chance, if you had any). These are much rarer than More Damage though, so most builds don't have access to them.
Critical Strike Multiplier
This works similar to Increased Damage. Whenever we have a Critical Strike, we multiply our damage by our crit multi and any additional sources of Critical Strike Multiplier are added together. Example: If we have a Hit that would normally do 100 damage, but it is also a Critical Strike, and we have two sources of 50% Critical Strike Multiplier, the calculation would look like this:
(100)*(2+.5+.5) = 300, where '2' is our baseline Critical Strike Multiplier before the additional sources are added.Here is how the equation we've been working with would look for a Hit that is also a Critical Strike:
(((Base + ((Added 1 + Added 2...)*(Effectiveness)))*(Increased 1 + Increased 2 ...)*(More 1)*(More 2)...*(2 + Crit Multi 1 + Crit Multi 2...)Attack/Cast Speed
These are the stats that increase the rate you can use a particular skill. Almost all skills can scale Attack or Cast Speed, but there are exceptions (i.e. Disintegrate only scales the initiation of the cast, not the speed at which it applies DoT damage) as well as skills that convert Attack/Cast Speed to another stat (i.e. Dancing Strikes converts Attack Speed to More Damage). Generic Attack Speed applies to all attacks, while Cast Speed applies to all Spells. There are also more specific versions of Attack Speed (Melee Attack Speed, Throwing Attack Speed, Bow Attack Speed) that apply only to skills with the appropriate tag.
When attempting to calculate speed, a different equation must be used for Attack Speed vs Cast Speed. This is due to cast speed not scaling off of a weapon's base Attack Speed, while all attacks do scale off it.
For Spells
Take the base Attack Rate of the Spell, then apply any increases to Cast Speed, with multiple sources of Increased Cast Speed being additive.
- Example: With a Spell with a base Attack Rate of 1 (meaning 1 cast per second) and 25% Increased Cast Speed, we would get (1*(1+.25) = 1.25). So we now have 1.25 casts per second
For Attacks
We need to factor in the base Attack Rate of the Spell, the base Attack Rate of the weapon, and our Increased Attack Speed.
- Example: We have a Melee Attack with a base Attack Rate of 1, and we're wearing a weapon with a 1.2 base Attack Rate. We also have 25% increased Attack Speed. In this scenario we get 1*1.2*(1+.25) = 1.5
- If we're dual wielding, we take the average of both weapons and use that for their base Attack Rate.
Damage Over Time
Damage over Time (DoT) consists of any damage that is spread out over a period of time. This is in direct contrast to Hits that deal all their damage at once. DoTs can either be from Ailments (i.e. Ignite, Poison, Bleed) or skills that have the 'Damage Over Time' tag (i.e. Disintegrate, Maelstrom). Since DoTs cannot Hit, they cannot crit or apply 'on Hit' effects (i.e. Chance to Poison on Hit).
There are multiple ways to scale DoTs:
- For Ailments, obtaining increased chance to apply the Ailment on Hit (i.e. Chance to Poison on Hit). This can be increased beyond 100%, allowing the player to apply multiple stacks of the Ailment each Hit.
- Increase the appropriate Damage Type (i.e. Poison Damage for Poison DoTs)
- Increasing Ailment Duration (i.e. Lasting Stench). Unlike some games, this is a direct damage increase because it allows for more ticks of the DoT to occur over a longer period of time. The tick rate remains unchanged.
- Example: 100% Bleed Duration increases Bleed from 3 to 6 seconds. Since the rate of 1 tick per second remains unchanged, this doubles the damage.
- Sources of Penetration or Shred for the appropriate Damage Type.
- Generic sources of 'More Damage' of a DoT skill or a skill that applies DoT's
- This excludes More Damage sources that are tagged in a way that would not apply to the DoT (i.e. 'More Melee Damage' or 'More Hit Damage').
- Increasing Base Damage for DoT skills with Added Damage scaling (i.e. Maelstrom has 30% Added Damage scaling)
- There is currently no way of increasing Base Damage for Ailments. Each Ailment has a set amount that is unmodifiable.
Chance To Apply
DoTs all share the same tick rate (the rate to which DoT damage is actually applied) that cannot be increased. Instead many DoTs (specifically Ailments) are primarily scaled by increasing the chance to apply that Ailment on every Hit. As noted previously, this chance can go above 100%, allowing the player to apply multiple stacks of an Ailment on each Hit. Example: If you have 250% chance to Poison on Hit, then for each Hit you are guaranteed to apply two stacks of Poison and have a 50% chance to apply a third stack. Some Ailments (i.e. Time Rot) have a cap on how many stacks an enemy can have on them and that number cannot be exceeded, not even by your application chance or how many skills you use to apply the Ailment. However the major DoT Ailments (Bleed, Poison, Ignite, Frostbite, Electrify) have no cap, meaning the player is only limited by how quickly they can apply stacks to an enemy and their Ailment duration.
Shred and Penetration
Shred and Penetration reduce the defenses of an enemy, causing them to take Increased Damage. Because they are calculated after all player damage calculations (since they increase how much damage an enemy takes instead of increasing your damage directly), Shred and Penetration act as de facto damage multipliers. How they reduce defenses is a little different for each, so let's cover them separately.
Shred
There are two kinds of Shred, Armor (or Armour) and Resistance. In both cases, they are applied in stacks to the enemy, similar to Ailments (in fact, Shred is technically a type of Ailment).
- Resistance Shred - Decreases the amount of resistance to a particular Damage Type (i.e. Physical Resistance Shred) per stack of Shred (5% for non bosses, 2% for bosses). Caps at 10 stacks. Each stack lasts 4 seconds.
- Armor Shred - Decreases the amount of Armor an enemy has by 100, by default for each stack. There's no differences between bosses and non bosses and there's no cap on stacks. However, Armor is subject to diminishing returns. Each stack lasts 4 seconds.
Enemies generally have no Resistances or Armor by default, but both defenses can go negative which causes the enemy to take increased damage from that source. This makes Shred very beneficial to damage output regardless of the enemy and their own defenses.
Penetration
Penetration reduces an enemies defense, but unlike shred it:
- Does not stack. Multiple instances of Penetration add together.
- Only exists for Resistances. There is no Armor Penetration.
- Does not need to be applied. Any sources automatically count for any applicable damage.
Resistance Shred and Penetration are additive with each other since they both reduce the resistance of the enemy. Example: If you have 10% Fire Penetration and 4 stacks of Fire Shred on a non-boss enemy, you have reduced their Physical Resistance by 30%. Armor is a different defense type altogether which makes it multiplicative with Shred and Penetration. Armor Doesn't help with DoT builds since armor only protects from Hits, while Shred and Penetration do. If you're running a Hit build find some room for both, but if you're a DoT build you only want Shred/Penetration.
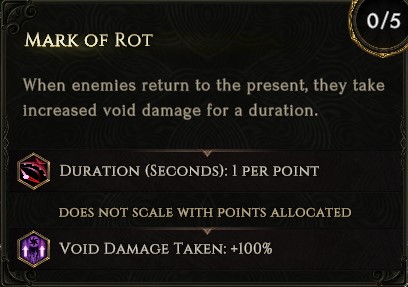
Increased Damage Taken
Increased Damage Taken is very similar to penetration. It can be universal or Damage Type specific (i.e. Increased Void Damage Taken). It is also independent of Shred/Penetration in the damage calculation, and therefore works as a de facto multiplier that is highly coveted. However, multiple instances of Increased Damage taken are additive, just like Penetration.
Damage Conversions
It is generally challenging to scale for more than one Damage Type in Last Epoch. This means that having mixed Damage Types on a build can result in a significant loss of output. One way to combat this problem on some builds is through Damage Conversions. These are generally nodes in Skill Trees or Unique items that can convert one or more Damage types to another. An example of this is Acid Rain within the Hail of Arrows skill tree that converts all Base Damage and swaps the skill's tag from Physical to Poison and also changes all sources of Bleed Chance to Poison Chance. This powerful node allows for much more scaling of Poison damage for Hail of Arrows builds.
One important factor when considering whether or not you should convert damage is how the damage is being converted. Not all sources of Damage Conversion work the same. Here are some examples:
- Rip Spirit from the Rip Blood tree converts the Base Damage of Rip Blood to Necrotic. It does not convert any Added Damage.
- Septic Wound, also in the Rip Blood tree, only converts the Bleed Chance of another node, Gushing Wound, to Poison chance.
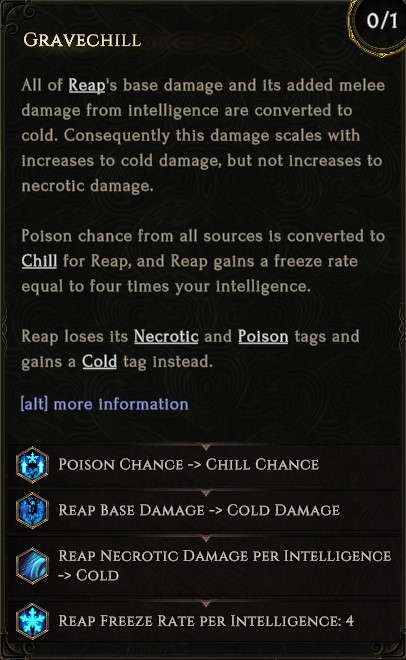
- Gravechill from Reaper Form converts base damage to Cold for Reap, as well as added damage from the Intelligence scaling that Reap gets. It also converts all sources of Poison Chance to Chill Chance and gives it a Freeze Rate based on your Intelligence.
The moral of the story is: if you're thinking about doing a conversion you need to know exactly how it works. Read the description carefully. Conversions aren't handled consistently and misunderstanding a conversion can be a costly and time consuming mistake.
Minions
Everything up to this point has been focused on the player and increasing the power of your own character. Minions, however, are treated much differently than the player and require different build making strategies. Here we discuss what you need to know in order to properly scale your Minions, what exceptions there are to Minion scaling, as well as a unique mechanic called Minion Power.
Scaling
Minion damage scales independently from the player. This means they have their own set of stats and affixes that a Minion player needs to add to their build instead of traditional damage stats. If the stat doesn't fall under this list, it doesn't scale with Minions:
- Minion (i.e. Minion Damage)
- Companions (For Primalist Pets)
- Totems (For Primalist Totems)
- Allies
- Shared
- For You and Your Minions
- Is a primary attribute that the Minion skill is tagged for
Exceptions
There are a few notable exceptions where a Minion skill is able to get player damage scaling:
- Manifest Armor applies the stats from body armor, helmet, gloves, and boots, and has skill tree nodes that increase the stat scaling from these items.
- Ballista can use the Shared Enhancements node to gain a percentage of your damage modifiers.
- The gloves Julra's Obsession apply the stats on the gloves to Minions. This includes Legendary affixes.
Minion Power
Minions have their own unique way of scaling that's based directly on player level. Starting at level 26 your minions begin to gain 0.6% Minion Power per character level. Minion power increases the damage they do while also decreasing the damage they take, and this damage is multiplicative with other sources. At max level (100) your minions deal 45% More Damage and take 45% less damage. This is a powerful scaling mechanic that makes leveling even more powerful for Minion builds than most others.
Damage Variance and Enemy Damage Mitigation
When calculating your damage, it becomes clear that the actual damage you do to enemies in game doesn't add up to expectations. This is for two reasons:
- Hit damage is subject to 20% variance. So on any Hit might be 20% more or less than expected. This variance does not apply to DoT damage.
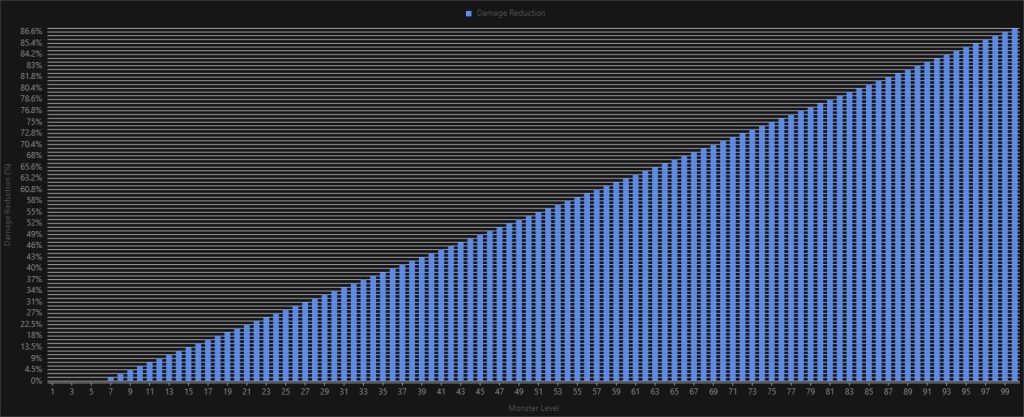
- Enemies gain universal damage reduction at higher levels, capping at 87% for level 100 enemies. This cannot be directly countered in any way.
You can get a better sense of your damage without the universal damage reduction by using the test dummies. However, the variance is always in place.
Skill DPS

You may have already noticed that there's a DPS calculator for every skill, and you may be tempted to use this as your barometer for damage. We advise against relying heavily on this tool because there are many factors that the calculator does not consider, including Debuffs on the enemy. It also historically overvalued some sources of damage, like DoTs. Use this tool as a very basic comparison option and take any information you get from it with a very large grain of salt.
Case Examples
In this section we've provided three case examples where we put everything together and calculate the expected damage. We employ most of the concepts in this guide, so make sure you have a solid understanding of what we've covered before diving in. Note: This is not meant to reflect a real build in its entirety. These examples are just meant to show how all of the concepts fit together. Actual builds are generally significantly more complex than this. We also aren't considering Attack/Cast speed in these examples, since we're just looking for the damage of a single attack, not our DPS.
Note: Data used in these examples is from patch 0.8.5. Depending on when you play the numbers may have changed, but the process for determining damage will still be the same.
Overview
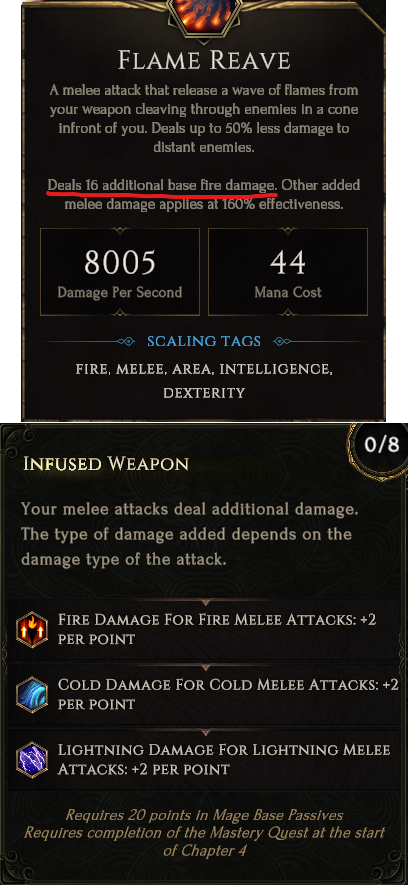
- Skill - Flame Reave
- Base Damage - 15 Fire
- Added Damage - 38 Melee Physical, 45 Melee Fire
- Added Damage Effectiveness - 150%
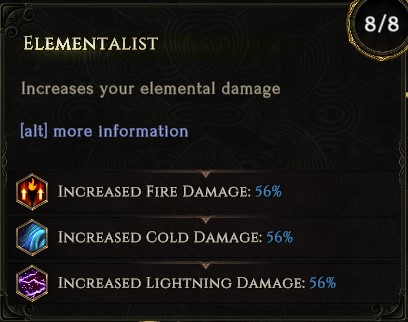
- Increased Damage - 75% Fire, 70% Fire
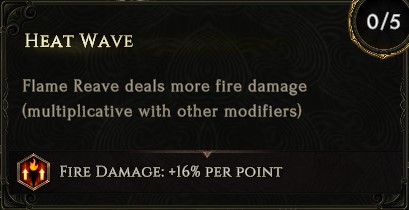
- More Damage - 80% Fire, 32% Melee, 80% Melee
- Critical Strike Multiplier - 60%, 25%, 30%, 25%
- Pen/Shred - 9% Fire, 25% Fire
- Increased Damage Taken - None
We're going to use Flame Reave as our example Hit Skill, and we're going to assume that we land a Critical Strike. It has 15 Base Fire Damage and 150% Added Damage Effectiveness. We've taken the Skill nodes Heat Wave, Arcane Severance, and Ember Infusion for 80% More Fire Damage, 32% More Melee Damage, and 80% More Melee Damage respectively. Our weapon is Eye of Reen, which has 38 Melee Physical and 45 Melee Fire damage. It also has 60% Critical Strike Multiplier and can proc Reen's Ire, which gives us Critical Strike Multiplier. Assume that we have five stacks of Reen's Ire. We're also wearing Rahyeh's Light which gives 75% Increased Fire Damage, and a Pyromancer's Bone Amulet with 9% Fire Penetration and 70% Fire Damage. Finally we have two blessings: 25% Emptiness of Ash and 20% Breath of Cinders. We'll assume 5 stacks of Shred.
Note: We're ignoring a small amount of Intelligence and Dexterity in this example to keep things simpler. For attribute scaling, check out the DoT Skill example.
Base, Added, and Effectiveness
We need to start by putting together the Base Damage and Added Damage, but we immediately run into a problem. We have both Fire and Physical Added Damage. Later on we're going to have more scalers for Fire Damage, so we have to separate the two types of Added Damage and calculate them independently before bringing them together. Let's start with Fire.
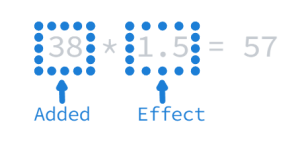
Flame Reave has a Base of 15 Fire, so we need to add the 45 Melee Fire Damage from Eye of Reen. First we need to multiply the Added Damage by our 150% Added Damage Effectiveness (do not multiply the Base Damage):
Next up is the Melee Physical Damage. We don't have any Base, so here we just multiply our Added Damage by our Added Damage Effectiveness:
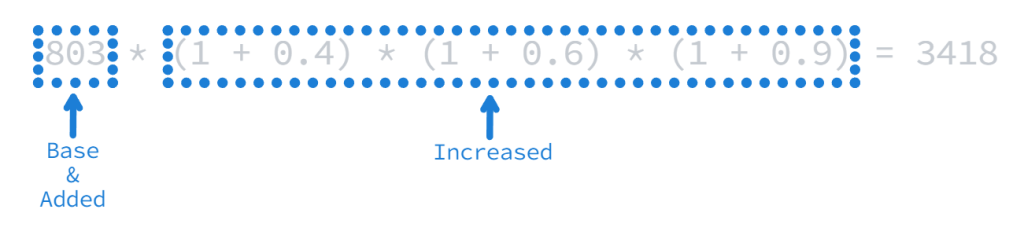
Increased
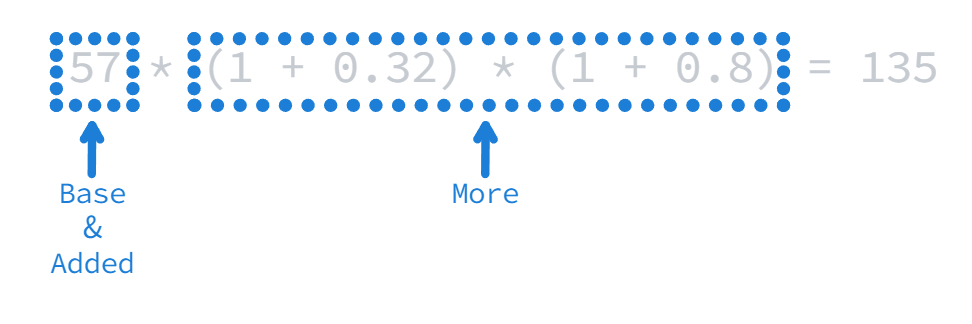
Next we multiply the sum of our Added and Base Damage by our Increased. Our Fire Damage benefits from all sources of increased damage. Remember that sources of Increased Damage are additive with each other, which is reflected in the equation:

For our Physical Damage we don't actually have any Increased Damage that applies, so we can now move on to the next step.
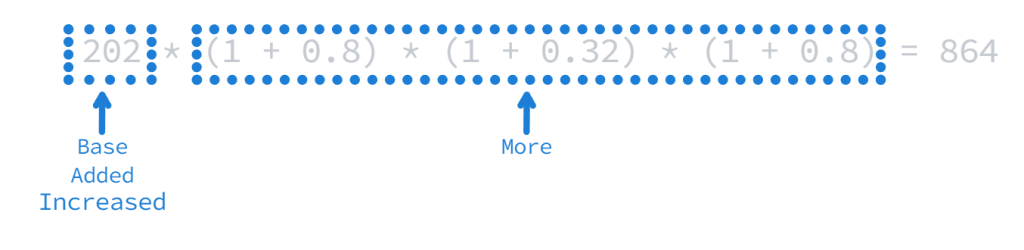
More
We have three multipliers, one for just Fire Damage and two for Melee Damage. Let's start with Fire which benefits from all three:
Next is the Physical Damage which only gets the two Melee Damage multipliers:
Critical Strike
Since we also Critically Struck the enemy, we need to factor in our Critical Strike Multiplier to the equation. This is a straight multiplier to the rest of our damage up to this point, so we just take what we already have and multiply it by our Critical Strike Multiplier. Remember that skills start off with 100% Critical Strike Multiplier by default, which is represented by a '2' in the equation. Let's start with the Fire Damage part:
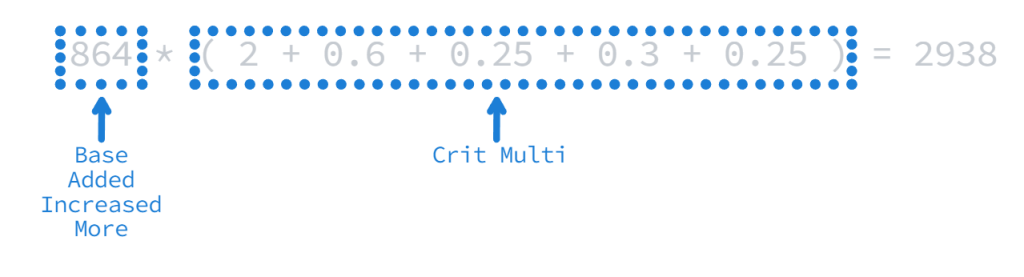
Now it's time for the same equation but with Physical Damage:
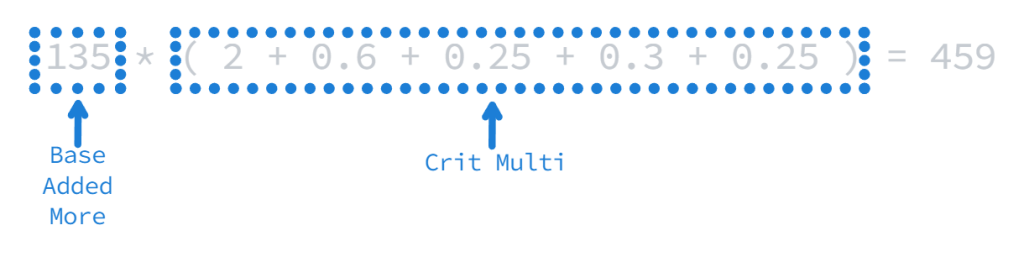
Penetration/Shred
This is the last step for this particular equation before we add the two damage types together. In this case, we can ignore Physical Damage because we have no Shred or Penetration for it, so it stays the same from the last step. Fire Damage, however, does have two sources:

Adding The Damage Types Together
Finally we get the finished product by adding together our Fire Damage and Physical Damage:
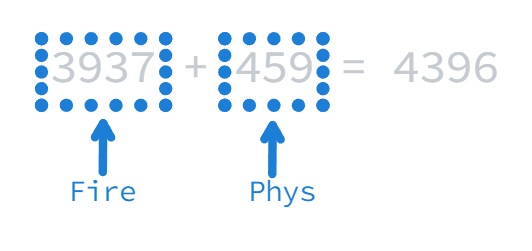
Don't forget that our damage is subject to both a 20% Damage Variance and Enemy Damage Mitigation, so you probably won't be seeing this exact number in game!
Overview
- Skill - Hail of Arrows
- Base Damage - 1 Physical
- Added Damage - 45 Bow Physical, 19 Bow Fire, 5 Bow Physical
- Added Damage Effectiveness - 300%
- Increased Damage - 100% Physical, 60% DoT, 96% DoT, 50% Bow, 80% Dexterity
- More Damage - 40%, 60% Bow, 90%
- Pen/Shred - None
- Increased Damage Taken - None
- Conversion - Cold Damage
This example uses Hail of Arrows, A DoT Bow Attack with good multipliers that, with the node Crystal Arrows, can also convert our Base Damage and all of our Added Damage to Cold Damage. Three sources of Base Damage are converted (2 Physical, 1 Fire), and that Damage is be scaled by a very high 300% Added Damage Effectiveness. We have multiple sources of Increased Damage, but not all apply in this scenario. We also have three sources of More Damage from Hail of Arrows, but no Penetration or Shred.
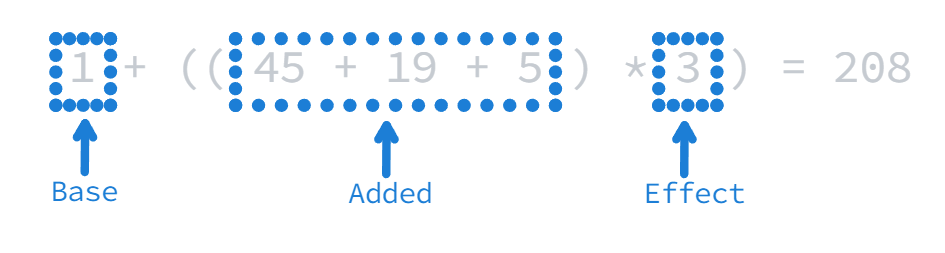
Base, Added, and Effectiveness
Start by putting together the Base Damage and Added Damage, but first consider how Crystal Arrows is converting Damage. Fortunately this is an easy one since it converts all Base Damage and Added Damage to Cold Damage. This means that we can treat all of our sources as Cold Damage which makes the calculations much easier. Thanks to Hail of Arrows' Added Damage Effectiveness we need to multiply our Added Damage by 300%:
Increased
Next, multiply the sum of Added and Base Damage by Increased Damage. Our DoT and Bow Damage apply since Hail of Arrows has both tags. However since we converted our Base and Added Damage to Cold Damage, our Increased Physical Damage no longer counts. We also have 20 Dexterity which provides Hail of Arrows with 4% Increased Damage per point of Dexterity (so 80% total). Remember that sources of Increased Damage are additive with each other which is reflected in the equation:
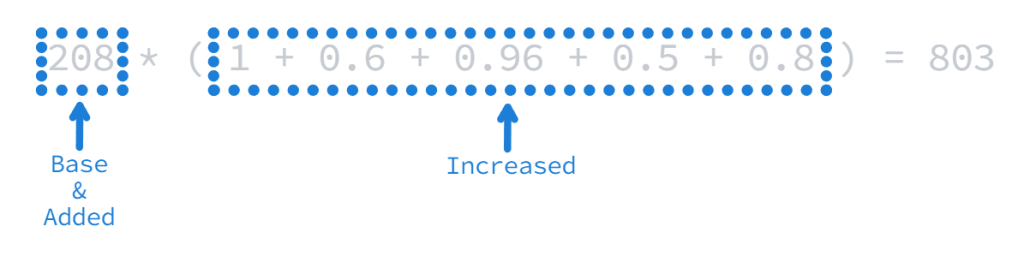
More
We have three multipliers. Two are universal and therefore apply to all damage from Hail of Arrows. The third is Bow Damage, which also applies to all of our damage in this scenario:
We have no more damage to consider so our calculation is complete. Don't forget that our damage is still subject to Enemy Damage Mitigation (DoTs are not subject to Damage Variance), so you probably won't be seeing this exact number in game!
Overview
- Skill - Flame Reave
- Base Damage - 39 Fire
- Added Damage - NA
- Added Damage Effectiveness - NA
- Increased Damage - 75% Fire, 70% Fire, 25% Fire Damage Over Time
- More Damage - 80% Fire, 32% Melee, 80% Melee
- Pen/Shred - 9% Fire, 25% Fire
- Increased Damage Taken - None
- Chance To Apply Ignite - 200% On Melee Hit
For this example, we're going to use the same Flame Reave setup as we did in the Hit Case Example, except this time we are looking at the Ignite portion. Flame Reave has 15 Base Fire Damage and 150% Added Damage Effectiveness, but this doesn't apply to Ailments. Instead we use the Base Damage of Ignite (39). We take the Skill nodes Heat Wave, Arcane Severance, and Ember Infusion for 80% More Fire Damage, 32% More Melee Damage, and 80% More Melee Damage respectively. Our weapon is Eye of Reen which has 38 Melee Physical and 45 Melee Fire damage, but just like Base Damage this won't come into play for Ailments. Assume that we have five stacks of Reen's Ire, which gives us 25% Fire Damage Over Time. We're also wearing Rahyeh's Light which gives 75% Fire Damage, and a Pyromancer's Bone Amulet with 9% Fire Penetration and 70% Fire Damage. Finally we have one applicable Blessing: 20% Breath of Cinders. Assume 5 stacks of Shred. We also have 200% Chance to Ignite on Melee Hit from Eye of Reen which comes into play at the end.
Base, Added, and Effectiveness
Ailments do not use a Skill's Base Damage nor do they scale with Added Damage. Instead they have their own Base Damage, which for Ignite is 39 Fire Damage.
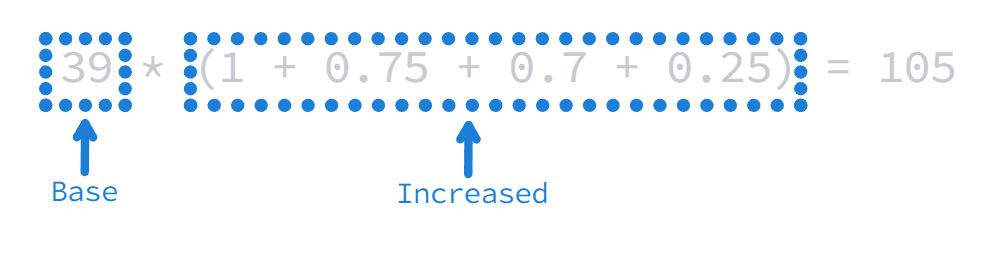
Increased
Next multiply the Base Damage of Ignite by our Increased Damage. Fortunately all of our sources of Increased Damage are Fire and/or Damage Over Time, so they all apply to our Ignites.
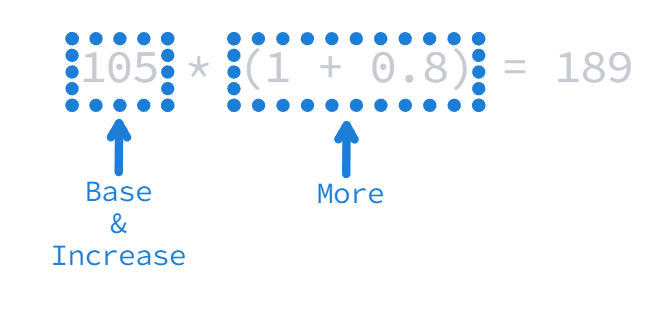
More
While there are three multipliers, two are for Melee Damage which don't apply. Only our multiplier for Fire Damage scales our Ignites:
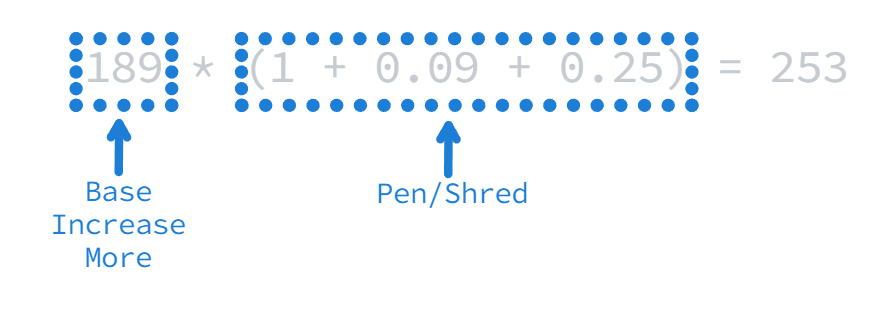
Penetration/Shred
We have one source of Penetration and one source of Shred that we need to add together and then multiply our damage from. Remember that we're also assuming 10 stacks of Shred on a non-boss enemy here, so we end up with 25% Fire Resistance Shred to go along with our 9% Fire Penetration. The enemy has no Fire Resistance so we don't need to factor that in.
Ignite Stacks
For our final step we need to know how many stacks of Ignite are on the enemy, then scale our damage accordingly. This is a simple step of multiplying our damage by the number of stacks we have on the enemy. Let's assume we have 10 stacks:

We have no more damage to consider so our calculation is complete. Don't forget that our damage is still subject to Enemy Damage Mitigation (DoTs are not subject to Damage Variance), so you probably won't be seeing this exact number in game!
Summary
- Added, Increased, and More Damage are your foundational damage stats.
- More Damage is a powerful multiplier that is necessary in pretty much all builds.
- Be aware of Added Damage Effectiveness when trying to determine the value of Added Damage.
- Damage Types and Ability Types determine how you can scale your damage.
- There are multiple sources of Damage Over Time, including Ailments, so make sure you know where it's coming from and how to scale it.
- Damage Conversions can be tricky because they don't all work the same. Read carefully and make sure you know exactly how it works for whatever source you're using.
- Minions do not scale with your own stats. They have their own that you need to focus on with Minion builds.
- Damage Variance and Enemy Damage Mitigation can make in game damage look very different from calculations. Make sure to account for these.
- Don't trust the Skill DPS Tooltip.
Video
Credits
Written by McFluffin.
Reviewed by Facefoot, Lizard_IRL, Raxxanterax.