Guardian Rank Progression
Last Updated:February 4, 2025|Changelog
To progress and unlock great Weapons and Armor you need to understand Destiny 2's Guardian Ranks and Power progression systems. This applies whether you're a freshly risen Guardian new to Destiny 2, or a returning player who understandably doesn't recognize modern Destiny 2 after half a decade. While most people think of progression as getting really great Weapons or Armor to make all-powerful builds, there's progression steps before that.
Players should prioritize Guardian Rank 6. You start at Rank 1 and progress to Rank 6 to unlock essential build crafting components. Aim to passively raise your Character's Power in order to gain access to and eventually get slightly stronger within certain Power Enabled activities.
Guardian Rank Progression
Prioritize reaching new Guardian Ranks until you reach Guardian Rank 6 to unlock essential build-crafting components like Armor Mods, Weapon Mods and Subclass Fragments, and earn Loadout Slots along the way.
View your current Guardian Rank and the requirements for reaching the next one in the Journey tab.
After completing all required tasks for a Rank, meditate at the Ironwood Tree in the Tower to graduate to the next Guardian Rank.
Your Guardian Rank displays next to your name for all players to see.
- Guardian Ranks 7 through 11 are cosmetic and do not unlock new features. These reset back to Guardian Rank 6 seasonally.
- Completing certain challenges within these Ranks permanently unlocks additional sets of additional Loadout Slots. You won't need these for a while, though.
This is the fastest way to get stronger in Destiny 2.
Guardian Rank Requirements
Guardian Rank 2 Requirements
- Complete the "A Guardian Rises" Quest in the Cosmodrome.
Reaching Guardian Rank 2 permanently unlocks Ghost Mods. Ignore this for now. You can't do anything with these until you find a new Ghost Shell.
- Ghost Mods - placed in your Ghost - grant a variety of minor passive looting bonuses, like increasing how much Glimmer or Experience you get.
Guardian Rank 3 Requirements
- Go to the EDZ and meet Devrim Kay. While in the EDZ, do 3 Public Events.
- Public Events appear all over each destination. View incoming Public Events through the destination's world-map.
- Go to Nessus and meet Failsafe. While on Nessus, do a Patrol and complete 2 Lost Sectors
- Patrols task you with completing an objective within the area, find them by pulling out your Ghost.
- Lost Sectors are closed off instances that contain dozens of Combatants and a Boss. Defeat the boss to open up a Chest at the end, which completes the Lost Sector.
- Find Lost Sectors on the world-map by looking for this Lost Sector of Earth icon.
- Complete the (free) opening Campaign Mission for The Final Shape and meet the Traveler's Pale Heart's primary Vendor.
Reaching Guardian Rank 3 permanently unlocks Triumphs.
- Triumphs are achievements, completing them rewards Triumph Score and potentially Lore Entries or items.
Guardian Rank 4 Requirements
- Complete the "Learning Light" quest in the Cosmodrome.
- Collect 20,000 Glimmer
- Public Events and Patrols are a great source of Glimmer!
- Purchase 2 Aspects and 3 Fragments from Ikora in the Tower to enhance your Subclass.
- Complete a Light Subclass quest from Ikora in the Tower to unlock a new Subclass.
- Talk to Banshee-44 in the Tower, purchase a Bounty from him and complete it. Purchase a Weapon from him as well.
- Apply Shaders to Weapons or Armor 3 times.
- Purchase the Year 1 Shader Bundle in the Archive Section of the Eververse store for a practically free 1000 Glimmer and get a ton of color options!
- Apply an Economic or Tracking mod to your Ghost Shell.
Reaching Guardian Rank 4 permanently unlocks additional Subclass Fragments.
Guardian Rank 5 Requirements
- Obtain Riskrunner and its Catalyst from the final new player Cosmodrome quest. Complete the Catalyst by getting kills with Riskrunner.
- Complete a Subclass Mastery Quest, obtain these from Ikora in the Tower.
- Find 9 different Legendary Weapons and 10 different pieces of Legendary Armor.
- Complete 2 Pathfinder Nodes. Complete a Vanguard Ops Strike, and complete at least 2 of those bounties.
- Send Commendations to players twice.
- Click on a player in the post-activity-results screen to pull up the Commendations menu.
- Talk to Shaxx in the Tower to learn about Destiny 2's PvP, the Crucible.
- Talk to the Drifter in the Tower to learn about Destiny 2's Gambit activity.
Reaching Guardian Rank 5 permanently unlocks Armor Mods and Fireteam Finder, an in game Looking For Group - LFG.
- Use Fireteam Finder to find or join players to complete non-matchmade activities.
- Slot Armor Mods into your Armor to make yourself stronger!
- I highly recommend Resilience Mods early on.
Guardian Rank 6 Requirements
- Talk to Saint-14 in the Tower to learn about the Trials of Osiris PvP gamemode.
- Accessing the Trials of Osiris requires ownership of the current yearly Expansion!
- Reach the Soft Power Cap (1940 Character Power Level)
- Before you reach the Soft Power Cap, all newly obtained gear has a higher Power level.
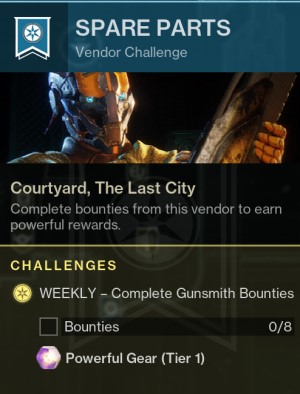
- Complete 2 Vendor Weekly Challenges.
- Most commonly, challenges that Tower NPCs have to complete 8 bounties in a week.
- Reach Rank 7 on the Season Pass, and complete 4 Seasonal Challenges.
- Seasonal Challenges grant massive amounts of XP.
- Obtain the current Seasonal Artifact, activate 3 Perks on it and raise its provided Power bonus to 3.
- Seasonal Artifacts become more powerful as you gain XP, giving you a passive Power bonus and allowing you to freely add up to 12 gameplay altering Artifact Perks to your build.
- Equip Armor Mods to your Helmet, Arms, Chestpiece, and Legs.
- Upgrade a piece of Armor's Tier - aka Masterwork - twice.
- Upgrading Armor Tier grants that Armor more Energy used to insert Armor Mods.
- Fully upgrading a piece of Armor's Tier "Masterworks" it, granting that Armor +2 to all Stats.
- Upgrade a Legendary Weapon's Tier - aka Masterwork - twice.
- Upgrading a Weapon's Tier gives it an additional Stat point.
- Fully upgrading a Weapon's Tier "Masterworks" it.
- Upgrading a Weapon's Tier isn't important early on!
- Earn an Enhancement Prism once.
- Rahool's Material Exchange in the Tower lets you purchase Enhancement Prisms for Enhancement Cores and Glimmer.
- Unlock the ability to Craft Weapons by completing the (free) “The Arrival” Witch Queen Campaign Mission and completing “The Relic” quest.
- Learn more about Weapon Crafting from our dedicated guide!
Reaching Guardian Rank 6 permanently unlocks Weapon Mods and Titles.
- Weapon Mods slightly increase a Legendary Weapon's performance.
- Titles are cosmetics displayed under your username, earned by completing various series of Triumphs.
Power Level Progression
Power Level in Destiny 2 is similar to Gear Score systems present in other MMOs, though here it is significantly less impactful. Increasing your Power Level is only important for accessing Power Enabled activities!
While you should gradually work on increasing your Power Level, it's not important enough to prioritize unless you're immediately looking to play some of the game's harder content.
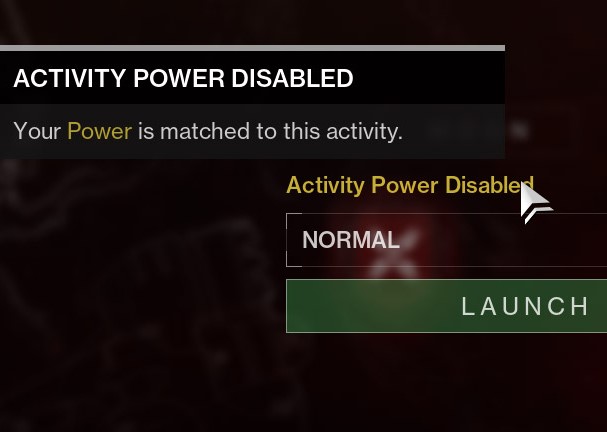
Power Disabled Activities
Many Activities in Destiny 2 are Power Disabled.
Here, Power Level is not taken into account, and all players face the same level of challenge regardless of whether they're at the Power Level Floor or the Pinnacle Cap.
Power Disabled Content includes:
- All Campaign Missions, regardless of their difficulty.
- The Crucible, (PvP) other than the Trials of Osiris.
- Seasonal Story Missions.
- Certain Legacy Content.
- Free-Roam Content.
Raising Your Power Level
Your Character's Power Level - Power for Short - is the average Power Level between your 3 equipped Weapons and your 5 pieces of equipped Armor, plus whatever bonus the Artifact is giving you.
Legendary or Exotic Weapons and Armor can be Infused, transferring the Power Level from 1 piece of gear to another that's in the same slot while destroying the gear with the higher Power Level. You can't infuse a Helmet into a Weapon, or Legs into a Class Item.
- Infusion requires Upgrade Modules, which are easily obtained from Banshee-44 in the Tower, as well as rewards from certain sources.
- Infusion allows you to use any Legendary or Exotic piece of Equipment anywhere in the game, regardless of when you obtained it and whatever Power Level it dropped as!
The infamous "Sunsetting" from Year 4 of Destiny 2 has been undone with the release of The Final Shape. Legacy Items can be Infused once more. Veteran Players, check your Vaults!
Obtain Weapons and Armor with higher Power to raise your Character's Power. How you do that depends on your current maximum Power. Character Power is Account based, applying to all 3 Characters!
The Power Level of dropped Weapons and Armor is dependent on the highest Character Power you'd be able to reach if you were to equip only your highest Power Level items on a single Character. You don't actually need to use your most recently acquired high-Powered Weapon or Armor Piece to get even higher Power gear, you can even leave them in your Vault!
As of The Final Shape Expansion, the Power Level Floor is 1900. All things have at least that high of a Power Level.
| Soft Cap | 1960 Power Level | While under 1960 Power, ALL Weapon and Armor Drops have a higher Power Level than your current Character Power Level. |
| Powerful Cap | 2010 Power Level | While over 60 and under 2020 Power, only "Powerful" drops of Weapons and Armor have a higher Power Level than your current Character Power Level. |
| Hard Cap - aka Pinnacle Cap | 2020 Power Level | While over 2010 Power, only "Pinnacle" drops of Weapons and Armor have a higher Power Level than your current Character Power Level. |
Power Enabled Activities
Many Activities in Destiny 2 are Power Enabled.
Here, Power is taken into account, up to the Power Cap which is dependent on the Activity's difficulty.
The further below the Power Cap you are, the harder the Activity is.
While at or above the Power Cap, the content is as easy as it can possibly be.
- Within Fireteams, the player with the highest Power Level is considered the Power Leader.
- All other players with a Power Level under the Activity's Power Cap are brought up to 5 Levels under the Power Leader's Power Level.
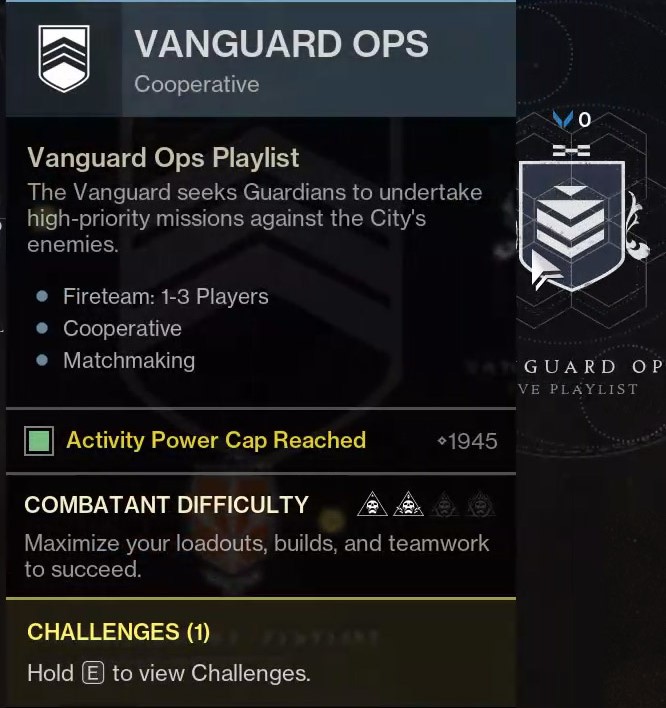
| Difficulty Tiers | Activity Power Cap | Included Activities |
|---|---|---|
| Standard Difficulty | 1945 | Vanguard Ops (Strikes), Seasonal Activities, Exotic missions, Standard Raids and Dungeons |
| Advanced Difficulty | 1995 | Standard Nightfalls |
| Expert Difficulty | 2025 | Expert Nightfalls, Rotating Lost Sectors, Harder Seasonal Activities, Exotic Missions |
| Master Difficulty | 2030 | Master Nightfalls, Master Rotating Lost Sectors, Master Raids and Dungeons |
| Grandmaster Difficulty | 2040 | Grandmaster Nightfalls |
| Contest Mode | 1995 | Newly released Raids and Dungeons within the first 48 Hours. |
Summary
- Before you seek to make an all-powerful build in Destiny 2, you need to get essential build-crafting systems and activities unlocked.
- Prioritize reaching Guardian Rank 6 to unlock essential build-crafting systems like Armor Mods, Weapon Mods, and Subclass Fragments.
- Raise your Character's Power Level over time to unlock new Power Enabled Activities and get slightly stronger within them.
- Your Character's Power Level is the average Power Level of all equipped Weapons and Armor.
- Use Infusion to raise the Power Level of Legendary or Exotic Weapons and Armor. Using Upgrade Modules, transfer the Power Level from 1 piece of gear to another that's in the same slot while destroying the gear with the higher Power Level.
- Sunsetting is no more. You can raise the Power Level of Legacy Weapons and Armor if you have any.
- Use Infusion to raise the Power Level of Legendary or Exotic Weapons and Armor. Using Upgrade Modules, transfer the Power Level from 1 piece of gear to another that's in the same slot while destroying the gear with the higher Power Level.
- While in a Fireteam, the player with the highest Power Level is the Power Leader. All players with a lower Power Level are raised to 5 Levels below the Power Leader's.
- Many Activities are Power Disabled. Power Level is wholly irrelevant for them.
- Your Character's Power Level is the average Power Level of all equipped Weapons and Armor.
Our First Steps guide takes you through everything you need to get started in Destiny 2.
Credits
Written by: Xtra37
Reviewed by: Byrdman, Tenkiei