Flasks Guide
Last Updated:June 13, 2025|Changelog
Flasks are rechargeable consumable items that restore your Life, Mana or give your character important buffs. They are important for every character and even define certain builds. As you reach endgame activities, you need to carefully consider which Flasks align with your build for survivability and damage. Ignoring Flasks is a critical mistake that some new players make, but don't worry! We have you covered in this guide! Check out our Flasks for Beginners Guide for the basics.
Flask Charges
When you use a Flask, it consumes a number of charges. For example, a Granite Flask has 60 charges and using it consumes 30 charges. This is important because there are some modifiers that make using Flasks more efficient, such as increasing the maximum number of charges, or decreasing the charges used when activated.
Flasks recharge when you kill monsters, or you return to town. In practice this means, your Flasks continuously recharge as you smash your way through the hordes of monsters you encounter.
There are also other unique ways to recharge Flasks. Pathfinder's Ascendancy Nature's Adrenaline, the Unique Timeless Jewel Brutal Restraint of Balbala with the Traitor Keystone and the Unique Flask The Overflowing Chalice are examples of alternative ways to regain Flask charges.
When you are low on Flask charges, burning a Portal Scroll is a valid strategy for recharging them. The Surgeon's Flasks, or those with the Charges Gain when Hit prefix, can be refilled depending on other conditions, but are less consistent than other options.
The number of charges gained from any Prefix can be crafted with Orb of Alteration and Orb of Augmentation with modifiers #% increased/reduced Flask Charges gained (e.g. from equipment and passive skills) and #% increased/reduced Charge Recovery.
Flask Recovery
You can use Flasks to recover your Life with a Life Flask or your Mana with a Mana Flask. A Flask's recovery depends on three factors:
- #% increased/reduced Amount Recovered causes a Flask to recover an increased/reduced amount of Life /Mana.
- #% reduced Recovery Rate causes a Flask to recover the same total amount at a slower rate.
- #% increased Recovery Rate causes a Flask to recover the same total amount at a faster rate.
- Instant Recovery causes a Flask to restore the whole amount instantly by overriding the duration to 0.
Flask charges are refilled in several ways:
- Killing normal monsters grants 1 Charge, magic monsters grants 3.5 Charges rare monsters grants 6 Charges, and unique monsters grant 11 Charges.
- Pathfinder's ascendancy node Nature's Adrenaline recovers charges over time.
- Precision Watcher's Eye.
- Flask Charges gained this way can only occur once every 100ms and gives a charge to one Flask at a time.
- Prefixes on Utility Flasks mainly alter number of charges, duration and effectiveness:
- (27-23)% reduced duration, 25% Increased Effect - Alchemist's prefix.
- Gain 3 Charges when you are Hit by an Enemy - Flagelant's prefix.
- (11–35)% chance to gain a Flask Charge when you deal a Critical Strike - Surgeon's prefix.
- (16–19) to Maximum Charges - Level 2
- (20–23) to Maximum Charges - Level 22
- (24–27) to Maximum Charges - Level 42
- (28–31) to Maximum Charges - Level 62
- (32–35) to Maximum Charges - Level 82
- (16–20)% increased Charge Recovery - Level 23
- (21–25)% increased Charge Recovery - Level 36
- (26–30)% increased Charge Recovery - Level 52
- (31–45)% increased Charge Recovery - Level 68
- (46–50)% increased Charge Recovery - Level 84
- (37–42)% increased Charge Recovery - Level 20
- 25% reduced effect
- (43–48)% increased Charge Recovery - Level 36
- 25% reduced effect
- (49–54)% increased Charge Recovery - Level 52
- 25% reduced effect
- (55–60)% increased Charge Recovery - Level 68
- 25% reduced effect
- (61–66)% increased Charge Recovery - Level 84
- 25% reduced effect
- (11-15)% chance to gain a Flask Charge when you deal a Critical Strike - Level 8
- (16-20)% chance to gain a Flask Charge when you deal a Critical Strike - Level 26
- (21-25)% chance to gain a Flask Charge when you deal a Critical Strike - Level 44
- (26-30)% chance to gain a Flask Charge when you deal a Critical Strike - Level 62
- (31-35)% chance to gain a Flask Charge when you deal a Critical Strike - Level 80
- Gain 1 Charges when you are Hit by an Enemy - Level 29
- Gain 2 Charges when you are Hit by an Enemy - Level 63
- Gain 3 Charges when you are Hit by an Enemy - Level 80
- (33–38)% reduced Duration - Level 20
- 25% increased effect
- (33–38)% reduced Duration - Level 50
- 25% increased effect
- (33–38)% reduced Duration - Level 80
- 25% increased effect
- (16–20)% increased Duration - Level 20
- (21–25)% increased Duration - Level 36
- (26–30)% increased Duration - Level 52
- (31–35)% increased Duration - Level 68
- (36–40)% increased Duration - Level 84
- (14–16)% reduced Charges per use - Level 14
- (17–19)% reduced Charges per use - Level 31
- (20–22)% reduced Charges per use - Level 48
- (23–25)% reduced Charges per use - Level 65
- (26–28)% reduced Charges per use - Level 82
Flask Effect
During the activation of a Flask, a temporary effect is granted. This includes implicit modifiers on utility Flasks, certain Flask suffixes, as well as modifiers on Unique Flasks.
The gold border around the icon of a Flask indicates that the effect is Flask-based and active!
- (41–45)% increased Armour during Flask effect - Level 6
- (46–50)% increased Armour during Flask effect - Level 32
- (51–55)% increased Armour during Flask effect - Level 58
- (56–60)% increased Armour during Flask effect - Level 84
- (41–45)% increased Evasion Rating during Flask effect - Level 6
- (46–50)% increased Evasion Rating during Flask effect - Level 32
- (51–55)% increased Evasion Rating during Flask effect - Level 58
- (56–60)% increased Evasion Rating during Flask effect - Level 84
- (6–8)% increased Movement Speed during Flask effect - Level 5
- (9–11)% increased Movement Speed during Flask effect - Level 65
- (12–14)% increased Movement Speed during Flask effect - Level 85
- (51–56)% increased Block and Stun Recovery during Flask effect - Level 1
- (57–62)% increased Block and Stun Recovery during Flask effect - Level 19
- (63–68)% increased Block and Stun Recovery during Flask effect - Level 37
- (69–74)% increased Block and Stun Recovery during Flask effect - Level 55
- (75–80)% increased Block and Stun Recovery during Flask effect - Level 73
- (21–24)% additional Elemental Resistances during Flask effect - Level 1
- (25–28)% additional Elemental Resistances during Flask effect - Level 21
- (29–32)% additional Elemental Resistances during Flask effect - Level 41
- (33–36)% additional Elemental Resistances during Flask effect - Level 61
- (37–40)% additional Elemental Resistances during Flask effect - Level 81
- 0.4% of Attack Damage Leeched as Life during Flask effect - Level 10
- 0.5% of Attack Damage Leeched as Life during Flask effect - Level 20
- 0.6% of Attack Damage Leeched as Life during Flask effect - Level 40
- 0.7% of Attack Damage Leeched as Life during Flask effect - Level 60
- 0.8% of Attack Damage Leeched as Life during Flask effect - Level 80
- 0.4% of Spell Damage Leeched as Energy Shield during Flask effect - Level 10
- 0.5% of Spell Damage Leeched as Energy Shield during Flask effect - Level 20
- 0.6% of Spell Damage Leeched as Energy Shield during Flask effect - Level 40
- 0.7% of Spell Damage Leeched as Energy Shield during Flask effect - Level 60
- 0.8% of Spell Damage Leeched as Energy Shield during Flask effect - Level 80
- (26–31)% increased Critical Strike Chance during Flask Effect - Level 18
- (32–37)% increased Critical Strike Chance during Flask Effect - Level 34
- (38–43)% increased Critical Strike Chance during Flask Effect - Level 50
- (44–49)% increased Critical Strike Chance during Flask Effect - Level 66
- (50–55)% increased Critical Strike Chance during Flask Effect - Level 82
- (19–22)% chance to Freeze, Shock and Ignite during Flask effect - Level 12
- (23–26)% chance to Freeze, Shock and Ignite during Flask effect - Level 32
- (27–30)% chance to Freeze, Shock and Ignite during Flask effect - Level 52
- (31–34)% chance to Freeze, Shock and Ignite during Flask effect - Level 72
- (16–21)% Chance to Avoid being Stunned during Flask Effect - Level 12
- (22–27)% Chance to Avoid being Stunned during Flask Effect - Level 29
- (28–33)% Chance to Avoid being Stunned during Flask Effect - Level 46
- (34–39)% Chance to Avoid being Stunned during Flask Effect - Level 63
- (40–45)% Chance to Avoid being Stunned during Flask Effect - Level 80
- (36–41)% reduced Effect of Chill on you during Flask Effect & reduced Freeze Duration on you during Flask Effect - Level 4
- (42–47)% reduced Effect of Chill on you during Flask Effect & reduced Freeze Duration on you during Flask Effect - Level 23
- (48–52)% reduced Effect of Chill on you during Flask Effect & reduced Freeze Duration on you during Flask Effect - Level 42
- (53–59)% reduced Effect of Chill on you during Flask Effect & reduced Freeze Duration on you during Flask Effect - Level 61
- (60–65)% reduced Effect of Chill on you during Flask Effect & reduced Freeze Duration on you during Flask Effect - Level 80
- (36–41)% reduced Effect of Shock on you during Flask Effect - Level 6
- (42–47)% reduced Effect of Shock on you during Flask Effect - Level 25
- (48–52)% reduced Effect of Shock on you during Flask Effect - Level 44
- (52–59)% reduced Effect of Shock on you during Flask Effect - Level 63
- (60–65)% reduced Effect of Shock on you during Flask Effect - Level 82
- (36–41)% reduced Effect of Curses on you during Flask Effect - Level 8
- (42–47)% reduced Effect of Curses on you during Flask Effect - Level 27
- (48–52)% reduced Effect of Curses on you during Flask Effect - Level 46
- (52–59)% reduced Effect of Curses on you during Flask Effect - Level 65
- (60–65)% reduced Effect of Curses on you during Flask Effect - Level 84
- (31–35)% chance to Avoid being Chilled during Flask Effect & chance to Avoid being Frozen during Flask Effect - Level 4
- (36–40)% chance to Avoid being Chilled during Flask Effect & chance to Avoid being Frozen during Flask Effect - Level 23
- (41–45)% chance to Avoid being Chilled during Flask Effect & chance to Avoid being Frozen during Flask Effect - Level 42
- (46–50)% chance to Avoid being Chilled during Flask Effect & chance to Avoid being Frozen during Flask Effect - Level 61
- (51��–55)% chance to Avoid being Chilled during Flask Effect & chance to Avoid being Frozen during Flask Effect - Level 80
- (31–35)% chance to Avoid being Ignited during Flask Effect - Level 6
- (36–40)% chance to Avoid being Ignited during Flask Effect - Level 25
- (41–45)% chance to Avoid being Ignited during Flask Effect - Level 44
- (46–50)% chance to Avoid being Ignited during Flask Effect - Level 63
- (51–55)% chance to Avoid being Ignited during Flask Effect - Level 82
- (31–35)% chance to Avoid being Shocked during Flask Effect - Level 6
- (36–40)% chance to Avoid being Shocked during Flask Effect - Level 25
- (41–45)% chance to Avoid being Shocked during Flask Effect - Level 44
- (46–50)% chance to Avoid being Shocked during Flask Effect - Level 63
- (51–55)% chance to Avoid being Shocked during Flask Effect - Level 82
The following veiled suffixes come from unveiling the Flask from defeating Catarina the Mastermind. Keep in mind that you can only get one out of three veiled modifiers each time she drops the Flask!
- Regenerate 3% of Life per second during Flask Effect
- 50% Chance to Avoid being Stunned during Flask Effect
- (20–30)% increased Rarity of Items found during Flask Effect
- 15% of Damage Taken from Hits is Leeched as Life during Flask Effect
- (60–80)% reduced Reflected Damage taken during Flask Effect
Types of Flasks
Flasks that see use in the majority of builds include Divine Life Flask, Quicksilver Flask, Granite Flask, Jade Flask and Silver Flask. But you can’t just copy and paste the Flasks being used between builds. The Modifiers on your Flasks make all the difference and you should carefully consider your options when planning out a build.
Life/Mana Flask Types
- Small Life Flask
- Medium Life Flask
- Large Life Flask
- Greater Life Flask
- Grand Life Flask
- Giant Life Flask
- Colossal Life Flask
- Sacred Life Flask
- Hallowed Life Flask
- Sanctified Life Flask
- Divine Life Flask
- Eternal Life Flask
- Small Mana Flask
- Medium Mana Flask
- Large Mana Flask
- Greater Mana Flask
- Grand Mana Flask
- Giant Mana Flask
- Colossal Mana Flask
- Sacred Mana Flask
- Hallowed Mana Flask
- Sanctified Mana Flask
- Divine Mana Flask
- Eternal Mana Flask
Hybrid Flask Types
- Small Hybrid Flask
- Medium Hybrid Flask
- Large Hybrid Flask
- Colossal Hybrid Flask
- Sacred Hybrid Flask
- Hallowed Hybrid Flask
Utility Flask Types
- Quicksilver Flask
- Bismuth Flask
- Ruby Flask
- Sapphire Flask
- Topaz Flask
- Amethyst Flask
- Aquamarine Flask
- Diamond Flask
- Granite Flask
- Jade Flask
- Quartz Flask
- Sulphur Flask
- Basalt Flask
- Silver Flask
- Stibnite Flask
- Corundum Flask
- Gold Flask
- Iron Flask
Crafting
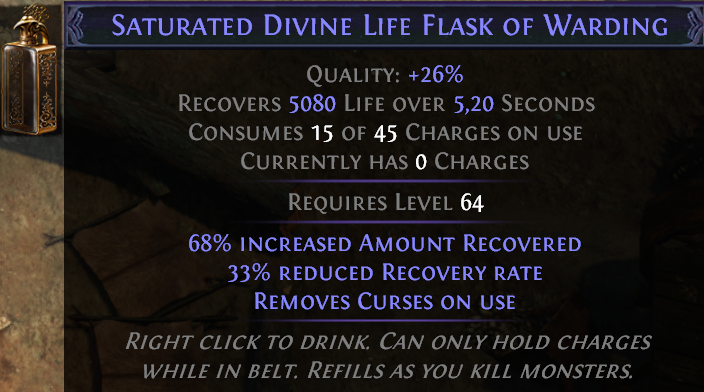
In addition to restoring Life or Mana, some Magic mods can change the behavior of a Flask. Other mods provide extra utilities, such as removing curses or ailments. Keep in mind that the Item Level of your Flask determines how high your mods can roll.
At Level 60 you can use a Divine Life Flask, which is the first Life Flask tier to fully invest in. Look out for a normal-rarity base, use 4x Glassblower's Bauble and then craft it until you hit Instant Recovery when on Low Life. This turns your Life Flask into a panic button that significantly heals you when you have less than 50% of your Life left.
Your Flask choices are just as important as any piece of gear you’re wearing. Some character build problems can easily be solved by prioritizing certain mods on your Flasks. Don’t forget your Flasks if you find yourself struggling in certain content! An example of this could be taking a Ruby Flask or two into your fight with the Searing Exarch since he deals fire damage!
Problem: You are cursed by a Diabolist, which can happen very often and want to get rid of it.
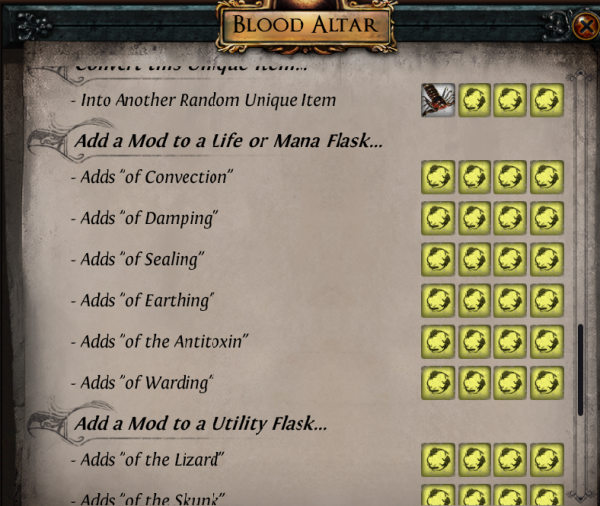
Solution: Crafting "Remove a Curse on use" Suffix "of Warding" on your Life/Mana or Utility Flask, with your Orb of Alteration and Orb of Augmentation or the Einhar beast crafting method at your Menagerie.

To enter the Menagerie, you have to complete the first Einhar Quest in Act 2.
The Blood Altar is part of the Bestiary league mechanic and is located in the Menagerie. This is a great tool to target-craft specific immunity effects on your Flasks and make sure they have an empty suffix!
Enhancing Flask Currency
Glassblower's Bauble
With a Glassblower's Bauble, you can enhance the quality of a Flask. On recovery flasks, quality increases the amount of Life and/or Mana recovered and Utility Flasks gain increased duration instead. Keep in mind that Flask quality stacks with other Flask modifiers that add %effect duration of Flask effects.
Instilling Orb
Instilling Orb is an uncommon currency which begins to drop from anything after Act 4. They are currency items that can be used to add random enchantments to utility Flasks. When certain conditions are met, the Flask automatically activates. The Flasks can still be used by the player regardless of the enchantments.
- Used when an adjacent Flask is used
- Reused at the end of this Flask's effect
- Used when Charges reach full
- Used when you Use a Guard Skill
- Used when you Use a Travel Skill
- Used when you lose a Guard Skill Buff
- Used when you Hit a Rare or Unique Enemy, if not already in effect
- Used when you become Frozen
- Used when you become Chilled
- Used when you become Shocked
- Used when you become Ignited
- Used when you start Bleeding
- Used when you become Poisoned
- Used when you Block
- Used when you take a Savage Hit (15% of your maximum Life)
- Used when you use a Life Flask
Enkindling Orb
Enkindling Orb is an uncommon currency which begins to drop from anything after Act 4. They are currency items that can be used to add random enchantments to utility Flasks. You no longer gain Charges during this Flasks Effect, but the Flask gets more Charges/a longer duration/increased Effect. The Increased Effect enchantment can be extremely powerful when paired with the chase unique Mageblood as this permanently applies your magic utility flasks to you, regardless of charges.
- (25–35)% reduced Charges per use
- Gains no Charges during Flask Effect
- (60–70)% increased effect
- Gains no Charges during Flask Effect
- (60–80)% increased Charge Recovery
- Gains no Charges during Flask Effect
- (80–100)% increased Duration
- Gains no Charges during Flask Effect
- +(40–60) to Maximum Charges
- Gains no Charges during Flask Effect
Summary
- Flasks can mean the difference between life and death. Use them whenever you can!
- Adjust your Flasks to the build you're playing.
- Crafting and enhancing your Flask is very important.
- Flask charges are mainly gained from kills, but you can also recover them in other ways.
- Flasks are great tools to mitigate ailments and other debuffs on your character.
Credits
Written by Void241
Reviewed by MacroBioBoi.