Loadout Optimizer Guide Destiny 2
Last Updated:July 30, 2024|Changelog
Guardian! Did you know that it's very easy to improve your Armor?
Loadout Optimization is important to all players at all skill levels in all activities. Opting to not do this results in a significantly weaker build for anything you'd ever want to do.
This guide gives you step-by-step instructions on how to use Destiny Item Manager's Loadout Optimizer tool to easily construct Loadouts with optimized Stats.
All Maxroll Destiny 2 Build Guides assume that you're going to do this!
Disclaimer: This guide is based around Destiny Item Manager's Loadout Optimizer, but it's not the only tool which optimizes Loadout Stats. D2ArmorPicker also does this job, though I don't recommend it for newer players. If you already use it and are happy with it, there's no reason for you to switch over. Do what's most comfortable for you.
- Loadout
- A build's Weapons, Armor, Armor Mods, Abilities, Subclass Aspects and Fragments.
- Destiny Item Manager's Loadout Optimizer optimizes a Loadout's Armor while taking Armor Mods and Subclass Fragments into account.
- A build's Weapons, Armor, Armor Mods, Abilities, Subclass Aspects and Fragments.
- Stats
- Mobility, Resilience, Recovery, Discipline, Intellect, and Strength.
- Stat Tier (or Tier)
- Every multiple of 10 points in a single Stat is 1 Stat Tier. Each Stat can have up to 10 Stat Tiers and cannot have less than 0.
- Having over 100 points in a Stat does absolutely nothing.
- There is no difference between an 89 point Strength Stat and an 80 point Strength Stat. The 9 point difference is waste.
- Stat Tier Priority
- Adjustable Stat preferences within Destiny Item Manager's Loadout Optimizer.
- This is prioritized after total Stat Tier. Loadout Optimizer shows you Loadouts that maximize Stats that you've set to be at the top - the highest priority.
- Adjust Stat Tier Priorities as our build guides show to easily follow them!
- Adjustable Stat preferences within Destiny Item Manager's Loadout Optimizer.
Why You Should Care
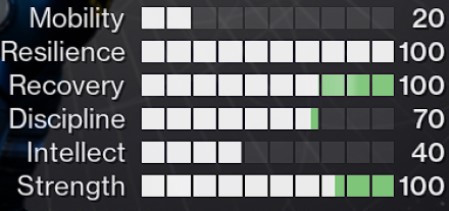
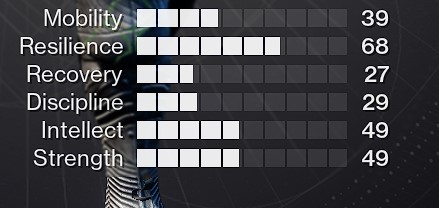
Do your Character's Stats look anything like this image? If so, that's VERY BAD.
- The Loadout in this image wastes 51 Stats.
- That's 5 entire Stat Tiers.
- If optimized, those wasted Stats could easily bring that Resilience Stat to 100.
- That's over 75% more passive damage resistance you're missing out on for absolutely no reason. OPTIMIZE YOUR LOADOUT'S STATS!
Stat Optimization
Creating Loadouts with highly optimized Stats without the help of tools is EXTREMELY math intensive and time consuming. So much so, that using these tools is nearly a requirement for all players. This is where Destiny Item Manager's Loadout Optimizer comes into play. This tool does all the hard Stat math for you so you can spend more time not doing math.
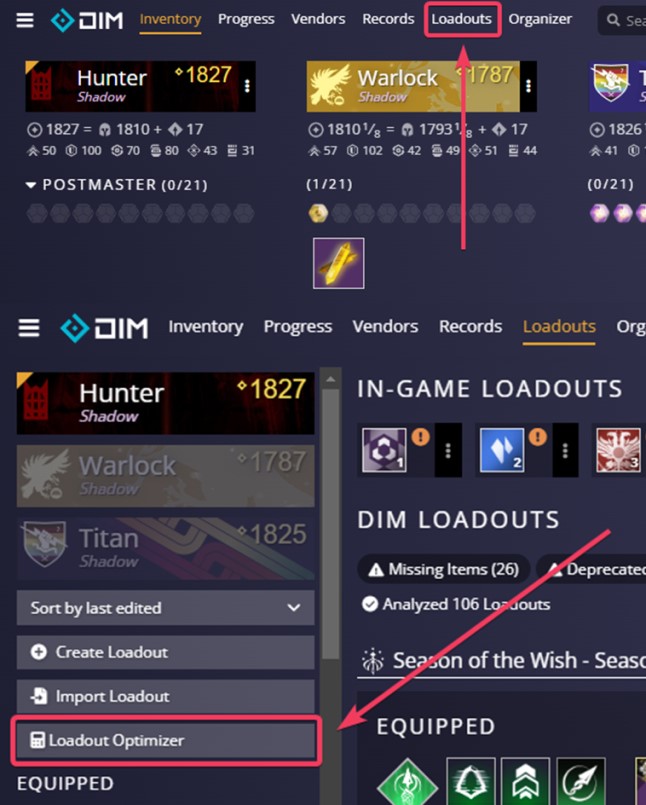
Navigate to the Loadout Optimizer from DIM's Homepage
- Open Destiny Item Manager - aka DIM.
- Sign in to your Bungie Account to give DIM permission to use Destiny 2's API to gain restricted access to your inventory.
- Don't worry, DIM is highly trustworthy. It is incapable of deleting your items, and can't do anything that you don't direct it to do.
- DIM's also great for inventory and Vault management, checking out what Vendors have in stock, as well as viewing your Quests and Collections.
- Navigate to DIM's Loadouts tab, then select "Loadout Optimizer" to begin the process of making highly optimized Loadouts.
Implementing Build Components & Finalizing Settings
- Select the Character you want to make a Loadout for, and the Subclass you plan to use it with.
Select an option for the "Assume Masterwork" setting.
- I recommend selecting "+ Exotic" if you can reasonably obtain multiple Ascendant Shards and Enhancement Prisms. This option yields the excellent results!
- Select "Legendary" or "None" if you can't afford the Ascendant Shards it takes to fully upgrade the tier - Masterwork - of Armor.
- This option yields worse results which should only be used temporarily until you can afford fully Masterworked Armor.
- Fully Masterworking Armor adds 2 points to all 6 Stats.
- Seasoned Guardians that have unlocked everything from the Monument to Lost Lights and have absolutely no other use for Exotic Ciphers should sparingly select "+ Artifice", which accounts for the Artifice Mod that can be added to Exotic Armor, giving it +3 points to any Stat.

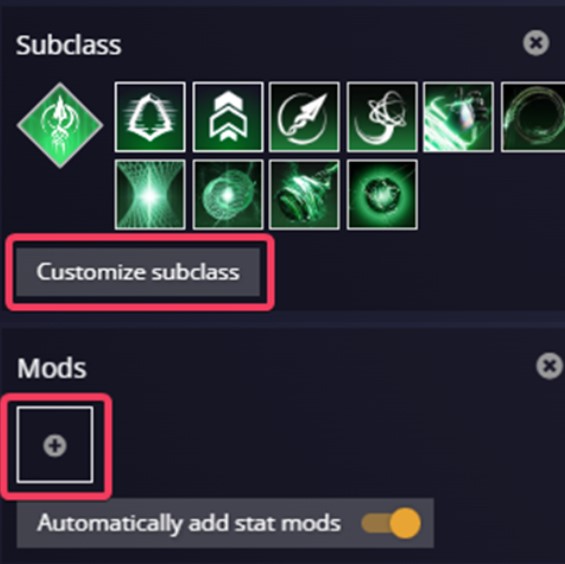
- Click “Customize Subclass” to bring up a menu that allows you to select your Loadout's Abilities, Aspects, and Fragments.
- Various Fragments across the Subclasses increase or in some cases reduce your Stats, influencing Stat Tiers.
- Use the small “Apply” button at the bottom left of the menu to save your selection.
- Click the empty Mod Socket to bring up a menu that allows you to select your Loadout's Armor Mods.
- Allocating more than 6 energy’s worth of Mods into a single piece of Armor prevents the use of some Stat Mods, influencing Stat Tiers.
- Use the small “Apply” button at the bottom left of the menu to save your selection.
Manipulating Stat Tiers & Making The Perfect Loadout
Now that all the setup is done, it's time to start generating some Loadouts. You should understand the following central rules for this:
- Loadout Optimizer prioritizes displaying Loadouts with the highest possible total Stat Tier, displayed with T.
- A T37 Loadout has 37 total Stat Tiers, which is 370 non-wasted Stat points.
- When you have several Loadouts all at the highest possible total Stat Tier, Stat Tier Priority kicks in to prioritize displaying Loadouts with the Stats you've prioritized.
- Use the Up and Down Arrow buttons to adjust Stat Tier Priority and ultimately change what Stats are prioritized first.
- Our build guides all include a Stat Tier Priority. This is the best way to follow that!
- Shift Click to set a Stat's maximum Tier. This overrides Stat Tier Priority.
- This is especially handy when accounting for conditional Stat Tier boosting modifiers, like Font Armor Mods or Lightweight Frame Weapons.

- Uncheck the box next to a Stat to deselect it. This overrides the Loadout Optimizer's highest possible Stat Tier priority rule.
- Deselected stats are grayed out. Total Stat Tier is now displayed in gray text within parentheses, while the total Stat Tier of all selected Stats is displayed with T.
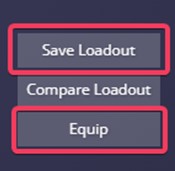
Save or Equip Your New Loadout
WARNING: The “Equip” function is prone to fail if the selected character is currently in an in-game Activity. For best results, use the “Equip” function while the game is closed or while in Orbit, the Tower, or the HELM. If you encounter DIM Errors after using the “Equip” function, try again after going to Orbit, the Tower, the HELM, or closing the game.
- After finding a Loadout that you wish to use, click “Save Loadout” to save it.
- This saves it as a DIM Loadout, which you can equip or adjust at any time.
- Alternatively, clicking “Equip”, causes DIM to immediately begin equipping the Loadout on your character.
Summary
- Optimizing your Loadout's Stats is important to all players at all skill levels in all activities, and requires third-party tools.
- I recommend using Destiny Item Manager's Loadout Optimizer Tool, it's more beginner friendly than other tools.
- Every multiple of 10 points in a single Stat is 1 Stat Tier. Each Stat can have up to 10 Stat Tiers and cannot have less than 0.
- Having over 100 points in a Stat does absolutely nothing.
- There is no difference between an 89 point Strength Stat and an 80 point Strength Stat. The 9 point difference is waste.
- Minimizing wasted Stat points via Loadout Optimization is a surefire way to increase total Stat Tiers, making you stronger.
Credits
Written by: Xtra37
Reviewed by: ShieldMaiden, Tenkiei