Map Reading
Last Updated:May 24, 2023|Changelog
Diablo II: Resurrected is filled with tons of unique Map Areas that can easily confuse rookies and veterans alike. This Map Reading guide helps you to traverse the Sanctuary a little easier. Not only does it help you in playing through the game itself, it also helps you in efficiently traveling to your farming spots.
Like most games with random Map generation, Diablo 2 uses "Map tiles" to create a Map. Think of them as a piece of a big jigsaw puzzle. While the puzzle piece itself can never change, there are nearly infinite arrangements.
Left / Right / Straight
A lot of people playing Diablo 2 use a basic concept that refers to the directions Left, Right, and Straight. We use this concept to indicate the directions your Character must travel to reach their intended location. Each "starting tile" of a Map allows you to only move in a certain direction. Taking the perspective of your Character, you determine what Left, Right, or Straight means.
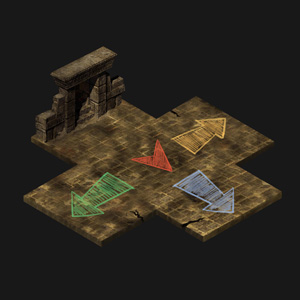
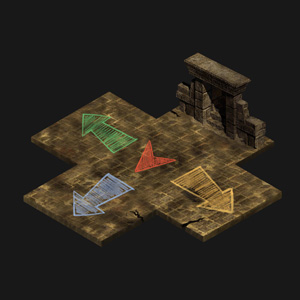
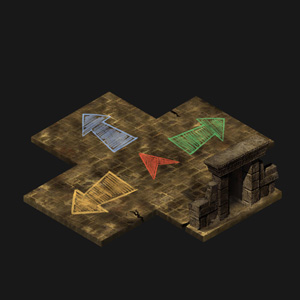
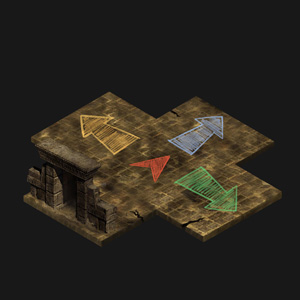
- Red marks your Character and the direction it is facing.
- Yellow = Left
- Green = Right
- Blue = Straight
Basic Example
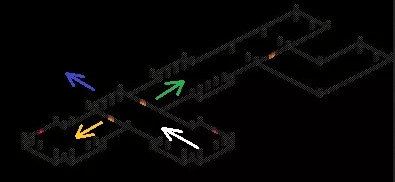
Let's take a look at a practical example - The Forgotten Tower. In Levels 1-4 of this area, the direction of the exit is "Left".
In Example 1 you can see a simple, around the corner Map where the entrance tile is coming from the South-East. Checking the corresponding cross at the top, we know that the exit points towards the South-West.
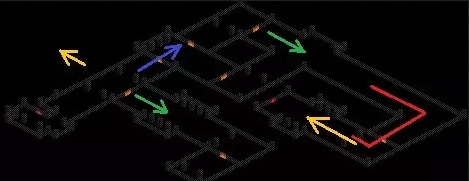
In Example 2 you can see a perfect display of how an exit tile can still spawn in a random location on the Map while keeping its orientation. The entrance tile is coming from the South-West and by proxy, the Exit has to point towards the North-West (Picture #4 above). Moving out of the entrance tile, we never have the chance to make a Left turn. This is commonly referred to as a "backwards" or "three Rights make a Left" Map. We have to make 3 right turns to get to the exit, despite the Map being Left.
Areas using Left / Right / Straight
Within the following Maps, the concept described takes effect. These Maps are pieced together like a jigsaw puzzle, using a number of tiles for their configuration.
| Area | Left | Straight | Right | |
| Cave Level 1 (from Entrance) | Next Level | Coldcrow | - | |
| Mausoleum (from Entrance) | Golden Chest | - | - | |
| Crypt (from Entrance) | Golden Chest Bonebreaker | - | - | |
| Underground Passage Level 1 (from Entrance) | Next Level | Exit | - | |
| The Hole Level 1 (from Entrance) | Next Level | - | - | |
| Forgotten Tower Level 1-4 (from Entrance) | Next Level | - | - | |
| Barracks (from Entrance) | Jail Level 1 or Horadric Malus | Jail Level 1 or Horadric Malus | - | |
| Jail Level 1 (from Entrance) | Waypoint | Next Level | - | |
| Jail Level 1 (from Waypoint) | Next Level | - | Barracks | |
| Jail Level 2 (from Entrance) | Pitspawn Fouldog | Next Level | - | |
| Jail Level 3 (from Entrance) | Exit | - | - | |
| Catacombs Level 2 (from Waypoint) | - | - | Next Level | |
| Area | Left | Straight | Right | |
| Sewers Level 2 (from Entrance) | Waypoint | Next Level | - | |
| Sewers Level 2 (from Waypoint) | Next Level | - | Previous Level | |
| Sewers Level 3 (from Entrance) | Radament | - | - | |
| Stony Tomb Level 1 (from Entrance) | Next Level | - | - | |
| Stony Tomb Level 2 (from Entrance) | Golden Chest | Creeping Feature | - | |
| Halls of the Dead Level 1 (from Entrance) | Next Level | - | - | |
| Halls of the Dead Level 2 (from Entrance) | Next Level | Waypoint | - | |
| Halls of the Dead Level 2 (from Waypoint) | - | Previous Level | Next Level | |
| Halls of the Dead Level 3 (from Entrance) | Bloodwitch the Wild Horadric Cube | - | - | |
| Maggot Lair Level 1-2 (from Entrance) | - | - | Next Level | |
| Maggot Lair Level 3 (from Entrance) | - | Coldworm the Burrower Staff of Kings | - | |
| Ancient Tunnels (from Entrance) | Golden Chest | - | - | |
| Claw Viper Temple Level 1 (from Entrance) | Next Level | - | - | |
| Correct Tal Rasha's Tomb (from Entrance) | Orifice | - | - | |
| "Wrong" Tal Rasha's Tomb (from Entrance) | Golden Chest | Ancient Kaa the Soulless (only in 1 Tomb) | ||
| Area | Left | Straight | Right | |
| Swampy Pits Level 1-2 (from Entrance) | Next Level | - | - | |
| Flayer Dungeon Level 1-2 (from Entrance) | Next Level | - | - | |
| Sewers Level 1 (from Sparkling Chest) | - | - | Next Level | |
| Durance of Hate Level 1 (from Entrance) | Next Level | - | - | |
| Durance of Hate Level 2 (from Entrance) | Waypoint | Next Level | - | |
| Durance of Hate Level 2 (from Waypoint) | Next Level | - | Previous Level | |
| Area | Left | Straight | Right | |
| River of Flame (from Entrance) | Hellforge1 | Waypoint and Chaos Sanctuary | Hellforge1 | |
1) The Hellforge is either Left or Right.
| Area | Left | Straight | Right | |
| Crystalline Passage (From Entrance) | Glacial Trail | Frozen River | Waypoint | |
| Crystalline Passage (from Waypoint) | Previous Area | Glacial Trail | Frozen River | |
| Glacial Trail 1 (from Waypoint or Entrance) | Frozen Tundra | Drifter Cavern | Golden Chest Bonesaw Breaker | |
| Ancients Way (from Entrance) | Arreat Summit | Icy Cellar | Waypoint | |
| Ancients Way (from Waypoint) | Previous Area | Arreat Summit | Icy Cellar | |
| Worldstone Keep Level 2 (from Waypoint) | - | - | Next Level | |
1) In the Glacial Trail, the Waypoint and the entrance point towards the same direction.
Semi-Static Maps
These Maps have a set outside border. Within this border you will find features that always have to be there. The setup of these features follows some restrictions, but also has random elements.
Areas with semi-static layouts:
Blood Moor
- Rectangular border with
- An Entrance from the Rogue Encampment on one end.
- A connector tile leading to the Cold Plains with Flavie standing in it on the other end.
- A path leads from the Rogue Encampment to the Cold Plains, with a crossroad connecting the Den of Evil as well.
Cold Plains
- Square shaped border with
- An Entrance from the Blood Moor next to the Waypoint, which is in a corner of the Map.
- An Exit leading to the Burial Grounds near one of the 3 far corners.
- An Exit that leads to the Stony Fields near the center of an edge.
- The 2 Exits can't be on the same edge with each other or the Entrance.
- A path connects the Entrance, both Exits and the Cave Level 1, which is in a random location on the Map.
- A camp site containing Bishibosh and his Minions can be found in a random location on the Map.
Stony Fields
- Square shaped border with
- An Entrance from the Cold Plains on one of the edges.
- An Exit leading to the Underground Passage Level 1, either on a border of the Map or semi-randomly located inside the Map.
- A path connects the Entrance with the Exit.
- The Cairn Stones, with the Superunique Rakanishu, are always located next to the path.
- A Waypoint and the Moldy Tome are randomly placed on the Map.
Dark Woods
- Square shaped border with
- An Entrance from the Underground Passage Level 1 on one edge or semi-randomly placed inside the Map.
- An Exit leading to the Black Marsh on one of the edges.
- A path directly connects the Entrance with the Exit.
- The Tree of Inifuss and Waypoint are randomly placed inside the Map.
Black Marsh
- Square shaped border with
- An Entrance from the Dark Woods on one edge.
- An Exit leading to the Tamoe Highlands on another edge.
- The Exit can NEVER be on the bottom left edge!
- A path directly connects the Entrance with the Exit as well as the Hole Level 1, which is in a semi-randomly location on the Map.
- When the Black Marsh contains a River, the Hole Level 1 might not be connected with the path!
- The Forgotten Tower and Waypoint are also randomly placed on the Map.
Tamoe Highlands
- Square shaped border with
- An Entrance from the Dark Woods on one edge.
- An Exit on the top right edge, leading to the Monastery Gate.
- A path directly connects the Entrance with the Exit as well as the Pit Level 1, which is in a semi-randomly location on the Map.
Rocky Waste
- Square shaped border with
- An Entrance from Lut Gholein in one corner of the Map.
- An Exit leading to the Dry Hills in one of the other corners, but not on the same edge as the Entrance. The Exit CAN be right next to the Entrance!
- The Stony Tomb is randomly placed in the Map.
Dry Hills
- Square shaped border with
- An Entrance from the Rocky Waste in one corner of the Map.
- An Exit leading to the Far Oasis in one of the 3 other corners.
- A rock face with a staircase splits the area into a lower and upper section, either in
- Setup 1: Has a straight wall which cuts the map into two ½ sections.
- Setup 2: Has a 90 degree wall that cuts the map into a ¼ lower section in the South, and ¾ upper section covering the West, North, and East.
- The Waypoint and the Entrance to the Halls of the Dead Level 1 are randomly placed in the Map.
Far Oasis
- Square shaped border with
- An Entrance from the Dry Hills in one corner of the Map.
- An Exit leading to the Lost City in one of the 3 other corners.
- A rock face with a staircase splits the area into a lower and upper section, either in
- Setup 1: Has a straight wall which cuts the map into two ½ sections.
- Setup 2: Has a 90 degree wall that cuts the map into a ¼ lower section in the South, and ¾ upper section covering the West, North, and East.
- The Waypoint and the Entrance to the Maggot Lair Level 1 are randomly placed in the Map.
- A Map tile containing the Superunique Beetleburst is also on the Map.
Lost City
- Square shaped border with
- an Entrance from the Far Oasis in one corner of the Map,
- and an Exit leading to the Valley of the Snakes in one of 3 corners (West, North, or East). The Exit can NEVER be in the South corner!
- A rock face with a staircase splits the area into a lower and upper section, either in
- Setup 1: Has a straight wall which cuts the map into two ½ sections.
- Setup 2: Has a 90 degree wall that cuts the map into a ¼ lower section in the South, and ¾ upper section covering the West, North, and East.
- The Waypoint and the Entrance to the Ancient Tunnels are randomly placed in the Map.
- A Map tile containing the Superunique Dark Elder is also on the Map.
Spider Forest
- Rectangular shape Map with a 2x6 Map tile grid.
- Entrance from the Kurast Docks in the South West Edge.
- Always has an Exit leading to the Great Marsh. This Exit can be on tile 3, 5, or 6 of the grid.
- Chance to have an Exit leading to the Flayer Jungle directly. This Exit can be on tile 3, 5, or 6 of the grid under the condition that the Exit to Great Marsh is on the same tile or an earlier grid tile!
- A River connects all Map tiles with each other! - The River is your friend!
- 3 Camps are located in the 2x6. These are marked by 2 poles, leading into a gap in the tree line.
- 1 Camp contains the Spider Cavern,
- 1 Camp contains the Waypoint and the Arachnid Lair,
- 1 Camp contains only ruins.
- The Camps sometimes have a connecting point to the Great Marsh or Flayer Jungle.
- In rare cases, the 2 poles can also be a direct connection to either the Great Marsh or the Flayer Jungle!
Great Marsh
- Rectangular shape Map with a 2x6 Map tile grid.
- Entrance from the Spider Forest on the first 2x1 section of the grid.
- There CAN be an Exit leading to the Flayer Jungle, this is no guaranteed outcome!
- A River connects all Map tiles with each other! - If you get lost in the jungle, follow the River!
- 3 Camps are located in the 2x6. These are marked by 2 poles, leading into a gap in the tree line.
- 1 Camp contains the Waypoint
- 2 Camps contain Sparkling Chests.
- The Camps sometimes have a connecting point to the Spider Forest or Flayer Jungle.
- In rare cases, the 2 poles can also be a direct connection to either the Spider Forest or the Flayer Jungle!
Flayer Jungle
- Rectangular shape Map with a 2x6 Map tile grid.
- Entrance from either Spider Forest or Great Marsh, or both.
- Exit on Map tile grid 6 leading to Lower Kurast.
- A River connects all Map tiles with each other! - The River is your friend!
- 3 Camps are located in the 2x6. These are marked by 2 poles, leading into a gap in the tree line.
- 1 Camp contains the Flayer Dungeon Level 1, and The Gidbinn,
- 1 Camp contains the Waypoint and the Entrance to the Swampy Pits Level 1,
- 1 Camp contains only ruins.
- The Exit tile contains the Superunique Stormtree.
Lower Kurast
- Square shaped border with
- the Entrance from Flayer Jungle in the center of the South-West edge,
- and the Exit to Kurast Bazaar in the Northern or Eastern corner of the Map.
- The Waypoint is randomly placed in the Map.
Kurast Bazaar
- Square shaped border with
- the Entrance from Lower Kurast in the Western or Southern corner,
- and the Exit to Upper Kurast in the OPPOSITE corner of the Entrance.
- 2 Entrances to the Sewers Level 1 can be found in the same location every time.
- The Ruined Temple, the Disused Fane, and the Waypoint are randomly placed on the Map.
Upper Kurast
- Square shaped border with
- the Entrance from Kurast Bazaar in the Western or Southern corner,
- and the Exit in the center of the North-Eastern edge of the Map.
- 2 Entrances to the Sewers Level 1 can be found in the same location every time.
- The Forgotten Temple, the Forgotten Reliquary, and the Waypoint are randomly placed on the Map.
Outer Steppes
- Square shaped border with
- An Entrance from the Pandemonium Fortress on the North-Western edge of the Map,
- An Exit to the Plains of Despair on any of the 3 edges, that don't have the Entrance.
Plains of Despair
- Square shaped border with
- An Entrance from the Outer Steps on any of the edges except the South-Eastern one,
- An Exit to the City of the Damned on any of the 3 edges, that don't have the Entrance.
- Izual is placed randomly on the Map.
City of the Damned
- Square shaped border with an Entrance from the Plains of Despair on any edge of the Map.
- The Stairs leading to the River of Flame is randomly placed on the Map. The Waypoint is located next to the stairs.
Frigid Highlands
- Rectangular shaped Map with
- The Entrance from the Bloody Foothills in the Southern corner of the Map.
- The Exit leading to the Arreat Plateau is, depending on the rotation of the rectangle, on the far edge to the North-West or North-East.
- The Waypoint and the Superunique Eldritch the Rectifier are located near the Entrance.
- 3 Walls stretch between the longer edges of the Map, which contain the 3 Barbarian cages you have to break for Quest 2. There can be 2 cages in one wall, making one wall void of a cage.
- The Superunique Sharptooth Slayer spawns near the first Barbarian cage you encounter.
- The red Portal to Abaddon is located between the walls of the Map.
- The Superunique Eyeback the Unleashed spawns in the connection tile to the Arreat Plateau.
Arreat Plateau
- Rectangular shaped Map with
- The Entrance from Frigid Highlands near the Southern corner of the Map, either on the short or long edge, depending on the rotation of the rectangle.
- The Exit to Crystalline Passage in the center of the farthest short-edge of the Map.
- 3 Walls stretch between the longer edges of the Map.
- The red Portal to the Pits of Acheron is located between the walls of the Map.
- The Waypoint is randomly placed between the walls areas as well.
- The Superunique Thresh Socket can be found in front of the Entrance of the Crystalline Passage.
Frozen Tundra
- Rectangular shaped Map with
- the Entrance from the Glacial Trail on the short Southern edge of the Map,
- and the Exit leading to the Ancients Way on the opposite edge, which is North-West or North-East, depending on the rotation of the rectangle.
- 3 Walls stretch between the longer edges of the Map.
- The red Portal to the Infernal Pit is located between the walls of the Map.
- The Waypoint is randomly placed between the wall areas as well.
Static Maps
In Diablo 2 there are many Maps that have a limited amount of fixed layouts. These Maps can easily be memorized.
Areas with static layouts:
| Area |
| Den of Evil |
| Cave Level 2 |
| Burial Grounds |
| Tristram |
| Underground Passage Level 2 |
| The Hole Level 2 |
| Tower Cellar Level 5 |
| The Pit Level 2 |
| Outer Cloister |
| Inner Cloister |
| Catacombs Level 4 |
| Area |
| Valley of Snakes |
| Claw Viper Temple Level 2 |
| Harem Level 1 |
| Harem Level 2 |
| Palace Cellar Level 1-3 |
| Canyon of the Magi |
| Tal Rasha's Chamber |
| Area |
| Spider Cavern |
| Swampy Pits Level 3 |
| Flayer Dungeon Level 3 |
| Disused Fane |
| Ruined Temple |
| Sewers Level 2 |
| Forgotten Temple |
| Forgotten Reliquary |
| Kurast Causeway |
| Disused Reliquary |
| Ruined Fane |
| Travincal |
| Durance of Hate Level 3 |
| Area |
| Chaos Sanctuary |
| Area |
| Bloody Foothills |
| Abaddon |
| Pit of Acheron |
| Frozen River |
| Nihlathak's Temple |
| Halls of Anguish |
| Halls of Pain |
| Halls of Vaught |
| Drifter Cavern |
| Infernal Pit |
| Icy Cellar |
| Arreat Summit |
| Throne of Destruction |
| The Worldstone Chamber |
Random Maps
This type of Map is rather rare. Entering the area, you have no indication, where the objective you are looking for is. This is true for:
- Catacombs Level 1 and 3 in Act 1
- Arcane Sanctuary in Act 2 (Arguably this Area has the static features of 4 directions, 3 of which have dead ends with 3 Super Chests, and 1 direction which has The Summoner).
- Worldstone Keep Level 1 and 3 in Act 5
Credits
Written by Teo1904
Reviewed by MacroBioBoi